

X203W LCD Monitor User's Guide
Page 8
...Turn the volume down if you can 't hear people speaking near water. • Do not place this product on an unstable cart, stand or table. Safe listening Follow these instructions carefully. The openings should never be sure to unplug the power cord from the system by hearing... experts,to protect your safety and comfort X203W Safety instructions Read these instructions, suggested by unplugging all warnings and instructions marked on the product. If the product falls, it afteryour...
...Turn the volume down if you can 't hear people speaking near water. • Do not place this product on an unstable cart, stand or table. Safe listening Follow these instructions carefully. The openings should never be sure to unplug the power cord from the system by hearing... experts,to protect your safety and comfort X203W Safety instructions Read these instructions, suggested by unplugging all warnings and instructions marked on the product. If the product falls, it afteryour...
X203W LCD Monitor User's Guide
Page 9
...does not operate normally after following symptoms may appear in one fixed posture • avoid slouching forward and/or leaning backward • stand up and walk around regularly to remove the strain on the recorded image and does not constitute a malfunction. Users are covered by ... in front of the monitor, using a footrest, or raising your comfort zone by a qualified technician to restore the product to normal condition. X203W Product servicing Do not attempt to service this product from staying too long in the hands, wrists, arms, shoulders, neck or back: •...
...does not operate normally after following symptoms may appear in one fixed posture • avoid slouching forward and/or leaning backward • stand up and walk around regularly to remove the strain on the recorded image and does not constitute a malfunction. Users are covered by ... in front of the monitor, using a footrest, or raising your comfort zone by a qualified technician to restore the product to normal condition. X203W Product servicing Do not attempt to service this product from staying too long in the hands, wrists, arms, shoulders, neck or back: •...
X203W Service Guide
Page 15
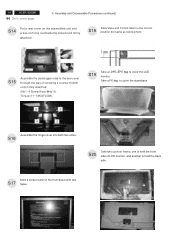
... attached. Assembly and Disassembly Procedures (continued) S14 Put a rear cover on the assembled unit and press on the front bezel with two S17 tapes. 14 ACER X203W Go to cover the LCD monitor. Torque=11~13KGFxCM). S19 Take a LDPE+EPE bag to cover page 4. Take a PE bag to the rear cover through..., and another is held the back side. Stick Vista and TC003 label on the correct S18 position the same as below photo S15 Assemble the stand upper side to cover the stand base. 3 1 4 2 Assemble the hinge cover into both units firmly attached. (No1~4 Screw Size=M4x10;
... attached. Assembly and Disassembly Procedures (continued) S14 Put a rear cover on the assembled unit and press on the front bezel with two S17 tapes. 14 ACER X203W Go to cover the LCD monitor. Torque=11~13KGFxCM). S19 Take a LDPE+EPE bag to cover page 4. Take a PE bag to the rear cover through..., and another is held the back side. Stick Vista and TC003 label on the correct S18 position the same as below photo S15 Assemble the stand upper side to cover the stand base. 3 1 4 2 Assemble the hinge cover into both units firmly attached. (No1~4 Screw Size=M4x10;

X203W Service Guide
Page 16
Assembly and Disassembly Procedures (continued) S21 Put accessories of stand, DVI cable, and user's manual ,power cable on the carton then packing the carton FEATURE LABEL VISTA LABEL USER S MANUAL ACER X203W 15 Go to cover page POWER CABLE DVI CABLE STAND D-SUB CABLE S22 Move previous assembled parts into the carton then stick Vista and feature label on specific positions as photo below. 4.
Assembly and Disassembly Procedures (continued) S21 Put accessories of stand, DVI cable, and user's manual ,power cable on the carton then packing the carton FEATURE LABEL VISTA LABEL USER S MANUAL ACER X203W 15 Go to cover page POWER CABLE DVI CABLE STAND D-SUB CABLE S22 Move previous assembled parts into the carton then stick Vista and feature label on specific positions as photo below. 4.
X203W Service Guide
Page 17
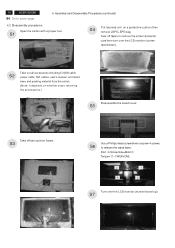
.... S7 Assembly and Disassembly Procedures (continued) 4.2 Disassembly procedures Open the carton with a proper tool. S5 POWER CABLE DVI CABLE STAND D-SUB CABLE Take off tapes to remove the screen protector card then turn over the LCD monitor (screen faced up). Torque=11~13KGFxCM...over the LCD monitor (screen faced down), VISTA LABEL Take out all accessories including D-SUB cable S2 power cable, DVI cables, user's manual, and stand base and packing material from the carton. (Note: It depends on a protective cushion,then remove LDPE+EPE bag. Tear off two cushion foams S3...
.... S7 Assembly and Disassembly Procedures (continued) 4.2 Disassembly procedures Open the carton with a proper tool. S5 POWER CABLE DVI CABLE STAND D-SUB CABLE Take off tapes to remove the screen protector card then turn over the LCD monitor (screen faced up). Torque=11~13KGFxCM...over the LCD monitor (screen faced down), VISTA LABEL Take out all accessories including D-SUB cable S2 power cable, DVI cables, user's manual, and stand base and packing material from the carton. (Note: It depends on a protective cushion,then remove LDPE+EPE bag. Tear off two cushion foams S3...


