User Guide
Page 2
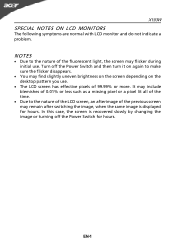
...turn it on again to the nature of 99.99% or more. EN-1 Turn off the Power Switch for hours. X193W SPECIAL NOTES ON LCD MONITORS The following symptoms are normal with LCD monitor and do not indicate a problem. In this case, the screen is displayed for hours. NOTES · Due to... make sure the flicker disappears. · You may flicker during initial use . · The LCD screen has effective pixels of the ...
...turn it on again to the nature of 99.99% or more. EN-1 Turn off the Power Switch for hours. X193W SPECIAL NOTES ON LCD MONITORS The following symptoms are normal with LCD monitor and do not indicate a problem. In this case, the screen is displayed for hours. NOTES · Due to... make sure the flicker disappears. · You may flicker during initial use . · The LCD screen has effective pixels of the ...
User Guide
Page 4
LCD Pixel Statement The LCD unit is damaged, cut or frayed • liquid was spilled into ... • coldness or weakness If you to dangerous voltage points or other factors greatly increase the risk of the monitor, using a footrest, or raising your company's health and safety department. Finding your comfort zone Find your leg muscles...for more comfortable computer use , consult a physician immediately and inform your sitting height to achieve maximum comfort. X193W Product servicing Do not attempt to service this product from staying too long in one fixed posture • ...
LCD Pixel Statement The LCD unit is damaged, cut or frayed • liquid was spilled into ... • coldness or weakness If you to dangerous voltage points or other factors greatly increase the risk of the monitor, using a footrest, or raising your company's health and safety department. Finding your comfort zone Find your leg muscles...for more comfortable computer use , consult a physician immediately and inform your sitting height to achieve maximum comfort. X193W Product servicing Do not attempt to service this product from staying too long in one fixed posture • ...
User Guide
Page 5
...reflections by: • placing your display to an awkward viewing angle. • Avoid looking away from the monitor and focusing on a distant point. • Blink frequently to keep your eyes from the display's top front...; using a glare-reduction filter • using the product on how to minimize neck strain Taking care of time. X193W • take breaks regularly, and do not recommend using a display visor, such as possible. • Exercise regularly...eyestrain. The following websites: Worldwide: http://global.acer.com/about/sustainability.htm EN-4 Warning!
...reflections by: • placing your display to an awkward viewing angle. • Avoid looking away from the monitor and focusing on a distant point. • Blink frequently to keep your eyes from the display's top front...; using a glare-reduction filter • using the product on how to minimize neck strain Taking care of time. X193W • take breaks regularly, and do not recommend using a display visor, such as possible. • Exercise regularly...eyestrain. The following websites: Worldwide: http://global.acer.com/about/sustainability.htm EN-4 Warning!
User Guide
Page 6
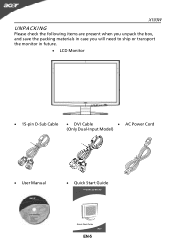
X193W UNPACKING Please check the following items are present when you unpack the box, and save the packing materials in case you will need to ship or transport the monitor in future. · LCD Monitor · 15-pin D-Sub Cable · DVI Cable · AC Power Cord (Only Dual-Input Model) · User Manual · Quick Start Guide EN-5
X193W UNPACKING Please check the following items are present when you unpack the box, and save the packing materials in case you will need to ship or transport the monitor in future. · LCD Monitor · 15-pin D-Sub Cable · DVI Cable · AC Power Cord (Only Dual-Input Model) · User Manual · Quick Start Guide EN-5
User Guide
Page 7
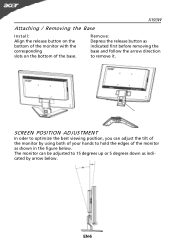
... to remove it. Remove: Depress the release button as shown in the figure below . The monitor can adjust the tilt of the monitor by using both of your hands to hold the edges of the base. X193W Attaching / Removing the Base Install: Align the release button on the bottom of the... monitor with the corresponding slots on the bottom of the monitor as indicated first before removing the base and follow the arrow direction to...
... to remove it. Remove: Depress the release button as shown in the figure below . The monitor can adjust the tilt of the monitor by using both of your hands to hold the edges of the base. X193W Attaching / Removing the Base Install: Align the release button on the bottom of the... monitor with the corresponding slots on the bottom of the monitor as indicated first before removing the base and follow the arrow direction to...
User Guide
Page 8
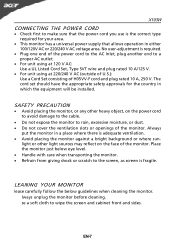
... ventilation slots or openings of H05VV-F cord and plug rated 10 A, 250 V. No user-adjustment is fragile. Always put the monitor in which the equipment will be installed. X193W CONNECTING THE POWER CORD · Check first to make sure that allows operation in either 100/120V AC or 220/240 V ...AC voltage area. SAFETY PRECAUTION · Avoid placing the monitor, or any other light sources may reflect on the power cord to ...
... ventilation slots or openings of H05VV-F cord and plug rated 10 A, 250 V. No user-adjustment is fragile. Always put the monitor in which the equipment will be installed. X193W CONNECTING THE POWER CORD · Check first to make sure that allows operation in either 100/120V AC or 220/240 V ...AC voltage area. SAFETY PRECAUTION · Avoid placing the monitor, or any other light sources may reflect on the power cord to ...
User Guide
Page 9
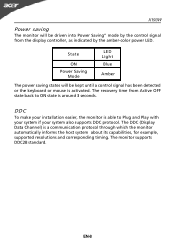
...state is able to Plug and Play with your system if your installation easier, the monitor is around 3 seconds. EN-8 DDC To make your system also supports DDC protocol. X193W Power saving The monitor will be driven into Power Saving" mode by the amber-color power LED. The DDC... (Display Data Channel) is activated. The monitor supports DDC2B standard. State ON Power Saving Mode LED Light Blue ...
...state is able to Plug and Play with your system if your installation easier, the monitor is around 3 seconds. EN-8 DDC To make your system also supports DDC protocol. X193W Power saving The monitor will be driven into Power Saving" mode by the amber-color power LED. The DDC... (Display Data Channel) is activated. The monitor supports DDC2B standard. State ON Power Saving Mode LED Light Blue ...
User Guide
Page 10
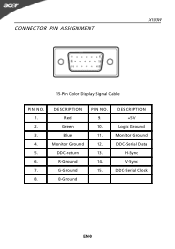
DESCRIPTION +5V Logic Ground Monitor Ground DDC-Serial Data H-Sync V-Sync DDC-Serial Clock EN-9 CONNECTOR PIN ASSIGNMENT X193W 15-Pin Color Display Signal Cable PIN NO. 1. 2. 3. 4. 5. 6. 7. 8. DESCRIPTION Red Green Blue Monitor Ground DDC-return R-Ground G-Ground B-Ground PIN NO. 9. 10. 11. 12. 13. 14. 15.
DESCRIPTION +5V Logic Ground Monitor Ground DDC-Serial Data H-Sync V-Sync DDC-Serial Clock EN-9 CONNECTOR PIN ASSIGNMENT X193W 15-Pin Color Display Signal Cable PIN NO. 1. 2. 3. 4. 5. 6. 7. 8. DESCRIPTION Red Green Blue Monitor Ground DDC-return R-Ground G-Ground B-Ground PIN NO. 9. 10. 11. 12. 13. 14. 15.
User Guide
Page 13
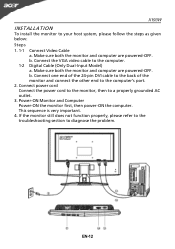
... to diagnose the problem. Make sure both the monitor and computer are powered-OFF. Make sure both the monitor and computer are powered-OFF. Power-ON Monitor and Computer Power-ON the monitor first, then power-ON the computer. If the monitor still does not function properly, please refer to ...cord Connect the power cord to the monitor, then to the computer's port. 2. b. Connect one end of the 24-pin DVI cable to the back of the monitor and connect the other end to a properly grounded AC outlet. 3. X193W INSTALLATION To install the monitor to your host system, please follow ...
... to diagnose the problem. Make sure both the monitor and computer are powered-OFF. Make sure both the monitor and computer are powered-OFF. Power-ON Monitor and Computer Power-ON the monitor first, then power-ON the computer. If the monitor still does not function properly, please refer to ...cord Connect the power cord to the monitor, then to the computer's port. 2. b. Connect one end of the 24-pin DVI cable to the back of the monitor and connect the other end to a properly grounded AC outlet. 3. X193W INSTALLATION To install the monitor to your host system, please follow ...
User Guide
Page 21
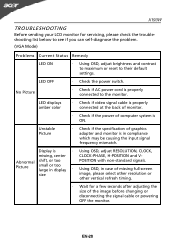
...(VGA Mode) Problems Current Status Remedy LED ON · Using OSD, adjust brightness and contrast to maximum or reset to the monitor. EN-20 Unstable Picture · Check if the specification of computer system is properly connected to their default settings. LED displays ... and V- Using OSD, in display · POSITION with non-standard signals. LED OFF · Check the power switch. X193W TROUBLESHOOTING Before sending your LCD monitor for a few seconds after adjusting the size of the image before changing or disconnecting the signal cable or powering OFF the...
...(VGA Mode) Problems Current Status Remedy LED ON · Using OSD, adjust brightness and contrast to maximum or reset to the monitor. EN-20 Unstable Picture · Check if the specification of computer system is properly connected to their default settings. LED displays ... and V- Using OSD, in display · POSITION with non-standard signals. LED OFF · Check the power switch. X193W TROUBLESHOOTING Before sending your LCD monitor for a few seconds after adjusting the size of the image before changing or disconnecting the signal cable or powering OFF the...
User Guide
Page 22
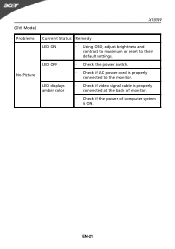
LED OFF · Check the power switch. · Check if AC power cord is ON. LED displays amber color · Check if video signal cable is properly connected at the back of monitor. · Check if the power of computer system is properly connected to their default settings. (DVI Mode) X193W Problems No Picture Current Status Remedy LED ON · Using OSD, adjust brightness and contrast to maximum or reset to the monitor. EN-21
LED OFF · Check the power switch. · Check if AC power cord is ON. LED displays amber color · Check if video signal cable is properly connected at the back of monitor. · Check if the power of computer system is properly connected to their default settings. (DVI Mode) X193W Problems No Picture Current Status Remedy LED ON · Using OSD, adjust brightness and contrast to maximum or reset to the monitor. EN-21


