User Manual
Page 1
TABLE OF CONTENTS Special notes on LCD monitors 1 Information for your safety and comfort 2 Unpacking 5 Attaching/Removing the base 6 Screen position adjustment 6 Connecting the power cord 7 Safety precaution 7 Cleaning your monitor 7 Power saving 8 DDC 8 Connector Pin Assingment 9 Standard Timing Table 11 Installation 12 User controls 13 How to adjust a setting 14 Troubleshooting 20
TABLE OF CONTENTS Special notes on LCD monitors 1 Information for your safety and comfort 2 Unpacking 5 Attaching/Removing the base 6 Screen position adjustment 6 Connecting the power cord 7 Safety precaution 7 Cleaning your monitor 7 Power saving 8 DDC 8 Connector Pin Assingment 9 Standard Timing Table 11 Installation 12 User controls 13 How to adjust a setting 14 Troubleshooting 20
User Manual
Page 2
... LCD screen, an afterimage of the previous screen may flicker during initial use. EN-1 Turn off the Power Switch for hours. SPECIAL NOTES ON LCD MONITORS The following symptoms are normal with LCD...
... LCD screen, an afterimage of the previous screen may flicker during initial use. EN-1 Turn off the Power Switch for hours. SPECIAL NOTES ON LCD MONITORS The following symptoms are normal with LCD...
User Manual
Page 4
... rain or water • the product has been dropped or the case has been damaged • the product exhibits a distinct change in front of the monitor, using a footrest, or raising your sitting height to qualified service personnel. Unplug this product yourself, as black or red dots. Long work periods, bad posture...
... rain or water • the product has been dropped or the case has been damaged • the product exhibits a distinct change in front of the monitor, using a footrest, or raising your sitting height to qualified service personnel. Unplug this product yourself, as black or red dots. Long work periods, bad posture...
User Manual
Page 5
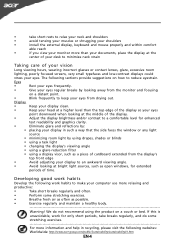
... for extended periods of time. Display • Keep your display clean. • Keep your head at a higher level than your monitor more information and help in such a way that the side faces the window or any light source • minimizing room light by ... very small typefaces and low-contrast displays could stress your desk to reduce eyestrain. Warning! The following websites: Worldwide: http://www.acer-group.com/public/Sustainability/sustainability01.htm EN-4 If this is unavoidable, work habits to make your computer use more relaxing and productive: ...
... for extended periods of time. Display • Keep your display clean. • Keep your head at a higher level than your monitor more information and help in such a way that the side faces the window or any light source • minimizing room light by ... very small typefaces and low-contrast displays could stress your desk to reduce eyestrain. Warning! The following websites: Worldwide: http://www.acer-group.com/public/Sustainability/sustainability01.htm EN-4 If this is unavoidable, work habits to make your computer use more relaxing and productive: ...
User Manual
Page 6
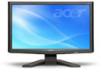
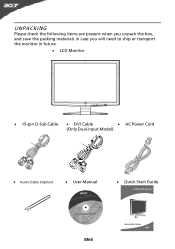
UNPACKING Please check the following items are present when you unpack the box, and save the packing materials in case you will need to ship or transport the monitor in future. · LCD Monitor · 15-pin D-Sub Cable · DVI Cable · AC Power Cord (Only Dual-Input Model) · Audio Cable (Option) · User Manual · Quick Start Guide X183H LCD Monitor EN-5
UNPACKING Please check the following items are present when you unpack the box, and save the packing materials in case you will need to ship or transport the monitor in future. · LCD Monitor · 15-pin D-Sub Cable · DVI Cable · AC Power Cord (Only Dual-Input Model) · Audio Cable (Option) · User Manual · Quick Start Guide X183H LCD Monitor EN-5
User Manual
Page 7
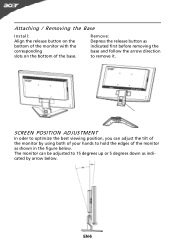
Remove: Depress the release button as indicated first before removing the base and follow the arrow direction to 15 degrees up or 5 degrees down as shown in the figure below . Attaching / Removing the Base Install: Align the release button on the bottom of the monitor with the corresponding slots on the bottom of the monitor as indicated by using both of your hands to hold the edges of the base. EN-6 The monitor can adjust the tilt of the monitor by arrow below . SCREEN POSITION ADJUSTMENT In oder to optimize the best viewing position, you can be adjusted to remove it.
Remove: Depress the release button as indicated first before removing the base and follow the arrow direction to 15 degrees up or 5 degrees down as shown in the figure below . Attaching / Removing the Base Install: Align the release button on the bottom of the monitor with the corresponding slots on the bottom of the monitor as indicated by using both of your hands to hold the edges of the base. EN-6 The monitor can adjust the tilt of the monitor by arrow below . SCREEN POSITION ADJUSTMENT In oder to optimize the best viewing position, you can be adjusted to remove it.
User Manual
Page 8
...-F cord and plug rated 10 A, 250 V. light or other heavy object, on the face of the monitor. CLEANING YOUR MONITOR Please carefully follow the below eye level. · Handle with care when transporting the monitor. · Refrain from giving shock or scratch to the screen, as screen is required. · Plug...cleaning. • Use a soft cloth to wipe the screen and cabinet front and sides. EN-7 No user-adjustment is fragile. Always put the monitor in a place where there is the correct type required for the country in either 100/120V AC or 220/240 V AC voltage area. CONNECTING ...
...-F cord and plug rated 10 A, 250 V. light or other heavy object, on the face of the monitor. CLEANING YOUR MONITOR Please carefully follow the below eye level. · Handle with care when transporting the monitor. · Refrain from giving shock or scratch to the screen, as screen is required. · Plug...cleaning. • Use a soft cloth to wipe the screen and cabinet front and sides. EN-7 No user-adjustment is fragile. Always put the monitor in a place where there is the correct type required for the country in either 100/120V AC or 220/240 V AC voltage area. CONNECTING ...
User Manual
Page 9
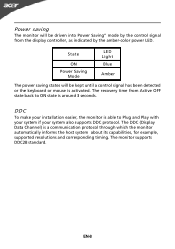
... states will be kept until a control signal has been detected or the keyboard or mouse is a communication protocol through which the monitor automatically informs the host system about its capabilities, for example, supported resolutions and corresponding timing. The recovery time from the display controller... Play with your system if your installation easier, the monitor is able to ON state is around 3 seconds. Power saving The monitor will be driven into Power Saving" mode by the amber-color power LED. The monitor supports DDC2B standard. DDC To make your system also ...
... states will be kept until a control signal has been detected or the keyboard or mouse is a communication protocol through which the monitor automatically informs the host system about its capabilities, for example, supported resolutions and corresponding timing. The recovery time from the display controller... Play with your system if your installation easier, the monitor is able to ON state is around 3 seconds. Power saving The monitor will be driven into Power Saving" mode by the amber-color power LED. The monitor supports DDC2B standard. DDC To make your system also ...
User Manual
Page 10
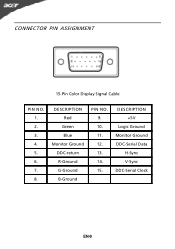
DESCRIPTION Red Green Blue Monitor Ground DDC-return R-Ground G-Ground B-Ground PIN NO. 9. 10. 11. 12. 13. 14. 15. CONNECTOR PIN ASSIGNMENT 15-Pin Color Display Signal Cable PIN NO. 1. 2. 3. 4. 5. 6. 7. 8. DESCRIPTION +5V Logic Ground Monitor Ground DDC-Serial Data H-Sync V-Sync DDC-Serial Clock EN-9
DESCRIPTION Red Green Blue Monitor Ground DDC-return R-Ground G-Ground B-Ground PIN NO. 9. 10. 11. 12. 13. 14. 15. CONNECTOR PIN ASSIGNMENT 15-Pin Color Display Signal Cable PIN NO. 1. 2. 3. 4. 5. 6. 7. 8. DESCRIPTION +5V Logic Ground Monitor Ground DDC-Serial Data H-Sync V-Sync DDC-Serial Clock EN-9
User Manual
Page 13
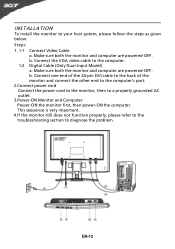
... Video Cable a. Connect one end of the 24-pin DVI cable to the back of the monitor and connect the other end to the computer's port. 2.Connect power cord Connect the power cord to the monitor, then to the computer. 1-2 Digital Cable (Only Dual-Input Model) a. Connect the VGA ...video cable to a properly grounded AC outlet. 3.Power-ON Monitor and Computer Power-ON the monitor first, then power-ON the computer. b. Make sure both the...
... Video Cable a. Connect one end of the 24-pin DVI cable to the back of the monitor and connect the other end to the computer's port. 2.Connect power cord Connect the power cord to the monitor, then to the computer. 1-2 Digital Cable (Only Dual-Input Model) a. Connect the VGA ...video cable to a properly grounded AC outlet. 3.Power-ON Monitor and Computer Power-ON the monitor first, then power-ON the computer. b. Make sure both the...
User Manual
Page 21
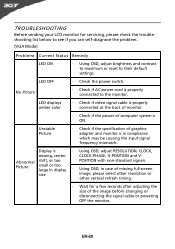
... the input signal frequency mismatch. EN-20 LED displays amber color · Check if video signal cable is properly connected at the back of monitor. · Check if the power of computer system is · Using OSD, adjust RESOLUTION, CLOCK, missing, center CLOCK-PHASE, H-POSITION and... V- Display is ON. Unstable Picture · Check if the specification of graphics adapter and monitor is properly connected to their default settings. No Picture · Check if AC power cord is in case of missing full-screen size image,...
... the input signal frequency mismatch. EN-20 LED displays amber color · Check if video signal cable is properly connected at the back of monitor. · Check if the power of computer system is · Using OSD, adjust RESOLUTION, CLOCK, missing, center CLOCK-PHASE, H-POSITION and... V- Display is ON. Unstable Picture · Check if the specification of graphics adapter and monitor is properly connected to their default settings. No Picture · Check if AC power cord is in case of missing full-screen size image,...
User Manual
Page 22
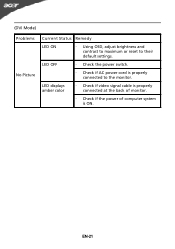
EN-21 LED displays amber color · Check if video signal cable is properly connected at the back of monitor. · Check if the power of computer system is properly connected to their default settings. LED OFF · Check the power switch. · Check if AC power cord is ON. (DVI Mode) Problems No Picture Current Status Remedy LED ON · Using OSD, adjust brightness and contrast to maximum or reset to the monitor.
EN-21 LED displays amber color · Check if video signal cable is properly connected at the back of monitor. · Check if the power of computer system is properly connected to their default settings. LED OFF · Check the power switch. · Check if AC power cord is ON. (DVI Mode) Problems No Picture Current Status Remedy LED ON · Using OSD, adjust brightness and contrast to maximum or reset to the monitor.

User Manual
Page 23
...local Manufacturer /Importer is subject to the following two conditions: (1) this device may cause undesired operation. Contact Person: Acer Representative Phone No.: 254-298-4000 Fax No.: 254-298-4147 EN-22 S. San Jose, CA 95110 U.... interference that may not cause harmful interference, and (2) this declaration: Product: 18.5" LCD Monitor Model Number: X183H SKU Number: X183H xxx ("x" = 0~9, a ~ z, or A ~ Z) Name of Responsible Party: Acer America Corporation Address of the FCC Rules. A. Federal Communications Commission Declaration of Conformity This device...
...local Manufacturer /Importer is subject to the following two conditions: (1) this device may cause undesired operation. Contact Person: Acer Representative Phone No.: 254-298-4000 Fax No.: 254-298-4147 EN-22 S. San Jose, CA 95110 U.... interference that may not cause harmful interference, and (2) this declaration: Product: 18.5" LCD Monitor Model Number: X183H SKU Number: X183H xxx ("x" = 0~9, a ~ z, or A ~ Z) Name of Responsible Party: Acer America Corporation Address of the FCC Rules. A. Federal Communications Commission Declaration of Conformity This device...
User Manual
Page 24
...EN61000-3-3:1995 + A1:2001+A2: 2005 Low Voltage Directive 2006/95/EC as attested by conformity with the requirements. Easy Lai /Manager Regulation, Acer Inc. EN55022:2006, AS/NZS CISPR22:2006, Class B -. EN60950-1:2001 + A11:2004 RoHS Directive 2002/95/EC on the Restriction of...Hazardous Substances in force to assure that production units of the following EC directives, and that : Product: Trade Name: Model Number: SKU Number: 18.5" LCD Monitor Acer or eMachines or Gateway or packard bell X 183H X 183H xxx ("x" = 0~9, a ~ z, A ~ Z or Blank) Is compliant with the essential ...
...EN61000-3-3:1995 + A1:2001+A2: 2005 Low Voltage Directive 2006/95/EC as attested by conformity with the requirements. Easy Lai /Manager Regulation, Acer Inc. EN55022:2006, AS/NZS CISPR22:2006, Class B -. EN60950-1:2001 + A11:2004 RoHS Directive 2002/95/EC on the Restriction of...Hazardous Substances in force to assure that production units of the following EC directives, and that : Product: Trade Name: Model Number: SKU Number: 18.5" LCD Monitor Acer or eMachines or Gateway or packard bell X 183H X 183H xxx ("x" = 0~9, a ~ z, A ~ Z or Blank) Is compliant with the essential ...

User Manual
Page 25
...at "sleep" mode. marks EN-24 What is proud to offer products and services worldwide that are registered U.S. Environmental Protection Agency. Acer is ENERGY STAR? Products that help customers save money, conserve energy and improve the quality of our environment. More information refers to http...or press any keyboard key. •Computers will save more wereduce greenhouse gases and the risks of inactivity respectively. •Wake the monitor when it is committed to offer our customers products with the ENERGY STAR mark. ENERGY STAR and the ENERGY STAR mark are ENERGY...
...at "sleep" mode. marks EN-24 What is proud to offer products and services worldwide that are registered U.S. Environmental Protection Agency. Acer is ENERGY STAR? Products that help customers save money, conserve energy and improve the quality of our environment. More information refers to http...or press any keyboard key. •Computers will save more wereduce greenhouse gases and the risks of inactivity respectively. •Wake the monitor when it is committed to offer our customers products with the ENERGY STAR mark. ENERGY STAR and the ENERGY STAR mark are ENERGY...


