

User Manual
Page 2
... manual or supplementary documents and publications. Acer Projector X1111/X1111H/X1111A/X1211/X1211H/X1211S/X1211K/X1213P/X1213PH/ X1311KW/X1311WH/X1313PW/X1313PWH Series Model number Serial number Date of purchase Place of purchase Acer and the Acer logo are used herein for a particular...logo and High-Definition Multimedia Interface are recorded on the label affixed to their respective companies. Acer Projector X1111/X1111H/X1111A/X1211/X1211H/X1211S/X1211K/X1213P/X1213PH/ X1311KW/X1311WH/X1313PW/X1313PWH Series User's Guide Original Issue: 8/2011 Changes may be reproduced, stored in...
... manual or supplementary documents and publications. Acer Projector X1111/X1111H/X1111A/X1211/X1211H/X1211S/X1211K/X1213P/X1213PH/ X1311KW/X1311WH/X1313PW/X1313PWH Series Model number Serial number Date of purchase Place of purchase Acer and the Acer logo are used herein for a particular...logo and High-Definition Multimedia Interface are recorded on the label affixed to their respective companies. Acer Projector X1111/X1111H/X1111A/X1211/X1211H/X1211S/X1211K/X1213P/X1213PH/ X1311KW/X1311WH/X1313PW/X1313PWH Series User's Guide Original Issue: 8/2011 Changes may be reproduced, stored in...

User Manual
Page 3
... supply unit before connecting the power cord to the AC power outlet. • Unplug the power cord before removing the power supply unit from the projector. • If the system has multiple sources of any kind into this product through cabinet slots as possible. Caution for Your Safety and Comfort Read...
... supply unit before connecting the power cord to the AC power outlet. • Unplug the power cord before removing the power supply unit from the projector. • If the system has multiple sources of any kind into this product through cabinet slots as possible. Caution for Your Safety and Comfort Read...

User Manual
Page 5
...are higher than 10000 feet. • Unplug immediately if there is poorly ventilated or confined. Keep them out of the reach of your projector. Your device and its enhancements may result in performance, indicating a need for purchase options. At least 50cm clearance from the wall outlet ...• Do not place the product in the following the operating instructions Note: Adjust only those controls that is something wrong with your projector. Unplug this product yourself, as inside of other risks. It Warning! Do not operate if smoke, strange noise or odor comes out ...
...are higher than 10000 feet. • Unplug immediately if there is poorly ventilated or confined. Keep them out of the reach of your projector. Your device and its enhancements may result in performance, indicating a need for purchase options. At least 50cm clearance from the wall outlet ...• Do not place the product in the following the operating instructions Note: Adjust only those controls that is something wrong with your projector. Unplug this product yourself, as inside of other risks. It Warning! Do not operate if smoke, strange noise or odor comes out ...

User Manual
Page 6
... control. • The lamp becomes extremely hot during operation. To temporarily turn off the main power abruptly or unplug the projector during operation. Allow the projector to cool for the fan to stop before disconnecting power. • Do not frequently turn off . • Do not...securely installed. It may hurt you. Only use acer ceiling mount kit for inspection. • Do not face the projector lens to suitable qualified professional service personnel. • Do not stand the projector on . • Do not block the projector lens with dirt or dust. • Do ...
... control. • The lamp becomes extremely hot during operation. To temporarily turn off the main power abruptly or unplug the projector during operation. Allow the projector to cool for the fan to stop before disconnecting power. • Do not frequently turn off . • Do not...securely installed. It may hurt you. Only use acer ceiling mount kit for inspection. • Do not face the projector lens to suitable qualified professional service personnel. • Do not stand the projector on . • Do not block the projector lens with dirt or dust. • Do ...

User Manual
Page 7
... 't hear people speaking near you. For more information on the Waste from Electrical and Electronics Equipment (WEEE) regulations, visit http://www.acer-group.com/public/ Sustainability/sustainability01.htm Mercury advisory For projectors or electronic products containing an LCD/CRT monitor or display: "Lamp(s) contain Mercury, Dispose Properly." Lamp(s) inside this electronic device...
... 't hear people speaking near you. For more information on the Waste from Electrical and Electronics Equipment (WEEE) regulations, visit http://www.acer-group.com/public/ Sustainability/sustainability01.htm Mercury advisory For projectors or electronic products containing an LCD/CRT monitor or display: "Lamp(s) contain Mercury, Dispose Properly." Lamp(s) inside this electronic device...
User Manual
Page 8
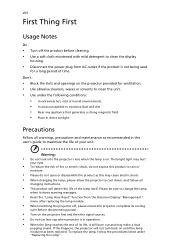
...itself. If this may make a loud popping sound. To replace the lamp, follow all warnings, precautions and maintenance as this happens, the projector will not turn back on the projector provided for a long period of time. Don't: • Block the slots and openings on until the lamp module has been replaced. Warning... mild detergent to change the lamp when it will burn out and may cause electric shock. • When changing the lamp, please allow the projector to maximize the life of your unit. viii First Thing First Usage Notes Do: • Turn off , please ensure the...
...itself. If this may make a loud popping sound. To replace the lamp, follow all warnings, precautions and maintenance as this happens, the projector will not turn back on the projector provided for a long period of time. Don't: • Block the slots and openings on until the lamp module has been replaced. Warning... mild detergent to change the lamp when it will burn out and may cause electric shock. • When changing the lamp, please allow the projector to maximize the life of your unit. viii First Thing First Usage Notes Do: • Turn off , please ensure the...
User Manual
Page 9
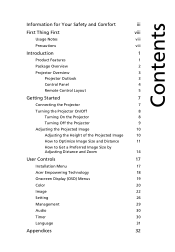
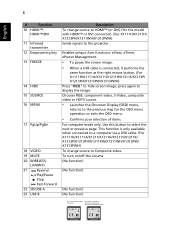
... Product Features 1 Package Overview 2 Projector Overview 3 Projector Outlook 3 Control Panel 4 Remote Control Layout 5 Getting Started 7 Connecting the Projector 7 Turning the Projector On/Off 8 Turning On the Projector 8 Turning Off the Projector 9 Adjusting the Projected Image 10 ...Adjusting the Height of the Projected Image 10 How to Optimize Image Size and Distance 11 How to Get a Preferred Image Size by Adjusting Distance and Zoom 14 User Controls 17 Installation Menu 17 Acer...
... Product Features 1 Package Overview 2 Projector Overview 3 Projector Outlook 3 Control Panel 4 Remote Control Layout 5 Getting Started 7 Connecting the Projector 7 Turning the Projector On/Off 8 Turning On the Projector 8 Turning Off the Projector 9 Adjusting the Projected Image 10 ...Adjusting the Height of the Projected Image 10 How to Optimize Image Size and Distance 11 How to Get a Preferred Image Size by Adjusting Distance and Zoom 14 User Controls 17 Installation Menu 17 Acer...
User Manual
Page 11
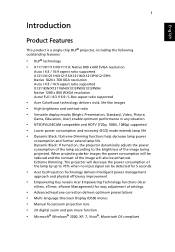
.../X1213PH: Native 1024 x 768 XGA resolution Auto / 4:3 / 16:9 aspect ratio supported X1311KW/X1311WH/X1313PW/X1313PWH: Native 1280 x 800 WXGA resolution Auto/ Full / 4:3 /16:9 / L.Box aspect ratio supported • Acer ColorBoost technology delivers vivid, life-like images • High brightness and contrast ratio • Versatile...Extreme Dimming functions help decrease lamp power consumption and further extend lamp life Dynamic Black: If turned on, the projector dynamically adjusts the power consumption of the lamp according to 70% when no input signal can be detected for 5 seconds. •...
.../X1213PH: Native 1024 x 768 XGA resolution Auto / 4:3 / 16:9 aspect ratio supported X1311KW/X1311WH/X1313PW/X1313PWH: Native 1280 x 800 WXGA resolution Auto/ Full / 4:3 /16:9 / L.Box aspect ratio supported • Acer ColorBoost technology delivers vivid, life-like images • High brightness and contrast ratio • Versatile...Extreme Dimming functions help decrease lamp power consumption and further extend lamp life Dynamic Black: If turned on, the projector dynamically adjusts the power consumption of the lamp according to 70% when no input signal can be detected for 5 seconds. •...

User Manual
Page 12
Contact your dealer immediately if any thing is missing. Check to make sure you have them all the items shown below. English 2 Package Overview This projector comes with lens cap Acer Projector Security Card Power cord Acer Projector This CD contains • User's manual • Quick Start Guide • Acrobat® Reader® www.acer.com Security card User's guide (CD-ROM) VGA cable ENTER BACK PgUp PgDn SD/USB A HDMI/DVI LAN/WiFi USBB Remote control Quick Start Guide Quick start guide Battery x 2 Carrying case (Optional) Dust filter (Optional) Projector with all .
Contact your dealer immediately if any thing is missing. Check to make sure you have them all the items shown below. English 2 Package Overview This projector comes with lens cap Acer Projector Security Card Power cord Acer Projector This CD contains • User's manual • Quick Start Guide • Acrobat® Reader® www.acer.com Security card User's guide (CD-ROM) VGA cable ENTER BACK PgUp PgDn SD/USB A HDMI/DVI LAN/WiFi USBB Remote control Quick Start Guide Quick start guide Battery x 2 Carrying case (Optional) Dust filter (Optional) Projector with all .

User Manual
Page 13
English 3 Projector Overview Projector Outlook Front / upper side (X1111/X1111H/X1111A/X1211/X1211H/ X1211K/X1213P/X1213PH/X1311KW/ X1311WH/X1313PW/X1313PWH) (X1211S) 1 51 5 6 6 7 7 2 2 3 83 8 4 4 # Description 1 Control panel 2 Projection lens 3 Elevator button .../ X1313PW) # Description 5 Power key and Power indicator LED 6 Zoom ring 7 Focus ring 8 Remote control receiver (X1111H/X1211H/X1213PH/ X1311WH/X1313PWH) (X1211K/X1311KW) (X1111) # Description # Description 1 USB connector 6 Audio input connector Audio output connector 2 RS232 connector 7 Tilt...
English 3 Projector Overview Projector Outlook Front / upper side (X1111/X1111H/X1111A/X1211/X1211H/ X1211K/X1213P/X1213PH/X1311KW/ X1311WH/X1313PW/X1313PWH) (X1211S) 1 51 5 6 6 7 7 2 2 3 83 8 4 4 # Description 1 Control panel 2 Projection lens 3 Elevator button .../ X1313PW) # Description 5 Power key and Power indicator LED 6 Zoom ring 7 Focus ring 8 Remote control receiver (X1111H/X1211H/X1213PH/ X1311WH/X1313PWH) (X1211K/X1311KW) (X1111) # Description # Description 1 USB connector 6 Audio input connector Audio output connector 2 RS232 connector 7 Tilt...

User Manual
Page 14
...Acer functions: eView, eTimer, ePower Management. Selects items or makes adjustments to your selection of items. Refer to the previous step for the OSD menu operation or exits the OSD menu. • Confirms your selection. Temp Indicator LED Chooses RGB, component video, S-Video, composite video or HDTV source. Automatically synchronizes the projector... to the input source. • Launches the Onscreen Display (OSD) menu, returns to the "Turning the Projector On/ Off" section. 4 Control Panel English 1 7...
...Acer functions: eView, eTimer, ePower Management. Selects items or makes adjustments to your selection of items. Refer to the previous step for the OSD menu operation or exits the OSD menu. • Confirms your selection. Temp Indicator LED Chooses RGB, component video, S-Video, composite video or HDTV source. Automatically synchronizes the projector... to the input source. • Launches the Onscreen Display (OSD) menu, returns to the "Turning the Projector On/ Off" section. 4 Control Panel English 1 7...
User Manual
Page 15
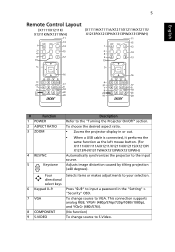
...(480i/576i). 8 COMPONENT (No function) 9 S-VIDEO To change source to VGA. To choose the desired aspect ratio. • Zooms the projector display in the "Setting" > "Security" OSD. 7 VGA To change source to the input source. directional select keys 6 Keypad 0~9 Press ...as the left mouse button. (For X1111H/X1111A/X1211/X1211H/X1211S/X1213P/ X1213PH/X1311WH/X1313PW/X1313PWH) Automatically synchronizes the projector to S-Video. 5 Remote Control Layout (X1111/X1211K/ X1311KW/X1311WH) (X1111H/X1111A/X1211/X1211H/X1211S/ X1213P/X1213PH/X1313PW/X1313PWH) English ENTER BACK ...
...(480i/576i). 8 COMPONENT (No function) 9 S-VIDEO To change source to VGA. To choose the desired aspect ratio. • Zooms the projector display in the "Setting" > "Security" OSD. 7 VGA To change source to the input source. directional select keys 6 Keypad 0~9 Press ...as the left mouse button. (For X1111H/X1111A/X1211/X1211H/X1211S/X1213P/ X1213PH/X1311WH/X1313PW/X1313PWH) Automatically synchronizes the projector to S-Video. 5 Remote Control Layout (X1111/X1211K/ X1311KW/X1311WH) (X1111H/X1111A/X1211/X1211H/X1211S/ X1213P/X1213PH/X1313PW/X1313PWH) English ENTER BACK ...
User Manual
Page 16
... composite video or HDTV source. • Launches the Onscreen Display (OSD) menu, returns to the projector. This function is connected, it performs the same function as the right mouse button. (For X1111H/... 14 HIDE 15 SOURCE 16 MENU 17 PgUp/PgDn 18 VIDEO 19 MUTE 20 WIRELESS; Enables unique Acer functions: eView, eTimer, ePower Management. • To pause the screen image. • When ...a computer via a USB cable. (For X1111H/X1111A/X1211/X1211H/X1211S/X1211K/ X1213P/X1213PH/X1311KW/X1311WH/X1313PW/ X1313PWH) To change source to HDMI™ (or DVI) (for the model with HDMI™...
... composite video or HDTV source. • Launches the Onscreen Display (OSD) menu, returns to the projector. This function is connected, it performs the same function as the right mouse button. (For X1111H/... 14 HIDE 15 SOURCE 16 MENU 17 PgUp/PgDn 18 VIDEO 19 MUTE 20 WIRELESS; Enables unique Acer functions: eView, eTimer, ePower Management. • To pause the screen image. • When ...a computer via a USB cable. (For X1111H/X1111A/X1211/X1211H/X1211S/X1211K/ X1213P/X1213PH/X1311KW/X1311WH/X1313PW/ X1313PWH) To change source to HDMI™ (or DVI) (for the model with HDMI™...

User Manual
Page 17
English 7 Getting Started Connecting the Projector VGA RS232 Display DVD player, Set-top box, HDTV receiver Video/S-Video Output Speakers # Description 1 Power cord 2 VGA cable 3 VGA to component video/HDTV adapter 4 Composite video cable 5 Audio cable # Description 6 S-Video cable 7 RS232 cable 8 USB cable 9 3 RCA component cable 10 HDMI cable Note: To ensure the projector works well with your computer, please make sure the timing of the display mode is compatible with the projector.
English 7 Getting Started Connecting the Projector VGA RS232 Display DVD player, Set-top box, HDTV receiver Video/S-Video Output Speakers # Description 1 Power cord 2 VGA cable 3 VGA to component video/HDTV adapter 4 Composite video cable 5 Audio cable # Description 6 S-Video cable 7 RS232 cable 8 USB cable 9 3 RCA component cable 10 HDMI cable Note: To ensure the projector works well with your computer, please make sure the timing of the display mode is compatible with the projector.

User Manual
Page 18
...control panel or remote control, or the direct source key on your source (computer, notebook, video player, etc.). English 8 Turning the Projector On/Off Turning On the Projector 1 Remove the lens cap. 2 Ensure that the power cord and signal cable are securely connected. • If you connect to ...switch between inputs. 2&3 1 Lens cap The Power LED will light red. 3 Turn on the projector by pressing (POWER) on the control panel or remote control, and the Power indicator LED will detect your source automatically. • If the screen ...
...control panel or remote control, or the direct source key on your source (computer, notebook, video player, etc.). English 8 Turning the Projector On/Off Turning On the Projector 1 Remove the lens cap. 2 Ensure that the power cord and signal cable are securely connected. • If you connect to ...switch between inputs. 2&3 1 Lens cap The Power LED will light red. 3 Turn on the projector by pressing (POWER) on the control panel or remote control, and the Power indicator LED will detect your source automatically. • If the screen ...

User Manual
Page 19
..., press the power button. This onscreen message indicates that the fan has failed. The lamp will turn off soon." Note: Whenever the projector automatically shuts down , and the LED temp indicator will automatically turn solid red. Contact your local reseller or service center. Press the power... button again. 2 The LED power indicator will turn off , the projector will automatically turn solid red to indicate standby mode. 3 It is now safe to unplug the power cord. Lamp will automatically shut down...
..., press the power button. This onscreen message indicates that the fan has failed. The lamp will turn off soon." Note: Whenever the projector automatically shuts down , and the LED temp indicator will automatically turn solid red. Contact your local reseller or service center. Press the power... button again. 2 The LED power indicator will turn off , the projector will automatically turn solid red to indicate standby mode. 3 It is now safe to unplug the power cord. Lamp will automatically shut down...
User Manual
Page 20
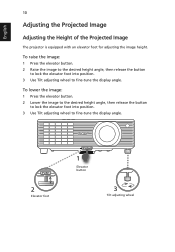
...-tune the display angle. 2 Elevator foot 1 Elevator button 3 Tilt adjusting wheel English 10 Adjusting the Projected Image Adjusting the Height of the Projected Image The projector is equipped with an elevator foot for adjusting the image height.
...-tune the display angle. 2 Elevator foot 1 Elevator button 3 Tilt adjusting wheel English 10 Adjusting the Projected Image Adjusting the Height of the Projected Image The projector is equipped with an elevator foot for adjusting the image height.

User Manual
Page 21
... (inch) < B > W (cm) x H (cm) From base to top of image (cm) < C > Diagonal (inch) < B > W (cm) x H (cm) From base to find the optimal image sizes achievable when the projector is possible for image sizes between 72" and 79". English 11 How to Optimize Image Size and Distance Consult the table below figure, the space... 12 289 588 x 441 484 318 645 x 484 533 Zoom Ratio: 1.1 x Note: Remind as below to top of 132 cm height is required when the projector is located at a desired distance from the screen. • X1111/X1111H/X1111A/X1211/X1211H/X1211K/X1213P/X1213PH If the...
... (inch) < B > W (cm) x H (cm) From base to top of image (cm) < C > Diagonal (inch) < B > W (cm) x H (cm) From base to find the optimal image sizes achievable when the projector is possible for image sizes between 72" and 79". English 11 How to Optimize Image Size and Distance Consult the table below figure, the space... 12 289 588 x 441 484 318 645 x 484 533 Zoom Ratio: 1.1 x Note: Remind as below to top of 132 cm height is required when the projector is located at a desired distance from the screen. • X1111/X1111H/X1111A/X1211/X1211H/X1211K/X1213P/X1213PH If the...

User Manual
Page 22
...) < B > W (cm) x H (cm) From base to top of image (cm) < C > Diagonal (inch) < B > W (cm) x H (cm) From base to top of 142 cm height is required when the projector is possible for image sizes between 84" and 93". English Note: Remind as below figure, the space of image (cm) < C > 1.5 42 91 x 57 64 46... x 375 425 10 281 606 x 379 428 310 667 x 417 472 11 310 667 x 417 472 340 733 x 458 518 Zoom Ratio: 1.1 x 12 • X1311KW/X1311WH/X1313PW/X1313PWH If the projector is 3 m from the screen, good image quality is located at 3 m distance.
...) < B > W (cm) x H (cm) From base to top of image (cm) < C > Diagonal (inch) < B > W (cm) x H (cm) From base to top of 142 cm height is required when the projector is possible for image sizes between 84" and 93". English Note: Remind as below figure, the space of image (cm) < C > 1.5 42 91 x 57 64 46... x 375 425 10 281 606 x 379 428 310 667 x 417 472 11 310 667 x 417 472 340 733 x 458 518 Zoom Ratio: 1.1 x 12 • X1311KW/X1311WH/X1313PW/X1313PWH If the projector is 3 m from the screen, good image quality is located at 3 m distance.

User Manual
Page 23
...) < B > W (cm) x H (cm) From base to top of 262 cm height is possible for image sizes between 137" and 164". English 13 • X1211S If the projector is 3 m from the screen, good image quality is required when located at 3 m distance. Note: Remind as below figure, the space of image (cm) < C > 55 111...
...) < B > W (cm) x H (cm) From base to top of 262 cm height is possible for image sizes between 137" and 164". English 13 • X1211S If the projector is 3 m from the screen, good image quality is required when located at 3 m distance. Note: Remind as below figure, the space of image (cm) < C > 55 111...


