
User Manual
Page 3
... product. Turning the product off before cleaning Unplug this product from the wall outlet before removing the power supply unit from the projector. • If the system has multiple sources of power, disconnect power from the electrical outlet. When you plug the power cord into the product. These openings must not be sure to the equipment, be blocked or covered. Do not use this...
... product. Turning the product off before cleaning Unplug this product from the wall outlet before removing the power supply unit from the projector. • If the system has multiple sources of power, disconnect power from the electrical outlet. When you plug the power cord into the product. These openings must not be sure to the equipment, be blocked or covered. Do not use this...

User Manual
Page 5
... and will often require extensive work by the operating instructions, since improper adjustment of small children. v Product servicing Do not attempt to service this product from walls and free flow of air around the projector are necessary. • Locations where temperatures may become excessively high, such as opening or removing covers may expose you to dangerous voltage points or other controls may result in the following...
... and will often require extensive work by the operating instructions, since improper adjustment of small children. v Product servicing Do not attempt to service this product from walls and free flow of air around the projector are necessary. • Locations where temperatures may become excessively high, such as opening or removing covers may expose you to dangerous voltage points or other controls may result in the following...

User Manual
Page 6
... the remote control. • The lamp becomes extremely hot during operation. Please be sure to change the lamp when warning messages display. • When changing the lamp, please allow the projector to cool down, and follow all changing instructions. • Reset the "Lamp Hour Reset" function from the Onscreen Display "Management" menu after replacing the lamp module. • Do not attempt to break or drop it. It may hurt you. The only user serviceable part...
... the remote control. • The lamp becomes extremely hot during operation. Please be sure to change the lamp when warning messages display. • When changing the lamp, please allow the projector to cool down, and follow all changing instructions. • Reset the "Lamp Hour Reset" function from the Onscreen Display "Management" menu after replacing the lamp module. • Do not attempt to break or drop it. It may hurt you. The only user serviceable part...
User Manual
Page 8
... shows warning messages. • Reset the "Lamp Hour Reset" function from AC outlet if the product is on the projector provided for ventilation. • Use abrasive cleaners, waxes or solvents to clean the unit. • Use under "Replacing the Lamp". The bright light may hurt your eyes. • To reduce the risk of time. To replace the lamp, follow all warnings, precautions and maintenance as this user's guide to...
... shows warning messages. • Reset the "Lamp Hour Reset" function from AC outlet if the product is on the projector provided for ventilation. • Use abrasive cleaners, waxes or solvents to clean the unit. • Use under "Replacing the Lamp". The bright light may hurt your eyes. • To reduce the risk of time. To replace the lamp, follow all warnings, precautions and maintenance as this user's guide to...

User Manual
Page 9
... Overview 3 Projector Outlook 3 Control Panel 4 Remote Control Layout 5 Getting Started 7 Connecting the Projector 7 Turning the Projector On/Off 8 Turning On the Projector 8 Turning Off the Projector 9 Adjusting the Projected Image 10 Adjusting the Height of the Projected Image 10 How to Optimize Image Size and Distance 11 How to Get a Preferred Image Size by Adjusting Distance and Zoom 14 User Controls 17 Installation Menu 17 Acer Empowering Technology 18 Onscreen Display (OSD) Menus 19 Color 20 Image 22 Setting 26 Management 29 Audio 30 Timer 30...
... Overview 3 Projector Outlook 3 Control Panel 4 Remote Control Layout 5 Getting Started 7 Connecting the Projector 7 Turning the Projector On/Off 8 Turning On the Projector 8 Turning Off the Projector 9 Adjusting the Projected Image 10 Adjusting the Height of the Projected Image 10 How to Optimize Image Size and Distance 11 How to Get a Preferred Image Size by Adjusting Distance and Zoom 14 User Controls 17 Installation Menu 17 Acer Empowering Technology 18 Onscreen Display (OSD) Menus 19 Color 20 Image 22 Setting 26 Management 29 Audio 30 Timer 30...

User Manual
Page 11
...) menus • Manual focus/zoom projection lens • 2X digital zoom and pan move function • Microsoft® Windows® 2000, XP, 7, Vista®, Macintosh OS compliant English 1 Introduction Product Features This product is a single-chip DLP® projector, including the following outstanding features: • DLP® technology • X1111/X1111H/X1111A: Native 800 x 600 SVGA resolution Auto / 4:3 / 16:9 aspect ratio supported X1211/X1211H/X1211S/X1211K/X1213P...
...) menus • Manual focus/zoom projection lens • 2X digital zoom and pan move function • Microsoft® Windows® 2000, XP, 7, Vista®, Macintosh OS compliant English 1 Introduction Product Features This product is a single-chip DLP® projector, including the following outstanding features: • DLP® technology • X1111/X1111H/X1111A: Native 800 x 600 SVGA resolution Auto / 4:3 / 16:9 aspect ratio supported X1211/X1211H/X1211S/X1211K/X1213P...
User Manual
Page 15
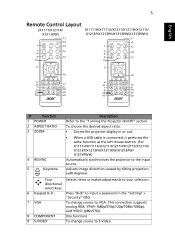
... input a password in or out. • When a USB cable is connected, it performs the same function as the left mouse button. (For X1111H/X1111A/X1211/X1211H/X1211S/X1211K/ X1213P/X1213PH/X1311KW/X1313PW/ X1313PWH) Automatically synchronizes the projector to the input source. Adjusts image distortion caused by tilting projection (±40 degrees). Four Selects items or makes adjustments to the "Turning the Projector On/Off" section. This connection supports analog...
... input a password in or out. • When a USB cable is connected, it performs the same function as the left mouse button. (For X1111H/X1111A/X1211/X1211H/X1211S/X1211K/ X1213P/X1213PH/X1311KW/X1313PW/ X1313PWH) Automatically synchronizes the projector to the input source. Adjusts image distortion caused by tilting projection (±40 degrees). Four Selects items or makes adjustments to the "Turning the Projector On/Off" section. This connection supports analog...

User Manual
Page 16
... computer mode only. 6 English # Function 10 HDMI™; Enables unique Acer functions: eView, eTimer, ePower Management. • To pause the screen image. • When a USB cable is only available when connected to a computer via a USB cable. (For X1111H/X1111A/X1211/X1211H/X1211S/X1211K/ X1213P/X1213PH/X1311KW/X1313PW/X1313PWH) To change source to hide screen image; Chooses RGB, component video, S-Video, composite video or HDTV source. • Launches the Onscreen Display (OSD) menu...
... computer mode only. 6 English # Function 10 HDMI™; Enables unique Acer functions: eView, eTimer, ePower Management. • To pause the screen image. • When a USB cable is only available when connected to a computer via a USB cable. (For X1111H/X1111A/X1211/X1211H/X1211S/X1211K/ X1213P/X1213PH/X1311KW/X1313PW/X1313PWH) To change source to hide screen image; Chooses RGB, component video, S-Video, composite video or HDTV source. • Launches the Onscreen Display (OSD) menu...

User Manual
Page 18
... you connect to multiple sources at the same time, use "SOURCE" on the control panel or remote control, or the direct source key on your source automatically. • If the screen displays "No Signal", please make sure the signal cables are securely connected. The Power LED will light red. 3 Turn on the projector by pressing (POWER) on the control panel or remote control, and the Power indicator LED will detect your source (computer, notebook, video player, etc.). The projector will turn blue. 4 Turn on the remote control to switch between inputs. 2&3 1 Lens...
... you connect to multiple sources at the same time, use "SOURCE" on the control panel or remote control, or the direct source key on your source automatically. • If the screen displays "No Signal", please make sure the signal cables are securely connected. The Power LED will light red. 3 Turn on the projector by pressing (POWER) on the control panel or remote control, and the Power indicator LED will detect your source (computer, notebook, video player, etc.). The projector will turn blue. 4 Turn on the remote control to switch between inputs. 2&3 1 Lens...

User Manual
Page 21
... image sizes achievable when the projector is possible for image sizes between 72" and 79". English 11 How to Optimize Image Size and Distance Consult the table below figure, the space of 132 cm height is required when the projector is located at a desired distance from the screen. • X1111/X1111H/X1111A/X1211/X1211H/X1211K/X1213P/X1213PH If the projector is 3 m from the screen, good image...
... image sizes achievable when the projector is possible for image sizes between 72" and 79". English 11 How to Optimize Image Size and Distance Consult the table below figure, the space of 132 cm height is required when the projector is located at a desired distance from the screen. • X1111/X1111H/X1111A/X1211/X1211H/X1211K/X1213P/X1213PH If the projector is 3 m from the screen, good image...

User Manual
Page 27
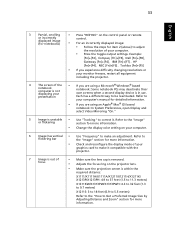
English 17 User Controls Installation Menu The Installation menu provides an onscreen display (OSD) for projector installation and maintenance. (X1111) (X1111H/X1111A/X1211/X1211H/ X1211S/X1211K/X1213P/X1213PH/ X1311KW/X1313PW/X1313PWH) 3 The background pattern acts as a guide to adjusting the calibration and alignment settings, such as screen size and distance, focus and more. 4 The Installation menu includes the following options: • Projection method • Menu location • Keystone settings • Language settings • Reset to factory default functions Use the up...
English 17 User Controls Installation Menu The Installation menu provides an onscreen display (OSD) for projector installation and maintenance. (X1111) (X1111H/X1111A/X1211/X1211H/ X1211S/X1211K/X1213P/X1213PH/ X1311KW/X1313PW/X1313PWH) 3 The background pattern acts as a guide to adjusting the calibration and alignment settings, such as screen size and distance, focus and more. 4 The Installation menu includes the following options: • Projection method • Menu location • Keystone settings • Language settings • Reset to factory default functions Use the up...

User Manual
Page 30
... the image. 20 Color English Display Mode Wall Color Brightness Contrast There are several choices, including White, Light Yellow, Light Blue, Pink and Dark Green. There are many factory presets optimized for various types of the picture. Adjusts the brightness of black and white in a bright environment. • Picture: For graphic picture. • Game: For game content. • Education: For education environment. • User: Memorize user's settings. Adjusting the contrast changes the...
... the image. 20 Color English Display Mode Wall Color Brightness Contrast There are several choices, including White, Light Yellow, Light Blue, Pink and Dark Green. There are many factory presets optimized for various types of the picture. Adjusts the brightness of black and white in a bright environment. • Picture: For graphic picture. • Game: For game content. • Education: For education environment. • User: Memorize user's settings. Adjusting the contrast changes the...

User Manual
Page 31
... projector dynamically adjusts the power consumption of the lamp according to increase the amount of the image will also be enhanced. Adjusts the blue color. Adjusts the color balance of red and green. • Press to increase the amount of green in the image. Adjusts the green color. English 21 Color Temperature Degamma Color R Color G Color B Saturation Tint Dynamic Black Adjusts the color temperature. at lower color temperatures, the screen looks warmer. At higher color temperatures, the screen looks colder; When projecting...
... projector dynamically adjusts the power consumption of the lamp according to increase the amount of the image will also be enhanced. Adjusts the blue color. Adjusts the color balance of red and green. • Press to increase the amount of green in the image. Adjusts the green color. English 21 Color Temperature Degamma Color R Color G Color B Saturation Tint Dynamic Black Adjusts the color temperature. at lower color temperatures, the screen looks warmer. At higher color temperatures, the screen looks colder; When projecting...

User Manual
Page 37
... to enter the password again. • The factory default setting of "Administrator Password" is NTSC. Both "User Password" and "Administrator Password" can switch on the projector without password. English 27 Closed Caption Security Selects a preferred closed captioning mode from 10 to 990 minutes. • When time is up, the projector will request you to enter password when switching on the "Security Mode". Security This projector provides a useful security function...
... to enter the password again. • The factory default setting of "Administrator Password" is NTSC. Both "User Password" and "Administrator Password" can switch on the projector without password. English 27 Closed Caption Security Selects a preferred closed captioning mode from 10 to 990 minutes. • When time is up, the projector will request you to enter password when switching on the "Security Mode". Security This projector provides a useful security function...

User Manual
Page 38
... local Acer service center. X1211H/X1211S/ X1211K/X1213P/ X1213PH/ X1311KW/ Enabling this function slightly increases the standby power consumption. The projector can enter "Administrator Password" when the "Enter Administrator Password" or "Enter Password" dialogue box displays. • Press to change "User Password". • Use the numerical keys on the remote control to set up or change "Administrator Password". • The factory default of "Administrator Password" is "1234". Administrator Password You can output (Standby) a VGA signal when...
... local Acer service center. X1211H/X1211S/ X1211K/X1213P/ X1213PH/ X1311KW/ Enabling this function slightly increases the standby power consumption. The projector can enter "Administrator Password" when the "Enter Administrator Password" or "Enter Password" dialogue box displays. • Press to change "User Password". • Use the numerical keys on the remote control to set up or change "Administrator Password". • The factory default of "Administrator Password" is "1234". Administrator Password You can output (Standby) a VGA signal when...

User Manual
Page 39
... show up 30 hours before end of life. The message will show or hide warning message Lamp Reminding when the changing lamp message is turned on the High Altitude mode. Choose "On" to turn on , the projector fans operate at full speed continuously to cool down while there is (Minutes) no signal input detected after the setting time. Choose "Off" to return to 0 hours. Lamp Hour Elapse Displays the lamp's elapsed operating time (in hours). Choose this function...
... show up 30 hours before end of life. The message will show or hide warning message Lamp Reminding when the changing lamp message is turned on the High Altitude mode. Choose "On" to turn on , the projector fans operate at full speed continuously to cool down while there is (Minutes) no signal input detected after the setting time. Choose "Off" to return to 0 hours. Lamp Hour Elapse Displays the lamp's elapsed operating time (in hours). Choose this function...

User Manual
Page 42
..." on the control panel or remote or incorrectly control. If the problem still appears, change the monitor display you are bent or broken. • Check if the projection lamp has been securely installed. 32 Appendices English Troubleshooting If you experience a problem with your local reseller or service center. displayed image (For PC (Windows • For an incorrectly displayed image: 95/98/2000/XP/ Win7/Vista)) • Open "My Computer > Control Panel," and...
..." on the control panel or remote or incorrectly control. If the problem still appears, change the monitor display you are bent or broken. • Check if the projection lamp has been securely installed. 32 Appendices English Troubleshooting If you experience a problem with your local reseller or service center. displayed image (For PC (Windows • For an incorrectly displayed image: 95/98/2000/XP/ Win7/Vista)) • Open "My Computer > Control Panel," and...
User Manual
Page 43
... Get a Preferred Image Size by Adjusting Distance and Zoom" section for more information. • Change the display color setting on the control panel or remote control. • For an incorrectly displayed image: • Follow the steps for detailed information. • If you are using a Microsoft® Windows® based notebook computer is not displaying your notebook: Some notebook PCs may deactivate their own screens when a second display device is unstable...
... Get a Preferred Image Size by Adjusting Distance and Zoom" section for more information. • Change the display color setting on the control panel or remote control. • For an incorrectly displayed image: • Follow the steps for detailed information. • If you are using a Microsoft® Windows® based notebook computer is not displaying your notebook: Some notebook PCs may deactivate their own screens when a second display device is unstable...

User Manual
Page 44
Go to "Image" > "Auto Keystone" or "Image" > "Manual Keystone" to make a loud popping sound. Set up the display format to or further from the screen. • Press "MENU" on the control panel or remote control. or too large • Move the projector closer to 16:9 (wide) aspect ratio on your DVD player. 9 Image is too small • Adjust the zoom lever on the top of the screen. • Press the Keystone correction...
Go to "Image" > "Auto Keystone" or "Image" > "Manual Keystone" to make a loud popping sound. Set up the display format to or further from the screen. • Press "MENU" on the control panel or remote control. or too large • Move the projector closer to 16:9 (wide) aspect ratio on your DVD player. 9 Image is too small • Adjust the zoom lever on the top of the screen. • Press the Keystone correction...

User Manual
Page 46
failure) V V V Quick flashing TEMP LED Red -- --- -- -- 36 English LED & Alarm Definition Listing LED Messages Message Standby (Power cord plugged in) Power on Lamp retry Turning off (Cooling state) Turning off (Cooling completed) Error (Thermal failure) Error (Fan lock failure) Power LED Red Blue V -- --- Quick flashing V V Quick flashing -- -- -- V LAMP LED Red -- ---- -- --- Error (Color wheel -- Error (Lamp breakdown) -- V -- V Quick flashing ---
failure) V V V Quick flashing TEMP LED Red -- --- -- -- 36 English LED & Alarm Definition Listing LED Messages Message Standby (Power cord plugged in) Power on Lamp retry Turning off (Cooling state) Turning off (Cooling completed) Error (Thermal failure) Error (Fan lock failure) Power LED Red Blue V -- --- Quick flashing V V Quick flashing -- -- -- V LAMP LED Red -- ---- -- --- Error (Color wheel -- Error (Lamp breakdown) -- V -- V Quick flashing ---


