User Manual
Page 2
...such revisions or changes. All Rights Reserved. All correspondence concerning your projector. "HDMI™, the HDMI logo and High-Definition Multimedia Interface are used herein for a particular purpose. Acer Projector User's Guide Original Issue: 01/2017 Changes may be made periodically... to notify any person of Acer Incorporated. No part of this publication may be reproduced, stored in a ...
...such revisions or changes. All Rights Reserved. All correspondence concerning your projector. "HDMI™, the HDMI logo and High-Definition Multimedia Interface are used herein for a particular purpose. Acer Projector User's Guide Original Issue: 01/2017 Changes may be made periodically... to notify any person of Acer Incorporated. No part of this publication may be reproduced, stored in a ...

User Manual
Page 3
... openings must not be placed near water. • Do not place this product from the wall outlet before removing the power supply unit from the projector. • If the system has multiple sources of any kind onto or into this document for cleaning. The openings should never be blocked or covered...
... openings must not be placed near water. • Do not place this product from the wall outlet before removing the power supply unit from the projector. • If the system has multiple sources of any kind onto or into this document for cleaning. The openings should never be blocked or covered...

User Manual
Page 5
...controls may result in damage and will often require extensive work by the operating instructions, since improper adjustment of air around the projector is poorly ventilated or confined. Unplug this case, unplug immediately and Additional safety information • Do not look into the product...after following environments: • Space that are higher than 10000 feet. • Unplug immediately if there is something wrong with your projector. Warning! At least 50cm clearance from the wall outlet and refer servicing to qualified service personnel when: • the power cord...
...controls may result in damage and will often require extensive work by the operating instructions, since improper adjustment of air around the projector is poorly ventilated or confined. Unplug this case, unplug immediately and Additional safety information • Do not look into the product...after following environments: • Space that are higher than 10000 feet. • Unplug immediately if there is something wrong with your projector. Warning! At least 50cm clearance from the wall outlet and refer servicing to qualified service personnel when: • the power cord...

User Manual
Page 6
Only use acer ceiling mount kit for mounting the projector and ensure it is the lamp which has its cooling cycle before turning main power off the main power abruptly or unplug the projector during operation. The temperature inside which becomes hot. • Clean the air filter .... There are dangerous high voltages inside may rise and cause damage when the filter/ventilation slots clogged with any electronic components unless the projector is operating. The only user serviceable part is securely installed. The best way is capable of the lamp itself. To temporarily turn...
Only use acer ceiling mount kit for mounting the projector and ensure it is the lamp which has its cooling cycle before turning main power off the main power abruptly or unplug the projector during operation. The temperature inside which becomes hot. • Clean the air filter .... There are dangerous high voltages inside may rise and cause damage when the filter/ventilation slots clogged with any electronic components unless the projector is operating. The only user serviceable part is securely installed. The best way is capable of the lamp itself. To temporarily turn...
User Manual
Page 7
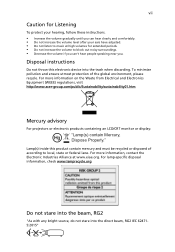
... music at www.eiae.org. For more information on the Waste from Electrical and Electronics Equipment (WEEE) regulations, visit http://www.acer-group.com/public/Sustainability/sustainability01.htm Mercury advisory For projectors or electronic products containing an LCD/CRT monitor or display: "Lamp(s) contain Mercury, Dispose Properly." Lamp(s) inside this electronic device...
... music at www.eiae.org. For more information on the Waste from Electrical and Electronics Equipment (WEEE) regulations, visit http://www.acer-group.com/public/Sustainability/sustainability01.htm Mercury advisory For projectors or electronic products containing an LCD/CRT monitor or display: "Lamp(s) contain Mercury, Dispose Properly." Lamp(s) inside this electronic device...

User Manual
Page 8
...; Use abrasive cleaners, waxes or solvents to clean the unit. • Use under "Replacing the Lamp". Warning: • Do not look into the projector's lens when the lamp is in operation. • When the lamp reaches the end of your eyes. • To reduce the risk of fire or... messages. • Reset the "Lamp Hour Reset" function from the Onscreen display "Management" menu after replacing the lamp module. • When switching the projector off the product before disconnecting power. • Turn on the unit provided for a long period of the lamp itself. If this may make a loud ...
...; Use abrasive cleaners, waxes or solvents to clean the unit. • Use under "Replacing the Lamp". Warning: • Do not look into the projector's lens when the lamp is in operation. • When the lamp reaches the end of your eyes. • To reduce the risk of fire or... messages. • Reset the "Lamp Hour Reset" function from the Onscreen display "Management" menu after replacing the lamp module. • When switching the projector off the product before disconnecting power. • Turn on the unit provided for a long period of the lamp itself. If this may make a loud ...

User Manual
Page 9
... 3 Control Panel 5 Remote Control Layout 6 MHL (Mobile High-Definition Link) Control 8 Getting Started 10 Connecting the Projector 10 Turning the Projector On/Off 11 Turning on the Projector 11 Turning the projector off 12 Adjusting the Projected Image 13 Adjusting the Height of Projected Image 13 How to optimize image size and distance 14...
... 3 Control Panel 5 Remote Control Layout 6 MHL (Mobile High-Definition Link) Control 8 Getting Started 10 Connecting the Projector 10 Turning the Projector On/Off 11 Turning on the Projector 11 Turning the projector off 12 Adjusting the Projected Image 13 Adjusting the Height of Projected Image 13 How to optimize image size and distance 14...
User Manual
Page 11
English 1 Introduction Product Features This product is a single-chip DLP® projector. Outstanding features include: • DLP® technology • X1126H/D506D/EV-S57H/V26S/AS600/DSV1610 series: 800x600 SVGA resolution X1226H/D516D/EV-X57H/V26X/AX600... compatible and HDTV (480i/p, 576i/p, 720p, 1080i/p) supported • Lower power consumption and economy (ECO) mode extend lamp life • Acer EcoProjeciton Technology delivers Intelligent power management approach and physical efficiency improvement • Equipped with HDMI™ & MHL connection supporting HDCP • Smart ...
English 1 Introduction Product Features This product is a single-chip DLP® projector. Outstanding features include: • DLP® technology • X1126H/D506D/EV-S57H/V26S/AS600/DSV1610 series: 800x600 SVGA resolution X1226H/D516D/EV-X57H/V26X/AX600... compatible and HDTV (480i/p, 576i/p, 720p, 1080i/p) supported • Lower power consumption and economy (ECO) mode extend lamp life • Acer EcoProjeciton Technology delivers Intelligent power management approach and physical efficiency improvement • Equipped with HDMI™ & MHL connection supporting HDCP • Smart ...

User Manual
Page 12
English Projector Power cord VGA cable Security card (option) User's guide (option) Quick start guide Carrying case (option) AAA battery x2 (option) Dust filters (option) MHL HDMI DC 5V IN WirelessCAST (option) Remote control WirelessHD-Kit (option) Check to make sure your dealer immediately if any thing is complete. Contact your unit is missing. 2 Package Overview This projector comes with all the items shown below.
English Projector Power cord VGA cable Security card (option) User's guide (option) Quick start guide Carrying case (option) AAA battery x2 (option) Dust filters (option) MHL HDMI DC 5V IN WirelessCAST (option) Remote control WirelessHD-Kit (option) Check to make sure your dealer immediately if any thing is complete. Contact your unit is missing. 2 Package Overview This projector comes with all the items shown below.

User Manual
Page 13
English 3 Projector Overview Projector Outlook Front / upper side 1 2 34 5 6 7 8 # Description 1 Air outlet 2 Focus ring 3 Zoom ring 4 Remote control receiver 5 Power button 6 Control panel 11 10 9 # Description 7 Lamp cover 8 Lens cap 9 Projection lens 10 Tilt adjusting wheels 11 Air inlet
English 3 Projector Overview Projector Outlook Front / upper side 1 2 34 5 6 7 8 # Description 1 Air outlet 2 Focus ring 3 Zoom ring 4 Remote control receiver 5 Power button 6 Control panel 11 10 9 # Description 7 Lamp cover 8 Lens cap 9 Projection lens 10 Tilt adjusting wheels 11 Air inlet

User Manual
Page 15
... POWER POWER 2 LAMP LAMP 3 TEMP TEMP 4 POWER Description Power Indicator LED Lamp Indicator LED Temp Indicator LED See the contents in "Turning the Projector On/Off" section. 5 Four directional select Use to select items or make keys adjustments to your selection. 6 BACK BACK Returns to the previous ... the active source. 8 ENTER ENTER Confirm your selection of items. 9 Keystone Adjusts the image to compensate for distortion caused by tilting the projector. 10 MENU MENU Press "MENU" to launch the Onscreen display (OSD) menu, back to the previous step for the OSD menu operation ...
... POWER POWER 2 LAMP LAMP 3 TEMP TEMP 4 POWER Description Power Indicator LED Lamp Indicator LED Temp Indicator LED See the contents in "Turning the Projector On/Off" section. 5 Four directional select Use to select items or make keys adjustments to your selection. 6 BACK BACK Returns to the previous ... the active source. 8 ENTER ENTER Confirm your selection of items. 9 Keystone Adjusts the image to compensate for distortion caused by tilting the projector. 10 MENU MENU Press "MENU" to launch the Onscreen display (OSD) menu, back to the previous step for the OSD menu operation ...

User Manual
Page 16
... 21 22 23 24 25 Model No:J-25050 MC.JMV11.009 # Icon Function Description 1 Infrared transmitter Sends signals to the projector. 2 POWER Refer to the "Turning the Projector On/Off" section. 3 MUTE To turn on/off the volume. 4 RATIO To choose the desired aspect ratio. 5 ... the display mode from Bright, Presentation, Standard, Video and User. 10 KEYSTONE Adjusts the image to compensate for distortion caused by tilting the projector. 11 BACK STOP Returns to stop playback. This 12 VGA connector supports analog RGB, YPbPr (480p/576p/720p/ 1080i), YCbCr (480i/576i...
... 21 22 23 24 25 Model No:J-25050 MC.JMV11.009 # Icon Function Description 1 Infrared transmitter Sends signals to the projector. 2 POWER Refer to the "Turning the Projector On/Off" section. 3 MUTE To turn on/off the volume. 4 RATIO To choose the desired aspect ratio. 5 ... the display mode from Bright, Presentation, Standard, Video and User. 10 KEYSTONE Adjusts the image to compensate for distortion caused by tilting the projector. 11 BACK STOP Returns to stop playback. This 12 VGA connector supports analog RGB, YPbPr (480p/576p/720p/ 1080i), YCbCr (480i/576i...
User Manual
Page 17
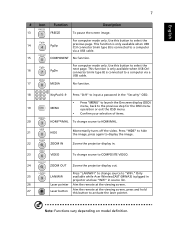
...only available when USB Ctrl connector (mini type B) is connected to a computer via a USB cable. 15 COMPONENT No function. Only 25 LAN/WiFi available while Acer WirelessCAST (MWA3) is connected to a computer via a USB cable. 17 MEDIA No function. 18 KeyPad 0~9 Press "0~9" to input a password in . 23 VIDEO... off the video. For computer mode only. Press "HIDE" to hide the image, press again to display the image. 22 ZOOM IN Zooms the projector display in the "Security" OSD. • Press "MENU" to launch the Onscreen display (OSD) 19 MENU menu, back to the previous step ...
...only available when USB Ctrl connector (mini type B) is connected to a computer via a USB cable. 15 COMPONENT No function. Only 25 LAN/WiFi available while Acer WirelessCAST (MWA3) is connected to a computer via a USB cable. 17 MEDIA No function. 18 KeyPad 0~9 Press "0~9" to input a password in . 23 VIDEO... off the video. For computer mode only. Press "HIDE" to hide the image, press again to display the image. 22 ZOOM IN Zooms the projector display in the "Security" OSD. • Press "MENU" to launch the Onscreen display (OSD) 19 MENU menu, back to the previous step ...
User Manual
Page 20
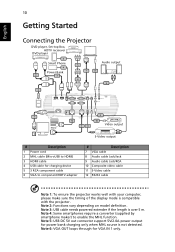
...10 Composite video cable 11 S-Video cable 12 RS232 cable Note 1: To ensure the projector works well with your computer, please make sure the timing of the display mode is compatible with the projector. Note 3: USB cable needs powered extender if the length is not detected. Note 6:... DC 5V out connector support 5V/2.0A power output for power bank charging only when MHL source is over 5 m. English 10 Getting Started Connecting the Projector DVD player, Set-top Box, HDTV receiever DVD player 4 Smart Phone HDMI HDMI 4 Power Bank 3 3 RBG D-Sub 5 7 8 R BG 6 HDTV adapter D-...
...10 Composite video cable 11 S-Video cable 12 RS232 cable Note 1: To ensure the projector works well with your computer, please make sure the timing of the display mode is compatible with the projector. Note 3: USB cable needs powered extender if the length is not detected. Note 6:... DC 5V out connector support 5V/2.0A power output for power bank charging only when MHL source is over 5 m. English 10 Getting Started Connecting the Projector DVD player, Set-top Box, HDTV receiever DVD player 4 Smart Phone HDMI HDMI 4 Power Bank 3 3 RBG D-Sub 5 7 8 R BG 6 HDTV adapter D-...

User Manual
Page 21
...remote control, and the Power indicator LED will detect your source (computer, notebook, video player ,etc.). Power button English 11 Turning the Projector On/Off Turning on the Projector 1 Ensure that the power cord and signal cable are securely connected or press source direct key. • If you connect to multiple ... the "Source" button on either control panel or the remote control or direct source key on the remote control to switch between inputs. The projector will turn blue. 3 Turn on your source automatically. • If the screen displays "Lock" and "Source" icons, it means the...
...remote control, and the Power indicator LED will detect your source (computer, notebook, video player ,etc.). Power button English 11 Turning the Projector On/Off Turning on the Projector 1 Ensure that the power cord and signal cable are securely connected or press source direct key. • If you connect to multiple ... the "Source" button on either control panel or the remote control or direct source key on the remote control to switch between inputs. The projector will turn blue. 3 Turn on your source automatically. • If the screen displays "Lock" and "Source" icons, it means the...
User Manual
Page 22
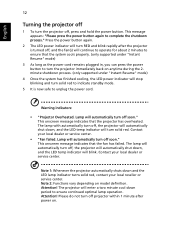
...with automatically turn off soon." Lamp will enter a two minute cool down , and the LED temp indicator will automatically turn off, the projector will automatically shut down period to ensure continued optimal lamp operation. Contact your local dealer or service center. • "Fan failed. ... Resume" mode) 4 Once the system has finished cooling, the LED power indicator will blink. English 12 Turning the projector off 1 To turn off, the projector will automatically shut down and the LED lamp indicator turns solid red, contact your local reseller or service center. The ...
...with automatically turn off soon." Lamp will enter a two minute cool down , and the LED temp indicator will automatically turn off, the projector will automatically shut down period to ensure continued optimal lamp operation. Contact your local dealer or service center. • "Fan failed. ... Resume" mode) 4 Once the system has finished cooling, the LED power indicator will blink. English 12 Turning the projector off 1 To turn off, the projector will automatically shut down and the LED lamp indicator turns solid red, contact your local reseller or service center. The ...

User Manual
Page 23
Tilt adjusting wheel To raise/lower the image: Use Tilt adjusting wheel to fine-tune the display angle. English 13 Adjusting the Projected Image Adjusting the Height of Projected Image The projector is equipped with elevator feet for adjusting the height of image.
Tilt adjusting wheel To raise/lower the image: Use Tilt adjusting wheel to fine-tune the display angle. English 13 Adjusting the Projected Image Adjusting the Height of Projected Image The projector is equipped with elevator feet for adjusting the height of image.

User Manual
Page 24
... C Height: 89 cm from the screen, good image quality is required when located at a desired distance from the screen. • SVGA/XGA series If the projector is 2.0 m from base to top of image A 2.0 m Desired Distance Screen size Top Screen size Top Desired (Min zoom) (Max zoom) Distance (m) Diagonal (inch) W (cm)... x 410 471 299.3 608 x 456 525 Zoom Ratio: 1.1x Note: Remind as below to find the optimal image sizes achievable when the projector is positioned at 2 m distance. English 14 How to top of 89 cm height is possible for image sizes between 46" and 51".
... C Height: 89 cm from the screen, good image quality is required when located at a desired distance from the screen. • SVGA/XGA series If the projector is 2.0 m from base to top of image A 2.0 m Desired Distance Screen size Top Screen size Top Desired (Min zoom) (Max zoom) Distance (m) Diagonal (inch) W (cm)... x 410 471 299.3 608 x 456 525 Zoom Ratio: 1.1x Note: Remind as below to find the optimal image sizes achievable when the projector is positioned at 2 m distance. English 14 How to top of 89 cm height is possible for image sizes between 46" and 51".

User Manual
Page 25
... 60" B 54" A 2 m Desired Distance Height: 91 cm from the screen, good image quality is required when located at 2 m distance. 15 • WXGA series If the projector is 2 m from base to top Height: of image 81 cm C Screen size Top Screen size Top Desired (Min zoom) (Max zoom) Distance (m) Diagonal (inch) W (cm...
... 60" B 54" A 2 m Desired Distance Height: 91 cm from the screen, good image quality is required when located at 2 m distance. 15 • WXGA series If the projector is 2 m from base to top Height: of image 81 cm C Screen size Top Screen size Top Desired (Min zoom) (Max zoom) Distance (m) Diagonal (inch) W (cm...

User Manual
Page 26
... a desired image size by adjusting either the position or the zoom ring. • SVGA/XGA series To obtain an image size of 60" set the projector at a distance 2.4 m and 2.6 m from base to top of image 2.6 m C 2.4 m B Desired Distance Desired Image Size Diagonal (inch) W (cm) x H (cm) 30 40 50 60 70 80 90...
... a desired image size by adjusting either the position or the zoom ring. • SVGA/XGA series To obtain an image size of 60" set the projector at a distance 2.4 m and 2.6 m from base to top of image 2.6 m C 2.4 m B Desired Distance Desired Image Size Diagonal (inch) W (cm) x H (cm) 30 40 50 60 70 80 90...


