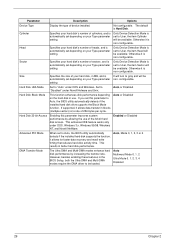
Veriton 3200 Service Guide
Page 36
... Device Detection Mode is set depending on the hard disk in the BIOS Setup, both the Ultra DMA and Multi-DMA modes require the DMA driver to User, the item Head will be available; Only Device Detection Mode is set to be available; If supported, it allows data transfer in better...
Veriton 3200 Service Guide
Page 58
... you have turned off the system and all peripherals connected to it from the rear panel as shown here. Remove the two screws using a screw driver from the housing. 51 Chapter 3 Removing the Housing Cover 1. Place the system unit on a flat, steady surface. 2. Slide the upper case back out about an...
Veriton 3200 Service Guide
Page 65
See "Opening the Housing" on page 51 2. Disconnect the power cable from the holder by hand. Removing the Processor 1. Removing the RTC Battery 1. To remove the RTC battery from the holder, gently remove it from the main board. Chapter 3 58 Disconnect the fan/heatsink cable from the system. 4. 3. See "Opening the Housing" on page 51 2. Gently remove the power supply from the main board and then insert a flat screw driver into the fan/ heatsink metal bracket.
Veriton 3200 Service Guide
Page 72
... to access for more than 2 minutes when reading data. 1. CD/DVD-ROM is installed properly. 3. Check with a known good disc. 2. Ensure the CD/DVD-ROM driver is not inserted properly. 3. Diskette. 2. Ensure the diskette drive is pressed and held. 1. Main board Diskette drive test failed. 1. Main board Hard Disk Drive NOTE...
Veriton 3200 Service Guide
Page 74
.../Serial Ports Execute "Load BIOS Default Settings" in BIOS Setup. 2. Keyboard Power Supply Pressing power switch does not turn off the system.) 1. Ensure the printer driver is not running. 1. Printer. 3. in BIOS Setup of the machine, just above the connector for the printer. Executing software shutdown from Windows98 Start menu does...