

User Guide
Page 3
... power cords from the LCD monitor: • Make sure the monitor is displayed for a few hours. Turn off the power switch and then turn it on again to the nature of the fluorescent light, the screen may find slightly uneven brightness on the screen depending on the desktop pattern you use . Cleaning your safety and comfort Safety instructions Read these guidelines when cleaning the monitor: • Always unplug the monitor before connecting...
... power cords from the LCD monitor: • Make sure the monitor is displayed for a few hours. Turn off the power switch and then turn it on again to the nature of the fluorescent light, the screen may find slightly uneven brightness on the screen depending on the desktop pattern you use . Cleaning your safety and comfort Safety instructions Read these guidelines when cleaning the monitor: • Always unplug the monitor before connecting...

User Guide
Page 4
... cart, stand or table. Accessibility Be sure that could be seriously damaged. • Slots and openings are not sure of the type of power available, consult your ears have adjusted. • Limit the amount of time listening to music at high volume. • Avoid turning up the volume to block out noisy surroundings. • Turn the volume down if...
... cart, stand or table. Accessibility Be sure that could be seriously damaged. • Slots and openings are not sure of the type of power available, consult your ears have adjusted. • Limit the amount of time listening to music at high volume. • Avoid turning up the volume to block out noisy surroundings. • Turn the volume down if...

User Guide
Page 5
... product, make sure that is not properly grounded may expose you need to replace the power cord set . The grounding pin is properly grounded before inserting the power cord plug. Unplug this product yourself, as opening or removing covers may result in a grounded power outlet. Do not insert the plug into the extension cord does not exceed the extension cord ampere rating. Using a power outlet that the new power cord meets...
... product, make sure that is not properly grounded may expose you need to replace the power cord set . The grounding pin is properly grounded before inserting the power cord plug. Unplug this product yourself, as opening or removing covers may result in a grounded power outlet. Do not insert the plug into the extension cord does not exceed the extension cord ampere rating. Using a power outlet that the new power cord meets...

User Guide
Page 6
... and will often require extensive work by the operating instructions, since improper adjustment of other controls may contain small parts. personnel when: • the power cord or plug is strongly committed to environmental protection and views recycling, in the form of salvaging and disposal of used equipment, as grain, dust or metal powders. Potentially explosive environments Switch off your device in...
... and will often require extensive work by the operating instructions, since improper adjustment of other controls may contain small parts. personnel when: • the power cord or plug is strongly committed to environmental protection and views recycling, in the form of salvaging and disposal of used equipment, as grain, dust or metal powders. Potentially explosive environments Switch off your device in...

User Guide
Page 7
... more information on the recorded image and does not constitute a malfunction. Users are also at risk of physical injury after prolonged use Computer users may occasionally misfire or appear as black or red dots. This product has been shipped enabled for power management: • Activate display's Sleep mode within 5 minutes of user inactivity. • Wake the monitor when it is produced with...
... more information on the recorded image and does not constitute a malfunction. Users are also at risk of physical injury after prolonged use Computer users may occasionally misfire or appear as black or red dots. This product has been shipped enabled for power management: • Activate display's Sleep mode within 5 minutes of user inactivity. • Wake the monitor when it is produced with...

User Guide
Page 8
...eyes frequently. • Give your eyes regular breaks by adjusting the viewing angle of the monitor, using a footrest, or raising your eyes from staying too long in such a way that the side faces the window or any other recurring or persistent discomfort and/or pain... or any light source viii Display • Keep your display clean. • Keep your head at a higher level than the top edge of your vision Long viewing hours, wearing incorrect glasses or contact lenses, glare, excessive room lighting, poorly focused screens, very small typefaces and low-contrast displays could stress your...
...eyes frequently. • Give your eyes regular breaks by adjusting the viewing angle of the monitor, using a footrest, or raising your eyes from staying too long in such a way that the side faces the window or any other recurring or persistent discomfort and/or pain... or any light source viii Display • Keep your display clean. • Keep your head at a higher level than the top edge of your vision Long viewing hours, wearing incorrect glasses or contact lenses, glare, excessive room lighting, poorly focused screens, very small typefaces and low-contrast displays could stress your...
User Guide
Page 12
...of Conformity Federal Communications Commission Declaration of Conformity Unpacking 1 ATTACHING/ REMOVING THE BASE 2 Screen position adjustment 3 Connecting the Power cord 4 Power saving 4 Display Data Channel (DDC) 4 Connector pin assignment 5 Standard timing table 7 Installation 8 Users controls 9 Using the Shortcut Menu 9 Input Source Selection 10 Acer eColor Management 10 Adjusting the OSD settings 12 Adjusting the OSD position 13 Adjusting the setting 14 Product information 15 Troubleshooting 16 VGA Mode 16 DVI mode 17 HDMI/DP Mode (Optional) 17
...of Conformity Federal Communications Commission Declaration of Conformity Unpacking 1 ATTACHING/ REMOVING THE BASE 2 Screen position adjustment 3 Connecting the Power cord 4 Power saving 4 Display Data Channel (DDC) 4 Connector pin assignment 5 Standard timing table 7 Installation 8 Users controls 9 Using the Shortcut Menu 9 Input Source Selection 10 Acer eColor Management 10 Adjusting the OSD settings 12 Adjusting the OSD position 13 Adjusting the setting 14 Product information 15 Troubleshooting 16 VGA Mode 16 DVI mode 17 HDMI/DP Mode (Optional) 17

User Guide
Page 14
English ATTACHING/ REMOVING THE BASE Install: Align the base with the stand and push the base towards the top of safety requirement. • To prevent fragile panel broken, when moving and disassembling the product , it must pull the monitor head to remove the base. Tighten the screw clockwise. ② ① Remove: Press release bottom and reverse the steps to the top at first and place...
English ATTACHING/ REMOVING THE BASE Install: Align the base with the stand and push the base towards the top of safety requirement. • To prevent fragile panel broken, when moving and disassembling the product , it must pull the monitor head to remove the base. Tighten the screw clockwise. ② ① Remove: Press release bottom and reverse the steps to the top at first and place...

User Guide
Page 15
The monitor can adjust the monitor tilt by using both of the monitor as shown below. English Screen position adjustment To optimize the viewing position, you can be adjusted to hold the edges of your hands to 20 degrees up or 5 degrees down. 20 3
The monitor can adjust the monitor tilt by using both of the monitor as shown below. English Screen position adjustment To optimize the viewing position, you can be adjusted to hold the edges of your hands to 20 degrees up or 5 degrees down. 20 3

User Guide
Page 16
... a control signal has been detected or the keyboard or mouse is a communication protocol through which the equipment will be installed. The monitor supports the DDC2B standard. 4 The cord set consisting of H05VV-F cord and plug rated 10 A/250 V. for your system supports the DDC protocol, the monitor is able to make installation easier, so long as indicated by the amber-colored power LED. Power saving The monitor will be switched to...
... a control signal has been detected or the keyboard or mouse is a communication protocol through which the equipment will be installed. The monitor supports the DDC2B standard. 4 The cord set consisting of H05VV-F cord and plug rated 10 A/250 V. for your system supports the DDC protocol, the monitor is able to make installation easier, so long as indicated by the amber-colored power LED. Power saving The monitor will be switched to...
User Guide
Page 20
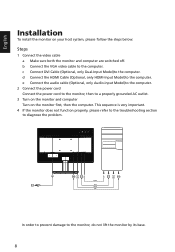
.... HDMI AUDIO IN VGA IN DVI-D IN HDMI HDMI In order to prevent damage to the computer. c Connect DVI Cable (Optional, only Dual-Input Model)to the monitor, do not lift the monitor by its base. 8 b Connect the VGA video cable to a properly grounded AC outlet. 3 Turn on the monitor and computer Turn on your host system, please follow the steps below: Steps 1 Connect the video cable a Make sure both the monitor and computer are switched off. English Installation...
.... HDMI AUDIO IN VGA IN DVI-D IN HDMI HDMI In order to prevent damage to the computer. c Connect DVI Cable (Optional, only Dual-Input Model)to the monitor, do not lift the monitor by its base. 8 b Connect the VGA video cable to a properly grounded AC outlet. 3 Turn on the monitor and computer Turn on your host system, please follow the steps below: Steps 1 Connect the video cable a Make sure both the monitor and computer are switched off. English Installation...
User Guide
Page 21
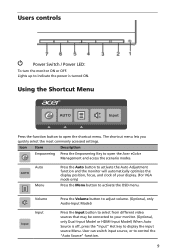
... input source Menu. Volume Input Input Press the Volume button to adjust volume. (Optional, only Audio-Input Model) Press the Input button to select from different video sources that may be connected to your display. (For VGA mode only) Press the Menu button to indicate the power is off, press the "Input" Hot key to open the Acer eColor Management and access the scenario modes. Icon Item Description Empowering Press the Empowering Key to control the "Auto Source" function. 9 Users controls Power Switch / Power LED: To turn the monitor...
... input source Menu. Volume Input Input Press the Volume button to adjust volume. (Optional, only Audio-Input Model) Press the Input button to select from different video sources that may be connected to your display. (For VGA mode only) Press the Menu button to indicate the power is off, press the "Input" Hot key to open the Acer eColor Management and access the scenario modes. Icon Item Description Empowering Press the Empowering Key to control the "Auto Source" function. 9 Users controls Power Switch / Power LED: To turn the monitor...
User Guide
Page 22
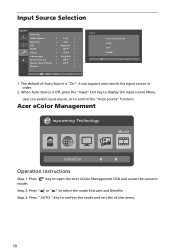
... to open the Acer eColor Management OSD and access the scenario modes Step 2: Press " "/ or/" " to select the mode Features and Benefits Step 3: Press " AUTO " Key to display the input source Menu. When Auto Source is "On", it can switch input source, or to control the "Auto Source" function. Input Source Selection Setting Wide Mode DDC/CI OD ACM Input Language Auto Source Quick Start Mode Reset OFFFull ON ON Normal OFF VGA English OFF OFF Exit Enter Input Auto Source On VGA DVI HDMI 1. The default of Auto Source is Off...
... to open the Acer eColor Management OSD and access the scenario modes Step 2: Press " "/ or/" " to select the mode Features and Benefits Step 3: Press " AUTO " Key to display the input source Menu. When Auto Source is "On", it can switch input source, or to control the "Auto Source" function. Input Source Selection Setting Wide Mode DDC/CI OD ACM Input Language Auto Source Quick Start Mode Reset OFFFull ON ON Normal OFF VGA English OFF OFF Exit Enter Input Auto Source On VGA DVI HDMI 1. The default of Auto Source is Off...

User Guide
Page 23
Displays scenes in vibrant mode colors with sharp detail. N/A Standard Default Setting. Settings can be fine-tuned to suit any situation Adjusts the settings to reduce power N/A ECO mode consumption. N/A Grahpic Pictures and photographs appear in clearest detail. lit mode environments. 11 Reflects native display capability mode Enhances colors and emphasize fine detail. Features and benefits Main Menu icon Sub Menu icon N/A Sub Menu item Description User mode User defined. Presents N/A Movie gre at vi sua ls , even in unsui tably -
Displays scenes in vibrant mode colors with sharp detail. N/A Standard Default Setting. Settings can be fine-tuned to suit any situation Adjusts the settings to reduce power N/A ECO mode consumption. N/A Grahpic Pictures and photographs appear in clearest detail. lit mode environments. 11 Reflects native display capability mode Enhances colors and emphasize fine detail. Features and benefits Main Menu icon Sub Menu icon N/A Sub Menu item Description User mode User defined. Presents N/A Movie gre at vi sua ls , even in unsui tably -
User Guide
Page 24
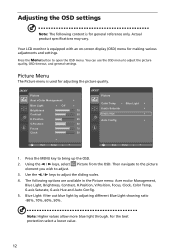
... with an on-screen display (OSD) menu for adjusting the picture quality. For the best protection select a lower value. 12 Then navigate to open the OSD menu. Actual product specifications may vary. Adjusting the OSD settings Note: The following options are available in the Picture menu: Acer ecolor Management, Blue Light, Brightness, Contrast, H.Position, V.Position, Focus, Clock, Color Temp, 6-axis Saturate, 6-axis Hue and Auto Config. 5. Picture from the OSD. Blue Light: filter out blue light by adjusting different Blue Light showing ratio -80...
... with an on-screen display (OSD) menu for adjusting the picture quality. For the best protection select a lower value. 12 Then navigate to open the OSD menu. Actual product specifications may vary. Adjusting the OSD settings Note: The following options are available in the Picture menu: Acer ecolor Management, Blue Light, Brightness, Contrast, H.Position, V.Position, Focus, Clock, Color Temp, 6-axis Saturate, 6-axis Hue and Auto Config. 5. Picture from the OSD. Blue Light: filter out blue light by adjusting different Blue Light showing ratio -80...
User Guide
Page 25
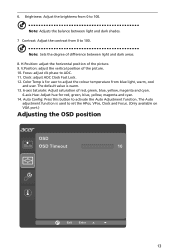
... on VGA port.) Adjusting the OSD position OSD OSD Timeout 10 Exit Enter 13 V.Position: adjust the vertical position of the picture. 9. Clock: adjust ADC Clock Fast Lock. 12. 6. Brightness: Adjust the brightness from 0 to 100. H.Position: adjust the horizontal position of the picture. 10. Focus: adjust clk phase to activate the Auto Adjustment function. Auto Config: Press this button to ADC. 11. Color Temp is used to adjust the colour temperature from blue light, warm, cool and user. The Auto adjustment function is for red, green, blue...
... on VGA port.) Adjusting the OSD position OSD OSD Timeout 10 Exit Enter 13 V.Position: adjust the vertical position of the picture. 9. Clock: adjust ADC Clock Fast Lock. 12. 6. Brightness: Adjust the brightness from 0 to 100. H.Position: adjust the horizontal position of the picture. 10. Focus: adjust clk phase to activate the Auto Adjustment function. Auto Config: Press this button to ADC. 11. Color Temp is used to adjust the colour temperature from blue light, warm, cool and user. The Auto adjustment function is for red, green, blue...

User Guide
Page 26
... confirm. 5 Wide mode: You can select which allows monitor controls to bring up the OSD. 2. Adjusting the setting Setting Wide Mode DDC/CI OD ACM Input Language Auto Source Quick Start Mode Reset OFFFull ON ON Normal OFF VGA English ON OFF Exit Enter 1 Press the Menu button to bring up the OSD menu. 2 Press the < / > button to select Setting and press the Menu button to be sent via software. 7 OD: Select Off, Normal, or Extreme. 8 ACM: Turn ACM on screen display.
... confirm. 5 Wide mode: You can select which allows monitor controls to bring up the OSD. 2. Adjusting the setting Setting Wide Mode DDC/CI OD ACM Input Language Auto Source Quick Start Mode Reset OFFFull ON ON Normal OFF VGA English ON OFF Exit Enter 1 Press the Menu button to bring up the OSD menu. 2 Press the < / > button to select Setting and press the Menu button to be sent via software. 7 OD: Select Off, Normal, or Extreme. 8 ACM: Turn ACM on screen display.
User Guide
Page 27
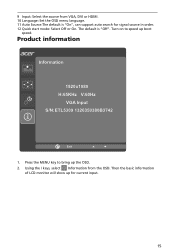
Product information Information 1920x1080 H:65KHz V:60Hz VGA Input S/N:ETL5309 1326350380B3742 Exit 1. Using the / keys, select Information from VGA, DVI or HDMI. 10 Language: Set the OSD menu language. 11 Auto Source:The default is "Off". Press the MENU key to speed up boot speed. Then the basic information of LCD monitor will show up the OSD. 2. The default is "On", can support auto search for current input. 15 Turn on to bring up for signal source in order. 12 Quick start mode: Select Off or On. 9 Input: Select the source from the OSD.
Product information Information 1920x1080 H:65KHz V:60Hz VGA Input S/N:ETL5309 1326350380B3742 Exit 1. Using the / keys, select Information from VGA, DVI or HDMI. 10 Language: Set the OSD menu language. 11 Auto Source:The default is "Off". Press the MENU key to speed up boot speed. Then the basic information of LCD monitor will show up the OSD. 2. The default is "On", can support auto search for current input. 15 Turn on to bring up for signal source in order. 12 Quick start mode: Select Off or On. 9 Input: Select the source from the OSD.
User Guide
Page 28
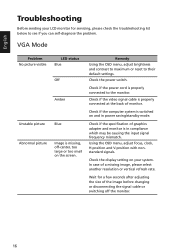
... monitor. Check the power switch. Using the OSD menu, adjust focus, clock, H-position and V-position with nonstandard signals. Wait for servicing, please check the troubleshooting list below to their default settings. In case of monitor. Check if the specification of the image before changing or disconnecting the signal cable or switching off -center, too large or too small on and in compliance which may be causing the input signal frequency mismatch. Check if the power cord is in power saving/standby mode. VGA Mode Problem No picture...
... monitor. Check the power switch. Using the OSD menu, adjust focus, clock, H-position and V-position with nonstandard signals. Wait for servicing, please check the troubleshooting list below to their default settings. In case of monitor. Check if the specification of the image before changing or disconnecting the signal cable or switching off -center, too large or too small on and in compliance which may be causing the input signal frequency mismatch. Check if the power cord is in power saving/standby mode. VGA Mode Problem No picture...
User Guide
Page 29
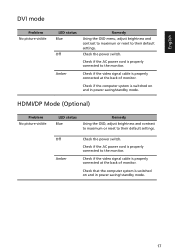
... power saving/standby mode. Check if the AC power cord is switched on and in power saving/ standby mode. 17 Check that the computer system is properly connected to their default settings. Amber Check if the video signal cable is properly connected at the back of monitor. Check if the video signal cable is properly connected at the back of monitor. English DVI mode Problem No picture visible LED status Blue Off Remedy Using the OSD menu, adjust brightness and contrast to maximum or reset to the monitor. Off Amber Check the power switch...
... power saving/standby mode. Check if the AC power cord is switched on and in power saving/ standby mode. 17 Check that the computer system is properly connected to their default settings. Amber Check if the video signal cable is properly connected at the back of monitor. Check if the video signal cable is properly connected at the back of monitor. English DVI mode Problem No picture visible LED status Blue Off Remedy Using the OSD menu, adjust brightness and contrast to maximum or reset to the monitor. Off Amber Check the power switch...

