
User Manual
Page 1
TABLE OF CONTENTS Special notes on LCD monitors 1 Information for your safety and comfort 2 Unpacking 5 Attaching/Removing the base 6 Screen position adjustment 6 Connecting the power cord 7 Safety precaution 7 Cleaning your monitor 7 Power saving 8 DDC 8 Connector Pin Assignment 9 Standard Timing Table 11 Installation 12 User controls 13 Troubleshooting 19
TABLE OF CONTENTS Special notes on LCD monitors 1 Information for your safety and comfort 2 Unpacking 5 Attaching/Removing the base 6 Screen position adjustment 6 Connecting the power cord 7 Safety precaution 7 Cleaning your monitor 7 Power saving 8 DDC 8 Connector Pin Assignment 9 Standard Timing Table 11 Installation 12 User controls 13 Troubleshooting 19

User Manual
Page 2
... LCD screen has effective pixels of the fluorescent light, the screen may remain after switching the image, when the same image is displayed for hours. Turn off the Power Switch for hours. EN-1 NOTES · Due to make sure the flicker disappears. · You may find slightly uneven brightness on the screen depending on the desktop pattern you use . In this case, the screen is recovered slowly by changing...
... LCD screen has effective pixels of the fluorescent light, the screen may remain after switching the image, when the same image is displayed for hours. Turn off the Power Switch for hours. EN-1 NOTES · Due to make sure the flicker disappears. · You may find slightly uneven brightness on the screen depending on the desktop pattern you use . In this case, the screen is recovered slowly by changing...

User Manual
Page 3
... use this product near you plug the power cord into is provided. • Never push objects of the following power supplies: Manufacturer: FSP Technology Inc., Model: FSP040- Never spill liquid of any kind into the product. • To avoid damage of the product and to unplug the power cord from surrounding light and bright surfaces. EN-2 Follow all warnings and instructions marked...
... use this product near you plug the power cord into is provided. • Never push objects of the following power supplies: Manufacturer: FSP Technology Inc., Model: FSP040- Never spill liquid of any kind into the product. • To avoid damage of the product and to unplug the power cord from surrounding light and bright surfaces. EN-2 Follow all warnings and instructions marked...
User Manual
Page 4
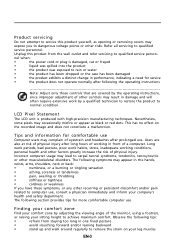
... black or red dots. Nevertheless, some pixels may occasionally misfire or appear as opening or removing covers may complain of eyestrain and headaches after long hours of physical injury. Observe the following section provides tips for more comfortable computer use Computer users may expose you have these symptoms, or any other risks. nel when: • the power cord or plug is...
... black or red dots. Nevertheless, some pixels may occasionally misfire or appear as opening or removing covers may complain of eyestrain and headaches after long hours of physical injury. Observe the following section provides tips for more comfortable computer use Computer users may expose you have these symptoms, or any other risks. nel when: • the power cord or plug is...

User Manual
Page 5
... low-contrast displays could stress your eyes. Eyes • Rest your eyes frequently. • Give your eyes regular breaks by looking away from the monitor and focusing on a distant point. • Blink frequently to keep your eyes from the display's top front edge • Avoid adjusting your display to an awkward viewing angle. • Avoid looking at bright light sources, such as open windows...
... low-contrast displays could stress your eyes. Eyes • Rest your eyes frequently. • Give your eyes regular breaks by looking away from the monitor and focusing on a distant point. • Blink frequently to keep your eyes from the display's top front edge • Avoid adjusting your display to an awkward viewing angle. • Avoid looking at bright light sources, such as open windows...

User Manual
Page 6
UNPACKING Please check the following items are present when you unpack the box, and save the packing materials in case you will need to ship or transport the monitor in future. · LCD Monitor · AC Adapter · AC Power Cord · D-Sub Cable (Optional) · DVI Cable (Optional) · HDMI Cable (Optional) · User Manual · Quick Start Guide V185HL/V195HQL V205HL V225WL V235HL LCD monitor P/N:MU.LV200.001 EN-5
UNPACKING Please check the following items are present when you unpack the box, and save the packing materials in case you will need to ship or transport the monitor in future. · LCD Monitor · AC Adapter · AC Power Cord · D-Sub Cable (Optional) · DVI Cable (Optional) · HDMI Cable (Optional) · User Manual · Quick Start Guide V185HL/V195HQL V205HL V225WL V235HL LCD monitor P/N:MU.LV200.001 EN-5

User Manual
Page 7
SCREEN POSITION ADJUSTMENT In oder to optimize the best viewing position, you can be adjusted to hold the edges of the monitor as indi- Carefully place the monitor face-down as shown in the figure below . 5 15 EN-6 use a cloth to avoid scratching the screen. 1 Attach the the monitor stand arm to avoid injuring yourself. Note:Take care when performing the installation to the base. 2 Ensure that...
SCREEN POSITION ADJUSTMENT In oder to optimize the best viewing position, you can be adjusted to hold the edges of the monitor as indi- Carefully place the monitor face-down as shown in the figure below . 5 15 EN-6 use a cloth to avoid scratching the screen. 1 Attach the the monitor stand arm to avoid injuring yourself. Note:Take care when performing the installation to the base. 2 Ensure that...

User Manual
Page 8
... cover the ventilation slots or openings of the monitor. SAFETY PRECAUTION · Avoid placing the monitor, or any other light sources may reflect on the power cord to avoid damage to the cable. · Do not expose the monitor to a proper AC outlet. · For unit using at 120 V AC: Use a UL Listed Cord Set, Type SVT wire and plug rated 10 A/125 V. · For unit using...
... cover the ventilation slots or openings of the monitor. SAFETY PRECAUTION · Avoid placing the monitor, or any other light sources may reflect on the power cord to avoid damage to the cable. · Do not expose the monitor to a proper AC outlet. · For unit using at 120 V AC: Use a UL Listed Cord Set, Type SVT wire and plug rated 10 A/125 V. · For unit using...

User Manual
Page 9
... corresponding timing. EN-8 The recovery time from the display controller, as indicated by the control signal from Active OFF state back to Plug and Play with your system if your installation easier, the monitor is able to ON state is around 3 seconds. DDC To make your system also supports DDC protocol. Power saving The monitor will be driven into Power Saving" mode by the amber-color power LED.
... corresponding timing. EN-8 The recovery time from the display controller, as indicated by the control signal from Active OFF state back to Plug and Play with your system if your installation easier, the monitor is able to ON state is around 3 seconds. DDC To make your system also supports DDC protocol. Power saving The monitor will be driven into Power Saving" mode by the amber-color power LED.

User Manual
Page 10
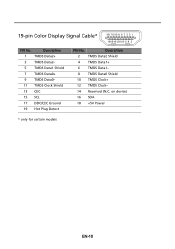
... +5V Power Logic Ground Hot Plug Detect TMDS Data0TMDS Data0+ TMDS Data 0/5 Shield NC NC TMDS Clock Shield TMDS Clock+ DDC TMDS Clock- TMDS Data2- 13. 2. TMDS Data2+ 14. 3. NC 16. 5. TMDS Data1+ 22. 11. NC 20. 9. DDC Data 19. 8. DDC Clock 18. 7. CONNECTOR PIN ASSIGNMENT 15-Pin Color Display Signal Cable PIN NO. 1. 2. 3. 4. 5. 6. 7. 8. DESCRIPTION Red Green Blue Monitor Ground DDC...
... +5V Power Logic Ground Hot Plug Detect TMDS Data0TMDS Data0+ TMDS Data 0/5 Shield NC NC TMDS Clock Shield TMDS Clock+ DDC TMDS Clock- TMDS Data2- 13. 2. TMDS Data2+ 14. 3. NC 16. 5. TMDS Data1+ 22. 11. NC 20. 9. DDC Data 19. 8. DDC Clock 18. 7. CONNECTOR PIN ASSIGNMENT 15-Pin Color Display Signal Cable PIN NO. 1. 2. 3. 4. 5. 6. 7. 8. DESCRIPTION Red Green Blue Monitor Ground DDC...
User Manual
Page 11
on device) 16 SDA 18 +5V Power * only for certain models EN-10 Description 1 TMDS Data2+ 3 TMDS Data2- 5 TMDS Data1 Shield 7 TMDS Data0+ 9 TMDS Data0- 11 TMDS Clock Shield 13 CEC 15 SCL 17 DDC/CEC Ground 19 Hot Plug Detect PIN No. Description 2 TMDS Data2 Shield 4 TMDS Data1+ 6 TMDS Data1- 8 TMDS Data0 Shield 10 TMDS Clock+ 12 TMDS Clock- 14 Reserved (N.C. 19-pin Color Display Signal Cable* 1917151311 9 7 5 3 1 1816141210 8 6 4 2 PIN No.
on device) 16 SDA 18 +5V Power * only for certain models EN-10 Description 1 TMDS Data2+ 3 TMDS Data2- 5 TMDS Data1 Shield 7 TMDS Data0+ 9 TMDS Data0- 11 TMDS Clock Shield 13 CEC 15 SCL 17 DDC/CEC Ground 19 Hot Plug Detect PIN No. Description 2 TMDS Data2 Shield 4 TMDS Data1+ 6 TMDS Data1- 8 TMDS Data0 Shield 10 TMDS Clock+ 12 TMDS Clock- 14 Reserved (N.C. 19-pin Color Display Signal Cable* 1917151311 9 7 5 3 1 1816141210 8 6 4 2 PIN No.

User Manual
Page 13
... 1. 1-1 Connect Video Cable a. DC D-Sub 2 DVI HDMI HDMI DVI D-Sub EN-12 DC IN b. If the monitor still does not function properly, please refer to the troubleshooting section to the computer. 1-2 Cao. Connect the HDMI cable to the adapter. Connect the adapter a Connect the AC cord to the computer. 2. Mnnaekcet stuhreedbiogtithatlhceabmleo(noitnolyr afonrddcuoaml-pinupteurt amreodpeolws).ered-OFF. Power-ON Monitor and Computer Power-ON the monitor first, then power-ON the computer. INSTALLATION...
... 1. 1-1 Connect Video Cable a. DC D-Sub 2 DVI HDMI HDMI DVI D-Sub EN-12 DC IN b. If the monitor still does not function properly, please refer to the troubleshooting section to the computer. 1-2 Cao. Connect the HDMI cable to the adapter. Connect the adapter a Connect the AC cord to the computer. 2. Mnnaekcet stuhreedbiogtithatlhceabmleo(noitnolyr afonrddcuoaml-pinupteurt amreodpeolws).ered-OFF. Power-ON Monitor and Computer Power-ON the monitor first, then power-ON the computer. INSTALLATION...

User Manual
Page 14
... VGA or DVI input is used to activate the OSD menu. Using the Shortcut Menu Press the function button to indicate the power is turned ON. AUTO Auto Adjust: Press this botton to set the HPos, VPos, Clock and Focus. Lights up to open the Acer eColor Management OSD and access the scenario modes. USER CONTROLS Power Switch / Power LED: To turn the monitor ON or OFF. It may be connected to your monitor. (a) VGA input (b) DVI input (c) HDMI input As you cycle through the sources you quickly...
... VGA or DVI input is used to activate the OSD menu. Using the Shortcut Menu Press the function button to indicate the power is turned ON. AUTO Auto Adjust: Press this botton to set the HPos, VPos, Clock and Focus. Lights up to open the Acer eColor Management OSD and access the scenario modes. USER CONTROLS Power Switch / Power LED: To turn the monitor ON or OFF. It may be connected to your monitor. (a) VGA input (b) DVI input (c) HDMI input As you cycle through the sources you quickly...

User Manual
Page 15
... situation N/A ECO mode Adjusts the settings to confirm the mode and exit the eColor menu. R eflects n a tive d isp lay mode capability N/A Grahpic mode Enhances colors and emphasize fine detail. Acer eColor Management Operation instructions Step 1: Press " " Key to open the Acer eColor Management OSD and access the scenario modes Step 2: Press " " or " " to select the mode Step 3: Press " AUTO " Key to reduce power consumption. Pictures and photographs appear...
... situation N/A ECO mode Adjusts the settings to confirm the mode and exit the eColor menu. R eflects n a tive d isp lay mode capability N/A Grahpic mode Enhances colors and emphasize fine detail. Acer eColor Management Operation instructions Step 1: Press " " Key to open the Acer eColor Management OSD and access the scenario modes Step 2: Press " " or " " to select the mode Step 3: Press " AUTO " Key to reduce power consumption. Pictures and photographs appear...

User Manual
Page 16
... current Brightness, Contrast, Colour Temp, Auto Config and other image-related qualities. Actual product specifications may vary. The OSD can be used for general reference only. Then navigate to the picture element you wish to adjust. 3 Use the / keys to adjust the sliding scales. 4 The Picture menu can use the OSD to adjust the picture quality, OSD position and general settings. EN-15 You can be used to open the OSD. For advanced settings...
... current Brightness, Contrast, Colour Temp, Auto Config and other image-related qualities. Actual product specifications may vary. The OSD can be used for general reference only. Then navigate to the picture element you wish to adjust. 3 Use the / keys to adjust the sliding scales. 4 The Picture menu can use the OSD to adjust the picture quality, OSD position and general settings. EN-15 You can be used to open the OSD. For advanced settings...

User Manual
Page 18
Then navigate to the feature you wish to adjust. 3 The Setting menu can be used to bring up the OSD. 2 Using the / keys, select Setting from the OSD. EN-17 Adjusting the setting 1 Press the MENU key to adjust the screen Menu Language and other important settings.
Then navigate to the feature you wish to adjust. 3 The Setting menu can be used to bring up the OSD. 2 Using the / keys, select Setting from the OSD. EN-17 Adjusting the setting 1 Press the MENU key to adjust the screen Menu Language and other important settings.

User Manual
Page 20
... AC power cord is ON. LED displays amber color · Check if video signal cable is properly connected at the back of monitor. · Check if the power of computer system is properly connected to their default settings. Unstable Picture · Check if the specification of graphics adapter and monitor is · Using OSD, adjust RESOLUTION, CLOCK, missing, center CLOCK-PHASE, H-POSITION and V- small or too large in display · Using OSD, in compliance which may be causing the input signal frequency...
... AC power cord is ON. LED displays amber color · Check if video signal cable is properly connected at the back of monitor. · Check if the power of computer system is properly connected to their default settings. Unstable Picture · Check if the specification of graphics adapter and monitor is · Using OSD, adjust RESOLUTION, CLOCK, missing, center CLOCK-PHASE, H-POSITION and V- small or too large in display · Using OSD, in compliance which may be causing the input signal frequency...

User Manual
Page 21
(DVI/HDMI mode) Problems Current Status Remedy LED ON · Using OSD, adjust brightness and contrast to maximum or reset to the monitor. EN-20 LED displays amber color · Check if video signal cable is properly connected at the back of monitor. · Check if the power of computer system is properly connected to their default settings. LED OFF · Check the power switch. No Picture · Check if AC power cord is ON.
(DVI/HDMI mode) Problems Current Status Remedy LED ON · Using OSD, adjust brightness and contrast to maximum or reset to the monitor. EN-20 LED displays amber color · Check if video signal cable is properly connected at the back of monitor. · Check if the power of computer system is properly connected to their default settings. LED OFF · Check the power switch. No Picture · Check if AC power cord is ON.

User Manual
Page 22
...0.1% Hexavalent Chromium 0.1% Cadmium 0.01% Directive 2009/125/EC with regard to establishing a framework for the setting of ecodesign requirements for energy-related product. Acer Incorporated 8F, 88, Sec. 1, Xintai 5th Rd., Xizhi New Taipei City 221, Taiwan Declaration of Conformity ...20020 Lainate (MI) Italy Tel: +39-02-939-921 ,Fax: +39-02 9399-2913 www.acer.it Hereby declare that: Product: LCD Monitor Trade Name: Acer Model Number: V185HL/V195HQL,V205HL,V225W L,V235HL SKU Number: V185HL xxxxxx /V195HQL xxxxxx, V205HL xxxxxx,V225W L xxxxxx, V235HL xxxxxx; ("x" = 0~9, a ~ z, A ~ Z, ...
...0.1% Hexavalent Chromium 0.1% Cadmium 0.01% Directive 2009/125/EC with regard to establishing a framework for the setting of ecodesign requirements for energy-related product. Acer Incorporated 8F, 88, Sec. 1, Xintai 5th Rd., Xizhi New Taipei City 221, Taiwan Declaration of Conformity ...20020 Lainate (MI) Italy Tel: +39-02-939-921 ,Fax: +39-02 9399-2913 www.acer.it Hereby declare that: Product: LCD Monitor Trade Name: Acer Model Number: V185HL/V195HQL,V205HL,V225W L,V235HL SKU Number: V185HL xxxxxx /V195HQL xxxxxx, V205HL xxxxxx,V225W L xxxxxx, V235HL xxxxxx; ("x" = 0~9, a ~ z, A ~ Z, ...

User Manual
Page 24
...% energy at "sleep" mode. Products that help customers save you money by the U.S. marks What is proud to offer products and services worldwide that are registered U.S. Environmental Protection Agency. ENERGY STAR and the ENERGY STAR mark are ENERGY STAR qualified use less energy and prevent greenhouse gas emissions by meeting strict energy efficiency guidelines set by reducing...
...% energy at "sleep" mode. Products that help customers save you money by the U.S. marks What is proud to offer products and services worldwide that are registered U.S. Environmental Protection Agency. ENERGY STAR and the ENERGY STAR mark are ENERGY STAR qualified use less energy and prevent greenhouse gas emissions by meeting strict energy efficiency guidelines set by reducing...

