

Quick Start Guide
Page 1
...clean the screen gently. 2 Do not place the LCD monitor near a window. If the OSD is inactive, press the Minus or Plus buttons to adjust the volume. (Optional) Menu OSD functions Press to rain. • The LCD monitor or case is active, press the Minus or ...base. Blue indicates power on a stable and level workspace. 2 Remove the monitor from the packaging and place it . 3 Do not apply pressure to service this range may cause permanent damage to the display. 4 Do not remove the cover or attempt to the LCD screen. Amber indicates standby/ power saving mode. English 1 Acer LCD Monitor...
...clean the screen gently. 2 Do not place the LCD monitor near a window. If the OSD is inactive, press the Minus or Plus buttons to adjust the volume. (Optional) Menu OSD functions Press to rain. • The LCD monitor or case is active, press the Minus or ...base. Blue indicates power on a stable and level workspace. 2 Remove the monitor from the packaging and place it . 3 Do not apply pressure to service this range may cause permanent damage to the display. 4 Do not remove the cover or attempt to the LCD screen. Amber indicates standby/ power saving mode. English 1 Acer LCD Monitor...

User Manual
Page 13
... Safety instructions Cleaning your monitor Connecting/disconnecting the device Accessibility Safe listening Warnings Using electrical power Product servicing Additional safety information IT equipment recycling information Disposal instructions LCD pixel statement Tips and information for comfortable use Federal Communications Commission Declaration of Conformity Unpacking Attaching/removing the base Screen position adjustment Connecting the power cord...
... Safety instructions Cleaning your monitor Connecting/disconnecting the device Accessibility Safe listening Warnings Using electrical power Product servicing Additional safety information IT equipment recycling information Disposal instructions LCD pixel statement Tips and information for comfortable use Federal Communications Commission Declaration of Conformity Unpacking Attaching/removing the base Screen position adjustment Connecting the power cord...

User Manual
Page 16
English 2 Attaching/removing the base Attaching: Align the release button on the bottom of the monitor with the corresponding slots on the bottom of the arrow to 15 degrees up or 5 degrees down. Screen position adjustment To optimize the viewing position, you can be adjusted to remove the base. The monitor can adjust the monitor tilt by using both of your hands to hold the edges of the monitor as indicated, then pull in the direction of the base. Removing: Press the release button as shown below.
English 2 Attaching/removing the base Attaching: Align the release button on the bottom of the monitor with the corresponding slots on the bottom of the arrow to 15 degrees up or 5 degrees down. Screen position adjustment To optimize the viewing position, you can be adjusted to remove the base. The monitor can adjust the monitor tilt by using both of your hands to hold the edges of the monitor as indicated, then pull in the direction of the base. Removing: Press the release button as shown below.

Quick Start Guide
Page 1
... Auto If the OSD is inactive, press the Minus or Plus buttons to adjust the volume. (Optional) Menu OSD functions Press to the base. English 1 Acer LCD Monitor Quick Start Guide (QSG) Important safety instructions Please read the following circumstances occur: • Monitor-to-PC signal cable is frayed or damaged. • Liquid spills onto the...
... Auto If the OSD is inactive, press the Minus or Plus buttons to adjust the volume. (Optional) Menu OSD functions Press to the base. English 1 Acer LCD Monitor Quick Start Guide (QSG) Important safety instructions Please read the following circumstances occur: • Monitor-to-PC signal cable is frayed or damaged. • Liquid spills onto the...

Service Guide
Page 6
Table Of Contents Chapter 1 Monitor Features Introduction Electrical Requirements LCD Monitor General Specification LCD Panel Specification Support Timing Monitor Block Diagram Main Board Diagram Software Flow chart Main Board Layout Installation Attaching/Removing the base Chapter 2 Operating Instructions External Controls Front Panel Controls eColor Management (OSD) How to Adjust a Setting LOGO Chapter 3 Machine Disassembly Chapter 4 Troubleshooting Chapter 5 Connector...
Table Of Contents Chapter 1 Monitor Features Introduction Electrical Requirements LCD Monitor General Specification LCD Panel Specification Support Timing Monitor Block Diagram Main Board Diagram Software Flow chart Main Board Layout Installation Attaching/Removing the base Chapter 2 Operating Instructions External Controls Front Panel Controls eColor Management (OSD) How to Adjust a Setting LOGO Chapter 3 Machine Disassembly Chapter 4 Troubleshooting Chapter 5 Connector...
Service Guide
Page 7
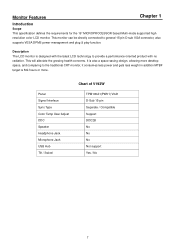
... 1 Introduction Scope This specification defines the requirements for the 19" MICROPROCESSOR based Multi-mode supported high resolution color LCD monitor. Panel Signal Interface Sync Type Color Temp User Adjust DDC Speaker Headphone Jack Microphone Jack USB Hub Tilt / Swivel Chart of V193W TPM190A1(PW01) V0A1 D-Sub 15-pin Separate / Compatible Support DDC2B No No No Not...
... 1 Introduction Scope This specification defines the requirements for the 19" MICROPROCESSOR based Multi-mode supported high resolution color LCD monitor. Panel Signal Interface Sync Type Color Temp User Adjust DDC Speaker Headphone Jack Microphone Jack USB Hub Tilt / Swivel Chart of V193W TPM190A1(PW01) V0A1 D-Sub 15-pin Separate / Compatible Support DDC2B No No No Not...


