
User Manual
Page 9
TMa550.book Page ix Wednesday, October 3, 2001 10:57 AM 5 Software System software Easy Button E-Mail Detector BIOS Setup Utility Main System Devices Security Others Boot Exit 6 Troubleshooting Frequently-asked questions Error messages Appendix A Specifications Appendix B Notices Index ix 59 61 62 63 64 65 67 68 71 72 73 75 77 81 85 91 99
TMa550.book Page ix Wednesday, October 3, 2001 10:57 AM 5 Software System software Easy Button E-Mail Detector BIOS Setup Utility Main System Devices Security Others Boot Exit 6 Troubleshooting Frequently-asked questions Error messages Appendix A Specifications Appendix B Notices Index ix 59 61 62 63 64 65 67 68 71 72 73 75 77 81 85 91 99
User Manual
Page 21
... system sets aside a portion of main memory for large-audience presentations. For more details on page 67. Video performance Video memory is adjustable via the BIOS Setup Utility. If you prefer, you to control the presentation from your audience. You can also connect an external monitor when giving presentations. This computer...
... system sets aside a portion of main memory for large-audience presentations. For more details on page 67. Video performance Video memory is adjustable via the BIOS Setup Utility. If you prefer, you to control the presentation from your audience. You can also connect an external monitor when giving presentations. This computer...
User Manual
Page 37
..."Rear view" on the rear panel of the computer lets you need to contact your dealer. Passwords The user password protects your password! See "BIOS Setup Utility" on page 64 for details on how to secure the lock. Some keyless models are available. a security notch and a password....set with appropriate options enabled, no one can access the computer without entering the correct password. Important: Do not forget your computer and the BIOS Setup Utility from unauthorized access. TMa550.book Page 27 Wednesday, October 3, 2001 10:57 AM 27 Securing your password, you connect a ...
..."Rear view" on the rear panel of the computer lets you need to contact your dealer. Passwords The user password protects your password! See "BIOS Setup Utility" on page 64 for details on how to secure the lock. Some keyless models are available. a security notch and a password....set with appropriate options enabled, no one can access the computer without entering the correct password. Important: Do not forget your computer and the BIOS Setup Utility from unauthorized access. TMa550.book Page 27 Wednesday, October 3, 2001 10:57 AM 27 Securing your password, you connect a ...

User Manual
Page 44
... cut off during Standby mode. See "Taking care of your computer" on page 71. • Eject the PC Card from 10 to this through the BIOS Setup Utility. However, when you are connected to 30 degrees Celsius. The charge-in a cool, dry place.
... cut off during Standby mode. See "Taking care of your computer" on page 71. • Eject the PC Card from 10 to this through the BIOS Setup Utility. However, when you are connected to 30 degrees Celsius. The charge-in a cool, dry place.
User Manual
Page 51
For the location of these ports, see your printer manual. To operate your printer, see "Rear view" on page 7 and "Right view" on page 71 for assistance. See "Others" on page 6. For a parallel printer, plug the printer cable into the parallel port. For a USB printer, connect it to the USB port. Note: If the printer does not function, enter the BIOS Setup Utility and verify that the parallel port is enabled. TMa550.book Page 41 Wednesday, October 3, 2001 10:57 AM 41 Printer This computer supports both parallel and USB printers.
For the location of these ports, see your printer manual. To operate your printer, see "Rear view" on page 7 and "Right view" on page 71 for assistance. See "Others" on page 6. For a parallel printer, plug the printer cable into the parallel port. For a USB printer, connect it to the USB port. Note: If the printer does not function, enter the BIOS Setup Utility and verify that the parallel port is enabled. TMa550.book Page 41 Wednesday, October 3, 2001 10:57 AM 41 Printer This computer supports both parallel and USB printers.

User Manual
Page 58
Note: The system allocates a portion of main memory for details. See "System Devices" on page 67 for video which can be adjusted in the BIOS Setup Utility. TMa550.book Page 48 Wednesday, October 3, 2001 10:57 AM 48 3 Peripherals and options 2 Remove the screws from the memory door (1), slide the ...
Note: The system allocates a portion of main memory for details. See "System Devices" on page 67 for video which can be adjusted in the BIOS Setup Utility. TMa550.book Page 48 Wednesday, October 3, 2001 10:57 AM 48 3 Peripherals and options 2 Remove the screws from the memory door (1), slide the ...
User Manual
Page 71
To learn about the software and utility, make use of the online help provided by the software. TMa550.book Page 61 Wednesday, October 3, 2001 10:57 AM 61 System software The computer comes preloaded with the following software: • Microsoft Windows operating system • Hardware BIOS setup utility • System utilities, drivers and application software Note: To access Windows software applications, click on the application icon to run the selected application. Then click on the Start button and select the application folder.
To learn about the software and utility, make use of the online help provided by the software. TMa550.book Page 61 Wednesday, October 3, 2001 10:57 AM 61 System software The computer comes preloaded with the following software: • Microsoft Windows operating system • Hardware BIOS setup utility • System utilities, drivers and application software Note: To access Windows software applications, click on the application icon to run the selected application. Then click on the Start button and select the application folder.
User Manual
Page 74
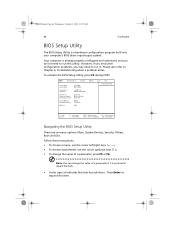
... sub-items. Press Enter to run this item. TMa550.book Page 64 Wednesday, October 3, 2001 10:57 AM 64 5 Software BIOS Setup Utility The BIOS Setup Utility is already properly configured and optimized, and you may need to expand this utility. However, if you encounter configuration problems,... System Devices Security Others System Time: System Date: Floppy Drive: Hard Disk: Quiet Boot: Power on display: LCD Display stretch: System Memory: Extended Memory: BIOS Ver. [11:21:00] [09/11/2001] 1.44MB, 3½" IBM-DJSA-220-(PM) [Enabled] [Auto-Selected] [Enabled] 640 KB 113664 KB...
... sub-items. Press Enter to run this item. TMa550.book Page 64 Wednesday, October 3, 2001 10:57 AM 64 5 Software BIOS Setup Utility The BIOS Setup Utility is already properly configured and optimized, and you may need to expand this utility. However, if you encounter configuration problems,... System Devices Security Others System Time: System Date: Floppy Drive: Hard Disk: Quiet Boot: Power on display: LCD Display stretch: System Memory: Extended Memory: BIOS Ver. [11:21:00] [09/11/2001] 1.44MB, 3½" IBM-DJSA-220-(PM) [Enabled] [Auto-Selected] [Enabled] 640 KB 113664 KB...
User Manual
Page 75
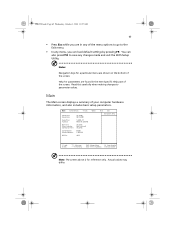
.... Main The Main screen displays a summary of the menu options to go to the Exit menu. • In any changes made and exit the BIOS Setup Utility. Help for reference only. Read this carefully when making changes to save any menu, you are shown on display: LCD Display stretch: System... Memory: Extended Memory: BIOS Ver. [11:21:00] [09/11/2001] 1.44MB, 3½" IBM-DJSA-220-(PM) [Enabled] [Auto-Selected] [Enabled] 640 KB 113664 KB V0.01 Boot...
.... Main The Main screen displays a summary of the menu options to go to the Exit menu. • In any changes made and exit the BIOS Setup Utility. Help for reference only. Read this carefully when making changes to save any menu, you are shown on display: LCD Display stretch: System... Memory: Extended Memory: BIOS Ver. [11:21:00] [09/11/2001] 1.44MB, 3½" IBM-DJSA-220-(PM) [Enabled] [Auto-Selected] [Enabled] 640 KB 113664 KB V0.01 Boot...
User Manual
Page 76
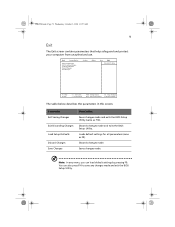
...the image to fill the screen. Description Sets the system time. Options: Enabled or Disabled Shows the amount of extended memory Shows the system BIOS version. Settings in this screen. Determines the way the system boots up. Note: Main memory = system memory + extended memory Options: ...Enabled or Disabled Determines the display device on display LCD Display stretch System Memory Extended Memory BIOS Ver. Parameter System Time System Date Floppy Drive Hard Disk Quiet Boot Power on startup. Format: MM/DD/YYYY (month/day/year) ...
...the image to fill the screen. Description Sets the system time. Options: Enabled or Disabled Shows the amount of extended memory Shows the system BIOS version. Settings in this screen. Determines the way the system boots up. Note: Main memory = system memory + extended memory Options: ...Enabled or Disabled Determines the display device on display LCD Display stretch System Memory Extended Memory BIOS Ver. Parameter System Time System Date Floppy Drive Hard Disk Quiet Boot Power on startup. Format: MM/DD/YYYY (month/day/year) ...

User Manual
Page 79
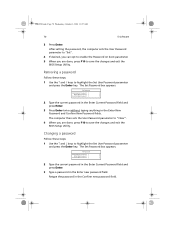
... password: [ ] 2 Type a password in boldface are prompted to enter a password, you may consist of the user password. Retype the password in this password protects the BIOS Setup Utility from unauthorized access during boot up to reset it. Options: Clear or Set Set User Password Press Enter to highlight the Set User...
... password: [ ] 2 Type a password in boldface are prompted to enter a password, you may consist of the user password. Retype the password in this password protects the BIOS Setup Utility from unauthorized access during boot up to reset it. Options: Clear or Set Set User Password Press Enter to highlight the Set User...
User Manual
Page 80
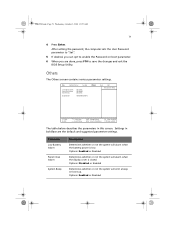
... 4 If desired, you can opt to enable the Password on boot parameter. 5 When you are done, press F10 to save the changes and exit the BIOS Setup Utility. The Set Password box appears: Set Password Enter Current Password [ ] Enter New Password [ ] Confirm New Password [ ] 2 Type the current...field. The computer then sets the User Password parameter to "Clear". 4 When you are done, press F10 to save the changes and exit the BIOS Setup Utility. Removing a password Follow these steps: 1 Use the ↑ and ↓ keys to highlight the Set User Password parameter and ...
... 4 If desired, you can opt to enable the Password on boot parameter. 5 When you are done, press F10 to save the changes and exit the BIOS Setup Utility. The Set Password box appears: Set Password Enter Current Password [ ] Enter New Password [ ] Confirm New Password [ ] 2 Type the current...field. The computer then sets the User Password parameter to "Clear". 4 When you are done, press F10 to save the changes and exit the BIOS Setup Utility. Removing a password Follow these steps: 1 Use the ↑ and ↓ keys to highlight the Set User Password parameter and ...
User Manual
Page 81
... or Enabled Determines whether or not the system will emit a beep on boot parameter. 6 When you can opt to save the changes and exit the BIOS Setup Utility. TMa550.book Page 71 Wednesday, October 3, 2001 10:57 AM 71 4 Press Enter.
... or Enabled Determines whether or not the system will emit a beep on boot parameter. 6 When you can opt to save the changes and exit the BIOS Setup Utility. TMa550.book Page 71 Wednesday, October 3, 2001 10:57 AM 71 4 Press Enter.
User Manual
Page 83
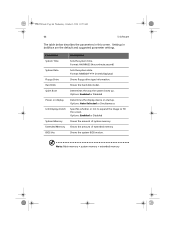
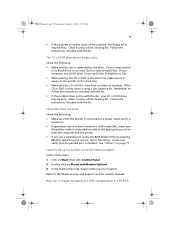
...menu, you can load default settings by pressing F9. Discards changes made . Saves changes made . Discards changes made and exits the BIOS Setup Utility (same as F9). Main System Devices Exit Saving Changes Exit Discarding Changes Load Setup Defaults Discard Changes Save Changes Security ...this screen. Parameter Exit Saving Changes Exit Discarding Changes Load Setup Defaults Discard Changes Save Changes Description Saves changes made and exits the BIOS Setup Utility. Loads default settings for all parameters (same as F10). TMa550.book Page 73 Wednesday, October 3, 2001 10:57 ...
...menu, you can load default settings by pressing F9. Discards changes made . Saves changes made . Discards changes made and exits the BIOS Setup Utility (same as F9). Main System Devices Exit Saving Changes Exit Discarding Changes Load Setup Defaults Discard Changes Save Changes Security ...this screen. Parameter Exit Saving Changes Exit Discarding Changes Load Setup Defaults Discard Changes Save Changes Description Saves changes made and exits the BIOS Setup Utility. Loads default settings for all parameters (same as F10). TMa550.book Page 73 Wednesday, October 3, 2001 10:57 ...
User Manual
Page 89
... lie with the disc, your computer has a DVD drive, it can read CDs but cannot read DVDs in addition to use a parallel port, access the BIOS Setup Utility by the drive. Follow these steps: 1 Click on Start, then click Control Panel. 2 Double-click on both the computer and the printer. •...
... lie with the disc, your computer has a DVD drive, it can read CDs but cannot read DVDs in addition to use a parallel port, access the BIOS Setup Utility by the drive. Follow these steps: 1 Click on Start, then click Control Panel. 2 Double-click on both the computer and the printer. •...

User Manual
Page 91
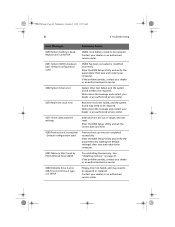
...note the message and take the corrective action. Keyboard controller test failed. Display device mismatch. For more information, see "BIOS Setup Utility" on page 64. Enter the BIOS Setup Utility and verify the parameters (try loading the default settings); Shadow RAM test failed. Extended RAM test failed....your dealer or an authorized service center. Write down the message and contact your dealer or an authorized service center. Enter the BIOS Setup Utility and verify the hard disk is detected. Write down the message and contact your dealer or an authorized service center....
...note the message and take the corrective action. Keyboard controller test failed. Display device mismatch. For more information, see "BIOS Setup Utility" on page 64. Enter the BIOS Setup Utility and verify the parameters (try loading the default settings); Shadow RAM test failed. Extended RAM test failed....your dealer or an authorized service center. Write down the message and contact your dealer or an authorized service center. Enter the BIOS Setup Utility and verify the hard disk is detected. Write down the message and contact your dealer or an authorized service center....
User Manual
Page 92
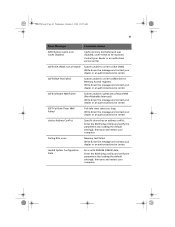
... Corrective Action 0250 System battery is dead Replace and run SETUP Floppy drive test failed, and may need to be repaired. Enter the BIOS Setup Utility and verify the parameters (try loading the default settings); If the problem persists, contact your dealer or an authorized service center... timer test failed, and the system board needs to be repaired or replaced. Write down the message and contact your computer. Enter the BIOS Setup Utility and set the correct date and time. 0280 Previous boot incomplete - See "Installing memory" on page 47. Default configuration used...
... Corrective Action 0250 System battery is dead Replace and run SETUP Floppy drive test failed, and may need to be repaired. Enter the BIOS Setup Utility and verify the parameters (try loading the default settings); If the problem persists, contact your dealer or an authorized service center... timer test failed, and the system board needs to be repaired or replaced. Write down the message and contact your computer. Enter the BIOS Setup Utility and set the correct date and time. 0280 Previous boot incomplete - See "Installing memory" on page 47. Default configuration used...
User Manual
Page 93
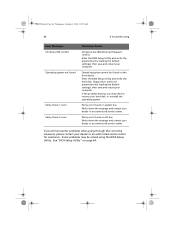
...Non-Maskable Interrupt). device Address Conflict Specific device has an address conflict. Write down the message and contact your computer. Enter the BIOS Setup Utility and verify the parameters (try loading the default settings); cache needs to EISA CMOS. Failing Bits: nnnn Memory test...restart your dealer or an authorized service center. 02F4 EISA CMOS not writeable System unable to write to be replaced. Enter the BIOS Setup Utility and verify the parameters (try loading the default settings); Invalid System Configuration Data Error with NVRAM (CMOS) data. ...
...Non-Maskable Interrupt). device Address Conflict Specific device has an address conflict. Write down the message and contact your computer. Enter the BIOS Setup Utility and verify the parameters (try loading the default settings); cache needs to EISA CMOS. Failing Bits: nnnn Memory test...restart your dealer or an authorized service center. 02F4 EISA CMOS not writeable System unable to write to be replaced. Enter the BIOS Setup Utility and verify the parameters (try loading the default settings); Invalid System Configuration Data Error with NVRAM (CMOS) data. ...
User Manual
Page 94
... found on page 64. then save and restart your dealer or an authorized service center. Operating system cannot be solved using the BIOS Setup Utility. If the problem persists, you still encounter problems after going through the corrective measures, please contact your hard disk, ...or reinstall the operating system. Enter the BIOS Setup Utility and verify the parameters (try loading the default settings); Some problems may need to recover your dealer or an authorized service...
... found on page 64. then save and restart your dealer or an authorized service center. Operating system cannot be solved using the BIOS Setup Utility. If the problem persists, you still encounter problems after going through the corrective measures, please contact your hard disk, ...or reinstall the operating system. Enter the BIOS Setup Utility and verify the parameters (try loading the default settings); Some problems may need to recover your dealer or an authorized service...

User Manual
Page 97
... 640 MB Synchronous Dynamic Random Access Memory (SDRAM) • One 1.25-inch, 144-pin industry-standard soDIMM socket (PC-133) • 512 KB Flash ROM BIOS Data storage • One internal floppy drive (3.5", 1.44 MB) • One E-IDE hard disk (2.5", 9.5mm, UltraDMA-100) • One internal optical drive ...displaying 16.7 million colors at 1400x1050 Super eXtended Graphics Array Plus (SXGA+) resolution • AGP 4X support • Video memory allocation from main memory (BIOS) • Simultaneous LCD and CRT display • S-video (NTSC/PAL) output • DualView support
... 640 MB Synchronous Dynamic Random Access Memory (SDRAM) • One 1.25-inch, 144-pin industry-standard soDIMM socket (PC-133) • 512 KB Flash ROM BIOS Data storage • One internal floppy drive (3.5", 1.44 MB) • One E-IDE hard disk (2.5", 9.5mm, UltraDMA-100) • One internal optical drive ...displaying 16.7 million colors at 1400x1050 Super eXtended Graphics Array Plus (SXGA+) resolution • AGP 4X support • Video memory allocation from main memory (BIOS) • Simultaneous LCD and CRT display • S-video (NTSC/PAL) output • DualView support


