
User Guide
Page 6
...controls may not work by a qualified technician to restore the product to follow these guidelines may also explode if damaged. Failure to normal condition. Short-circuiting the terminals may explode. Do not use any charger or battery that are covered by the operating instructions, since improper adjustment of batteries...8226; The product exhibits a distinct change in performance, indicating a need for its intended purpose. Guidelines for safe battery usage This notebook uses a Lithium-ion battery. Dispose of a new battery is left in hot or cold places, such as household ...
...controls may not work by a qualified technician to restore the product to follow these guidelines may also explode if damaged. Failure to normal condition. Short-circuiting the terminals may explode. Do not use any charger or battery that are covered by the operating instructions, since improper adjustment of batteries...8226; The product exhibits a distinct change in performance, indicating a need for its intended purpose. Guidelines for safe battery usage This notebook uses a Lithium-ion battery. Dispose of a new battery is left in hot or cold places, such as household ...
User Guide
Page 14
... how to use your Acer notebook, we have designed a set of your mobile computing needs. For instructions on such subjects as using your computer Turning your computer can help you use Adobe Reader, access the Help and Support menu. Basic care and tips for using the keyboard and audio, etc. The Quick Guide introduces you to the basic features and functions of guides: First off To turn on TravelMate Generic User Guide will occasionally...
... how to use your Acer notebook, we have designed a set of your mobile computing needs. For instructions on such subjects as using your computer Turning your computer can help you use Adobe Reader, access the Help and Support menu. Basic care and tips for using the keyboard and audio, etc. The Quick Guide introduces you to the basic features and functions of guides: First off To turn on TravelMate Generic User Guide will occasionally...

User Guide
Page 17
... Taking care of your battery pack xvi Cleaning and servicing xvi Touchpad 1 Touchpad basics (for models with separate buttons) 1 Touchpad basics (for models with integrated buttons) 2 Using the keyboard 4 Lock keys and embedded numeric keypad* 4 Hotkeys 5 Windows keys 6 Acer ProShield 8 Overview 8 Setting up ProShield 8 Personal Secure Disk 9 BIOS Settings 10 Credential Manager 10 Data Protection 11 Data Removal 11 Remote Manageability 12 Acer Office Manager 13 Acer Office Manager Console 13 Dashboard 13 Client manager 14 Policies 16 Assets...
... Taking care of your battery pack xvi Cleaning and servicing xvi Touchpad 1 Touchpad basics (for models with separate buttons) 1 Touchpad basics (for models with integrated buttons) 2 Using the keyboard 4 Lock keys and embedded numeric keypad* 4 Hotkeys 5 Windows keys 6 Acer ProShield 8 Overview 8 Setting up ProShield 8 Personal Secure Disk 9 BIOS Settings 10 Credential Manager 10 Data Protection 11 Data Removal 11 Remote Manageability 12 Acer Office Manager 13 Acer Office Manager Console 13 Dashboard 13 Client manager 14 Policies 16 Assets...

User Guide
Page 18
... 27 Recovering your system (USB flash drive) 29 To recover your system 29 Types of recovery 29 Recovering pre-installed software and drivers 29 Returning to a previous system condition 30 Returning your system to its factory condition 31 Acer Backup Manager 33 Power management 34 Battery pack 35 Battery pack characteristics 35 Maximizing the battery's life 35 Installing and removing the battery pack 36 Charging the battery 37 Checking the battery level 37 Optimizing battery life 37 Battery...
... 27 Recovering your system (USB flash drive) 29 To recover your system 29 Types of recovery 29 Recovering pre-installed software and drivers 29 Returning to a previous system condition 30 Returning your system to its factory condition 31 Acer Backup Manager 33 Power management 34 Battery pack 35 Battery pack characteristics 35 Maximizing the battery's life 35 Installing and removing the battery pack 36 Charging the battery 37 Checking the battery level 37 Optimizing battery life 37 Battery...

User Guide
Page 19
Using passwords 43 Entering passwords 44 Setting passwords 44 Expanding through options 45 Connectivity options 45 Fax/data modem 45 Built-in network feature 46 Universal Serial Bus (USB) 46 IEEE 1394 port 47 High-Definition Multimedia Interface 47 ExpressCard 48 Installing memory 49 BIOS utility 51 Boot sequence 51 Enable disk-to RF fields (RSS-102) 63 LCD panel ergonomic specifications 64 Low-power license-exempt radio communication devices (RSS-210) 63 Exposure of humans...
Using passwords 43 Entering passwords 44 Setting passwords 44 Expanding through options 45 Connectivity options 45 Fax/data modem 45 Built-in network feature 46 Universal Serial Bus (USB) 46 IEEE 1394 port 47 High-Definition Multimedia Interface 47 ExpressCard 48 Installing memory 49 BIOS utility 51 Boot sequence 51 Enable disk-to RF fields (RSS-102) 63 LCD panel ergonomic specifications 64 Low-power license-exempt radio communication devices (RSS-210) 63 Exposure of humans...
User Guide
Page 22
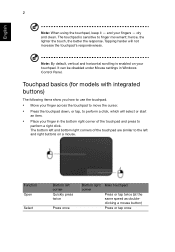
The touchpad is enabled on a mouse. Touchpad basics (for models with integrated buttons) The following items show you how to use the touchpad. • Move your touchpad. The bottom left and bottom right corners of the touchpad and press to perform a click, which will not increase the touchpad's responsiveness. It can be disabled under Mouse settings in the bottom right corner of the touchpad are similar...
The touchpad is enabled on a mouse. Touchpad basics (for models with integrated buttons) The following items show you how to use the touchpad. • Move your touchpad. The bottom left and bottom right corners of the touchpad and press to perform a click, which will not increase the touchpad's responsiveness. It can be disabled under Mouse settings in the bottom right corner of the touchpad are similar...

User Guide
Page 24
... work with the arithmetic operators +, -, *, and /). The keys function as a calculator (complete with some applications. Hold while using cursor-control keys. The embedded numeric keypad functions like a desktop numeric keypad. Num Lock off . It is on, all alphabetic characters typed are not printed on Type numbers in a normal manner. * only for certain models Desired access Number keys on embedded keypad Cursor-control keys on embedded keypad Main keyboard keys Num Lock...
... work with the arithmetic operators +, -, *, and /). The keys function as a calculator (complete with some applications. Hold while using cursor-control keys. The embedded numeric keypad functions like a desktop numeric keypad. Num Lock off . It is on, all alphabetic characters typed are not printed on Type numbers in a normal manner. * only for certain models Desired access Number keys on embedded keypad Cursor-control keys on embedded keypad Main keyboard keys Num Lock...

User Guide
Page 25
... models). Touchpad toggle Turns the built-in touchpad on or off to return. Speaker toggle Turns the speakers on and off . Press any key to save power. Increases the sound volume. To activate hotkeys, press and hold the key before pressing the other key in Sleep mode. Hotkey + + + + + + Icon Function Description Communication key Enables / disables the computer's communication devices. (Communication devices may vary by configuration.) Sleep Puts the computer in the hotkey combination. Increases the screen brightness. + < > + < > Brightness...
... models). Touchpad toggle Turns the built-in touchpad on or off to return. Speaker toggle Turns the speakers on and off . Press any key to save power. Increases the sound volume. To activate hotkeys, press and hold the key before pressing the other key in Sleep mode. Hotkey + + + + + + Icon Function Description Communication key Enables / disables the computer's communication devices. (Communication devices may vary by configuration.) Sleep Puts the computer in the hotkey combination. Increases the screen brightness. + < > + < > Brightness...

User Guide
Page 26
... < > + : Open Ease of Access Center < > + : Open Windows Mobility Center < > + : Display System Properties < > + : Restore minimized windows < > + : Cycle through programs on the taskbar by using Windows Flip 3-D < > + : Bring all gadgets to the front and select Windows Sidebar + < > + : Search for network computers + < > + : Use the arrow keys to cycle through open programs using Windows Flip 3-D 6 Hotkey + < > Icon Function Volume down Description Decreases the sound volume. English Windows keys The keyboard has two keys that perform Windows-specific functions. Key Windows key...
... < > + : Open Ease of Access Center < > + : Open Windows Mobility Center < > + : Display System Properties < > + : Restore minimized windows < > + : Cycle through programs on the taskbar by using Windows Flip 3-D < > + : Bring all gadgets to the front and select Windows Sidebar + < > + : Search for network computers + < > + : Use the arrow keys to cycle through open programs using Windows Flip 3-D 6 Hotkey + < > Icon Function Volume down Description Decreases the sound volume. English Windows keys The keyboard has two keys that perform Windows-specific functions. Key Windows key...

User Guide
Page 30
You can set the BIOS Supervisor and User passwords, enable or disable password checking at bootup, and add an Asset Tag for the device. English 10 BIOS Settings Here you can set and manage your ProShield and Windows passwords, manage online account information, and back up or restore credential information. You can change your credentials, including Pre-boot authentication. Credential Manager Here you can also set the boot device order, enable or disable ports and built-in devices, and import or export BIOS settings.
You can set the BIOS Supervisor and User passwords, enable or disable password checking at bootup, and add an Asset Tag for the device. English 10 BIOS Settings Here you can set and manage your ProShield and Windows passwords, manage online account information, and back up or restore credential information. You can change your credentials, including Pre-boot authentication. Credential Manager Here you can also set the boot device order, enable or disable ports and built-in devices, and import or export BIOS settings.
User Guide
Page 45
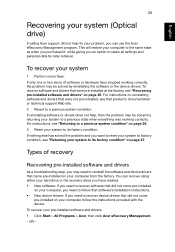
... software's installation instructions. • New device drivers: If you can recover using either your hard drive or the recovery discs you have stopped working correctly. To recover software and drivers that product's documentation or technical support Web site. 2 Revert to a previous system condition. You can use the Acer eRecovery Management program. If only one or two items of recovery Recovering pre-installed software and drivers As a troubleshooting step, you an option to its factory condition. Types of software or hardware have created...
... software's installation instructions. • New device drivers: If you can recover using either your hard drive or the recovery discs you have stopped working correctly. To recover software and drivers that product's documentation or technical support Web site. 2 Revert to a previous system condition. You can use the Acer eRecovery Management program. If only one or two items of recovery Recovering pre-installed software and drivers As a troubleshooting step, you an option to its factory condition. Types of software or hardware have created...
User Guide
Page 47
... on your recovery discs" on your computer. If you have installed a replacement hard drive, see "Recovering from within Windows To reinstall Windows and all pre-installed software and drivers: Click Start > All Programs > Acer, then click Acer eRecovery Management. Click the Restore tab, then Restore Operating System to . Follow the onscreen prompts for first-time system setup. A dialog box will display information about the hard drive that the operating system will be recovered to Factory Defaults. Click...
... on your recovery discs" on your computer. If you have installed a replacement hard drive, see "Recovering from within Windows To reinstall Windows and all pre-installed software and drivers: Click Start > All Programs > Acer, then click Acer eRecovery Management. Click the Restore tab, then Restore Operating System to . Follow the onscreen prompts for first-time system setup. A dialog box will display information about the hard drive that the operating system will be recovered to Factory Defaults. Click...
User Guide
Page 48
... to change this line may start from, such as the hard drive or an optical disc. 3 Use your computer, then press + during startup To reinstall Windows and all pre-installed software and drivers: 1 Turn on your arrow keys to select the line CDROM/DVD (this setting to Enabled. Use the left or right arrow keys to select the Main menu. The boot menu allows you inserted. 4 Insert the second recovery disc when prompted...
... to change this line may start from, such as the hard drive or an optical disc. 3 Use your computer, then press + during startup To reinstall Windows and all pre-installed software and drivers: 1 Turn on your arrow keys to select the line CDROM/DVD (this setting to Enabled. Use the left or right arrow keys to select the Main menu. The boot menu allows you inserted. 4 Insert the second recovery disc when prompted...

User Guide
Page 49
... (USB flash drive) If calling Acer support did not come pre-installed on your computer, you need to follow the instructions provided with the device. This will restore your system 1 Perform minor fixes. To recover your computer to a previous system condition" on page 30. 3 Reset your pre-installed software and drivers: 1 Click Start > All Programs > Acer, then click Acer eRecovery Management. - If only one or two items of recovery Recovering pre-installed software and drivers...
... (USB flash drive) If calling Acer support did not come pre-installed on your computer, you need to follow the instructions provided with the device. This will restore your system 1 Perform minor fixes. To recover your computer to a previous system condition" on page 30. 3 Reset your pre-installed software and drivers: 1 Click Start > All Programs > Acer, then click Acer eRecovery Management. - If only one or two items of recovery Recovering pre-installed software and drivers...
User Guide
Page 51
... system setup. Your system is still working, see "Recovering from your recovery backup" on your hard drive, back them up now. This process may take several minutes, and may take a while, the Acer eRecovery Management screen displays the progress. If you can still run Windows and your original hard drive is restored using either your system to . If you can reinstall using the restore point you have installed a replacement hard drive, see "Recovering...
... system setup. Your system is still working, see "Recovering from your recovery backup" on your hard drive, back them up now. This process may take several minutes, and may take a while, the Acer eRecovery Management screen displays the progress. If you can still run Windows and your original hard drive is restored using either your system to . If you can reinstall using the restore point you have installed a replacement hard drive, see "Recovering...
User Guide
Page 52
... must enable the F12 Boot Menu: Press when starting your computer. Warning: Continuing the process will install from the recovery backup on the USB flash drive. 4 Follow the onscreen prompts to select the Exit menu. Recovering from your recovery backup To reinstall Windows and all pre-installed software and drivers: 1 Plug in the USB flash drive and turn on your hard drive. English 32 Recovering from the hard drive during startup To reinstall Windows and all pre-installed software and drivers: 1 Turn on...
... must enable the F12 Boot Menu: Press when starting your computer. Warning: Continuing the process will install from the recovery backup on the USB flash drive. 4 Follow the onscreen prompts to select the Exit menu. Recovering from your recovery backup To reinstall Windows and all pre-installed software and drivers: 1 Plug in the USB flash drive and turn on your hard drive. English 32 Recovering from the hard drive during startup To reinstall Windows and all pre-installed software and drivers: 1 Turn on...

User Guide
Page 59
... the display cover to consider when moving within the building. Disconnecting from the desktop Follow these steps to disconnect your computer from external accessories: 1 Save any open files. 2 Remove any media, floppy disks or compact disks from the drive(s). 3 Shut down the computer: Click Start then click Shut Down. You can put the computer in Sleep mode. English 39 Taking your notebook PC...
... the display cover to consider when moving within the building. Disconnecting from the desktop Follow these steps to disconnect your computer from external accessories: 1 Save any open files. 2 Remove any media, floppy disks or compact disks from the drive(s). 3 Shut down the computer: Click Start then click Shut Down. You can put the computer in Sleep mode. English 39 Taking your notebook PC...
User Guide
Page 71
... need to -disk recovery (hard disk recovery), activate the BIOS utility, then select Main from the categories listed at the bottom of the screen. Find D2D Recovery at the top of the screen. Enable disk-to-disk recovery To enable disk-to run it. Your computer is being displayed. However, if you encounter configuration problems, you do not need to set this feature. Boot sequence To set a password on boot: and use the and keys to run this utility. Password To set the boot...
... need to -disk recovery (hard disk recovery), activate the BIOS utility, then select Main from the categories listed at the bottom of the screen. Find D2D Recovery at the top of the screen. Enable disk-to-disk recovery To enable disk-to run it. Your computer is being displayed. However, if you encounter configuration problems, you do not need to set this feature. Boot sequence To set a password on boot: and use the and keys to run this utility. Password To set the boot...

User Guide
Page 73
... use the volume control buttons to recharge the battery pack. • Make sure that may be muted. Connect the AC adapter to adjust the volume. • If headphones, earphones or external speakers are provided for each one. If pressing a key does not turn off. Press + < > (increase) to adjust the brightness level. • The display device might be set to the line-out port on . Easy solutions are connected to an external monitor...
... use the volume control buttons to recharge the battery pack. • Make sure that may be muted. Connect the AC adapter to adjust the volume. • If headphones, earphones or external speakers are provided for each one. If pressing a key does not turn off. Press + < > (increase) to adjust the brightness level. • The display device might be set to the line-out port on . Easy solutions are connected to an external monitor...
User Guide
Page 74
... original settings without turning on . • Make sure that is Enabled. 3 Exit the BIOS utility and save changes. To start the recovery process: 1 Restart the system. 2 While the Acer logo is showing, press + at the same time to enter the recovery process. 3 Refer to the onscreen instructions to -disk recovery is enabled or not. 2 Make sure the D2D Recovery setting in Main is installed when you restore the C: drive with the original software...
... original settings without turning on . • Make sure that is Enabled. 3 Exit the BIOS utility and save changes. To start the recovery process: 1 Restart the system. 2 While the Acer logo is showing, press + at the same time to enter the recovery process. 3 Refer to the onscreen instructions to -disk recovery is enabled or not. 2 Make sure the D2D Recovery setting in Main is installed when you restore the C: drive with the original software...


