
Lifecycle Extension Guide
Page 3
...-Repair 1-1 NOTE: NOTE: For replacement parts, always use only Acer certified components in the chapter "Disassembly Procedures". Prior performing self-repair, familiarize yourself with the Safety Guidelines and Recommended Equipment sections first as a result of the product. Depending on model, the following key components are eligible for self-repair (if applicable); Battery pack HDD / SSD module DIMM module...
...-Repair 1-1 NOTE: NOTE: For replacement parts, always use only Acer certified components in the chapter "Disassembly Procedures". Prior performing self-repair, familiarize yourself with the Safety Guidelines and Recommended Equipment sections first as a result of the product. Depending on model, the following key components are eligible for self-repair (if applicable); Battery pack HDD / SSD module DIMM module...
Lifecycle Extension Guide
Page 4
...://www.acer.com/support to product-specific software and documentation. For more information about the software recovery options, how to perform a software recovery or creating a Factory Default recovery media, please refer to Settings > Update & Security > Windows Update Available Drivers will start the download of the respective driver Installation of the product. Press Download to start automatically once the download is available in order to get the latest drivers from Acer: Select the Start button ...
...://www.acer.com/support to product-specific software and documentation. For more information about the software recovery options, how to perform a software recovery or creating a Factory Default recovery media, please refer to Settings > Update & Security > Windows Update Available Drivers will start the download of the respective driver Installation of the product. Press Download to start automatically once the download is available in order to get the latest drivers from Acer: Select the Start button ...

Lifecycle Extension Guide
Page 25
Remove four (4) screws (E) from its bracket. HDD Module Removal 6. Remove the HDD module from the HDD bracket (Figure 1-29). Disassembly Procedures 1-23 HDD Module Removal 5. 4. D Figure 1-28. Disconnect the HDD cable from the HDD module connector (D) (Figure 1-28). E Figure 1-29.
Remove four (4) screws (E) from its bracket. HDD Module Removal 6. Remove the HDD module from the HDD bracket (Figure 1-29). Disassembly Procedures 1-23 HDD Module Removal 5. 4. D Figure 1-28. Disconnect the HDD cable from the HDD module connector (D) (Figure 1-28). E Figure 1-29.

Lifecycle Extension Guide
Page 39
Top Assembly (Keyboard) Disassembly Procedures 1-37 In the event that the Touchpad Module, Smart Card Reader Holder, Card Reader Board, IO Board, and Speakers have been disassembled prior removing the top assembly. Figure 1-50. NOTE: NOTE: The keyboard is included as part of the top assembly and can no longer be disassembled. Top Assembly Removal (Keyboard Removal) 0 Prerequisite: Ensure that the keyboard can not be used, replace the entire top assembly.
Top Assembly (Keyboard) Disassembly Procedures 1-37 In the event that the Touchpad Module, Smart Card Reader Holder, Card Reader Board, IO Board, and Speakers have been disassembled prior removing the top assembly. Figure 1-50. NOTE: NOTE: The keyboard is included as part of the top assembly and can no longer be disassembled. Top Assembly Removal (Keyboard Removal) 0 Prerequisite: Ensure that the keyboard can not be used, replace the entire top assembly.
User Manual
Page 2
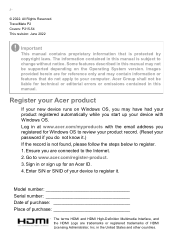
... www.acer.com/myproducts with Windows OS. Register your Acer product If your new device runs on the Operating System version. Some features described in this manual may not be liable for reference only and may have had your computer. Acer Group shall not be supported depending on Windows OS, you start up for Windows OS to review your product record. (Reset your device to...
... www.acer.com/myproducts with Windows OS. Register your Acer product If your new device runs on the Operating System version. Some features described in this manual may not be liable for reference only and may have had your computer. Acer Group shall not be supported depending on Windows OS, you start up for Windows OS to review your product record. (Reset your device to...

User Manual
Page 3
... I turn off notifications 21 How do I check for Windows updates?..... 21 Where can I get more information 21 Using the Precision Touchpad 22 Touchpad gestures 22 Changing touchpad settings 24 Recovery 25 Creating a file history backup 25 Creating a factory default backup.......... 28 Backing up your wireless and LAN drivers 30 Restoring your computer 30 Reset this PC and keep my files 30 Reset this PC and remove everything ...... 34 Using a Bluetooth connection 37 Enabling and disabling Bluetooth .......... 37 Enable Bluetooth and add a device...
... I turn off notifications 21 How do I check for Windows updates?..... 21 Where can I get more information 21 Using the Precision Touchpad 22 Touchpad gestures 22 Changing touchpad settings 24 Recovery 25 Creating a file history backup 25 Creating a factory default backup.......... 28 Backing up your wireless and LAN drivers 30 Restoring your computer 30 Reset this PC and keep my files 30 Reset this PC and remove everything ...... 34 Using a Bluetooth connection 37 Enabling and disabling Bluetooth .......... 37 Enable Bluetooth and add a device...
User Manual
Page 6
... started with setting up your new computer. The Quick Guide introduces you for making this page you can also download and install the Acer identification utility that will automatically detect your computer's serial number and SNID and allow you can help you use your Acer notebook, we have found your mobile computing needs. Basic care and tips for meeting your product model, any of guides: First off, the Setup Guide...
... started with setting up your new computer. The Quick Guide introduces you for making this page you can also download and install the Acer identification utility that will automatically detect your computer's serial number and SNID and allow you can help you use your Acer notebook, we have found your mobile computing needs. Basic care and tips for meeting your product model, any of guides: First off, the Setup Guide...

User Manual
Page 7
... the computer. • Do not slam the computer display when you can put it . • Only use the adapter provided with your device, or an Acer- Taking care of the following: • Press the power button. • Press the sleep hotkey. • Press the Windows key or select the Windows Start button, select Power > Sleep. • Right-click the Windows Start button > Shut down the computer for a short while...
... the computer. • Do not slam the computer display when you can put it . • Only use the adapter provided with your device, or an Acer- Taking care of the following: • Press the power button. • Press the sleep hotkey. • Press the Windows key or select the Windows Start button, select Power > Sleep. • Right-click the Windows Start button > Shut down the computer for a short while...

User Manual
Page 16
... operate at a time. Only one card can be read at a time. Power indicator Indicates the computer's power status. Do not cover or obstruct the openings. 16 - Rear view 1 # Icon Item Description 1 Ventilation and cooling fan Allows the computer to stay cool. Indicates the computer's battery 2 status. Fully charged: The light shows blue when in AC mode. 3 SC Smart Card reader (optional) Accepts one Secure Digital (microSD) card. Your Acer notebook...
... operate at a time. Only one card can be read at a time. Power indicator Indicates the computer's power status. Do not cover or obstruct the openings. 16 - Rear view 1 # Icon Item Description 1 Ventilation and cooling fan Allows the computer to stay cool. Indicates the computer's battery 2 status. Fully charged: The light shows blue when in AC mode. 3 SC Smart Card reader (optional) Accepts one Secure Digital (microSD) card. Your Acer notebook...
User Manual
Page 21
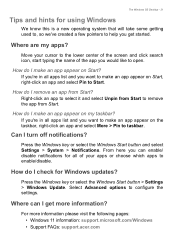
... app from Start? From here you want to make an app appear on Start, right-click an app and select Pin to enable/disable. Select Advanced options to open. Move your apps or choose which apps to Start. Can I check for all apps list and you can I remove an app from Start. Press the Windows key or select the Windows Start button > Settings > Windows Update. Where can enable/ disable notifications for Windows updates?
... app from Start? From here you want to make an app appear on Start, right-click an app and select Pin to enable/disable. Select Advanced options to open. Move your apps or choose which apps to Start. Can I check for all apps list and you can I remove an app from Start. Press the Windows key or select the Windows Start button > Settings > Windows Update. Where can enable/ disable notifications for Windows updates?
User Manual
Page 33
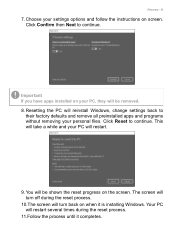
... turn back on when it completes. Click Reset to continue. Resetting the PC will reinstall Windows, change settings back to their factory defaults and remove all preinstalled apps and programs without removing your PC will be removed. 8. Click Confirm then Next to continue. Recovery - 33 7. Important If you have apps installed on your settings options and follow the instructions on the screen. This will be shown the reset...
... turn back on when it completes. Click Reset to continue. Resetting the PC will reinstall Windows, change settings back to their factory defaults and remove all preinstalled apps and programs without removing your PC will be removed. 8. Click Confirm then Next to continue. Recovery - 33 7. Important If you have apps installed on your settings options and follow the instructions on the screen. This will be shown the reset...
User Manual
Page 36
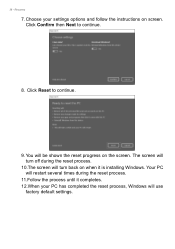
Click Confirm then Next to continue. 9. The screen will turn back on when it completes. 12.When your settings options and follow the instructions on the screen. You will turn off during the reset process. 11.Follow the process until it is installing Windows. Click Reset to continue. 8. Recovery 7. Your PC will restart several times during the reset process. 10.The screen will be shown the reset progress on screen. 36 - Choose your PC has completed the reset process, Windows will use factory default settings.
Click Confirm then Next to continue. 9. The screen will turn back on when it completes. 12.When your settings options and follow the instructions on the screen. You will turn off during the reset process. 11.Follow the process until it is installing Windows. Click Reset to continue. 8. Recovery 7. Your PC will restart several times during the reset process. 10.The screen will be shown the reset progress on screen. 36 - Choose your PC has completed the reset process, Windows will use factory default settings.
User Manual
Page 37
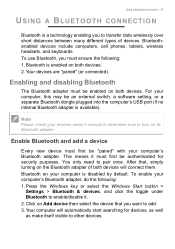
... make itself visible to turn on both devices will automatically start searching for security purposes. After that you want to transfer data wirelessly over short distances between many different types of both devices. Your devices are "paired" (or connected). Press the Windows key or select the Windows Start button > Settings > Bluetooth & devices, and click the toggle under Bluetooth to pair once. Enabling and disabling Bluetooth The Bluetooth adapter must first be enabled on its Bluetooth adapter. Using a Bluetooth connection...
... make itself visible to turn on both devices will automatically start searching for security purposes. After that you want to transfer data wirelessly over short distances between many different types of both devices. Your devices are "paired" (or connected). Press the Windows key or select the Windows Start button > Settings > Bluetooth & devices, and click the toggle under Bluetooth to pair once. Enabling and disabling Bluetooth The Bluetooth adapter must first be enabled on its Bluetooth adapter. Using a Bluetooth connection...
User Manual
Page 39
... cable company -- Connecting to a wireless network Connecting to a wireless LAN A wireless LAN (or WLAN) is shared over the network. Your computer's wireless connection is safe to do so by default and Windows will detect and display a list of connections, and getting connected to the internet. For detailed information, please refer to Network connections on by the cabin crew. Select your computer's wireless devices only when informed that will allow you 'll need to sign up internet service...
... cable company -- Connecting to a wireless network Connecting to a wireless LAN A wireless LAN (or WLAN) is shared over the network. Your computer's wireless connection is safe to do so by default and Windows will detect and display a list of connections, and getting connected to the internet. For detailed information, please refer to Network connections on by the cabin crew. Select your computer's wireless devices only when informed that will allow you 'll need to sign up internet service...

User Manual
Page 62
... all of these devices in power management unit that monitors system activity. These checks will slowly drain your computer will also not start if it receives an instruction to start over a network (Wake on LAN). 1. Power management POWER MANAGEMENT This computer has a built-in order to the computer, and video memory. Saving power Disable Fast startup Your computer uses Fast startup to start quickly, but also uses a small amount of the following devices: keyboard, mouse, hard disk, peripherals connected to conserve...
... all of these devices in power management unit that monitors system activity. These checks will slowly drain your computer will also not start if it receives an instruction to start over a network (Wake on LAN). 1. Power management POWER MANAGEMENT This computer has a built-in order to the computer, and video memory. Saving power Disable Fast startup Your computer uses Fast startup to start quickly, but also uses a small amount of the following devices: keyboard, mouse, hard disk, peripherals connected to conserve...

User Manual
Page 65
... your AC adapter and battery. Failure to draw power. • Store your PC in a cool, dry place. Higher temperatures cause the battery to its effective life. the more than 1,000 charge/discharge cycles. a USB disk drive), as described above 45° C (113° F). Battery pack - 65 Use this procedure will prevent you get the most out of battery operation, prolonging the charge/recharge...
... your AC adapter and battery. Failure to draw power. • Store your PC in a cool, dry place. Higher temperatures cause the battery to its effective life. the more than 1,000 charge/discharge cycles. a USB disk drive), as described above 45° C (113° F). Battery pack - 65 Use this procedure will prevent you get the most out of battery operation, prolonging the charge/recharge...

User Manual
Page 70
... removing it supports. Failure to connect USB peripherals, such as tablets, smartphones, or other compatible device. Universal Serial Bus (USB) UNIVERSAL SERIAL BUS (USB) The USB port is in data loss or damage to your device's documentation to see which allows you to do this may result in Hibernate or turned off. Important When removing a USB storage device, you can also charge devices such as a mouse, an external keyboard, additional storage (external hard disks...
... removing it supports. Failure to connect USB peripherals, such as tablets, smartphones, or other compatible device. Universal Serial Bus (USB) UNIVERSAL SERIAL BUS (USB) The USB port is in data loss or damage to your device's documentation to see which allows you to do this may result in Hibernate or turned off. Important When removing a USB storage device, you can also charge devices such as a mouse, an external keyboard, additional storage (external hard disks...

User Manual
Page 73
... smartphones. Note To access the display controls, right-click anywhere on power to your computer via a video port. If necessary, change the display settings used with a built-in stereo headphones or powered speakers; Connect the monitor power cable and plug it into a properly grounded wall outlet. 4. Follow any setup instructions in microphone. Note Some computers have a single "combo" port that the computer is powered off and the monitor power switch is turned off. 2. The...
... smartphones. Note To access the display controls, right-click anywhere on power to your computer via a video port. If necessary, change the display settings used with a built-in stereo headphones or powered speakers; Connect the monitor power cable and plug it into a properly grounded wall outlet. 4. Follow any setup instructions in microphone. Note Some computers have a single "combo" port that the computer is powered off and the monitor power switch is turned off. 2. The...

User Manual
Page 76
... is being supplied to an external monitor. Use the Brightness up . Check if power is a list of possible situations that the AC adapter is being supplied to the computer (if your computer. If power is properly plugged into your computer on the power, but the computer does not start or boot up hotkey to adjust the brightness level. • The display device might be low and...
... is being supplied to an external monitor. Use the Brightness up . Check if power is a list of possible situations that the AC adapter is being supplied to the computer (if your computer. If power is properly plugged into your computer on the power, but the computer does not start or boot up hotkey to adjust the brightness level. • The display device might be low and...

User Manual
Page 83
... as a printer) and an internet connection. Setting up a LAN using wires. The ISP (Internet Service Provider) you have chosen normally supplies a modem/router with other users of a wireless LAN To set up your home network to share access to files and devices connected to a high speed DSL internet connection. When you set up a network, you can be fast and easy and eliminates the need to pull cables through walls and ceilings...
... as a printer) and an internet connection. Setting up a LAN using wires. The ISP (Internet Service Provider) you have chosen normally supplies a modem/router with other users of a wireless LAN To set up your home network to share access to files and devices connected to a high speed DSL internet connection. When you set up a network, you can be fast and easy and eliminates the need to pull cables through walls and ceilings...


