

TravelMate C210 Service Guide
Page 7
... Specifications 1 Features 1 System Block Diagram 3 Board Layout 4 Top View 4 Bottom View 5 A TravelMate Tour 7 Top View 7 Open front view 8 Closed front view 8 Left view 9 Right view ...Acer eNet Management (for selected models 20 Acer ePower Management 22 Acer ePresentation Management 24 Acer eDataSecurity Management (for selected models 25 Acer eLock Management 27 Acer eRecovery Management 28 Acer eSettings Management 29 Acer ePerformance Management 29 Hardware Specifications and Configurations 31 Chapter 2 System Utilities 35 BIOS Setup Utility 41 Navigating the BIOS...
... Specifications 1 Features 1 System Block Diagram 3 Board Layout 4 Top View 4 Bottom View 5 A TravelMate Tour 7 Top View 7 Open front view 8 Closed front view 8 Left view 9 Right view ...Acer eNet Management (for selected models 20 Acer ePower Management 22 Acer ePresentation Management 24 Acer eDataSecurity Management (for selected models 25 Acer eLock Management 27 Acer eRecovery Management 28 Acer eSettings Management 29 Acer ePerformance Management 29 Hardware Specifications and Configurations 31 Chapter 2 System Utilities 35 BIOS Setup Utility 41 Navigating the BIOS...
TravelMate C210 Service Guide
Page 25
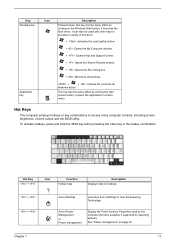
...before pressing the other keys to access many computer controls, including screen brightness, volume output and the BIOS utility. See "Power management" on hotkeys. + + Acer eSettings Launches Acer eSettings in the hotkey combination. it launches the Start menu. Hot Key + Icon Function Hotkey ...help Description Displays help on page 25. Acer ePower Management or Power management Display the Power Options Properties used with other key in Acer Empowering Technology. It can also be used by the computer (function available if ...
...before pressing the other keys to access many computer controls, including screen brightness, volume output and the BIOS utility. See "Power management" on hotkeys. + + Acer eSettings Launches Acer eSettings in the hotkey combination. it launches the Start menu. Hot Key + Icon Function Hotkey ...help Description Displays help on page 25. Acer ePower Management or Power management Display the Power Options Properties used with other key in Acer Empowering Technology. It can also be used by the computer (function available if ...
TravelMate C210 Service Guide
Page 40
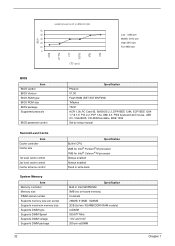
...rpm 50 40 30 20 10 0 CPU speed Low : 3380 rpm Middle: 3910 rpm High:4510 rpm Full:4800 rpm BIOS Item BIOS vendor BIOS Version BIOS ROM type BIOS ROM size BIOS package Supported protocols BIOS password control Specification Phoenix V1.00 Flash ROM (SST SST39VF080) 1Mbytes TSOP ACPI 1.0b,PC Card 95, SM... BIOS 2.3, EPP/IEEE 1284, ECP/IEEE 1284 1.7 & 1.9, PCI 2.2, PnP 1.0a, DMI 2.0, PS/2 keyboard and mouse, USB 2.0, VGA BIOS, CD-ROM bootable, IEEE 1394 Set by setup manual Second Level Cache Item Cache controller Cache...
...rpm 50 40 30 20 10 0 CPU speed Low : 3380 rpm Middle: 3910 rpm High:4510 rpm Full:4800 rpm BIOS Item BIOS vendor BIOS Version BIOS ROM type BIOS ROM size BIOS package Supported protocols BIOS password control Specification Phoenix V1.00 Flash ROM (SST SST39VF080) 1Mbytes TSOP ACPI 1.0b,PC Card 95, SM... BIOS 2.3, EPP/IEEE 1284, ECP/IEEE 1284 1.7 & 1.9, PCI 2.2, PnP 1.0a, DMI 2.0, PS/2 keyboard and mouse, USB 2.0, VGA BIOS, CD-ROM bootable, IEEE 1394 Set by setup manual Second Level Cache Item Cache controller Cache...

TravelMate C210 Service Guide
Page 45
... Four-in-one card reader Trackpoint Keyboard Item Keyboard controller Keyboard vendor & model name Total number of keypads Windows logo key Specification Enable/Disable by BIOS Setup TI 7411 IEEE 1394 1.0 1 Right side IEEE 1394 Specification TI PC7411 Type-II One type-II Left panel No ZV support Yes (IRQ10) Specification...
... Four-in-one card reader Trackpoint Keyboard Item Keyboard controller Keyboard vendor & model name Total number of keypads Windows logo key Specification Enable/Disable by BIOS Setup TI 7411 IEEE 1394 1.0 1 Right side IEEE 1394 Specification TI PC7411 Type-II One type-II Left panel No ZV support Yes (IRQ10) Specification...
TravelMate C210 Service Guide
Page 47
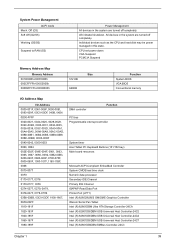
... power down VGA Suspend PCMCIA Suspend Memory Address Map Memory Address 00100000h-000F0000h 000CFFFFh-000C0000h 00009FFFFh-00000000h 512 KB 640KB Size Function System BIOS VGA BIOS Conventional memory I/O Address Map I/O Address 0000-001F, 0081-008F, 0090-0091, 0093-009F, 00C0-00DF, 040B, 04D6 0D00-FFFF...06F8-06FF 1810-181F 1820-183F 1840-185F 1860-187F 1880-189F DMA controller Function PCI bus Programmable interrupt controller System timer Acer Tablet PC Keyboard Buttons (101/102 key) Main board resources Microsoft ACPI-Compliant Embedded Controller System CMOS/real time clock Numeric...
... power down VGA Suspend PCMCIA Suspend Memory Address Map Memory Address 00100000h-000F0000h 000CFFFFh-000C0000h 00009FFFFh-00000000h 512 KB 640KB Size Function System BIOS VGA BIOS Conventional memory I/O Address Map I/O Address 0000-001F, 0081-008F, 0090-0091, 0093-009F, 00C0-00DF, 040B, 04D6 0D00-FFFF...06F8-06FF 1810-181F 1820-183F 1840-185F 1860-187F 1880-189F DMA controller Function PCI bus Programmable interrupt controller System timer Acer Tablet PC Keyboard Buttons (101/102 key) Main board resources Microsoft ACPI-Compliant Embedded Controller System CMOS/real time clock Numeric...

TravelMate C210 Service Guide
Page 49
... Utility is already properly configured and optimized, and you may need to run this menu, user can change boot device without entering BIOS SETUP Utility. Press m to enter multi-boot menu. Chapter 2 41 Please also refer to enter Setup" message is prompted on the ...bottom of screen). In this utility. To activate the BIOS Utility, press m during POST to enter setup. Your computer is a hardware configuration program built into your computer's BIOS (Basic Input/ Output System). However, if you encounter configuration problems, you do not ...
... Utility is already properly configured and optimized, and you may need to run this menu, user can change boot device without entering BIOS SETUP Utility. Press m to enter multi-boot menu. Chapter 2 41 Please also refer to enter Setup" message is prompted on the ...bottom of screen). In this utility. To activate the BIOS Utility, press m during POST to enter setup. Your computer is a hardware configuration program built into your computer's BIOS (Basic Input/ Output System). However, if you encounter configuration problems, you do not ...

TravelMate C210 Service Guide
Page 50
T A plus sign (+) indicates the item has sub-items. Press e to expand this carefully when making changes to parameter values. Navigating the BIOS Utility There are shown on the bottom of the screen. Follow these instructions: T To choose a menu, use the cursor up/down keys ( wy). This menu ..., use the cursor left/right keys (zx). T Press ^ while you are found in square brackets. Read this item. T In any changes made and exit the BIOS Setup Utility. T To change the value of the system. 42 Chapter 2 You can change the value of the menu options to go to save any...
T A plus sign (+) indicates the item has sub-items. Press e to expand this carefully when making changes to parameter values. Navigating the BIOS Utility There are shown on the bottom of the screen. Follow these instructions: T To choose a menu, use the cursor up/down keys ( wy). This menu ..., use the cursor left/right keys (zx). T Press ^ while you are found in square brackets. Read this item. T In any changes made and exit the BIOS Setup Utility. T To change the value of the system. 42 Chapter 2 You can change the value of the menu options to go to save any...

TravelMate C210 Service Guide
Page 54
...Enter] [Enter] [Enabled] Boot Exit Item Specific Help Supervisor Password controls accesses of the Supervisor password Press Enter to set , this password protects the BIOS Setup Utility from unauthorized access. F1 Help Esc Exit ↑ ↓ Select Item ← → Select Menu F5/F6 Change Values Enter Select... happened. If you forget your password, you have to return your notebook computer to your dealer to set , this password protects the BIOS Setup Utility from unauthorized access. Press Enter to reset it. 46 Chapter 2 It can be grayed out if the user password was...
...Enter] [Enter] [Enabled] Boot Exit Item Specific Help Supervisor Password controls accesses of the Supervisor password Press Enter to set , this password protects the BIOS Setup Utility from unauthorized access. F1 Help Esc Exit ↑ ↓ Select Item ← → Select Menu F5/F6 Change Values Enter Select... happened. If you forget your password, you have to return your notebook computer to your dealer to set , this password protects the BIOS Setup Utility from unauthorized access. Press Enter to reset it. 46 Chapter 2 It can be grayed out if the user password was...

TravelMate C210 Service Guide
Page 55
... appear on boot parameter. 5. When you have changed the settings, press u to save the changes and exit the BIOS Setup Utility. When you are done, press u to save the changes and exit the BIOS Setup Utility. The Set Password box appears: Chapter 2 47 The password length can opt to highlight the Set...
... appear on boot parameter. 5. When you have changed the settings, press u to save the changes and exit the BIOS Setup Utility. When you are done, press u to save the changes and exit the BIOS Setup Utility. The Set Password box appears: Chapter 2 47 The password length can opt to highlight the Set...

TravelMate C210 Service Guide
Page 56
... a password in the Enter New Password field. After setting the password, the computer sets the User Password parameter to save the changes and exit the BIOS Setup Utility. If the current password entered does not match the actual current password, the screen will display the following .
... a password in the Enter New Password field. After setting the password, the computer sets the User Password parameter to save the changes and exit the BIOS Setup Utility. If the current password entered does not match the actual current password, the screen will display the following .

TravelMate C210 Service Guide
Page 59
...supply when you may not boot the system because the BIOS is required for the following conditions: T New versions of system programs T New features or options T Restore a BIOS when it becomes corrupted. Fellow the steps below to finish BIOS flash, you run the Phlash. 1. Then boot the... system from the bootable diskette. Chapter 2 51 Copy the Phlash utilities to update the system BIOS flash ROM. The Phlash utility has ...
...supply when you may not boot the system because the BIOS is required for the following conditions: T New versions of system programs T New features or options T Restore a BIOS when it becomes corrupted. Fellow the steps below to finish BIOS flash, you run the Phlash. 1. Then boot the... system from the bootable diskette. Chapter 2 51 Copy the Phlash utilities to update the system BIOS flash ROM. The Phlash utility has ...

TravelMate C210 Service Guide
Page 60
Choose one upper-case string T Reboot system and key in "hdd_pw 15494 0" 2. Key in "0KJFN42" or "UVEIQ96" to solve HDD password locked problem, you can run HDD_PW.EXE 1. Select "2" 3. T If you key in wrong HDD password for three time, "HDD password error code" would display on the screen. See the image below. Remove HDD/BIOS Utility This section provide you with removing HDD/BIOS method: Remove HDD Password: T If you need to HDD user password. 52 Chapter 2
Choose one upper-case string T Reboot system and key in "hdd_pw 15494 0" 2. Key in "0KJFN42" or "UVEIQ96" to solve HDD password locked problem, you can run HDD_PW.EXE 1. Select "2" 3. T If you key in wrong HDD password for three time, "HDD password error code" would display on the screen. See the image below. Remove HDD/BIOS Utility This section provide you with removing HDD/BIOS method: Remove HDD Password: T If you need to HDD user password. 52 Chapter 2

TravelMate C210 Service Guide
Page 61
See the image below. Chapter 2 53 Remove BIOS Password: T If you key in wrong Supervisor Password for three time, "System Disabled" would display on the screen.
See the image below. Chapter 2 53 Remove BIOS Password: T If you key in wrong Supervisor Password for three time, "System Disabled" would display on the screen.

TravelMate C210 Service Guide
Page 62
Choose one upper-case string T Reboot the system and key in "bios_pw 14452 0" 2. Key in "qjjg9vy" or "07yqmjd" to solve BIOS password locked problem, you need to BIOS user password. 54 Chapter 2 T If you can run BIOS_PW.EXE 1.
Choose one upper-case string T Reboot the system and key in "bios_pw 14452 0" 2. Key in "qjjg9vy" or "07yqmjd" to solve BIOS password locked problem, you need to BIOS user password. 54 Chapter 2 T If you can run BIOS_PW.EXE 1.

TravelMate C210 Service Guide
Page 83
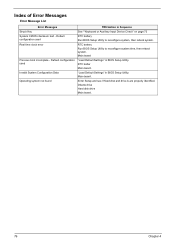
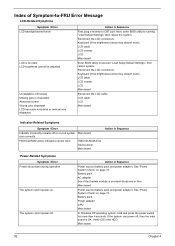
...actions in the sequence shown in FRU/Action column, if the FRU replacement does not solve the problem, put the original part back in the BIOS Setup Utility menus, reset the computer, enter Setup and install Setup defaults or correct the error. If the symptom is listed first. NOTE: ...If the system fails after you determine the next possible FRU to be replaced when servicing a computer. The following lists the error messages that the BIOS displays on page 87. NOTE: Most of memory installed. Chapter 4 75 Do not replace a non-defective FRU. The most likely cause is not ...
...actions in the sequence shown in FRU/Action column, if the FRU replacement does not solve the problem, put the original part back in the BIOS Setup Utility menus, reset the computer, enter Setup and install Setup defaults or correct the error. If the symptom is listed first. NOTE: ...If the system fails after you determine the next possible FRU to be replaced when servicing a computer. The following lists the error messages that the BIOS displays on page 87. NOTE: Most of memory installed. Chapter 4 75 Do not replace a non-defective FRU. The most likely cause is not ...
TravelMate C210 Service Guide
Page 84
... system, then reboot system. RTC batter Main baord. Default configuration used Invalid System Configuration Data Operating system not found FRU/Action in BIOS Setup Utility. Default configuration used Real time clock error Previous boot incomplete - Main board "Load Default Settings" in Sequence See ""Keyboard... or Auxiliary Input Device Check" on page 72 RTC battery Run BIOS Setup Utility to reconfigure system time, then reboot system. Main board. Dikette drive Hard disk drive Main board. 76 Chapter 4 Enter ...
... system, then reboot system. RTC batter Main baord. Default configuration used Invalid System Configuration Data Operating system not found FRU/Action in BIOS Setup Utility. Default configuration used Real time clock error Previous boot incomplete - Main board "Load Default Settings" in Sequence See ""Keyboard... or Auxiliary Input Device Check" on page 72 RTC battery Run BIOS Setup Utility to reconfigure system time, then reboot system. Main board. Dikette drive Hard disk drive Main board. 76 Chapter 4 Enter ...

TravelMate C210 Service Guide
Page 86
...registers with initial POST values Restore CPU control word during warm boot Initialize PCI Bus Mastering devices Initialize keyboard controller BIOS ROM checksum Initialize cache before memory autosize 8254 timer initialization 8237 DMA controller initialization Reset Programmable Interrupt Controller Test DRAM...high byte of memory bus Test CPU bus-clock frequency Initialize Phoenix Dispatch Manager Warm start shut down Shadow system BIOS ROM Autosize cache Advanced configuration of chipset registers Load alternate registers with CMOS values Initialize interrupt vectors POST device ...
...registers with initial POST values Restore CPU control word during warm boot Initialize PCI Bus Mastering devices Initialize keyboard controller BIOS ROM checksum Initialize cache before memory autosize 8254 timer initialization 8237 DMA controller initialization Reset Programmable Interrupt Controller Test DRAM...high byte of memory bus Test CPU bus-clock frequency Initialize Phoenix Dispatch Manager Warm start shut down Shadow system BIOS ROM Autosize cache Advanced configuration of chipset registers Load alternate registers with CMOS values Initialize interrupt vectors POST device ...

TravelMate C210 Service Guide
Page 87
... video configuration against CMOS Initialize PCI bus and devices Initialize all video adapters in system QuietBoot start (optional) Shadow video BIOS ROM Display BIOS copyright notice Display CPU type and speed Initialize EISA board Test keyboard Set key click if enabled Test for unexpected interrupts ... ports Initialize PC-compatible PnP ISA devices Re-initialize onboard I/O ports Configure Motherboard Configurable Devices (optional) Initialize BIOS Area Enable Non-Maskable Interrupts (NMIs) Initialize Extended BIOS Data Area Test and initialize PS/2 mouse Initialize floppy controller 79
... video configuration against CMOS Initialize PCI bus and devices Initialize all video adapters in system QuietBoot start (optional) Shadow video BIOS ROM Display BIOS copyright notice Display CPU type and speed Initialize EISA board Test keyboard Set key click if enabled Test for unexpected interrupts ... ports Initialize PC-compatible PnP ISA devices Re-initialize onboard I/O ports Configure Motherboard Configurable Devices (optional) Initialize BIOS Area Enable Non-Maskable Interrupts (NMIs) Initialize Extended BIOS Data Area Test and initialize PS/2 mouse Initialize floppy controller 79

TravelMate C210 Service Guide
Page 89
... in Flash ROM Initialize the chipset Initialize the bridge Initialize the CPU Initialize the system timer Initialize system I/O Check force recovery boot Checksum BIOS ROM Go to BIOS Set Huge Segment Initialize Multi Processor Initialize OEM special code Initialize PIC and DMA Initialize Memory type Initialize Memory size Shadow Boot Block System...
... in Flash ROM Initialize the chipset Initialize the bridge Initialize the CPU Initialize the system timer Initialize system I/O Check force recovery boot Checksum BIOS ROM Go to BIOS Set Huge Segment Initialize Multi Processor Initialize OEM special code Initialize PIC and DMA Initialize Memory type Initialize Memory size Shadow Boot Block System...
TravelMate C210 Service Guide
Page 90
... the thermal module is OK. Main board Power source (battery pack and power adapter). Next, enter BIOS utility to execute "Load Setup Default Settings", then reboot system. LCD cable LCD inverter LCD Main board Enter BIOS Utility to running "Load Default Settings" then reboot the system. Verify OS in Sequence Power source...
... the thermal module is OK. Main board Power source (battery pack and power adapter). Next, enter BIOS utility to execute "Load Setup Default Settings", then reboot system. LCD cable LCD inverter LCD Main board Enter BIOS Utility to running "Load Default Settings" then reboot the system. Verify OS in Sequence Power source...


