TravelMate 8200 Service Guide
Page 9
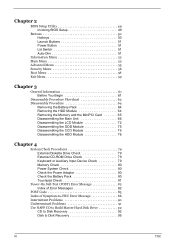
... 56 Boot Menu 58 Exit Menu 59 Chapter 3 General Information 61 Before You Begin 61 Disassembly Procedure Flowchart 62 Disassembly Procedure 64 Removing the Battery Pack 64 Removing the HDD Module 64 Removing the Memory and the MiniPCI Card 65 Disassembling the Main Unit 66 Disassembling the LCD Module 72...-ROM Drive Check 79 Keyboard or Auxiliary Input Device Check 79 Memory Check 80 Power System Check 80 Check the Power Adaptor 80 Check the Battery Pack 80 Touchpad Check 81 Power-On Self-Test (POST) Error Message 82 Index of Error Messages 82 POST Code 85 Index of Symptom...
... 56 Boot Menu 58 Exit Menu 59 Chapter 3 General Information 61 Before You Begin 61 Disassembly Procedure Flowchart 62 Disassembly Procedure 64 Removing the Battery Pack 64 Removing the HDD Module 64 Removing the Memory and the MiniPCI Card 65 Disassembling the Main Unit 66 Disassembling the LCD Module 72...-ROM Drive Check 79 Keyboard or Auxiliary Input Device Check 79 Memory Check 80 Power System Check 80 Check the Power Adaptor 80 Check the Battery Pack 80 Touchpad Check 81 Power-On Self-Test (POST) Error Message 82 Index of Error Messages 82 POST Code 85 Index of Symptom...
TravelMate 8200 Service Guide
Page 11
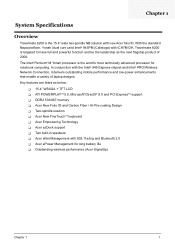
... / AI-Pre-coating Design T Two-spindle solution T Acer New FineTouchTM keyboard T Acer Empowering Technology T Acer ezDock support T Two built-in speakers T Acer eNet Management with ICH7M-DH, Travelmate 8200 is the world's most technically advanced processor for long battery life T Outstanding wireless performance (Acer SignalUp) Chapter 1 1 Chapter 1 System Specifications Overview Travelmate 8200 is the 15.4" wide two-spindle NB solution...
... / AI-Pre-coating Design T Two-spindle solution T Acer New FineTouchTM keyboard T Acer Empowering Technology T Acer ezDock support T Two built-in speakers T Acer eNet Management with ICH7M-DH, Travelmate 8200 is the world's most technically advanced processor for long battery life T Outstanding wireless performance (Acer SignalUp) Chapter 1 1 Chapter 1 System Specifications Overview Travelmate 8200 is the 15.4" wide two-spindle NB solution...
TravelMate 8200 Service Guide
Page 13
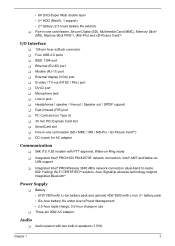
...HDD (Raid 0, 1 support) • 2nd battery (2.5 hours battery life extend) T Five-in-one card reader, Secure Digital (SD), Multimedia Card (MMC), Memory Stick® (MS), Memory Stick PROTM, (MS-Pro) and xD-Picture CardTM I/O Interface T 124-pin Acer ezDock connector T Four USB 2.0 ports T IEEE ....11a/b/g) Wi-Fi CERTIFIEDTM solution, Acer SignalUp wireless technology support, Integrated Bluetooth® Power Supply T Battery • 87W 7800 mAh Li-Ion battery pack and optional 42W 3800 mAh Li-Ion 2nd battery pack • Six-hour battery life under Acer ePower Management • 2.5-hour rapid...
...HDD (Raid 0, 1 support) • 2nd battery (2.5 hours battery life extend) T Five-in-one card reader, Secure Digital (SD), Multimedia Card (MMC), Memory Stick® (MS), Memory Stick PROTM, (MS-Pro) and xD-Picture CardTM I/O Interface T 124-pin Acer ezDock connector T Four USB 2.0 ports T IEEE ....11a/b/g) Wi-Fi CERTIFIEDTM solution, Acer SignalUp wireless technology support, Integrated Bluetooth® Power Supply T Battery • 87W 7800 mAh Li-Ion battery pack and optional 42W 3800 mAh Li-Ion 2nd battery pack • Six-hour battery life under Acer ePower Management • 2.5-hour rapid...

TravelMate 8200 Service Guide
Page 17
"Launch keys" on . 4 # Icon # Icon ItemItemBattery indicDaetsocrription DLeisgchrtispwtihoenn the battery is on page 10 N/A Latch Locks and releases the LCD panel. Lights to indicate theDsDteaetsuscscrroipifpwtitiorieonlenss LAN communications. (manufacturing option) 11 Four-pin IEEE 1394 Connects ...
"Launch keys" on . 4 # Icon # Icon ItemItemBattery indicDaetsocrription DLeisgchrtispwtihoenn the battery is on page 10 N/A Latch Locks and releases the LCD panel. Lights to indicate theDsDteaetsuscscrroipifpwtitiorieonlenss LAN communications. (manufacturing option) 11 Four-pin IEEE 1394 Connects ...

TravelMate 8200 Service Guide
Page 19
... Item NDoetsecr:iption 1 # Icon ItemDVI-D port DeSsucprpipotrtisodnigital video connections. 2 # Icon Item 124-pin port DescriCpotnionnects to Acer ezDock. (Replicator connector) 3 S-video port / TV out Connects to a television or display device with S-video port input. 4 N/A Battery Powers the computer. 5 Power jack Connects to an external display device. Right View # Icon Item Description No...
... Item NDoetsecr:iption 1 # Icon ItemDVI-D port DeSsucprpipotrtisodnigital video connections. 2 # Icon Item 124-pin port DescriCpotnionnects to Acer ezDock. (Replicator connector) 3 S-video port / TV out Connects to a television or display device with S-video port input. 4 N/A Battery Powers the computer. 5 Power jack Connects to an external display device. Right View # Icon Item Description No...
TravelMate 8200 Service Guide
Page 20
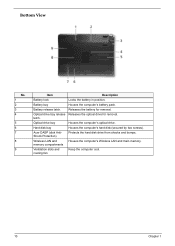
... screws). memory compartments Ventilation slots and cooling fan Keep the computer cool. Battery release latch. Optical drive bay Houses the computer's optical drive. Acer DASP (disk AntiShock Protection) Protects the hard disk drive from shocks and bumps. Battery bay Houses the computer's battery pack. latch. Note 10 Chapter 1 Wireless LAN and Houses the computer...
... screws). memory compartments Ventilation slots and cooling fan Keep the computer cool. Battery release latch. Optical drive bay Houses the computer's optical drive. Acer DASP (disk AntiShock Protection) Protects the hard disk drive from shocks and bumps. Battery bay Houses the computer's battery pack. latch. Note 10 Chapter 1 Wireless LAN and Houses the computer...
TravelMate 8200 Service Guide
Page 25
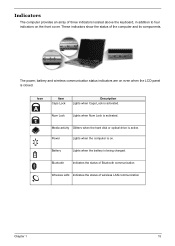
...keys" on page 10 # Item "Launch keys" on page 10 Description "Launch keys" on page 10 The power, battery and wireless communication status indicators are on . Fully charged: Wireless LAN Indicates the status of three indicators located above the ...Lights when Caps Lock is being charged. Bl1u.eCtohoatrhging: Indicates the status of the computer and its components. Battery Lights when the battery is activated. TDheessecrinipditciaotonrs show the status of Bluetooth communication 2. Description Lights whenDNeumscLroicpktisioanctivated. # Icon Item Description Media activity...
...keys" on page 10 # Item "Launch keys" on page 10 Description "Launch keys" on page 10 The power, battery and wireless communication status indicators are on . Fully charged: Wireless LAN Indicates the status of three indicators located above the ...Lights when Caps Lock is being charged. Bl1u.eCtohoatrhging: Indicates the status of the computer and its components. Battery Lights when the battery is activated. TDheessecrinipditciaotonrs show the status of Bluetooth communication 2. Description Lights whenDNeumscLroicpktisioanctivated. # Icon Item Description Media activity...
TravelMate 8200 Service Guide
Page 28
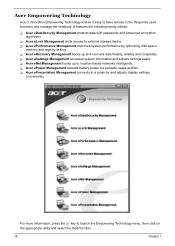
... a projector and adjusts dispaly settings conveniently. T Acer eSettings Management accesses system information and adjusts settings easily. T Acer ePresentation Management connects to external storage media. T Acer ePerformance Management improves system performance by optimizing disk space, memory and registry setting. T Acer ePower Management extends battery power via versatile usage profiles. T Acer eNet Management hooks up and recovers data...
... a projector and adjusts dispaly settings conveniently. T Acer eSettings Management accesses system information and adjusts settings easily. T Acer ePresentation Management connects to external storage media. T Acer ePerformance Management improves system performance by optimizing disk space, memory and registry setting. T Acer ePower Management extends battery power via versatile usage profiles. T Acer eNet Management hooks up and recovers data...
TravelMate 8200 Service Guide
Page 36
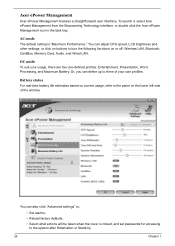
DC mode To suit your own profiles. Acer ePower Management Acer ePower Management features a straightforward user interface. Battery status For real-time battery life estimates based on current usage, refer to turn the following functions on the lower left side of your usage..., there are four pre-defined profiles: Entertainment, Presentation, Word Processing, and Maximum Battery. To launch it, select Acer ePower Management from the Empowering Technology interface, or double click the Acer ePower Management icon in the task tray. Or, you can define up to the system ...
DC mode To suit your own profiles. Acer ePower Management Acer ePower Management features a straightforward user interface. Battery status For real-time battery life estimates based on current usage, refer to turn the following functions on the lower left side of your usage..., there are four pre-defined profiles: Entertainment, Presentation, Word Processing, and Maximum Battery. To launch it, select Acer ePower Management from the Empowering Technology interface, or double click the Acer ePower Management icon in the task tray. Or, you can define up to the system ...
TravelMate 8200 Service Guide
Page 56
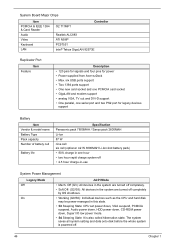
... VGA, TV out and DVI-D support • One parallel, one serial port and two PS2 port for power • Power supplied from Acer ezDock • Max. System Board Major Chips Item PCMCIA & IEEE 1394 & Card Reader Audio Video Keyboard LAN O2 711MP1 Controller Realtek ALC883 ... 82573E Replicator Port Item Feature Description • 120 pins for signals and four pins for legacy devices support Battery Item Vendor & model name Battery Type Pack capacity Number of battery cell Battery life Specification Panasonic pack 7800MAH / Sanyo pack 2600MAH Li-Ion 87 W nine cell six cell (optional: 42...
... VGA, TV out and DVI-D support • One parallel, one serial port and two PS2 port for power • Power supplied from Acer ezDock • Max. System Board Major Chips Item PCMCIA & IEEE 1394 & Card Reader Audio Video Keyboard LAN O2 711MP1 Controller Realtek ALC883 ... 82573E Replicator Port Item Feature Description • 120 pins for signals and four pins for legacy devices support Battery Item Vendor & model name Battery Type Pack capacity Number of battery cell Battery life Specification Panasonic pack 7800MAH / Sanyo pack 2600MAH Li-Ion 87 W nine cell six cell (optional: 42...
TravelMate 8200 Service Guide
Page 57
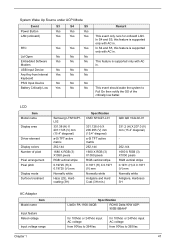
... Any Key from 90Vac to 264Vac for 100Vac or 240Vac input AC voltage from Internal Yes No No Keyboard PS/2 Input Device No No No Battery Critically Low Yes No No Remark This event only runs for onboard LAN. This feature is supported only with AC in. In S4 and S5...
... Any Key from 90Vac to 264Vac for 100Vac or 240Vac input AC voltage from Internal Yes No No Keyboard PS/2 Input Device No No No Battery Critically Low Yes No No Remark This event only runs for onboard LAN. This feature is supported only with AC in. In S4 and S5...
TravelMate 8200 Service Guide
Page 61
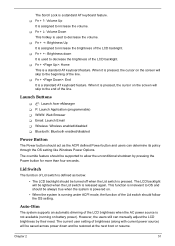
...OS and "Easys-lhauonuclhdbbuettoanlws"aoynsptarguee1w0 hen the system is powered on. • When the system is pressed, the cursor on battery power). This function is irrelevant to increase the brightness of the Lid switch should follow the OS setting. Chapter 2 51 When...Fn + I: Brightness down and be supported to the beginning of the LCD brightness when the AC power source is pressed. Launch Buttons T : Launch Acer eManager T P: Launch Application (programmable) T WWW: Web Browser T Email: Launch Email T Wireless: Wireless enabled/disabled T Bluetooth: Bluetooth enabled/disabled ...
...OS and "Easys-lhauonuclhdbbuettoanlws"aoynsptarguee1w0 hen the system is powered on. • When the system is pressed, the cursor on battery power). This function is irrelevant to increase the brightness of the Lid switch should follow the OS setting. Chapter 2 51 When...Fn + I: Brightness down and be supported to the beginning of the LCD brightness when the AC power source is pressed. Launch Buttons T : Launch Acer eManager T P: Launch Application (programmable) T WWW: Web Browser T Email: Launch Email T Wireless: Wireless enabled/disabled T Bluetooth: Bluetooth enabled/disabled ...
TravelMate 8200 Service Guide
Page 71
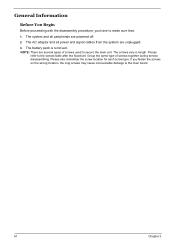
The AC adaptor and all peripherals are unplugged. 3. The screws vary in length. If you have to the screws table after the flowchart. The battery pack is removed. Group the same type of screws used to the main board. 61 Chapter 3 NOTE: There are several types of screws together during ...
The AC adaptor and all peripherals are unplugged. 3. The screws vary in length. If you have to the screws table after the flowchart. The battery pack is removed. Group the same type of screws used to the main board. 61 Chapter 3 NOTE: There are several types of screws together during ...
TravelMate 8200 Service Guide
Page 74
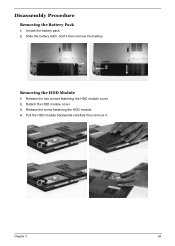
Release the screw fastening the HDD module. 4. Unlock the battery pack. 2. Removing the HDD Module 1. Pull the HDD module backwards carefully then remove it then remove the battery. Slide the battery latch, hold it . Release the two screws fastening the HDD module cover. 2. Chapter 3 64 Detach the HDD module cover. 3. Disassembly Procedure Removing the Battery Pack 1.
Release the screw fastening the HDD module. 4. Unlock the battery pack. 2. Removing the HDD Module 1. Pull the HDD module backwards carefully then remove it then remove the battery. Slide the battery latch, hold it . Release the two screws fastening the HDD module cover. 2. Chapter 3 64 Detach the HDD module cover. 3. Disassembly Procedure Removing the Battery Pack 1.

TravelMate 8200 Service Guide
Page 80
... the four-pin USB cable, 10-pin USB cable and modem cable. 37. Detach the bluetooth module from the main board. 34. Disconnect the RTC battery on the main board then detach it from the upper case. Remove the screw fastening the charge board then detach it . 31. Pull the latch...
... the four-pin USB cable, 10-pin USB cable and modem cable. 37. Detach the bluetooth module from the main board. 34. Disconnect the RTC battery on the main board then detach it from the upper case. Remove the screw fastening the charge board then detach it . 31. Pull the latch...
TravelMate 8200 Service Guide
Page 89
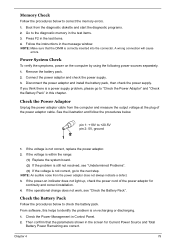
... range: (1) Replace the system board. (2) If the problem is on the computer by using the following power sources separately. 1. Check the Battery Pack Follow the procedures below . From software, this chapter. Follow the instructions in the test items. 4. NOTE: Make sure that the parameters...the symptoms, power on recharging or discharging. 1. See the illustration and follow the procedures below to "Check the Power Adaptor" and "Check the Battery Pack" in the screen for continuity and correct installation. 4. Memory Check Follow the procedures below to +20.5V pin 2: 0V, ground 1....
... range: (1) Replace the system board. (2) If the problem is on the computer by using the following power sources separately. 1. Check the Battery Pack Follow the procedures below . From software, this chapter. Follow the instructions in the test items. 4. NOTE: Make sure that the parameters...the symptoms, power on recharging or discharging. 1. See the illustration and follow the procedures below to "Check the Power Adaptor" and "Check the Battery Pack" in the screen for continuity and correct installation. 4. Memory Check Follow the procedures below to +20.5V pin 2: 0V, ground 1....
TravelMate 8200 Service Guide
Page 90
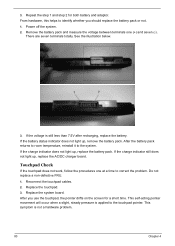
... 1. See the illustration below. 3. If the charge indicator does not light up , replace the AC/DC charger board. 3. Remove the battery pack and measure the voltage between terminals one at a time to the system. There are seven terminals totally. Touchpad Check If the touchpad... pressure is applied to identify whether you use the touchpad, the pointer drifts on the screen for both battery and adaptor. If the battery status indicator does not light up, remove the battery pack. If the voltage is not a hardware problem. 80 Chapter 4 This symptom is still less than...
... 1. See the illustration below. 3. If the charge indicator does not light up , replace the AC/DC charger board. 3. Remove the battery pack and measure the voltage between terminals one at a time to the system. There are seven terminals totally. Touchpad Check If the touchpad... pressure is applied to identify whether you use the touchpad, the pointer drifts on the screen for both battery and adaptor. If the battery status indicator does not light up, remove the battery pack. If the voltage is not a hardware problem. 80 Chapter 4 This symptom is still less than...
TravelMate 8200 Service Guide
Page 91
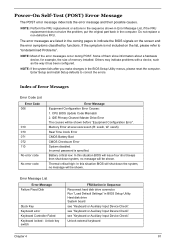
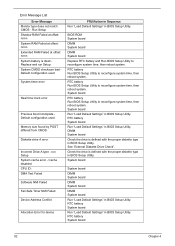
...code Error Message Equipment Configuration Error Causes: 1. Memory Error at xxxx:xxxx:xxxxh (R: xxxxh, W: xxxxh) Real Time Clock Error CMOS Battery Bad CMOS Checksum Error System disabled. see "Keyboard or Auxiliary Input Device Check". Do not replace a non-defective FRU. CPU BIOS ... Stuck Key Keyboard error Keyboard Controller Failed Keyboard locked - Run "Load Default Settings" in Sequence Reconnect hard disk drive connector. Battery critical low: In this situation BIOS will shut down system, no message will be shown. Others may indicate problems with a device...
...code Error Message Equipment Configuration Error Causes: 1. Memory Error at xxxx:xxxx:xxxxh (R: xxxxh, W: xxxxh) Real Time Clock Error CMOS Battery Bad CMOS Checksum Error System disabled. see "Keyboard or Auxiliary Input Device Check". Do not replace a non-defective FRU. CPU BIOS ... Stuck Key Keyboard error Keyboard Controller Failed Keyboard locked - Run "Load Default Settings" in Sequence Reconnect hard disk drive connector. Battery critical low: In this situation BIOS will shut down system, no message will be shown. Others may indicate problems with a device...
TravelMate 8200 Service Guide
Page 92
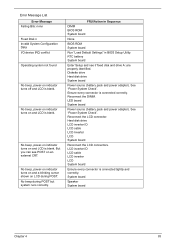
... system. Run Setup Shadow RAM Failed at offset: nnnn System RAM Failed at offset: nnnn Extended RAM Failed at offset: nnnn System battery is dead Replace and run Setup System cache error - DIMM System board Check the drive is defined with the proper diskette type in BIOS... Utility to reconfigure system time, then reboot system. Check the drive is defined with the proper diskette type in BIOS Setup Utility. RTC battery System board Run "Load Default Settings" in BIOS Setup Utility. run Setup System CMOS checksum bad Default configuration used System timer error Real...
... system. Run Setup Shadow RAM Failed at offset: nnnn System RAM Failed at offset: nnnn Extended RAM Failed at offset: nnnn System battery is dead Replace and run Setup System cache error - DIMM System board Check the drive is defined with the proper diskette type in BIOS... Utility to reconfigure system time, then reboot system. Check the drive is defined with the proper diskette type in BIOS Setup Utility. RTC battery System board Run "Load Default Settings" in BIOS Setup Utility. run Setup System CMOS checksum bad Default configuration used System timer error Real...
TravelMate 8200 Service Guide
Page 93
... board Enter Setup and see POST on an external CRT. Diskette drive Hard disk drive System board Power source (battery pack and power adapter). Reconnect the DIMM. Hard disk drive LCD inverter ID LCD cable LCD Inverter LCD System board Reconnect the LCD connectors. LCD ...
... board Enter Setup and see POST on an external CRT. Diskette drive Hard disk drive System board Power source (battery pack and power adapter). Reconnect the DIMM. Hard disk drive LCD inverter ID LCD cable LCD Inverter LCD System board Reconnect the LCD connectors. LCD ...


