
User Guide
Page 8
... accessories box) for service. 13. viii Use of another battery may present a risk of power supply cord set (provided in fire. If the product does not operate normally when the operating instructions are covered by a qualified technician to restore the product to normal condition. e. Batteries may result in performance, indicating a need for this unit. It should be a detachable type: UL listed/CSA certified, type SPT-2, rated...
... accessories box) for service. 13. viii Use of another battery may present a risk of power supply cord set (provided in fire. If the product does not operate normally when the operating instructions are covered by a qualified technician to restore the product to normal condition. e. Batteries may result in performance, indicating a need for this unit. It should be a detachable type: UL listed/CSA certified, type SPT-2, rated...

User Guide
Page 23
... CD-ROM drive u Dual display capability Connectivity u High-speed fax/data PCI modem 1 "on-die" means "on -die1 L2 cache memory u Large and vibrant Thin-Film-Transistor (TFT) Extended Graphics Array (XGA) Liquid Crystal Display (LCD) u 256-bit PCI/AGP graphics acceleration with 2.5MB graphics memory u Internal removable CD-ROM drive (AcerMedia Bay) u Internal 3.5-inch floppy drive u High-capacity, Enhanced-IDE removable hard disk u Lithium-Ion battery pack u Power management...
... CD-ROM drive u Dual display capability Connectivity u High-speed fax/data PCI modem 1 "on-die" means "on -die1 L2 cache memory u Large and vibrant Thin-Film-Transistor (TFT) Extended Graphics Array (XGA) Liquid Crystal Display (LCD) u 256-bit PCI/AGP graphics acceleration with 2.5MB graphics memory u Internal removable CD-ROM drive (AcerMedia Bay) u Internal 3.5-inch floppy drive u High-capacity, Enhanced-IDE removable hard disk u Lithium-Ion battery pack u Power management...
User Guide
Page 32
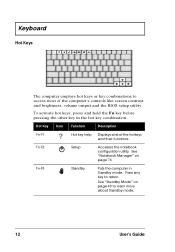
... Setup Accesses the notebook configuration utility. See "Standby Mode" on page 74. See "Notebook Manager" on page 40 to learn more about Standby mode. 12 User's Guide To activate hot keys, press and hold the Fn key before pressing the other key in Standby mode. Hot Key Icon Function Description Fn-F1 Hot key help Displays a list of the computer's controls like screen contrast and brightness, volume output and the BIOS setup utility. Press any key to access most of the hotkeys and their functions. Keyboard Hot Keys...
... Setup Accesses the notebook configuration utility. See "Standby Mode" on page 74. See "Notebook Manager" on page 40 to learn more about Standby mode. 12 User's Guide To activate hot keys, press and hold the Fn key before pressing the other key in Standby mode. Hot Key Icon Function Description Fn-F1 Hot key help Displays a list of the computer's controls like screen contrast and brightness, volume output and the BIOS setup utility. Press any key to access most of the hotkeys and their functions. Keyboard Hot Keys...
User Guide
Page 33
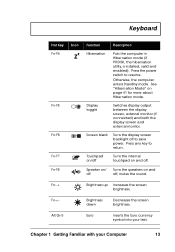
... 13 Display toggle Switches display output between the display screen, external monitor (if connected) and both the display screen and external monitor. Touchpad on/off Turns the internal touchpad on and off off . mutes the sound. Otherwise, the computer enters Standby mode. Keyboard Hot Key Fn-F4 Icon Fn-F5 Fn-F6 Fn-F7 Fn-F8 Function Description Hibernation Puts the computer in Hibernation mode (if PHDISK, the hibernation utility, is installed, valid and enabled). Press the power switch...
... 13 Display toggle Switches display output between the display screen, external monitor (if connected) and both the display screen and external monitor. Touchpad on/off Turns the internal touchpad on and off off . mutes the sound. Otherwise, the computer enters Standby mode. Keyboard Hot Key Fn-F4 Icon Fn-F5 Fn-F6 Fn-F7 Fn-F8 Function Description Hibernation Puts the computer in Hibernation mode (if PHDISK, the hibernation utility, is installed, valid and enabled). Press the power switch...
User Guide
Page 49
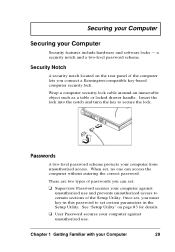
... connect a Kensington-compatible key-based computer security lock. There are two types of passwords you must key-in this password to set certain parameters in the Setup Utility. Once set, you can set , no one can access the computer without entering the correct password. When set : u Supervisor Password secures your computer against unauthorized use and prevents unauthorized access to secure the lock. u User Password secures your Computer Security features include hardware and software locks - See "Setup Utility...
... connect a Kensington-compatible key-based computer security lock. There are two types of passwords you must key-in this password to set certain parameters in the Setup Utility. Once set, you can set , no one can access the computer without entering the correct password. When set : u Supervisor Password secures your computer against unauthorized use and prevents unauthorized access to secure the lock. u User Password secures your Computer Security features include hardware and software locks - See "Setup Utility...

User Guide
Page 59
... drive, hard disk, peripherals connected to a brighter level. "Automatic Dim" Feature The computer has a unique "automatic dim" power-saving feature. Power Management Modes Display Standby Mode Screen activity is determined by the LCD backlight Timeout value, the display shuts off until you press a key or move the touchpad or external mouse. If you disconnect the AC adapter from the computer, it automatically adjusts the LCD backlight to the serial and parallel ports, and video memory...
... drive, hard disk, peripherals connected to a brighter level. "Automatic Dim" Feature The computer has a unique "automatic dim" power-saving feature. Power Management Modes Display Standby Mode Screen activity is determined by the LCD backlight Timeout value, the display shuts off until you press a key or move the touchpad or external mouse. If you disconnect the AC adapter from the computer, it automatically adjusts the LCD backlight to the serial and parallel ports, and video memory...
User Guide
Page 63
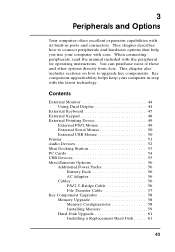
... operating instructions. Contents External Monitor 44 Using Dual Display 44 External Keyboard 47 External Keypad 48 External Pointing Device 49 External PS/2 Mouse 49 External Serial Mouse 50 External USB Mouse 50 Printer 51 Audio Devices 52 Mini Docking Station 53 PC Cards 54 USB Devices 55 Miscellaneous Options 56 Additional Power Packs 56 Battery Pack 56 AC Adapter 56 Cables 56 PS/2 Y-Bridge Cable 56 File Transfer Cable 57 Key Component Upgrades 58 Memory Upgrade 58 Memory Configurations 58 Installing Memory 59 Hard Disk Upgrade 61 Installing a Replacement Hard Disk...
... operating instructions. Contents External Monitor 44 Using Dual Display 44 External Keyboard 47 External Keypad 48 External Pointing Device 49 External PS/2 Mouse 49 External Serial Mouse 50 External USB Mouse 50 Printer 51 Audio Devices 52 Mini Docking Station 53 PC Cards 54 USB Devices 55 Miscellaneous Options 56 Additional Power Packs 56 Battery Pack 56 AC Adapter 56 Cables 56 PS/2 Y-Bridge Cable 56 File Transfer Cable 57 Key Component Upgrades 58 Memory Upgrade 58 Memory Configurations 58 Installing Memory 59 Hard Disk Upgrade 61 Installing a Replacement Hard Disk...

User Guide
Page 64
... an external monitor is especially useful for additional instructions. The S-video output jack is not connected, closing the display cover puts the computer into standby mode. Using Dual Display Your computer takes advantage of Windows 98 multidisplay capability, allowing you to display your desktop to a television monitor or LCD projector or extend it allows you to expand your computer output to an external display device. To use dual display, you more...
... an external monitor is especially useful for additional instructions. The S-video output jack is not connected, closing the display cover puts the computer into standby mode. Using Dual Display Your computer takes advantage of Windows 98 multidisplay capability, allowing you to display your desktop to a television monitor or LCD projector or extend it allows you to expand your computer output to an external display device. To use dual display, you more...
User Guide
Page 70
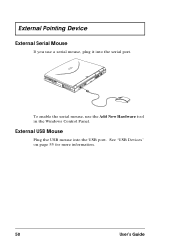
To enable the serial mouse, use a serial mouse, plug it into the USB port. External USB Mouse Plug the USB mouse into the serial port. External Pointing Device External Serial Mouse If you use the Add New Hardware tool in the Windows Control Panel. See "USB Devices" on page 55 for more information. 50 User's Guide
To enable the serial mouse, use a serial mouse, plug it into the USB port. External USB Mouse Plug the USB mouse into the serial port. External Pointing Device External Serial Mouse If you use the Add New Hardware tool in the Windows Control Panel. See "USB Devices" on page 55 for more information. 50 User's Guide
User Guide
Page 101
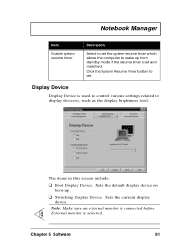
... System Resume Timer button to set. The items in this screen include: u Boot Display Device. Sets the default display device on boot-up from standby mode if the resume timer is set and matched. Note: Make sure an external monitor is connected before External monitor is used to control various settings related to display device(s), such as the display brightness level. Chapter 5 Software 81 Display Device Display Device is selected. u Switching Display Device. Notebook Manager Item Enable system resume timer Description Select to set the system resume timer...
... System Resume Timer button to set. The items in this screen include: u Boot Display Device. Sets the default display device on boot-up from standby mode if the resume timer is set and matched. Note: Make sure an external monitor is connected before External monitor is used to control various settings related to display device(s), such as the display brightness level. Chapter 5 Software 81 Display Device Display Device is selected. u Switching Display Device. Notebook Manager Item Enable system resume timer Description Select to set the system resume timer...
User Guide
Page 110
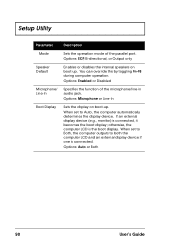
... display on boot-up . When set to both the computer LCD and an external display device if one is connected. You can override this by toggling Fn-F8 during computer operation. Setup Utility Parameter Description Mode Sets the operation mode of the microphone/line-in audio jack. When set to Both, the computer outputs to Auto, the computer automatically determines the display device. If an external display device (e.g., monitor) is the boot display. Options: Auto or Both 90 User's Guide...
... display on boot-up . When set to both the computer LCD and an external display device if one is connected. You can override this by toggling Fn-F8 during computer operation. Setup Utility Parameter Description Mode Sets the operation mode of the microphone/line-in audio jack. When set to Both, the computer outputs to Auto, the computer automatically determines the display device. If an external display device (e.g., monitor) is the boot display. Options: Auto or Both 90 User's Guide...
User Guide
Page 115
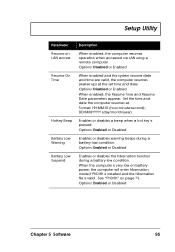
... Disabled Enables or disables warning beeps during a battery-low condition. Options: Enabled or Disabled Enables or disables the hibernation function during a battery-low condition. See "PhDISK" on LAN access Resume On Time Hotkey Beep Battery Low Warning Battery Low Suspend Description When enabled, the computer resumes operation when accessed via LAN using a remote computer. Format: HH:MM:SS (hour:minute:second); When the computer is very low on battery power, the computer will enter hibernation mode...
... Disabled Enables or disables warning beeps during a battery-low condition. Options: Enabled or Disabled Enables or disables the hibernation function during a battery-low condition. See "PhDISK" on LAN access Resume On Time Hotkey Beep Battery Low Warning Battery Low Suspend Description When enabled, the computer resumes operation when accessed via LAN using a remote computer. Format: HH:MM:SS (hour:minute:second); When the computer is very low on battery power, the computer will enter hibernation mode...
User Guide
Page 118
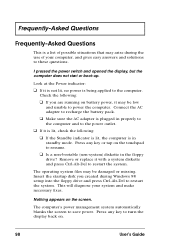
... the power switch and opened the display, but the computer does not start or boot-up. Remove or replace it is in standby mode. Nothing appears on . 98 User's Guide Check the following : u If the Standby indicator is lit, the computer is lit, check the following : u If you created during the use of possible situations that may arise during Windows 98 setup into the floppy drive and...
... the power switch and opened the display, but the computer does not start or boot-up. Remove or replace it is in standby mode. Nothing appears on . 98 User's Guide Check the following : u If the Standby indicator is lit, the computer is lit, check the following : u If you created during the use of possible situations that may arise during Windows 98 setup into the floppy drive and...
User Guide
Page 119
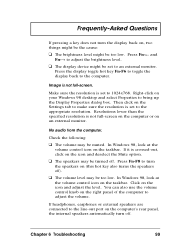
... is not full-screen. In Windows 98, look at the volume control icon on the taskbar. u The display device might be muted. If it is set to the line-out port on the computer's rear panel, the internal speakers automatically turn off. Press the display toggle hot key Fn-F6 to toggle the display back to an external monitor. Then click on the Settings tab to make sure the...
... is not full-screen. In Windows 98, look at the volume control icon on the taskbar. u The display device might be muted. If it is set to the line-out port on the computer's rear panel, the internal speakers automatically turn off. Press the display toggle hot key Fn-F6 to toggle the display back to an external monitor. Then click on the Settings tab to make sure the...

User Guide
Page 125
... drive (A:), then press Enter to reboot. Memory Size Mismatch Press F2 (during POST) to [Auto] for hard disk drive auto-detection. 3. Exit the Setup Utility (saving the changes). See the specification label attached to exit and reconfigure the computer. We suggest you set the Hard Disk 0 type to enter the Setup Utility. 2. Pointing Device Interface Error Contact your dealer or an authorized service center. Chapter 6 Troubleshooting 105 Enter the Hard Disk 0 submenu and correct the Hard Disk 0 type...
... drive (A:), then press Enter to reboot. Memory Size Mismatch Press F2 (during POST) to [Auto] for hard disk drive auto-detection. 3. Exit the Setup Utility (saving the changes). See the specification label attached to exit and reconfigure the computer. We suggest you set the Hard Disk 0 type to enter the Setup Utility. 2. Pointing Device Interface Error Contact your dealer or an authorized service center. Chapter 6 Troubleshooting 105 Enter the Hard Disk 0 submenu and correct the Hard Disk 0 type...
User Guide
Page 128
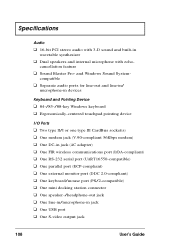
... DC-in jack (AC adapter) u One FIR wireless communications port (IrDA-compliant) u One RS-232 serial port (UART16550-compatible) u One parallel port (ECP-compliant) u One external monitor port (DDC 2.0-compliant) u One keyboard/mouse port (PS/2-compatible) u One mini docking station connector u One speaker-/headphone-out jack u One line-in/microphone-in wavetable synthesizer u Dual speakers and internal microphone with 3-D sound and built-in jack u One USB port u One S-video output jack 108 User's Guide Specifications Audio u 16...
... DC-in jack (AC adapter) u One FIR wireless communications port (IrDA-compliant) u One RS-232 serial port (UART16550-compatible) u One parallel port (ECP-compliant) u One external monitor port (DDC 2.0-compliant) u One keyboard/mouse port (PS/2-compatible) u One mini docking station connector u One speaker-/headphone-out jack u One line-in/microphone-in wavetable synthesizer u Dual speakers and internal microphone with 3-D sound and built-in jack u One USB port u One S-video output jack 108 User's Guide Specifications Audio u 16...
User Guide
Page 131
... enabling, 28 A AC adapter caring for, xviii connecting, xiv audio, 27 connecting externally, 52 controlling volume, 27 setting input source in Notebook Manager, 82 troubleshooting, 99-100 B battery installing, xiv battery pack battery-low warning, 37 caring for, xix characteristics, 32 charging, 34 charging indicator, 7 charging modes, 34 checking charge level, 35 installing, 33 low conditions, 38 optimizing, 36 removing, 34 using the first time, 32 boot order setting in Notebook Manager, 76 setting in Setup Utility, 88 brightness hot keys, 13 setting in Notebook Manager, 82 C caps lock...
... enabling, 28 A AC adapter caring for, xviii connecting, xiv audio, 27 connecting externally, 52 controlling volume, 27 setting input source in Notebook Manager, 82 troubleshooting, 99-100 B battery installing, xiv battery pack battery-low warning, 37 caring for, xix characteristics, 32 charging, 34 charging indicator, 7 charging modes, 34 checking charge level, 35 installing, 33 low conditions, 38 optimizing, 36 removing, 34 using the first time, 32 boot order setting in Notebook Manager, 76 setting in Setup Utility, 88 brightness hot keys, 13 setting in Notebook Manager, 82 C caps lock...
User Guide
Page 132
... floppy drive, 17 frequently-asked questions Fast Infrared. See warranty K keyboard, 9 connecting externally, 47 embedded numeric keypad, 10 hot keys, 12 lock keys, 9 troubleshooting, 101 112 User's Guide See frequently-asked questions, 98 H hard disk, 17 installing, 61-62 power management, 40 upgrading, 61 help Internet home page, xvi online manual, xvi technical support, xvii Hibernation mode, 41-42 conditions, 41 entering, 41 hot key, 13 resuming from, 42 utility, 73 hot keys, 12 I indicator lights, 7 infrared, 21 troubleshooting, 102 turning...
... floppy drive, 17 frequently-asked questions Fast Infrared. See warranty K keyboard, 9 connecting externally, 47 embedded numeric keypad, 10 hot keys, 12 lock keys, 9 troubleshooting, 101 112 User's Guide See frequently-asked questions, 98 H hard disk, 17 installing, 61-62 power management, 40 upgrading, 61 help Internet home page, xvi online manual, xvi technical support, xvii Hibernation mode, 41-42 conditions, 41 entering, 41 hot key, 13 resuming from, 42 utility, 73 hot keys, 12 I indicator lights, 7 infrared, 21 troubleshooting, 102 turning...
User Guide
Page 133
... error, 104 microphone troubleshooting, 100 modem, 23 module swapping, 19 monitor connecting, 44 mouse connecting externally, 49 troubleshooting, 101 N Notebook Manager, 74-82 Boot Sequence, 76 Display Device, 81 hot key, 12 Information Viewer, 75 Password, 77 Power Management, 80 starting, 74 num lock, 9 on indicator, 8 numeric keypad embedded, 10 Index Index O options cables, 56 hard disk upgrade, 61 memory upgrade, 58 mini docking station, 53 PC Cards, 54 spare AC adapter, 56 spare battery, 56 P palm rest, 14 parallel port setting in Setup Utility, 89 password, 29 changing...
... error, 104 microphone troubleshooting, 100 modem, 23 module swapping, 19 monitor connecting, 44 mouse connecting externally, 49 troubleshooting, 101 N Notebook Manager, 74-82 Boot Sequence, 76 Display Device, 81 hot key, 12 Information Viewer, 75 Password, 77 Power Management, 80 starting, 74 num lock, 9 on indicator, 8 numeric keypad embedded, 10 Index Index O options cables, 56 hard disk upgrade, 61 memory upgrade, 58 mini docking station, 53 PC Cards, 54 spare AC adapter, 56 spare battery, 56 P palm rest, 14 parallel port setting in Setup Utility, 89 password, 29 changing...

User Guide
Page 134
... printer connecting, 51 troubleshooting, 101 problems, 98 audio, 99-100 CD-ROM, 100 display, 98, 99 infrared, 102 keyboard, 101 printer, 101 serial mouse, 101 startup, 98 troubleshooting, 97 PS/2 mouse connecting, 49 PS/2 y-bridge cable connecting, 56 Q questions multiple PS/2 devices, 101 setting location for modem use, 102 S safety CD-ROM drive, x FCC notice, v general instructions, vii lithium battery, xi security keylock, 29 passwords, 29 serial mouse connecting, 50 serial port setting in Setup Utility, 89 service when to call, xix Setup Utility, 83...
... printer connecting, 51 troubleshooting, 101 problems, 98 audio, 99-100 CD-ROM, 100 display, 98, 99 infrared, 102 keyboard, 101 printer, 101 serial mouse, 101 startup, 98 troubleshooting, 97 PS/2 mouse connecting, 49 PS/2 y-bridge cable connecting, 56 Q questions multiple PS/2 devices, 101 setting location for modem use, 102 S safety CD-ROM drive, x FCC notice, v general instructions, vii lithium battery, xi security keylock, 29 passwords, 29 serial mouse connecting, 50 serial port setting in Setup Utility, 89 service when to call, xix Setup Utility, 83...


