Pre-Install Intel® AHCI Driver for Windows XP® Operating System
Page 1
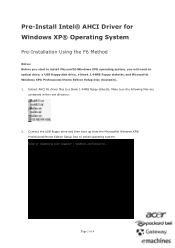
... 1 of 4 Connect the USB floppy drive and then boot up from the Microsoft® Windows XP® Professional/Home Edition Setup Disc to install Microsoft® Windows XP® operating system, you will need an optical drive, a USB floppy disk drive, a blank 1.44MB floppy diskette, and Microsoft® Windows XP® Professional/Home Edition Setup Disc (bootable). 1. Pre-Install Intel® AHCI Driver for Windows XP® Operating System Pre-Installation Using the F6...
... 1 of 4 Connect the USB floppy drive and then boot up from the Microsoft® Windows XP® Professional/Home Edition Setup Disc to install Microsoft® Windows XP® operating system, you will need an optical drive, a USB floppy disk drive, a blank 1.44MB floppy diskette, and Microsoft® Windows XP® Professional/Home Edition Setup Disc (bootable). 1. Pre-Install Intel® AHCI Driver for Windows XP® Operating System Pre-Installation Using the F6...
Quick Start Guide
Page 5
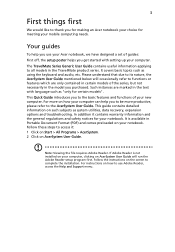
... screen to complete the installation. Follow these steps to access it contains warranty information and the general regulations and safety notices for your notebook. It covers basic topics such as system utilities, data recovery, expansion options and troubleshooting. Note: Viewing the file requires Adobe Reader. Follow the instructions on AcerSystem User Guide. 3 First things first We would like to thank you for making an Acer notebook...
... screen to complete the installation. Follow these steps to access it contains warranty information and the general regulations and safety notices for your notebook. It covers basic topics such as system utilities, data recovery, expansion options and troubleshooting. Note: Viewing the file requires Adobe Reader. Follow the instructions on AcerSystem User Guide. 3 First things first We would like to thank you for making an Acer notebook...

Quick Start Guide
Page 7
... right buttons function like screen brightness and volume output. 5 English # Icon Item Description 4 Communication Indicates the computer's wireless indicator connectivity device status. Turns the display screen backlight off Touchpad toggle Switches display output between the display screen, external monitor (if connected) and both. Turns the touchpad on and off . To activate hotkeys, press and hold the key before pressing the other key in Sleep mode. + + + Display toggle Display off to save power. HDD indicator Indicates when the hard disk drive is active...
... right buttons function like screen brightness and volume output. 5 English # Icon Item Description 4 Communication Indicates the computer's wireless indicator connectivity device status. Turns the display screen backlight off Touchpad toggle Switches display output between the display screen, external monitor (if connected) and both. Turns the touchpad on and off . To activate hotkeys, press and hold the key before pressing the other key in Sleep mode. + + + Display toggle Display off to save power. HDD indicator Indicates when the hard disk drive is active...

Quick Start Guide
Page 8
... + Function Description Speaker toggle Turns the speakers on and off. + < > Volume up Increases the sound volume. + < > Volume down Decreases the sound volume. + < > Brightness up Increases the screen brightness. + < > Brightness down Decreases the screen brightness. Charging: The light shows amber when the battery is charging. 2. Only one card can operate at any given time. Note: Push to remove/install the card. Closed front view 12 # Icon 1 2 Item 2-in AC mode. Battery indicator Indicates the computer's battery status. 1. Indicates the computer's power...
... + Function Description Speaker toggle Turns the speakers on and off. + < > Volume up Increases the sound volume. + < > Volume down Decreases the sound volume. + < > Brightness up Increases the screen brightness. + < > Brightness down Decreases the screen brightness. Charging: The light shows amber when the battery is charging. 2. Only one card can operate at any given time. Note: Push to remove/install the card. Closed front view 12 # Icon 1 2 Item 2-in AC mode. Battery indicator Indicates the computer's battery status. 1. Indicates the computer's power...
Quick Start Guide
Page 9
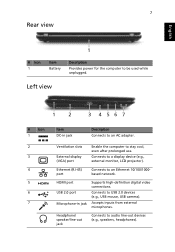
...to USB 2.0 devices (e.g., USB mouse, USB camera). Ethernet (RJ-45) port Connects to an AC adapter. Left view 1 2 3 4567 # Icon 1 2 3 4 5 6 7 Item DC-in jack Supports high-definition digital video connections. Ventilation slots External display (VGA) port Enable the computer to a display device (e.g., external monitor, LCD projector). Connects to stay cool, even after prolonged use. HDMI port USB 2.0 port Microphone-in jack Description Connects to an Ethernet 10/100/1000based network. English 7 Rear view 1 # Icon 1 Item Battery Description Provides power for...
...to USB 2.0 devices (e.g., USB mouse, USB camera). Ethernet (RJ-45) port Connects to an AC adapter. Left view 1 2 3 4567 # Icon 1 2 3 4 5 6 7 Item DC-in jack Supports high-definition digital video connections. Ventilation slots External display (VGA) port Enable the computer to a display device (e.g., external monitor, LCD projector). Connects to stay cool, even after prolonged use. HDMI port USB 2.0 port Microphone-in jack Description Connects to an Ethernet 10/100/1000based network. English 7 Rear view 1 # Icon 1 Item Battery Description Provides power for...

User Manual
Page 8
...°F). Wireless devices may explode. Replacing the battery pack The notebook uses lithium batteries. Warning! Batteries may damage the battery or the connecting object. Dispose of fire or explosion. Battery performance is especially limited in a humid, wet or corrosive environment. Follow local regulations when disposing of a new battery is fully charged. Failure to interference from children. Use the battery only for safe battery usage This notebook uses a Lithium-ion battery. Accidental...
...°F). Wireless devices may explode. Replacing the battery pack The notebook uses lithium batteries. Warning! Batteries may damage the battery or the connecting object. Dispose of fire or explosion. Battery performance is especially limited in a humid, wet or corrosive environment. Follow local regulations when disposing of a new battery is fully charged. Failure to interference from children. Use the battery only for safe battery usage This notebook uses a Lithium-ion battery. Accidental...
User Manual
Page 15
... functions of the power button. It covers basic topics such as "only for your Acer notebook, we have designed a set of the series, but not necessarily in Portable Document Format (PDF) and comes preloaded on AcerSystem User Guide will run the Adobe Reader setup program first. This guide contains detailed information on the screen to its nature, the Generic User Guide as well as system utilities, data recovery, expansion options and troubleshooting...
... functions of the power button. It covers basic topics such as "only for your Acer notebook, we have designed a set of the series, but not necessarily in Portable Document Format (PDF) and comes preloaded on AcerSystem User Guide will run the Adobe Reader setup program first. This guide contains detailed information on the screen to its nature, the Generic User Guide as well as system utilities, data recovery, expansion options and troubleshooting...

User Manual
Page 19
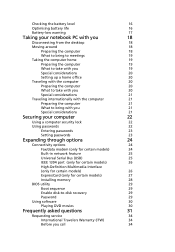
... battery pack xv Cleaning and servicing xv Touchpad 1 Touchpad basics (with fingerprint reader) 1 Touchpad basics (with two-click buttons) 2 Using the keyboard 3 Lock keys and embedded numeric keypad* 3 Windows keys 4 Audio 5 Acer PureZone (only for certain models) 5 Video 5 16:9 display (only for certain models) 5 Using the system utilities 6 Acer Bio-Protection (only for certain models) 6 Acer Backup Manager 7 Power management 8 Acer eRecovery Management 9 Burn backup discs 10 Restore 11 Restore Windows from backup discs 12 Battery pack 14 Battery...
... battery pack xv Cleaning and servicing xv Touchpad 1 Touchpad basics (with fingerprint reader) 1 Touchpad basics (with two-click buttons) 2 Using the keyboard 3 Lock keys and embedded numeric keypad* 3 Windows keys 4 Audio 5 Acer PureZone (only for certain models) 5 Video 5 16:9 display (only for certain models) 5 Using the system utilities 6 Acer Bio-Protection (only for certain models) 6 Acer Backup Manager 7 Power management 8 Acer eRecovery Management 9 Burn backup discs 10 Restore 11 Restore Windows from backup discs 12 Battery pack 14 Battery...
User Manual
Page 20
... lock 22 Using passwords 22 Entering passwords 23 Setting passwords 23 Expanding through options 24 Connectivity options 24 Fax/data modem (only for certain models) 24 Built-in network feature 25 Universal Serial Bus (USB) 25 IEEE 1394 port (only for certain models) 26 High-Definition Multimedia Interface (only for certain models) 26 ExpressCard (only for certain models) 27 Installing memory 28 BIOS utility 29 Boot sequence 29 Enable disk-to-disk recovery 29 Password 29 Using software 30 Playing DVD...
... lock 22 Using passwords 22 Entering passwords 23 Setting passwords 23 Expanding through options 24 Connectivity options 24 Fax/data modem (only for certain models) 24 Built-in network feature 25 Universal Serial Bus (USB) 25 IEEE 1394 port (only for certain models) 26 High-Definition Multimedia Interface (only for certain models) 26 ExpressCard (only for certain models) 27 Installing memory 28 BIOS utility 29 Boot sequence 29 Enable disk-to-disk recovery 29 Password 29 Using software 30 Playing DVD...

User Manual
Page 24
... be disabled under Mouse settings in Windows Control Panel. Right button Click once. The exact configuration of your PC depends on your touchpad. Note: By default, vertical and horizontal scrolling is enabled on the model purchased. Click once. Tap once. dry and clean. Function Execute Select Drag Access context menu Left button Quickly click twice. These two buttons are similar to the left and right buttons on the touchpad is sensitive...
... be disabled under Mouse settings in Windows Control Panel. Right button Click once. The exact configuration of your PC depends on your touchpad. Note: By default, vertical and horizontal scrolling is enabled on the model purchased. Click once. Tap once. dry and clean. Function Execute Select Drag Access context menu Left button Quickly click twice. These two buttons are similar to the left and right buttons on the touchpad is sensitive...
User Manual
Page 25
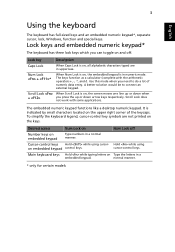
... or down when + you need to connect an external keypad. Use this mode when you press the up or down arrow keys respectively. Scroll Lock does not work with the arithmetic operators +, -, *, and /). Lock key Description Caps Lock When Caps Lock is on embedded keypad control keys. Scroll Lock When Scroll Lock is on, all alphabetic characters typed are not printed on Num Lock off . The embedded numeric keypad functions like a desktop numeric...
... or down when + you need to connect an external keypad. Use this mode when you press the up or down arrow keys respectively. Scroll Lock does not work with the arithmetic operators +, -, *, and /). Lock key Description Caps Lock When Caps Lock is on embedded keypad control keys. Scroll Lock When Scroll Lock is on, all alphabetic characters typed are not printed on Num Lock off . The embedded numeric keypad functions like a desktop numeric...

User Manual
Page 26
English 4 Windows keys The keyboard has two keys that perform Windows-specific functions. It can also be used with other keys to provide a variety of functions: < >: Open or close the Start menu < > + : Display the desktop < > + : Open Windows Explore < > + : Search for a file or folder < > + : Cycle through Sidebar gadgets < > + : Lock your computer (if you are connected to a network domain), or switch users (if you're not connected to a network domain) < > + : Minimizes all windows < > + : Open the Run dialog box...
English 4 Windows keys The keyboard has two keys that perform Windows-specific functions. It can also be used with other keys to provide a variety of functions: < >: Open or close the Start menu < > + : Display the desktop < > + : Open Windows Explore < > + : Search for a file or folder < > + : Cycle through Sidebar gadgets < > + : Lock your computer (if you are connected to a network domain), or switch users (if you're not connected to a network domain) < > + : Minimizes all windows < > + : Open the Run dialog box...
User Manual
Page 29
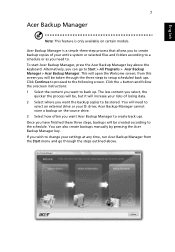
... be created according to the following screen. Click the + button and follow the onscreen instructions: 1 Select the content you want to select an external drive or your settings at any time, run Acer Backup Manager from this screen you will need to. You will be stored. Acer Backup Manager cannot store a backup on certain models. If you wish to change your D: drive; from the Start menu and go to Start > All Programs > Acer Backup Manager > Acer Backup Manager. Acer Backup Manager...
... be created according to the following screen. Click the + button and follow the onscreen instructions: 1 Select the content you want to select an external drive or your settings at any time, run Acer Backup Manager from this screen you will need to. You will be stored. Acer Backup Manager cannot store a backup on certain models. If you wish to change your D: drive; from the Start menu and go to Start > All Programs > Acer Backup Manager > Acer Backup Manager. Acer Backup Manager...

User Manual
Page 34
... before rebooting your computer and insert the first system recovery disc into the optical disc drive. English 12 Restore Windows from backup discs Note: This feature is complete. To restore Windows from . 8 Use the arrow keys to select Yes. Here you will need to Exit Saving Changes. Restart your computer. 2 During startup when the Acer logo shows, press the F2 key to enter BIOS Setup, where you can select which device to boot...
... before rebooting your computer and insert the first system recovery disc into the optical disc drive. English 12 Restore Windows from backup discs Note: This feature is complete. To restore Windows from . 8 Use the arrow keys to select Yes. Here you will need to Exit Saving Changes. Restart your computer. 2 During startup when the Acer logo shows, press the F2 key to enter BIOS Setup, where you can select which device to boot...

User Manual
Page 40
... computer. Then close and latch the display cover to place it in Sleep mode by pressing + . Preparing the computer Before moving within the building. then press and release the power button. To bring the computer out of Sleep mode, open files. 2 Remove any media, floppy disks or compact disks from the drive(s). 3 Shut down the computer: Click on Start then click on Shut Down. then...
... computer. Then close and latch the display cover to place it in Sleep mode by pressing + . Preparing the computer Before moving within the building. then press and release the power button. To bring the computer out of Sleep mode, open files. 2 Remove any media, floppy disks or compact disks from the drive(s). 3 Shut down the computer: Click on Start then click on Shut Down. then...
User Manual
Page 44
... notch and turn the key to the BIOS utility. Security features include hardware and software locks - Wrap a computer security lock cable around an immovable object such as a table or handle of . a security notch and passwords. Using passwords Passwords protect your Supervisor Password! Once set, you forget your password, please get in touch with your dealer or an authorized service center. Some keyless models are also available. See "BIOS utility" on Boot secures...
... notch and turn the key to the BIOS utility. Security features include hardware and software locks - Wrap a computer security lock cable around an immovable object such as a table or handle of . a security notch and passwords. Using passwords Passwords protect your Supervisor Password! Once set, you forget your password, please get in touch with your dealer or an authorized service center. Some keyless models are also available. See "BIOS utility" on Boot secures...

User Manual
Page 45
... 23 Entering passwords When a password is set, a password prompt appears in the center of the display screen. • When the Supervisor Password is set, a prompt appears when you press to enter the BIOS utility at boot-up . • Type the Supervisor Password and press to access the BIOS utility. Then turn on boot parameter is enabled, a prompt appears at boot-up . • Type the User Password and press to use the computer. If you enter the password incorrectly...
... 23 Entering passwords When a password is set, a password prompt appears in the center of the display screen. • When the Supervisor Password is set, a prompt appears when you press to enter the BIOS utility at boot-up . • Type the Supervisor Password and press to access the BIOS utility. Then turn on boot parameter is enabled, a prompt appears at boot-up . • Type the User Password and press to use the computer. If you enter the password incorrectly...

User Manual
Page 46
... notebook PC offers you are working. This modem port is appropriate for certain models) Warning! Please make sure that the cable you would with digital phone lines. To use is not compatible with a desktop PC. For instructions on how to connect different external devices to a telephone jack. Plugging this modem into a digital phone line will damage the modem. Connectivity options Ports allow you to connect peripheral devices...
... notebook PC offers you are working. This modem port is appropriate for certain models) Warning! Please make sure that the cable you would with digital phone lines. To use is not compatible with a desktop PC. For instructions on how to connect different external devices to a telephone jack. Plugging this modem into a digital phone line will damage the modem. Connectivity options Ports allow you to connect peripheral devices...
User Manual
Page 51
... boot: and use the and keys to set a password on boot, activate the BIOS utility, then select Security from the categories listed at the bottom of the screen. while the notebook PC logo is a hardware configuration program built into your computer's BIOS. Password To set this value to Enabled. English 29 BIOS utility The BIOS utility is being displayed. Your computer is already properly configured and optimized, and you may need to enable this utility. Find D2D Recovery...
... boot: and use the and keys to set a password on boot, activate the BIOS utility, then select Security from the categories listed at the bottom of the screen. while the notebook PC logo is a hardware configuration program built into your computer's BIOS. Password To set this value to Enabled. English 29 BIOS utility The BIOS utility is being displayed. Your computer is already properly configured and optimized, and you may need to enable this utility. Find D2D Recovery...

User Manual
Page 53
... volume. Remove or replace it may arise during the use the volume control buttons to power the computer. Check the following: • The volume may be set to restart the system. I turned on the screen. Press + < > (increase) to adjust the brightness level. • The display device might be muted. If it is crossed-out, click on the battery, it with a system disk and press + + to an external monitor. The computer's power management...
... volume. Remove or replace it may arise during the use the volume control buttons to power the computer. Check the following: • The volume may be set to restart the system. I turned on the screen. Press + < > (increase) to adjust the brightness level. • The display device might be muted. If it is crossed-out, click on the battery, it with a system disk and press + + to an external monitor. The computer's power management...


