
User Manual
Page 12
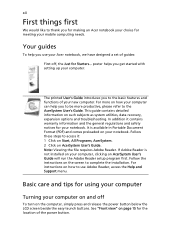
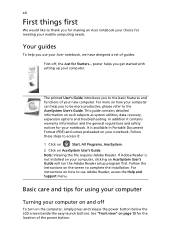
... computer on and off , the Just for using your computer Turning your computer, clicking on the computer, simply press and release the power button below the LCD screen beside the easy-launch buttons. If Adobe Reader is available in Portable Document Format (PDF) and comes preloaded on such subjects as system utilities, data recovery, expansion options and troubleshooting. Basic care and tips for Starters...
... computer on and off , the Just for using your computer Turning your computer, clicking on the computer, simply press and release the power button below the LCD screen beside the easy-launch buttons. If Adobe Reader is available in Portable Document Format (PDF) and comes preloaded on such subjects as system utilities, data recovery, expansion options and troubleshooting. Basic care and tips for Starters...

User Manual
Page 17
...55 Using passwords 55 Entering passwords 56 Setting passwords 56 Expanding through options 57 Connectivity options 57 Fax/data modem 57 Built-in network feature 58 Universal Serial Bus (USB) 58 PC Card slot 59 Installing memory 60 BIOS utility 60 Boot sequence 60 Enable disk-to-disk recovery 61 Password 61 Using software 61 Playing DVD movies 61 Power management 62 Acer eRecovery Management 62 Create backup 63 Restore from backup 63 Create factory default image CD 64 Re-install bundled software without CD 64 Change password 65 Troubleshooting 66...
...55 Using passwords 55 Entering passwords 56 Setting passwords 56 Expanding through options 57 Connectivity options 57 Fax/data modem 57 Built-in network feature 58 Universal Serial Bus (USB) 58 PC Card slot 59 Installing memory 60 BIOS utility 60 Boot sequence 60 Enable disk-to-disk recovery 61 Password 61 Using software 61 Playing DVD movies 61 Power management 62 Acer eRecovery Management 62 Create backup 63 Restore from backup 63 Create factory default image CD 64 Re-install bundled software without CD 64 Change password 65 Troubleshooting 66...
User Manual
Page 19
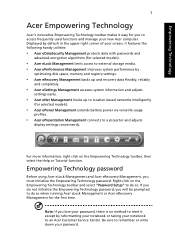
... and recovers data flexibly, reliably and completely. • Acer eSettings Management accesses system information and adjusts settings easily. • Acer eNet Management hooks up to location-based networks intelligently (for selected models). • Acer ePower Management extends battery power via versatile usage profiles. • Acer ePresentation Management connects to access frequently used functions and manage your password. For more information, right click on the Empowering Technology toolbar and select "Password Setup" to an Acer Customer Service Center...
... and recovers data flexibly, reliably and completely. • Acer eSettings Management accesses system information and adjusts settings easily. • Acer eNet Management hooks up to location-based networks intelligently (for selected models). • Acer ePower Management extends battery power via versatile usage profiles. • Acer ePresentation Management connects to access frequently used functions and manage your password. For more information, right click on the Empowering Technology toolbar and select "Password Setup" to an Acer Customer Service Center...
User Manual
Page 29
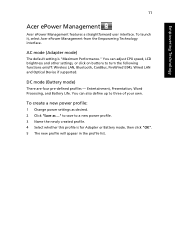
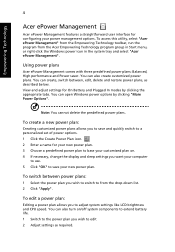
... in the profile list. You can adjust CPU speed, LCD brightness and other settings, or click on /off: Wireless LAN, Bluetooth, CardBus, FireWire(1394), Wired LAN and Optical Device if supported. To launch it, select Acer ePower Management from the Empowering Technology interface. Empowering Technology 11 Acer ePower Management Acer ePower Management features a straightforward user interface. to save to turn the following functions on buttons to a new power profile. 3 Name the newly created profile. 4 Select...
... in the profile list. You can adjust CPU speed, LCD brightness and other settings, or click on /off: Wireless LAN, Bluetooth, CardBus, FireWire(1394), Wired LAN and Optical Device if supported. To launch it, select Acer ePower Management from the Empowering Technology interface. Empowering Technology 11 Acer ePower Management Acer ePower Management features a straightforward user interface. to save to turn the following functions on buttons to a new power profile. 3 Name the newly created profile. 4 Select...

User Manual
Page 37
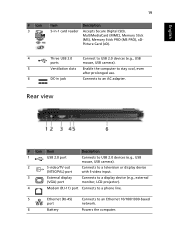
...port with S-video input. 3 External display Connects to a display device (e.g., external (VGA) port monitor, LCD projector). 4 Modem (RJ-11) port Connects to a phone line. 5 Ethernet (RJ-45) Connects to an AC adapter. English 19 # Icon 3 Item 5-in-1 card reader Description Accepts Secure Digital (SD), MultiMediaCard (MMC), Memory Stick (MS), Memory Stick PRO (MS PRO), xDPicture Card (xD). 4 Three USB 2.0 Connect to USB 2.0 devices (e.g., USB ports mouse, USB camera). 5 Ventilation slots Enable the computer to stay cool, even after prolonged use. 6 DC-in jack Connects...
...port with S-video input. 3 External display Connects to a display device (e.g., external (VGA) port monitor, LCD projector). 4 Modem (RJ-11) port Connects to a phone line. 5 Ethernet (RJ-45) Connects to an AC adapter. English 19 # Icon 3 Item 5-in-1 card reader Description Accepts Secure Digital (SD), MultiMediaCard (MMC), Memory Stick (MS), Memory Stick PRO (MS PRO), xDPicture Card (xD). 4 Three USB 2.0 Connect to USB 2.0 devices (e.g., USB ports mouse, USB camera). 5 Ventilation slots Enable the computer to stay cool, even after prolonged use. 6 DC-in jack Connects...
User Manual
Page 42
... support Microphone-in jack Line-in jack Ethernet (RJ-45) port Modem (RJ-11) port DC-in jack for TravelMate 5110 Series) PC Card slot (one Type II) Four USB 2.0 ports External display (VGA) port S-video/TV-out (NTSC/PAL) port Headphones/speaker/line-out jack with PTT approval; Wake-on -Ring ready LAN: gigabit Ethernet; Wake-on -LAN ready WPAN: Bluetooth® 2.0+EDR (Enhanced Data Rate) WLAN: Intel® PRO/Wireless 3945ABG network connection (dual-band tri-mode...
... support Microphone-in jack Line-in jack Ethernet (RJ-45) port Modem (RJ-11) port DC-in jack for TravelMate 5110 Series) PC Card slot (one Type II) Four USB 2.0 ports External display (VGA) port S-video/TV-out (NTSC/PAL) port Headphones/speaker/line-out jack with PTT approval; Wake-on -Ring ready LAN: gigabit Ethernet; Wake-on -LAN ready WPAN: Bluetooth® 2.0+EDR (Enhanced Data Rate) WLAN: Intel® PRO/Wireless 3945ABG network connection (dual-band tri-mode...
User Manual
Page 50
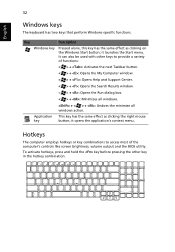
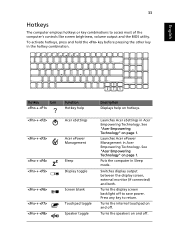
.... it opens the application's context menu. Hotkeys The computer employs hotkeys or key combinations to provide a variety of the computer's controls like screen brightness, volume output and the BIOS utility. It can also be used with other key in the hotkey combination. Key Description Windows key Pressed alone, this key has the same effect as clicking the right mouse key button; English 32 Windows keys The keyboard has two keys that perform Windows-specific functions. it launches the Start menu.
.... it opens the application's context menu. Hotkeys The computer employs hotkeys or key combinations to provide a variety of the computer's controls like screen brightness, volume output and the BIOS utility. It can also be used with other key in the hotkey combination. Key Description Windows key Pressed alone, this key has the same effect as clicking the right mouse key button; English 32 Windows keys The keyboard has two keys that perform Windows-specific functions. it launches the Start menu.
User Manual
Page 51
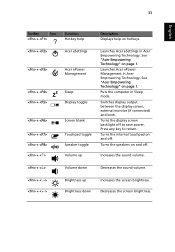
... the screen brightness. 33 English Hotkey Icon + Function Hotkey help Description Displays help on hotkeys. + + + + + + + + Acer eSettings Acer ePower Management Sleep Display toggle Screen blank Touchpad toggle Speaker toggle Volume up Brightness down Decreases the sound volume. + + Brightness up Launches Acer eSettings in Sleep mode. Press any key to save power. See "Acer Empowering Technology" on and off to return. Turns the internal touchpad on page 1. Switches display output between the display screen, external monitor (if connected...
... the screen brightness. 33 English Hotkey Icon + Function Hotkey help Description Displays help on hotkeys. + + + + + + + + Acer eSettings Acer ePower Management Sleep Display toggle Screen blank Touchpad toggle Speaker toggle Volume up Brightness down Decreases the sound volume. + + Brightness up Launches Acer eSettings in Sleep mode. Press any key to save power. See "Acer Empowering Technology" on and off to return. Turns the internal touchpad on page 1. Switches display output between the display screen, external monitor (if connected...

User Manual
Page 65
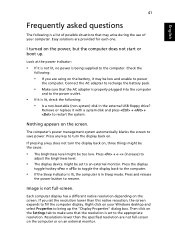
... the specified resolution are using on the battery, it is in the external USB floppy drive? Check the following: • If you set to an external monitor. Nothing appears on the screen. Press any key to turn the display back on the power, but the computer does not start or boot up the "Display Properties" dialog box. Press and release the power button to save power. Right-click on...
... the specified resolution are using on the battery, it is in the external USB floppy drive? Check the following: • If you set to an external monitor. Nothing appears on the screen. Press any key to turn the display back on the power, but the computer does not start or boot up the "Display Properties" dialog box. Press and release the power button to save power. Right-click on...
User Manual
Page 69
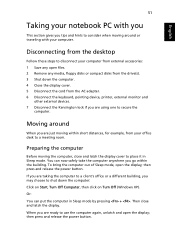
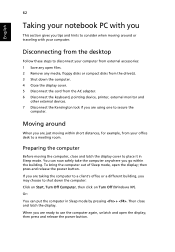
... out of Sleep mode, open files. 2 Remove any open the display; then press and release the power button. Disconnecting from the desktop Follow these steps to shut down the computer. 4 Close the display cover. 5 Disconnect the cord from external accessories: 1 Save any media, floppy disks or compact disks from the drive(s). 3 Shut down the computer: Click on Start, Turn Off Computer, then click on Turn Off (Windows XP). When...
... out of Sleep mode, open files. 2 Remove any open the display; then press and release the power button. Disconnecting from the desktop Follow these steps to shut down the computer. 4 Close the display cover. 5 Disconnect the cord from external accessories: 1 Save any media, floppy disks or compact disks from the drive(s). 3 Shut down the computer: Click on Start, Turn Off Computer, then click on Turn Off (Windows XP). When...
User Manual
Page 79
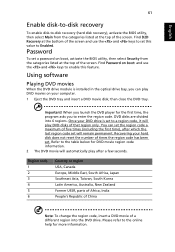
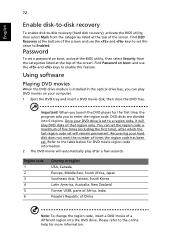
... after which the last region code set this feature. Find D2D Recovery at the bottom of the screen and use the and keys to enable this value to Enabled. Find Password on boot, activate the BIOS utility, then select Security from the categories listed at the top of the screen. then close the DVD tray. English 61 Enable disk-to-disk recovery To enable disk-to-disk recovery (hard disk recovery), activate the BIOS utility, then select Main from the...
... after which the last region code set this feature. Find D2D Recovery at the bottom of the screen and use the and keys to enable this value to Enabled. Find Password on boot, activate the BIOS utility, then select Security from the categories listed at the top of the screen. then close the DVD tray. English 61 Enable disk-to-disk recovery To enable disk-to-disk recovery (hard disk recovery), activate the BIOS utility, then select Main from the...
User Manual
Page 12
... the location of the power button. The printed User's Guide introduces you to complete the installation. It is not installed on your computer, clicking on such subjects as system utilities, data recovery, expansion options and troubleshooting. For instructions on how your computer can help you use Adobe Reader, access the Help and Support menu. For more productive, please refer to the AcerSystem User's Guide. Follow the instructions on the screen to...
... the location of the power button. The printed User's Guide introduces you to complete the installation. It is not installed on your computer, clicking on such subjects as system utilities, data recovery, expansion options and troubleshooting. For instructions on how your computer can help you use Adobe Reader, access the Help and Support menu. For more productive, please refer to the AcerSystem User's Guide. Follow the instructions on the screen to...
User Manual
Page 18
... 66 Using a computer security lock 66 Using passwords 66 Entering passwords 67 Setting passwords 67 Expanding through options 68 Connectivity options 68 Fax/data modem 68 Built-in network feature 69 Universal Serial Bus (USB) 69 PC Card slot 70 Installing memory 71 BIOS utility 71 Boot sequence 71 Enable disk-to-disk recovery 72 Password 72 Using software 72 Playing DVD movies 72 Power management 73 Acer eRecovery Management 74 Create backup 74 Burn backup disc 75 Restore and recovery 75 Troubleshooting 76 Troubleshooting tips 76 Error messages...
... 66 Using a computer security lock 66 Using passwords 66 Entering passwords 67 Setting passwords 67 Expanding through options 68 Connectivity options 68 Fax/data modem 68 Built-in network feature 69 Universal Serial Bus (USB) 69 PC Card slot 70 Installing memory 71 BIOS utility 71 Boot sequence 71 Enable disk-to-disk recovery 72 Password 72 Using software 72 Playing DVD movies 72 Power management 73 Acer eRecovery Management 74 Create backup 74 Burn backup disc 75 Restore and recovery 75 Troubleshooting 76 Troubleshooting tips 76 Error messages...
User Manual
Page 24
... settings like LCD brightness and CPU speed. You can also turn on . 4 If necessary, change the display and sleep settings you want your customized plan on /off system components to extend battery life. 1 Switch to the power plan you wish to switch to save and quickly switch to a personalized set of power options. 1 Click the Create Power Plan icon. 2 Enter a name for On Battery and Plugged In modes by clicking "More Power Options". You can open Windows power options...
... settings like LCD brightness and CPU speed. You can also turn on . 4 If necessary, change the display and sleep settings you want your customized plan on /off system components to extend battery life. 1 Switch to the power plan you wish to switch to save and quickly switch to a personalized set of power options. 1 Click the Create Power Plan icon. 2 Enter a name for On Battery and Plugged In modes by clicking "More Power Options". You can open Windows power options...
User Manual
Page 39
...with S-video input. 3 External display Connects to a display device (e.g., external (VGA) port monitor, LCD projector). 4 Modem (RJ-11) port Connects to a phone line. 5 Ethernet (RJ-45) Connects to an AC adapter. English 19 # Icon 3 Item 5-in-1 card reader Description Accepts Secure Digital (SD), MultiMediaCard (MMC), Memory Stick (MS), Memory Stick PRO (MS PRO), xDPicture Card (xD). 4 Three USB 2.0 Connect to USB 2.0 devices (e.g., USB ports mouse, USB camera). 5 Ventilation slots Enable the computer to stay cool, even after prolonged use. 6 DC-in jack Connects to...
...with S-video input. 3 External display Connects to a display device (e.g., external (VGA) port monitor, LCD projector). 4 Modem (RJ-11) port Connects to a phone line. 5 Ethernet (RJ-45) Connects to an AC adapter. English 19 # Icon 3 Item 5-in-1 card reader Description Accepts Secure Digital (SD), MultiMediaCard (MMC), Memory Stick (MS), Memory Stick PRO (MS PRO), xDPicture Card (xD). 4 Three USB 2.0 Connect to USB 2.0 devices (e.g., USB ports mouse, USB camera). 5 Ventilation slots Enable the computer to stay cool, even after prolonged use. 6 DC-in jack Connects to...
User Manual
Page 53
...'s controls like screen brightness, volume output and the BIOS utility. See "Acer Empowering Technology" on and off. To activate hotkeys, press and hold the key before pressing the other key in Acer Empowering Technology. Turns the internal touchpad on page 1. English 33 Hotkeys The computer employs hotkeys or key combinations to return. Puts the computer in Acer Empowering Technology. Switches display output between the display screen, external monitor (if connected) and both. See "Acer Empowering Technology" on hotkeys. + + + + + + + Acer...
...'s controls like screen brightness, volume output and the BIOS utility. See "Acer Empowering Technology" on and off. To activate hotkeys, press and hold the key before pressing the other key in Acer Empowering Technology. Turns the internal touchpad on page 1. English 33 Hotkeys The computer employs hotkeys or key combinations to return. Puts the computer in Acer Empowering Technology. Switches display output between the display screen, external monitor (if connected) and both. See "Acer Empowering Technology" on hotkeys. + + + + + + + Acer...
User Manual
Page 61
... computer display. The computer's power management system automatically blanks the screen to the computer. • If the Sleep indicator is lit, the computer is in the external USB floppy drive? Press and release the power button to resume. Check the following: • If you set to the appropriate resolution. Connect the AC adapter to recharge the battery pack. • Make sure that the resolution is set the...
... computer display. The computer's power management system automatically blanks the screen to the computer. • If the Sleep indicator is lit, the computer is in the external USB floppy drive? Press and release the power button to resume. Check the following: • If you set to the appropriate resolution. Connect the AC adapter to recharge the battery pack. • Make sure that the resolution is set the...
User Manual
Page 82
... power button. To bring the computer out of Sleep mode, open files. 2 Remove any open the display; When you are ready to use the computer again, unlatch and open the display; English 62 Taking your notebook PC with your computer from external accessories: 1 Save any media, floppy disks or compact disks from the AC adapter. 6 Disconnect the keyboard, pointing device, printer, external monitor and other external devices. 7 Disconnect the Kensington lock if you are using...
... power button. To bring the computer out of Sleep mode, open files. 2 Remove any open the display; When you are ready to use the computer again, unlatch and open the display; English 62 Taking your notebook PC with your computer from external accessories: 1 Save any media, floppy disks or compact disks from the AC adapter. 6 Disconnect the keyboard, pointing device, printer, external monitor and other external devices. 7 Disconnect the Kensington lock if you are using...
User Manual
Page 92
... time), after a few seconds. Password To set a password on your hard disk does not reset the number of the screen. Using software Playing DVD movies When the DVD drive module is set to a region code, it will remain permanent. When you launch the DVD player for more information. Recovering your computer. 1 Eject the DVD tray and insert a DVD movie disk; English 72 Enable disk-to-disk recovery To enable disk-to-disk recovery (hard disk recovery), activate the BIOS utility, then select Main from the...
... time), after a few seconds. Password To set a password on your hard disk does not reset the number of the screen. Using software Playing DVD movies When the DVD drive module is set to a region code, it will remain permanent. When you launch the DVD player for more information. Recovering your computer. 1 Eject the DVD tray and insert a DVD movie disk; English 72 Enable disk-to-disk recovery To enable disk-to-disk recovery (hard disk recovery), activate the BIOS utility, then select Main from the...
User Manual
Page 95
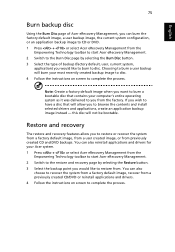
... restore or recover the system from a factory default image, from a user created image, or from a previously created CD/DVD or reinstall applications and drivers. 4 Follow the instructions on screen to complete the process. You can also reinstall applications and drivers for your Acer system. 1 Press + or select Acer eRecovery Management from the Empowering Technology toolbar to start Acer eRecovery Management. 2 Switch to the Burn Disc page by selecting the Burn Disc button...
... restore or recover the system from a factory default image, from a user created image, or from a previously created CD/DVD or reinstall applications and drivers. 4 Follow the instructions on screen to complete the process. You can also reinstall applications and drivers for your Acer system. 1 Press + or select Acer eRecovery Management from the Empowering Technology toolbar to start Acer eRecovery Management. 2 Switch to the Burn Disc page by selecting the Burn Disc button...


