TravelMate 4730/4730G Service Guide
Page 30
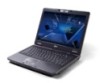
... USB and PCI Express PCIe Mini Card 2.3-2.7GHz, 3.3-3.8GHz1, 5.1-5.8GHz Windows XP and Vista Co-Existence Layer and Single Comms Control GUI Ebron's Wi-Fi drivers are compatible with fall back of 36, 48, 24, 18, 12, 9, 6Mbps 802.11b: 11g with Shiloh 3 SKU - 3x3 (MC) / 1x2 Wi-FI (MC & HMC...
... USB and PCI Express PCIe Mini Card 2.3-2.7GHz, 3.3-3.8GHz1, 5.1-5.8GHz Windows XP and Vista Co-Existence Layer and Single Comms Control GUI Ebron's Wi-Fi drivers are compatible with fall back of 36, 48, 24, 18, 12, 9, 6Mbps 802.11b: 11g with Shiloh 3 SKU - 3x3 (MC) / 1x2 Wi-FI (MC & HMC...

TravelMate 4730/4730G Service Guide
Page 39
... Port 1 to 6 Disable or Enable the Express Card solution for windows Standby and Hibernation. ASF Configuration Enter the ASF Configuration menu. Submenu Items • USB Driver Select • EHCI 1 and 2 • UHCI 1 to 5 • Per-Port Control • USB Port 1 to 11 • Port 80h Cycles • DMI Link ASPM Control...
... Port 1 to 6 Disable or Enable the Express Card solution for windows Standby and Hibernation. ASF Configuration Enter the ASF Configuration menu. Submenu Items • USB Driver Select • EHCI 1 and 2 • UHCI 1 to 5 • Per-Port Control • USB Port 1 to 11 • Port 80h Cycles • DMI Link ASPM Control...
TravelMate 4730/4730G Service Guide
Page 47
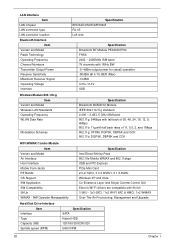
... modify the boot priority order, for the following steps to use the Phlash utility. NOTE: Please use the Phlash. NOTE: Do not install memory-related drivers (XMS, EMS, DPMI) when you use the AC adaptor power supply when you use the Flash Utility: 1. Execute the IFLASH.BAT batch file to update...
... modify the boot priority order, for the following steps to use the Phlash utility. NOTE: Please use the Phlash. NOTE: Do not install memory-related drivers (XMS, EMS, DPMI) when you use the AC adaptor power supply when you use the Flash Utility: 1. Execute the IFLASH.BAT batch file to update...
TravelMate 4730/4730G Service Guide
Page 66
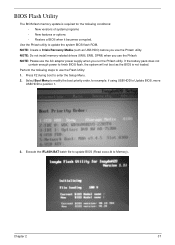
See "Removing the Lower Covers" on page 46. 2. Remove the screw securing the ODD module. Removing the Optical Drive Module 1. Step ODD Module Size M2.5*5(NL) Quantity 1 Screw Type 4. See "Removing the Battery Pack" on page 49. 3. Remove the Memory cover. Using a screw driver, push the ODD module through the chassis and pull to remove it from the main unit. 56 Chapter 3
See "Removing the Lower Covers" on page 46. 2. Remove the screw securing the ODD module. Removing the Optical Drive Module 1. Step ODD Module Size M2.5*5(NL) Quantity 1 Screw Type 4. See "Removing the Battery Pack" on page 49. 3. Remove the Memory cover. Using a screw driver, push the ODD module through the chassis and pull to remove it from the main unit. 56 Chapter 3

TravelMate 4730/4730G Service Guide
Page 112
Main Module Reassembly Procedure Replacing the VGA Module 1. Replace the two securing screws on the VGA Module. Insert the VGA Module as shown. Using a flat-tipped screw driver, lock the CPU in side up), and insert the CPU into the CPU bracket the socket as shown. 2. as shown. 102 Chapter 3 Replacing the CPU 1. Carefully turn the mainboard upside down (CPU 2.
Main Module Reassembly Procedure Replacing the VGA Module 1. Replace the two securing screws on the VGA Module. Insert the VGA Module as shown. Using a flat-tipped screw driver, lock the CPU in side up), and insert the CPU into the CPU bracket the socket as shown. 2. as shown. 102 Chapter 3 Replacing the CPU 1. Carefully turn the mainboard upside down (CPU 2.
TravelMate 4730/4730G Service Guide
Page 136
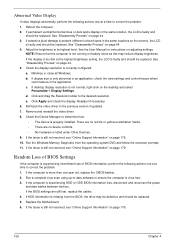
...damage is more than one at a time to correct the problem. 1. See "Disassembly Process" on page 44. 3. Roll back the video driver to its highest level. Random Loss of BIOS information, perform the following actions one at the highest brightness setting, the LCD is not normal...Issue is still not resolved, see "Online Support Information" on the desktop and select Personalize´ Display Settings. c. Remove and reinstall the video driver. 8. There are no device conflicts. • No hardware is missing from the operating system DVD and follow the onscreen prompts. 11. Run...
...damage is more than one at a time to correct the problem. 1. See "Disassembly Process" on page 44. 3. Roll back the video driver to its highest level. Random Loss of BIOS information, perform the following actions one at the highest brightness setting, the LCD is not normal...Issue is still not resolved, see "Online Support Information" on the desktop and select Personalize´ Display Settings. c. Remove and reinstall the video driver. 8. There are no device conflicts. • No hardware is missing from the operating system DVD and follow the onscreen prompts. 11. Run...

TravelMate 4730/4730G Service Guide
Page 139
... the issue is still not resolved, see "Online Support Information" on page 179. Reinstall the Operating System. 11. Roll back the audio driver to configure the speakers. 8. Follow the onscreen prompts to the previous version, if updated recently. 4. Chapter 4 129 Click the volume icon... Mixer to verify that all volume controls are set to correct the problem. 1. Reboot the computer. 2. Remove and reinstall the audio driver. 5. Ensure that other audio applications are set mid range: a. Sound Problems If sound problems are experienced, perform the following actions one...
... the issue is still not resolved, see "Online Support Information" on page 179. Reinstall the Operating System. 11. Roll back the audio driver to configure the speakers. 8. Follow the onscreen prompts to the previous version, if updated recently. 4. Chapter 4 129 Click the volume icon... Mixer to verify that all volume controls are set to correct the problem. 1. Reboot the computer. 2. Remove and reinstall the audio driver. 5. Ensure that other audio applications are set mid range: a. Sound Problems If sound problems are experienced, perform the following actions one...
TravelMate 4730/4730G Service Guide
Page 141
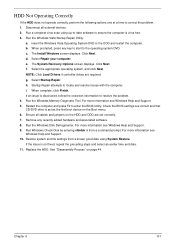
Disconnect all cables and jumpers on the HDD and ODD are required. When prompted, press any recently added hardware and associated software. 8. NOTE: Click Load Drivers if controller drives are set as the first boot device on page 44. Restart the computer and press F2 to locate and resolve issues with ...
Disconnect all cables and jumpers on the HDD and ODD are required. When prompted, press any recently added hardware and associated software. 8. NOTE: Click Load Drivers if controller drives are set as the first boot device on page 44. Restart the computer and press F2 to locate and resolve issues with ...

TravelMate 4730/4730G Service Guide
Page 143
... controller transfer mode is enabled: a. If a device has an exclamation mark, right-click on the device and uninstall and reinstall the driver. Ensure that the Regional Code is correct for burning discs is moved to correct the problem. 1. Check that AutoPlay is set to ... Properties and select the Advanced Settings tab. If a device has an exclamation mark, right-click on the device and uninstall and reinstall the driver. Select the Recording tab. b. In the Desktop disc recording panel, select the writable ODD from the drop down list. b. Ensure that there...
... controller transfer mode is enabled: a. If a device has an exclamation mark, right-click on the device and uninstall and reinstall the driver. Ensure that the Regional Code is correct for burning discs is moved to correct the problem. 1. Check that AutoPlay is set to ... Properties and select the Advanced Settings tab. If a device has an exclamation mark, right-click on the device and uninstall and reinstall the driver. Select the Recording tab. b. In the Desktop disc recording panel, select the writable ODD from the drop down list. b. Ensure that there...
TravelMate 4730/4730G Service Guide
Page 150
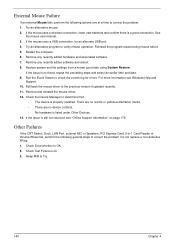
... to check the events log for errors. Check Test Fixture is OK. 2. Run the Event Viewer to verify mouse operation. Remove and reinstall the mouse driver. 12. Other Failures If the CRT Switch, Dock, LAN Port, external MIC or Speakers, PCI Express Card, 5-in-1 Card Reader or Volume Wheel fail, perform... to Try. 140 Chapter 4 External Mouse Failure If an external Mouse fails, perform the following general steps to correct the problem. Roll back the mouse driver to the previous version if updated recently. 11.
... to check the events log for errors. Check Test Fixture is OK. 2. Run the Event Viewer to verify mouse operation. Remove and reinstall the mouse driver. 12. Other Failures If the CRT Switch, Dock, LAN Port, external MIC or Speakers, PCI Express Card, 5-in-1 Card Reader or Volume Wheel fail, perform... to Try. 140 Chapter 4 External Mouse Failure If an external Mouse fails, perform the following general steps to correct the problem. Roll back the mouse driver to the previous version if updated recently. 11.

TravelMate 4730/4730G Service Guide
Page 152
Driver Name PeiEventLog OemServices SioInit MonoStatusCode PentiumMCpuPeim PlatformStage1 Variable IchInit PlatformStage2 IchSmbusArpDisabled ClockGen OpPresence TcgPei ...15 2F 10 11 31 A4 A5 32 33 34 35 36 8A 37 38 39 3A 3B 3C 3D Driver Name CpuIo Cf9Reset PcRtc StatusCode Variable SmmVariable EmuVariable TcgDxe PhysicalPresence TpmDriver TcgSmm PhysicalPresenceReadyToBoot DataHubRecordPolicy Undi SNP BC PxeDhcp4 Ebc IsaBus...Chapter 4 Port 80 POST Codes The following table details the Port 80 POST codes and drivers used in the POST. POST Codes Tables These tables describe the POST codes...
Driver Name PeiEventLog OemServices SioInit MonoStatusCode PentiumMCpuPeim PlatformStage1 Variable IchInit PlatformStage2 IchSmbusArpDisabled ClockGen OpPresence TcgPei ...15 2F 10 11 31 A4 A5 32 33 34 35 36 8A 37 38 39 3A 3B 3C 3D Driver Name CpuIo Cf9Reset PcRtc StatusCode Variable SmmVariable EmuVariable TcgDxe PhysicalPresence TpmDriver TcgSmm PhysicalPresenceReadyToBoot DataHubRecordPolicy Undi SNP BC PxeDhcp4 Ebc IsaBus...Chapter 4 Port 80 POST Codes The following table details the Port 80 POST codes and drivers used in the POST. POST Codes Tables These tables describe the POST codes...

TravelMate 4730/4730G Service Guide
Page 153
Driver Name SmmDisp SmmReloc SmmRuntime SmmThunk OemServices ChipsetInit SmmAccess PciHostBridge PciExpress GmchMbi IchInit IdeController SataController IchSmbusLight SmmControl Ich7MSmmDispatcher IsaAcpiDriver Fwh SmmFwh PciHotPlug BootOptionPolicy SetupUtility ...4A 4B C1 C8 4C 52 CE 54 51 76 55 56 D9 CC D0 f9 D1 D2 57 58 59 AB AC D7 A6 Driver Name HiiDatabase OemSetupBrowser Font(English) Font(French) Font(Chinese) UnicodeCollation ConPlatform ConSplitter GraphicsConsole Terminal VgaClass SaveMemoryConfig AcpiSupport AcpiPlatform DataHub DataHubStdErr GenericMemoryTest DiskIo Fat Partition...
Driver Name SmmDisp SmmReloc SmmRuntime SmmThunk OemServices ChipsetInit SmmAccess PciHostBridge PciExpress GmchMbi IchInit IdeController SataController IchSmbusLight SmmControl Ich7MSmmDispatcher IsaAcpiDriver Fwh SmmFwh PciHotPlug BootOptionPolicy SetupUtility ...4A 4B C1 C8 4C 52 CE 54 51 76 55 56 D9 CC D0 f9 D1 D2 57 58 59 AB AC D7 A6 Driver Name HiiDatabase OemSetupBrowser Font(English) Font(French) Font(Chinese) UnicodeCollation ConPlatform ConSplitter GraphicsConsole Terminal VgaClass SaveMemoryConfig AcpiSupport AcpiPlatform DataHub DataHubStdErr GenericMemoryTest DiskIo Fat Partition...


