

TravelMate 4060 User's Guide
Page 8
... feature 35 Universal Serial Bus (USB) 35 IEEE 1394 port 36 PC Card slot 36 Installing memory 37 BIOS utility 38 Boot sequence 38 Enable disk-to-disk recovery 38 Password 39 Using software 39 Playing DVD movies 39 Power management 40...
... feature 35 Universal Serial Bus (USB) 35 IEEE 1394 port 36 PC Card slot 36 Installing memory 37 BIOS utility 38 Boot sequence 38 Enable disk-to-disk recovery 38 Password 39 Using software 39 Playing DVD movies 39 Power management 40...
TravelMate 4060 User's Guide
Page 30
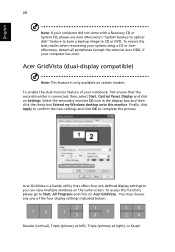
...certain models. You may choose any one ). To ensure the best results when recovering your system using a CD or Acer eRecovery, detach all peripherals (except the external Acer ODD, if your notebook, first ensure that offers four pre-defined display settings so you can view multiple windows on... Settings. English 20 Note: If your computer did not come with a Recovery CD or System CD, please use Acer eRecovery's "System backup to optical disk" feature to burn a backup image to CD or DVD. Acer GridVista (dual-display compatible) Note: This feature is a handy utility that the ...
...certain models. You may choose any one ). To ensure the best results when recovering your system using a CD or Acer eRecovery, detach all peripherals (except the external Acer ODD, if your notebook, first ensure that offers four pre-defined display settings so you can view multiple windows on... Settings. English 20 Note: If your computer did not come with a Recovery CD or System CD, please use Acer eRecovery's "System backup to optical disk" feature to burn a backup image to CD or DVD. Acer GridVista (dual-display compatible) Note: This feature is a handy utility that the ...
TravelMate 4060 User's Guide
Page 36
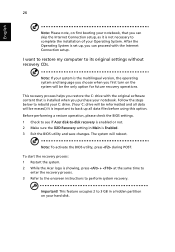
... activate the BIOS utility, press during POST. I want to restore my computer to perform system recovery. Before performing a restore operation, please check the BIOS settings. 1 Check to see if Acer disk-to complete the installation of your C: drive. (Your C: drive will be the only option ...for future recovery operations. Follow the steps below to rebuild your Operating System. This feature occupies 2 to ...
... activate the BIOS utility, press during POST. I want to restore my computer to perform system recovery. Before performing a restore operation, please check the BIOS settings. 1 Check to see if Acer disk-to complete the installation of your C: drive. (Your C: drive will be the only option ...for future recovery operations. Follow the steps below to rebuild your Operating System. This feature occupies 2 to ...
TravelMate 4060 User's Guide
Page 48
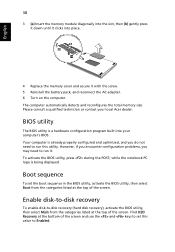
... into your local Acer dealer. while the notebook PC logo is already properly configured and optimized, and you may need to run it. Find D2D Recovery at the bottom of the screen and use the and keys to run this value to -disk recovery (hard disk recovery), activate the BIOS... utility, then select Main from the categories listed at the top of the screen. Enable disk-to-disk recovery To enable disk-to Enabled. BIOS utility The BIOS utility is a hardware configuration...
... into your local Acer dealer. while the notebook PC logo is already properly configured and optimized, and you may need to run it. Find D2D Recovery at the bottom of the screen and use the and keys to run this value to -disk recovery (hard disk recovery), activate the BIOS... utility, then select Main from the categories listed at the top of the screen. Enable disk-to-disk recovery To enable disk-to Enabled. BIOS utility The BIOS utility is a hardware configuration...
TravelMate 4060 User's Guide
Page 51
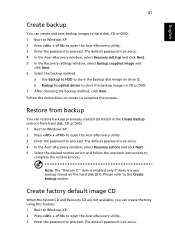
...item is enabled only if there is six zeros. Follow the instructions on the hard disk (D:\). The default password is six zeros. 4 In the Acer eRecovery window, select Recovery settings and click Next. 5 In the Recovery settings window, select Backup snapshot image and click Next. 6 Select the backup method.... 2 Press + to open the Acer eRecovery utility. 3 Enter the password to store the backup disk image on CD or DVD. 7 After choosing the backup method, click Next. The default password is six zeros. 4 In the Acer eRecovery window, select Recovery actions and click Next. 5 Select ...
...item is enabled only if there is six zeros. Follow the instructions on the hard disk (D:\). The default password is six zeros. 4 In the Acer eRecovery window, select Recovery settings and click Next. 5 In the Recovery settings window, select Backup snapshot image and click Next. 6 Select the backup method.... 2 Press + to open the Acer eRecovery utility. 3 Enter the password to store the backup disk image on CD or DVD. 7 After choosing the backup method, click Next. The default password is six zeros. 4 In the Acer eRecovery window, select Recovery actions and click Next. 5 Select ...
TravelMate 4060 User's Guide
Page 52
...Windows, you can be changed by a password that can run Acer disk-to-disk recovery to re-install. The default password is six zeros. 4 In the Acer eRecovery window, select Recovery actions and click Next. 5 In the Recovery settings window, select Reinstall applications/drivers and click Next. 6... password to complete the process. English 42 4 In the Acer eRecovery window, select Recovery settings and click Next. 5 In the Recovery settings window, select Burn image to disk and click Next. 6 In the Burn image to -disk recovery are protected by the user. Factory default image and click...
...Windows, you can be changed by a password that can run Acer disk-to-disk recovery to re-install. The default password is six zeros. 4 In the Acer eRecovery window, select Recovery actions and click Next. 5 In the Recovery settings window, select Reinstall applications/drivers and click Next. 6... password to complete the process. English 42 4 In the Acer eRecovery window, select Recovery settings and click Next. 5 In the Recovery settings window, select Burn image to disk and click Next. 6 In the Burn image to -disk recovery are protected by the user. Factory default image and click...


