

TravelMate 4060 Service Guide
Page 2
Revision History Please refer to 533MHz on page 19. Update LCD panel specification on TravelMate 4060 service guide. II Date 200512/27 2006/01/17 Chapter Chapter 1 Chapter 1 Updates Revise memory specification to the table below for the updates made on page 25.
Revision History Please refer to 533MHz on page 19. Update LCD panel specification on TravelMate 4060 service guide. II Date 200512/27 2006/01/17 Chapter Chapter 1 Chapter 1 Updates Revise memory specification to the table below for the updates made on page 25.
TravelMate 4060 Service Guide
Page 7
... Using the keyboard 13 Lock keys and embedded numeric keypad 13 Windows keys 13 Hot Keys 14 Special keys 15 Touchpad 17 Touchpad basics 17 Hardware Specifications and Configurations 18 Chapter 2 System Utilities 30 BIOS Setup Utility 30 Navigating the BIOS Utility 31 Information 32 Main 33 Security 35 Boot 39 Exit 40 BIOS Flash Utility 41 Chapter 3 Machine Disassembly and Replacement 42 General Information 43 Before You Begin 43 Disassembly Procedure Flowchart 44 Removing the Battery 46 Removing the Hard Disc Drive Module...
... Using the keyboard 13 Lock keys and embedded numeric keypad 13 Windows keys 13 Hot Keys 14 Special keys 15 Touchpad 17 Touchpad basics 17 Hardware Specifications and Configurations 18 Chapter 2 System Utilities 30 BIOS Setup Utility 30 Navigating the BIOS Utility 31 Information 32 Main 33 Security 35 Boot 39 Exit 40 BIOS Flash Utility 41 Chapter 3 Machine Disassembly and Replacement 42 General Information 43 Before You Begin 43 Disassembly Procedure Flowchart 44 Removing the Battery 46 Removing the Hard Disc Drive Module...
TravelMate 4060 Service Guide
Page 8
... 63 External Diskette Drive Check 63 External CD-ROM Drive Check 63 Keyboard or Auxiliary Input Device Check 63 Memory check 64 Power System Check 64 Touchpad Check 66 Power-On Self-Test (POST) Error Message 67 Index of Error Messages 68 Phoenix BIOS Beep Codes 71 Index of Symptom-to-FRU Error Message 75 Intermittent Problems 78 Undetermined Problems 79 Chapter 6 FRU (Field Replaceable Unit) List 80 TravelMate 4060 Exploded Diagram Please...
... 63 External Diskette Drive Check 63 External CD-ROM Drive Check 63 Keyboard or Auxiliary Input Device Check 63 Memory check 64 Power System Check 64 Touchpad Check 66 Power-On Self-Test (POST) Error Message 67 Index of Error Messages 68 Phoenix BIOS Beep Codes 71 Index of Symptom-to-FRU Error Message 75 Intermittent Problems 78 Undetermined Problems 79 Chapter 6 FRU (Field Replaceable Unit) List 80 TravelMate 4060 Exploded Diagram Please...
TravelMate 4060 Service Guide
Page 16
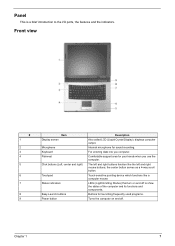
... frequently used programs. Turns the computer on and off . Touch-sensitive pointing device which functions like the left and right buttons function like a computer mouse. The left and right mouse buttons; LEDs (Light Emitting Diodes) that turn on and off to the I/O ports, the features and the indicators. Chapter 1 7 Buttons for your hands when you computer. the center button serves as a 4-way scroll button. Internal microphone for sound recording. Front view # 1 2 3 4 5 6 7 8 9 Item Display screen Microphone Keyboard...
... frequently used programs. Turns the computer on and off . Touch-sensitive pointing device which functions like the left and right buttons function like a computer mouse. The left and right mouse buttons; LEDs (Light Emitting Diodes) that turn on and off to the I/O ports, the features and the indicators. Chapter 1 7 Buttons for your hands when you computer. the center button serves as a 4-way scroll button. Internal microphone for sound recording. Front view # 1 2 3 4 5 6 7 8 9 Item Display screen Microphone Keyboard...
TravelMate 4060 Service Guide
Page 17
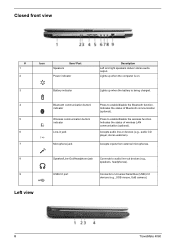
...Serial Bus (USB) 2.0 devices (e.g., USB mouse, UsB camera). Closed front view # 1 2 Icon Speakers Item/ Port Power indicator Description Left and right speakers deliver stereo audio output. Indicates the status of Bluetooth communication (optional). USB 2.0 port Connects to audio line-out devices (e.g., speakers, headphones). Press to enable/disable the Bluetooth function. Left view 8 TravelMate 4060 Indicates the status of wireless LAN communication (optional). Lights up when the computer is on. 3 Battery indicator Lights up when the battery is being charged...
...Serial Bus (USB) 2.0 devices (e.g., USB mouse, UsB camera). Closed front view # 1 2 Icon Speakers Item/ Port Power indicator Description Left and right speakers deliver stereo audio output. Indicates the status of Bluetooth communication (optional). USB 2.0 port Connects to audio line-out devices (e.g., speakers, headphones). Press to enable/disable the Bluetooth function. Left view 8 TravelMate 4060 Indicates the status of wireless LAN communication (optional). Lights up when the computer is on. 3 Battery indicator Lights up when the battery is being charged...
TravelMate 4060 Service Guide
Page 23
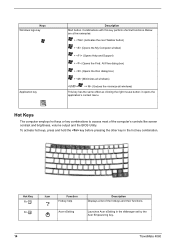
... next Taskbar button) + (Opens the My Computer window) + (Opens Help and Support) + (Opens the Find: All Files dialog box) + (Opens the Run dialog box) + (Minimizes all windows) + +< M> (Undoes the minimize all windows) This key has the same effect as clicking the right mouse button; Keys Windows logo key Application key Description Start button. Hot Key Fn-l Fn-m Icon Function Hotkey help Acer eSetting Description Displays a list of the computer's controls like screen contrast and brightness, volume output and the BIOS Utility.
... next Taskbar button) + (Opens the My Computer window) + (Opens Help and Support) + (Opens the Find: All Files dialog box) + (Opens the Run dialog box) + (Minimizes all windows) + +< M> (Undoes the minimize all windows) This key has the same effect as clicking the right mouse button; Keys Windows logo key Application key Description Start button. Hot Key Fn-l Fn-m Icon Function Hotkey help Acer eSetting Description Displays a list of the computer's controls like screen contrast and brightness, volume output and the BIOS Utility.
TravelMate 4060 Service Guide
Page 36
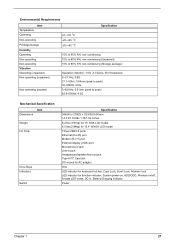
....98x 1.33/1.53 inches 6.4 Ibs (2.91kg) for 15" XGA LCD model 6.5 lbs (2.94kg) for 15.4" WXGA LCD model Three USB 2.0 ports Ethernet (RJ-45) port Modem (RJ-11) port External display (VGA) port Microphone-in jack Line-in jack Headphones/speaker/line-out jack Type II PC Card slot DC-in jack for AC adaptor One LED indicator for keyboard hot key: Caps Lock, Scroll Lock, NUmber lock LED indicator for function indicator: System power-on, HDD/ODD, Wireless on/off, Arcade LED mode, DC-in, Battery/Charging indicator Power Chapter 1 27
....98x 1.33/1.53 inches 6.4 Ibs (2.91kg) for 15" XGA LCD model 6.5 lbs (2.94kg) for 15.4" WXGA LCD model Three USB 2.0 ports Ethernet (RJ-45) port Modem (RJ-11) port External display (VGA) port Microphone-in jack Line-in jack Headphones/speaker/line-out jack Type II PC Card slot DC-in jack for AC adaptor One LED indicator for keyboard hot key: Caps Lock, Scroll Lock, NUmber lock LED indicator for function indicator: System power-on, HDD/ODD, Wireless on/off, Arcade LED mode, DC-in, Battery/Charging indicator Power Chapter 1 27
TravelMate 4060 Service Guide
Page 42
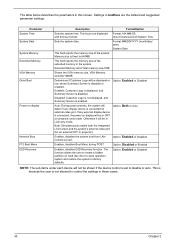
... disabled. Option: Disabled or Enabled Enables, disables D2D Recovery function. This is because the user is not allowed to factory defaults. VGA Memory size=64/128MB Determines if Customer Logo will detect if any external display device is connected, the power on hard disc drive to store operation system and restore the system to control the settings in CRT (or projector) only mode. Enabled: Customer Logo is displayed, and Summary Screen is enabled. The function allows the user to create a hidden partition on display...
... disabled. Option: Disabled or Enabled Enables, disables D2D Recovery function. This is because the user is not allowed to factory defaults. VGA Memory size=64/128MB Determines if Customer Logo will detect if any external display device is connected, the power on hard disc drive to store operation system and restore the system to control the settings in CRT (or projector) only mode. Enabled: Customer Logo is displayed, and Summary Screen is enabled. The function allows the user to create a hidden partition on display...
TravelMate 4060 Service Guide
Page 44
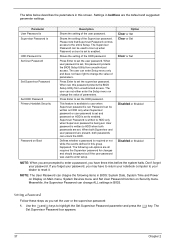
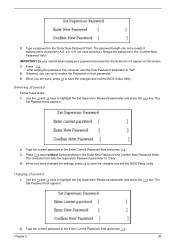
... Power on Display on Main menu, System Devices menu and Set User Password function on boot is set to your password. The Supervisor Password can enter Setup menu only and does not have to return your notebook computer to enabled. The user can change the value of parameters. Meanwhile, the Supervisor Password can not either enter the Setup menu nor change ALL settings in this password protects the BIOS Setup Utility from unauthorized access. The Set Supervisor Password box appears: 37 Chapter 2 User password is set...
... Power on Display on Main menu, System Devices menu and Set User Password function on boot is set to your password. The Supervisor Password can enter Setup menu only and does not have to return your notebook computer to enabled. The user can change the value of parameters. Meanwhile, the Supervisor Password can not either enter the Setup menu nor change ALL settings in this password protects the BIOS Setup Utility from unauthorized access. The Set Supervisor Password box appears: 37 Chapter 2 User password is set...
TravelMate 4060 Service Guide
Page 45
2. After setting the password, the computer sets the User Password parameter to highlight the Set Supervisor Password parameter and press the e key. Use the w and y keys to "Set". 4. When you are done, press u to save the changes and exit the BIOS Setup Utility. Removing a Password Follow these steps: 1. The Set Password box appears: 2. Type the current password in the "Enter New Password" field. Type a password in the Enter Current Password field and press e. Press e. Use the w and y keys to "Clear". 4. Press e twice...
2. After setting the password, the computer sets the User Password parameter to highlight the Set Supervisor Password parameter and press the e key. Use the w and y keys to "Set". 4. When you are done, press u to save the changes and exit the BIOS Setup Utility. Removing a Password Follow these steps: 1. The Set Password box appears: 2. Type the current password in the "Enter New Password" field. Type a password in the Enter Current Password field and press e. Press e. Use the w and y keys to "Clear". 4. Press e twice...

TravelMate 4060 Service Guide
Page 47
... Change Values Enter Select 4 Sub-Menu F9 Setup Defaults F10 Save and Exit Chapter 2 40 Boot This menu allows the user to decide the order of boot devices to expand/collapses. Info. PhoenixBIOS Setup Utility Main Advanced Security Boot Exit CD-ROM/DVD Drive Floppy Devices +Hard Drive Network Boot Item Specific Help + and - Use to load the operating system. Boot order is top-down . Use and to move highlighted item up and down using only the top device in module...
... Change Values Enter Select 4 Sub-Menu F9 Setup Defaults F10 Save and Exit Chapter 2 40 Boot This menu allows the user to decide the order of boot devices to expand/collapses. Info. PhoenixBIOS Setup Utility Main Advanced Security Boot Exit CD-ROM/DVD Drive Floppy Devices +Hard Drive Network Boot Item Specific Help + and - Use to load the operating system. Boot order is top-down . Use and to move highlighted item up and down using only the top device in module...

TravelMate 4060 Service Guide
Page 48
...; Select Menu F5/F6 Change Values Enter Select 4 Sub-Menu F9 Setup Defaults F10 Save and Exit The table below describes the parameters in this screen. Load previous values from unauthorized use. Parameter Exit Saving Changes Exit Discarding Changes Load Setup Default Discard Changes Save Changes Description Exit System Setup and save your changes to CMOS. Load default values for all SETUP item. PhoenixBIOS Setup Utility Info. Exit The Exit screen contains...
...; Select Menu F5/F6 Change Values Enter Select 4 Sub-Menu F9 Setup Defaults F10 Save and Exit The table below describes the parameters in this screen. Load previous values from unauthorized use. Parameter Exit Saving Changes Exit Discarding Changes Load Setup Default Discard Changes Save Changes Description Exit System Setup and save your changes to CMOS. Load default values for all SETUP item. PhoenixBIOS Setup Utility Info. Exit The Exit screen contains...
TravelMate 4060 Service Guide
Page 77
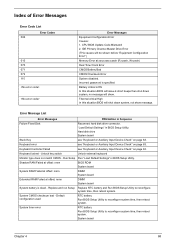
..."Load Default Settings" in BIOS Setup Utility. CPU BIOS Update Code Mismatch 2. Hard disk drive System board Stuck Key see "Keyboard or Auxiliary Input Device Check" on page 63. Unlock key switch Unlock external keyboard Monitor type does not match CMOS - Default configuration used RTC battery Run BIOS Setup Utility to reconfigure system time, then reboot system. Battery critical LOW In this situation BIOS will be shown before "Equipment Configuration Error") Memory Error at offset: nnnn DIMM System board System battery is specified. "Load Default Settings" in BIOS Setup...
..."Load Default Settings" in BIOS Setup Utility. CPU BIOS Update Code Mismatch 2. Hard disk drive System board Stuck Key see "Keyboard or Auxiliary Input Device Check" on page 63. Unlock key switch Unlock external keyboard Monitor type does not match CMOS - Default configuration used RTC battery Run BIOS Setup Utility to reconfigure system time, then reboot system. Battery critical LOW In this situation BIOS will be shown before "Equipment Configuration Error") Memory Error at offset: nnnn DIMM System board System battery is specified. "Load Default Settings" in BIOS Setup...
TravelMate 4060 Service Guide
Page 81
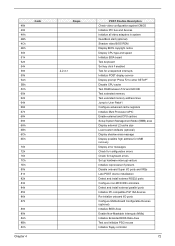
... devices Initialize all video adapters in system QuietBoot start (optional) Shadow video BIOS ROM Display BIOS copyright notice Display CPU type and speed Initialize EISA board Test keyboard Set key click if enabled Test for unexpected interrupts Initialize POST display service Display prompt "Press F2 to enter SETUP" Disable CPU cache Test RAM between 512 and 640 KB Test extended memory Test extended memory address lines Jump to User Patch1 Configure advanced cache registers Initialize Multi Processor APIC Enable external and CPU caches Setup...
... devices Initialize all video adapters in system QuietBoot start (optional) Shadow video BIOS ROM Display BIOS copyright notice Display CPU type and speed Initialize EISA board Test keyboard Set key click if enabled Test for unexpected interrupts Initialize POST display service Display prompt "Press F2 to enter SETUP" Disable CPU cache Test RAM between 512 and 640 KB Test extended memory Test extended memory address lines Jump to User Patch1 Configure advanced cache registers Initialize Multi Processor APIC Enable external and CPU caches Setup...
TravelMate 4060 Service Guide
Page 82
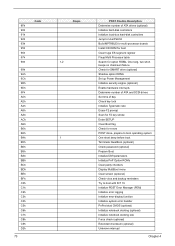
... stroke Enter SETUP Clear Boot flag Check for option ROMs. One long, two short beeps on checksum failure. Check for SMART drive (optional) Shadow option ROMs Set up Power Management Initialize security engine (optional) Enable hardware interrupts Determine number of ATA and SCSI drives Set time of ATA drives (optional) Initialize hard-disk controllers Initialize local-bus hard-disk controllers Jump to boot with INT 19 Initialize POST Error Manager (PEM) Initialize error logging Initialize error display function Initialize system error handler PnPnd dual CMOS (optional) Initialize notebook...
... stroke Enter SETUP Clear Boot flag Check for option ROMs. One long, two short beeps on checksum failure. Check for SMART drive (optional) Shadow option ROMs Set up Power Management Initialize security engine (optional) Enable hardware interrupts Determine number of ATA and SCSI drives Set time of ATA drives (optional) Initialize hard-disk controllers Initialize local-bus hard-disk controllers Jump to boot with INT 19 Initialize POST Error Manager (PEM) Initialize error logging Initialize error display function Initialize system error handler PnPnd dual CMOS (optional) Initialize notebook...
TravelMate 4060 Service Guide
Page 84
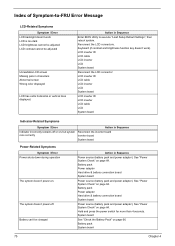
Keyboard (if contrast and brightness function key doesn't work LCD is too dark LCD brightness cannot be adjusted LCD contrast cannot be charged Action in Sequence Enter BIOS Utility to -FRU Error Message LCD-Related Symptoms Symptom / Error LCD backlight doesn't work ). See "Power System Check" on page 64. Battery can't be adjusted Unreadable LCD screen Missing pels in Sequence Indicator incorrectly remains off . The system doesn't power-off or on, but system Reconnect the inverter board runs...
Keyboard (if contrast and brightness function key doesn't work LCD is too dark LCD brightness cannot be adjusted LCD contrast cannot be charged Action in Sequence Enter BIOS Utility to -FRU Error Message LCD-Related Symptoms Symptom / Error LCD backlight doesn't work ). See "Power System Check" on page 64. Battery can't be adjusted Unreadable LCD screen Missing pels in Sequence Indicator incorrectly remains off . The system doesn't power-off or on, but system Reconnect the inverter board runs...
TravelMate 4060 Service Guide
Page 85
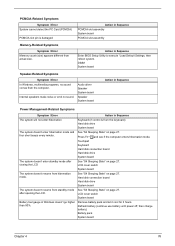
...In Windows, multimedia programs, no sound. LCD cover switch System board Battery fuel gauge in Sequence Enter BIOS Setup Utility to execute "Load Default Settings, then reboot system. Internal speakers make noise or emit no sound comes from hibernation mode. Audio driver Speaker System board Speaker System board Action in Sequence Power Management-Related Symptoms Symptom / Error Action in Sequence PCMCIA slot assembly System board PCMCIA slot assembly Memory-Related Symptoms Symptom / Error Memory count (size) appears different from the keyboard) Hard disk drive System board...
...In Windows, multimedia programs, no sound. LCD cover switch System board Battery fuel gauge in Sequence Enter BIOS Setup Utility to execute "Load Default Settings, then reboot system. Internal speakers make noise or emit no sound comes from hibernation mode. Audio driver Speaker System board Speaker System board Action in Sequence Power Management-Related Symptoms Symptom / Error Action in Sequence PCMCIA slot assembly System board PCMCIA slot assembly Memory-Related Symptoms Symptom / Error Memory count (size) appears different from the keyboard) Hard disk drive System board...
TravelMate 4060 User's Guide
Page 4
... for using your computer Turning your notebook. Follow these steps to complete the installation. It is not installed on the computer, simply press and release the power button below the LCD screen beside the easy-launch buttons. Note: Viewing the file requires Adobe Reader. poster helps you to the AcerSystem User's Guide. Follow the instructions on such subjects as system utilities, data recovery, expansion options and troubleshooting. For...
... for using your computer Turning your notebook. Follow these steps to complete the installation. It is not installed on the computer, simply press and release the power button below the LCD screen beside the easy-launch buttons. Note: Viewing the file requires Adobe Reader. poster helps you to the AcerSystem User's Guide. Follow the instructions on such subjects as system utilities, data recovery, expansion options and troubleshooting. For...

TravelMate 4060 User's Guide
Page 8
... with you 31 Special considerations 31 Securing your computer 32 Using a computer security lock 32 Using passwords 32 Entering passwords 33 Setting passwords 33 Expanding through options 34 Connectivity options 34 Fax/data modem 34 Built-in network feature 35 Universal Serial Bus (USB) 35 IEEE 1394 port 36 PC Card slot 36 Installing memory 37 BIOS utility 38 Boot sequence 38 Enable disk-to-disk recovery 38 Password 39 Using software 39 Playing DVD movies 39 Power management 40 Acer eRecovery 40
... with you 31 Special considerations 31 Securing your computer 32 Using a computer security lock 32 Using passwords 32 Entering passwords 33 Setting passwords 33 Expanding through options 34 Connectivity options 34 Fax/data modem 34 Built-in network feature 35 Universal Serial Bus (USB) 35 IEEE 1394 port 36 PC Card slot 36 Installing memory 37 BIOS utility 38 Boot sequence 38 Enable disk-to-disk recovery 38 Password 39 Using software 39 Playing DVD movies 39 Power management 40 Acer eRecovery 40

TravelMate 4060 User's Guide
Page 34
I pressed the power button, but the computer does not start or boot up the "Display Properties" dialog box. Connect the AC adapter to recharge the battery pack. • Make sure that the AC adapter is in the external USB floppy drive? Press any key to turn the display back on the screen. Press the display toggle hotkey + to toggle the display back to resume. Then click on . Easy solutions are using on...
I pressed the power button, but the computer does not start or boot up the "Display Properties" dialog box. Connect the AC adapter to recharge the battery pack. • Make sure that the AC adapter is in the external USB floppy drive? Press any key to turn the display back on the screen. Press the display toggle hotkey + to toggle the display back to resume. Then click on . Easy solutions are using on...


