
User Manual
Page 8
...Built-in network feature 41 Fast Infrared (FIR) 41 Universal Serial Bus (USB) 42 IEEE 1394 port 42 PC Card slot 43 Installing memory 44 BIOS utility 44 Boot sequence 44 Enable disk-to-disk recovery 45 Password 45 Using software 45 Playing DVD movies 45 Power management 46... Acer eRecovery Management 47 Create backup 47 Restore from backup 48 Create factory default image CD 48 Re-install bundled software without CD 48 Change ...
...Built-in network feature 41 Fast Infrared (FIR) 41 Universal Serial Bus (USB) 42 IEEE 1394 port 42 PC Card slot 43 Installing memory 44 BIOS utility 44 Boot sequence 44 Enable disk-to-disk recovery 45 Password 45 Using software 45 Playing DVD movies 45 Power management 46... Acer eRecovery Management 47 Create backup 47 Restore from backup 48 Create factory default image CD 48 Re-install bundled software without CD 48 Change ...

User Manual
Page 25
...dual-band 802.11b/g) Wi-Fi CERTIFIED™ solution, supporting Acer SignalUp™ wireless technology, or • Integrated Acer InviLink™ 802.11b/g Wi-Fi CERTIFIED™ solution, supporting Acer SignalUp™ wireless technology WPAN (optional): integrated Bluetooth® ...Three USB 2.0 ports 5-in jack for AC adapter 124-pin Acer ezDock connector Kensington lock slot BIOS user and supervisor passwords Acer Empowering Technology Acer GridVista Acer Launch Manager Adobe&#...
...dual-band 802.11b/g) Wi-Fi CERTIFIED™ solution, supporting Acer SignalUp™ wireless technology, or • Integrated Acer InviLink™ 802.11b/g Wi-Fi CERTIFIED™ solution, supporting Acer SignalUp™ wireless technology WPAN (optional): integrated Bluetooth® ...Three USB 2.0 ports 5-in jack for AC adapter 124-pin Acer ezDock connector Kensington lock slot BIOS user and supervisor passwords Acer Empowering Technology Acer GridVista Acer Launch Manager Adobe&#...
User Manual
Page 32
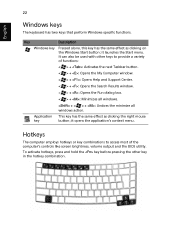
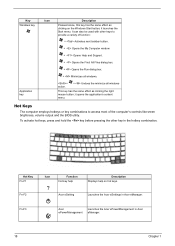
... the hotkey combination. Hotkeys The computer employs hotkeys or key combinations to provide a variety of the computer's controls like screen brightness, volume output and the BIOS utility. To activate hotkeys, press and hold the key before pressing the other keys to access most of functions: < > + : Activates the next Taskbar button. < > + : Opens...
... the hotkey combination. Hotkeys The computer employs hotkeys or key combinations to provide a variety of the computer's controls like screen brightness, volume output and the BIOS utility. To activate hotkeys, press and hold the key before pressing the other keys to access most of functions: < > + : Activates the next Taskbar button. < > + : Opens...
User Manual
Page 41
See "Hotkeys" on page 22 for printing to an infrared printer). • During the POST, press to access the BIOS utility and verify that the infrared ports of the two devices are IrDA-compliant. Check the following: • Make sure that the infrared port is ...
See "Hotkeys" on page 22 for printing to an infrared printer). • During the POST, press to access the BIOS utility and verify that the infrared ports of the two devices are IrDA-compliant. Check the following: • Make sure that the infrared port is ...
User Manual
Page 42
... Operating System. Refer to -disk recovery is enabled or not. 2 Make sure the D2D Recovery setting in Main is Enabled. 3 Exit the BIOS utility and save changes. I want to set up your communication software (e.g. I want to restore my computer to use your location: 1 Click .... HyperTerminal), you restore the C: drive with the Internet Connection setup. Before performing a restore operation, please check the BIOS settings. 1 Check to see if Acer disk-to the Windows manual. After the Operating System is set up my location to its original settings without recovery CDs...
... Operating System. Refer to -disk recovery is enabled or not. 2 Make sure the D2D Recovery setting in Main is Enabled. 3 Exit the BIOS utility and save changes. I want to set up your communication software (e.g. I want to restore my computer to use your location: 1 Click .... HyperTerminal), you restore the C: drive with the Internet Connection setup. Before performing a restore operation, please check the BIOS settings. 1 Check to see if Acer disk-to the Windows manual. After the Operating System is set up my location to its original settings without recovery CDs...
User Manual
Page 48
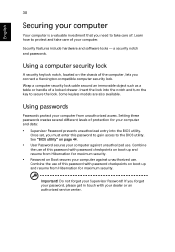
...computer security lock A security keylock notch, located on Boot secures your computer against unauthorized use of this password to gain access to the BIOS utility. Setting these passwords creates several different levels of protection for maximum security. Combine the use . If you forget your password, please ... Password prevents unauthorized entry into the notch and turn the key to secure the lock. Some keyless models are also available. See "BIOS utility" on boot-up and resume from unauthorized access. Learn how to protect and take care of. Combine the use of this ...
...computer security lock A security keylock notch, located on Boot secures your computer against unauthorized use of this password to gain access to the BIOS utility. Setting these passwords creates several different levels of protection for maximum security. Combine the use . If you forget your password, please ... Password prevents unauthorized entry into the notch and turn the key to secure the lock. Some keyless models are also available. See "BIOS utility" on boot-up and resume from unauthorized access. Learn how to protect and take care of. Combine the use of this ...
User Manual
Page 49
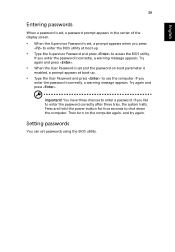
... prompt appears in the center of the display screen. • When the Supervisor Password is set, a prompt appears when you press to enter the BIOS utility at boot-up . • Type the Supervisor Password and press to shut down the computer. Try again and press . • When the... tries, the system halts. If you enter the password incorrectly, a warning message appears. Then turn on boot parameter is set passwords using the BIOS utility. Important! Setting passwords You can set and the password on the computer again, and try again. If you enter the password incorrectly, a...
... prompt appears in the center of the display screen. • When the Supervisor Password is set, a prompt appears when you press to enter the BIOS utility at boot-up . • Type the Supervisor Password and press to shut down the computer. Try again and press . • When the... tries, the system halts. If you enter the password incorrectly, a warning message appears. Then turn on boot parameter is set passwords using the BIOS utility. Important! Setting passwords You can set and the password on the computer again, and try again. If you enter the password incorrectly, a...
User Manual
Page 54
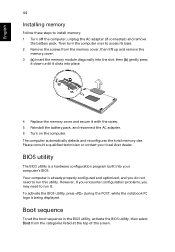
... diagonally into the slot, then (b) gently press it down until it clicks into your local Acer dealer. Boot sequence To set the boot sequence in the BIOS utility, activate the BIOS utility, then select Boot from the memory cover; The computer automatically detects and reconfigures the total... on the computer. English 44 Installing memory Follow these steps to run this utility. Please consult a qualified technician or contact your computer's BIOS. However, if you encounter configuration problems, you do not need to install memory: 1 Turn off the computer, unplug the AC adapter ...
... diagonally into the slot, then (b) gently press it down until it clicks into your local Acer dealer. Boot sequence To set the boot sequence in the BIOS utility, activate the BIOS utility, then select Boot from the memory cover; The computer automatically detects and reconfigures the total... on the computer. English 44 Installing memory Follow these steps to run this utility. Please consult a qualified technician or contact your computer's BIOS. However, if you encounter configuration problems, you do not need to install memory: 1 Turn off the computer, unplug the AC adapter ...

User Manual
Page 55
... to set . Once your DVD drive is installed in the optical drive bay, you can set will automatically play DVD movies on boot, activate the BIOS utility, then select Security from the categories listed at the top of the screen. Password To set to a region code, it will play DVD disks... DVD tray and insert a DVD movie disk; English 45 Enable disk-to-disk recovery To enable disk-to-disk recovery (hard disk recovery), activate the BIOS utility, then select Main from the categories listed at the top of the screen. Find D2D Recovery at the bottom of China then close the...
... to set . Once your DVD drive is installed in the optical drive bay, you can set will automatically play DVD movies on boot, activate the BIOS utility, then select Security from the categories listed at the top of the screen. Password To set to a region code, it will play DVD disks... DVD tray and insert a DVD movie disk; English 45 Enable disk-to-disk recovery To enable disk-to-disk recovery (hard disk recovery), activate the BIOS utility, then select Main from the categories listed at the top of the screen. Find D2D Recovery at the bottom of China then close the...

User Manual
Page 60
...disk 0 error Contact your dealer or an authorized service center. Memory size mismatch Press (during POST) to enter the BIOS utility, then press Exit in the BIOS utility to reboot. Error messages If you solve problems. If the system reports an error message or an error symptom ... error Contact your dealer or authorized service center for assistance. Equipment configuration error Press (during POST) to enter the BIOS utility, then press Exit in the BIOS utility to reboot. 50 English Troubleshooting This chapter shows you how to deal with the recommended course of action. Hard...
...disk 0 error Contact your dealer or an authorized service center. Memory size mismatch Press (during POST) to enter the BIOS utility, then press Exit in the BIOS utility to reboot. Error messages If you solve problems. If the system reports an error message or an error symptom ... error Contact your dealer or authorized service center for assistance. Equipment configuration error Press (during POST) to enter the BIOS utility, then press Exit in the BIOS utility to reboot. 50 English Troubleshooting This chapter shows you how to deal with the recommended course of action. Hard...

User Manual
Page 61
Some problems may be solved using the BIOS utility. English English 51 If you still encounter problems after going through the corrective measures, please contact your dealer or an authorized service center for assistance.
Some problems may be solved using the BIOS utility. English English 51 If you still encounter problems after going through the corrective measures, please contact your dealer or an authorized service center for assistance.

User Manual
Page 74
... messages 50 Euro 24 F FAQ. English 64 Index A AC adapter caring for v audio 26 adjusting the volume 26 troubleshooting 31 B battery pack caring for vi BIOS utility 44 brightness hotkeys 23 C caps lock 21 on indicator 17 care AC adapter v battery pack vi computer v CD-ROM ejecting 25 ejecting manually 31...
... messages 50 Euro 24 F FAQ. English 64 Index A AC adapter caring for v audio 26 adjusting the volume 26 troubleshooting 31 B battery pack caring for vi BIOS utility 44 brightness hotkeys 23 C caps lock 21 on indicator 17 care AC adapter v battery pack vi computer v CD-ROM ejecting 25 ejecting manually 31...

Service Guide
Page 2
on TravelMate 3300/Extensa 3100 service guide. Revision History Please refer to BIOS support protocols on page 23. II Add "WFM" to the table below for the updates made on page 25 and page 26. Date 2005/11/25 2005/12/15 Chapter All Chapter 1 Updates Revise TravelMate 3300/Extensa 3100 battery spec.
on TravelMate 3300/Extensa 3100 service guide. Revision History Please refer to BIOS support protocols on page 23. II Add "WFM" to the table below for the updates made on page 25 and page 26. Date 2005/11/25 2005/12/15 Chapter All Chapter 1 Updates Revise TravelMate 3300/Extensa 3100 battery spec.
Service Guide
Page 7
...-Fi CERTIFIEDTM solution Memory T T T 256MB or 512MB of DDRII 400/533 Upgradeable to 2GB Memory by Dual channels of SODIMM 512KB flash ROM BIOS Display and graphics T 14.1" WXGA Acer Crystallbrite clolor TFT LCD: 1280x 800 resolution T 14.1" WXGA clolor TFT LCD: 1280x 800 resolution T 16.7 million colors T Intel® 915GM integrated...
...-Fi CERTIFIEDTM solution Memory T T T 256MB or 512MB of DDRII 400/533 Upgradeable to 2GB Memory by Dual channels of SODIMM 512KB flash ROM BIOS Display and graphics T 14.1" WXGA Acer Crystallbrite clolor TFT LCD: 1280x 800 resolution T 14.1" WXGA clolor TFT LCD: 1280x 800 resolution T 16.7 million colors T Intel® 915GM integrated...
Service Guide
Page 13
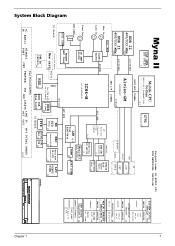
... USB port on IO Board 3 PORT 21 PWR SW TPS223129 HDD 20 21 MINI USB Blue-tooth NS SIO 87392 31 KBC Renesas RE144B 30 BIOS ROM 4M BITS PM49F004T-33VC 33 FIR IO Board Touch INT. Pad 32 KB 32 LPC DEBUG CONN. 33 SYSTEM DC/DC TPS5130 41,42...
... USB port on IO Board 3 PORT 21 PWR SW TPS223129 HDD 20 21 MINI USB Blue-tooth NS SIO 87392 31 KBC Renesas RE144B 30 BIOS ROM 4M BITS PM49F004T-33VC 33 FIR IO Board Touch INT. Pad 32 KB 32 LPC DEBUG CONN. 33 SYSTEM DC/DC TPS5130 41,42...
Service Guide
Page 24
... The computer employs hotkeys or key combinations to provide a variety of the computer's controls like sreen brightness, volume output and the BIOS utility. To activate hot keys, press and hold the key before pressing the other keys to access most of function: + Activates... alone, this key has the same effect as clicking the right mouse button; Fn-F3 Acer ePowerManagement Launches the Acer ePowerManagement in Acer eManager. it launches the Start menu. Acer eSetting Launches the Acer eSettings in Acer eManager. 18 Chapter 1 it opens the application's context menu.
... The computer employs hotkeys or key combinations to provide a variety of the computer's controls like sreen brightness, volume output and the BIOS utility. To activate hot keys, press and hold the key before pressing the other keys to access most of function: + Activates... alone, this key has the same effect as clicking the right mouse button; Fn-F3 Acer ePowerManagement Launches the Acer ePowerManagement in Acer eManager. it launches the Start menu. Acer eSetting Launches the Acer eSettings in Acer eManager. 18 Chapter 1 it opens the application's context menu.
Service Guide
Page 37
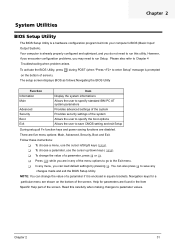
... to Chapter 4 Troubleshooting when problem arises. Help for a particular menu are five menu options: Main, Advanced, Security, Boot and Exit. To activate the BIOS Utility, press m during POST (when "Press to run this carefully when making changes to the Exit menu. T To change the value of the system ...Allows the user to specify the boot options Allows the user to save any changes made and exit the BIOS Setup Utility. NOTE: You can load default settings by pressing t. T Press ^ while you can change the value of the screen. Chapter 2 ...
... to Chapter 4 Troubleshooting when problem arises. Help for a particular menu are five menu options: Main, Advanced, Security, Boot and Exit. To activate the BIOS Utility, press m during POST (when "Press to run this carefully when making changes to the Exit menu. T To change the value of the system ...Allows the user to specify the boot options Allows the user to save any changes made and exit the BIOS Setup Utility. NOTE: You can load default settings by pressing t. T Press ^ while you can change the value of the screen. Chapter 2 ...
Service Guide
Page 38
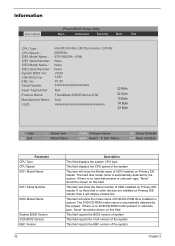
...: IDE2 Serial Number : System BIOS Ver: VGA BIOS Ver KBC Ver Serial Number Asset Tag Number Produce Name Manufacturer Name: UUID: Intel (R) Pentium (R) M processor 2.0GHz 2000MHz ST9100825A - (PM) None None None V0.08 1232 01.00 xxxxxxxxxxxxxxxxxxxxxx N/A TravelMate 3300/Extensa 3100 Acer xxxxxxxxxxxxxxxxxxxxxxxxxxxxxxxx 22 Byte 32 Byte 16... Defaults F10 Save and Exit Parameter CPU Type CPU Speed IDE1 Model Name IDE1 Serial Number IDE2 Model Name System BIOS Version VGA BIOS Version KBC Version 32 Description This field displays the system CPU type. The hard disk model name is no Hard...
...: IDE2 Serial Number : System BIOS Ver: VGA BIOS Ver KBC Ver Serial Number Asset Tag Number Produce Name Manufacturer Name: UUID: Intel (R) Pentium (R) M processor 2.0GHz 2000MHz ST9100825A - (PM) None None None V0.08 1232 01.00 xxxxxxxxxxxxxxxxxxxxxx N/A TravelMate 3300/Extensa 3100 Acer xxxxxxxxxxxxxxxxxxxxxxxxxxxxxxxx 22 Byte 32 Byte 16... Defaults F10 Save and Exit Parameter CPU Type CPU Speed IDE1 Model Name IDE1 Serial Number IDE2 Model Name System BIOS Version VGA BIOS Version KBC Version 32 Description This field displays the system CPU type. The hard disk model name is no Hard...

Service Guide
Page 42
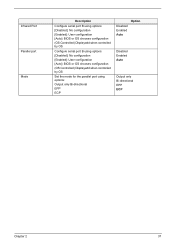
... [Enabled] [Enabled] [Enabled] Item Specific Help Configure Infrared Port using options: [Disabled]: No configuration [Enabled]: User configuration [Auto]: BIOS or OS chooses configuration (OS Controlled) Displayed when controlled by OS F1 Help Esc Exit ↑ ↓ Select Item ← ...hardware devices. Serial port A Description Configure serial port A using options: [Disable] No configuration [Enabled] User configuration [Auto] BIOS or OS chooses configuration (OS Controlled) Displayed when controlled by OS Option Disabled Enabled Auto 36 Chapter 2 It also provides advanced ...
... [Enabled] [Enabled] [Enabled] Item Specific Help Configure Infrared Port using options: [Disabled]: No configuration [Enabled]: User configuration [Auto]: BIOS or OS chooses configuration (OS Controlled) Displayed when controlled by OS F1 Help Esc Exit ↑ ↓ Select Item ← ...hardware devices. Serial port A Description Configure serial port A using options: [Disable] No configuration [Enabled] User configuration [Auto] BIOS or OS chooses configuration (OS Controlled) Displayed when controlled by OS Option Disabled Enabled Auto 36 Chapter 2 It also provides advanced ...
Service Guide
Page 43
... OS chooses configuration (OS Controlled) Displayedd when controlled by OS Configure serial port B using options: [Disabled]: No configuration [Enabled]: User configuration [Auto]: BIOS or OS chooses configuration (OS Controlled) Displayedd when controlled by OS Set the mode for the parallel port using options: Output only Bi-directional EPP ...
... OS chooses configuration (OS Controlled) Displayedd when controlled by OS Configure serial port B using options: [Disabled]: No configuration [Enabled]: User configuration [Auto]: BIOS or OS chooses configuration (OS Controlled) Displayedd when controlled by OS Set the mode for the parallel port using options: Output only Bi-directional EPP ...


