
User Guide
Page 21
... 28 Passwords 28 1 Contents Features 2 Display 4 Indicators and Microphone 6 Keyboard 8 Special Keys 8 Lock Keys 8 Embedded Keypad 9 Windows Keys 10 Hot Keys 11 Keyboard Ergonomics 14 Touchpad 15 Touchpad Basics 15 Storage 17 Hard Disk 17 External Drive 17 Connecting an External Floppy Drive . . . . 18 Ports 19 Rear Ports 19 Fast Infrared 20 Universal Serial Bus 21 Right Ports 22 Fax/Data Modem 23 PC Card Slots 23 Audio 26 Securing your Computer This computer combines high-performance, versatility, power management features...
... 28 Passwords 28 1 Contents Features 2 Display 4 Indicators and Microphone 6 Keyboard 8 Special Keys 8 Lock Keys 8 Embedded Keypad 9 Windows Keys 10 Hot Keys 11 Keyboard Ergonomics 14 Touchpad 15 Touchpad Basics 15 Storage 17 Hard Disk 17 External Drive 17 Connecting an External Floppy Drive . . . . 18 Ports 19 Rear Ports 19 Fast Infrared 20 Universal Serial Bus 21 Right Ports 22 Fax/Data Modem 23 PC Card Slots 23 Audio 26 Securing your Computer This computer combines high-performance, versatility, power management features...
User Guide
Page 24
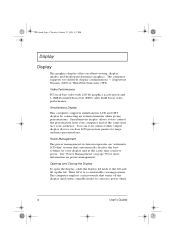
... Out (EDO) video RAM boost video performance. Power Management The power management system incorporates an "automatic LCD dim" feature that turns off the display (and enters standby mode) to the left and lift up the lid. You can even connect other output display devices such as LCD projection panels for more information on power management. 310-e.book Page 4 Tuesday, October 27, 1998 5:17 PM Display Display The graphics display offers excellent viewing, display quality and...
... Out (EDO) video RAM boost video performance. Power Management The power management system incorporates an "automatic LCD dim" feature that turns off the display (and enters standby mode) to the left and lift up the lid. You can even connect other output display devices such as LCD projection panels for more information on power management. 310-e.book Page 4 Tuesday, October 27, 1998 5:17 PM Display Display The graphics display offers excellent viewing, display quality and...
User Guide
Page 32
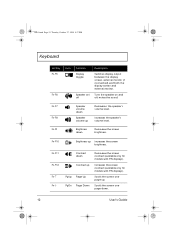
310-e.book Page 12 Tuesday, October 27, 1998 5:17 PM Keyboard Hot Key Fn-F5 Fn-F6 Icon Function Display toggle Speaker on and off Description Switches display output between the display screen, external monitor (if connected) and both the display screen and external monitor. Fn-F9 Brightness down . 12 User's Guide Fn-F10 Brightness up Decreases the speaker's volume level. Scrolls the screen one page up PgUp Page Up PgDn Page Down Decreases the screen contrast...
310-e.book Page 12 Tuesday, October 27, 1998 5:17 PM Keyboard Hot Key Fn-F5 Fn-F6 Icon Function Display toggle Speaker on and off Description Switches display output between the display screen, external monitor (if connected) and both the display screen and external monitor. Fn-F9 Brightness down . 12 User's Guide Fn-F10 Brightness up Decreases the speaker's volume level. Scrolls the screen one page up PgUp Page Up PgDn Page Down Decreases the screen contrast...
User Guide
Page 33
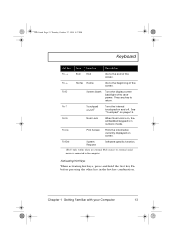
... Lock is on and off to return. Activating Hot Keys When activating hot keys, press and hold the first key Fn before pressing the other key in numeric mode. Press any key to save power. Fn-T Touchpad Turns the internal on/off1 touchpad on , the embedded keypad is connected to the computer. Fn-Del System Request Software specific function. 1Fn-T only works when no external PS/2 mouse or external serial mouse is in the hot key combination. Fn-D Screen...
... Lock is on and off to return. Activating Hot Keys When activating hot keys, press and hold the first key Fn before pressing the other key in numeric mode. Press any key to save power. Fn-T Touchpad Turns the internal on/off1 touchpad on , the embedded keypad is connected to the computer. Fn-Del System Request Software specific function. 1Fn-T only works when no external PS/2 mouse or external serial mouse is in the hot key combination. Fn-D Screen...
User Guide
Page 37
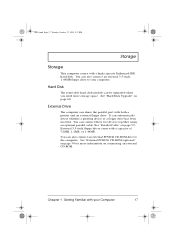
See "Hard Disk Upgrade" on page 57). Hard Disk The removable hard disk module can also connect an external PCMCIA CD-ROM drive to your Computer 17 It can share the parallel port with a high-capacity Enhanced-IDE hard disk. You can be upgraded when you need more inforamtion on page 54 for more storage space. 310-e.book Page 17 Tuesday, October 27, 1998 5:17 PM Storage Storage This computer comes...
See "Hard Disk Upgrade" on page 57). Hard Disk The removable hard disk module can also connect an external PCMCIA CD-ROM drive to your Computer 17 It can share the parallel port with a high-capacity Enhanced-IDE hard disk. You can be upgraded when you need more inforamtion on page 54 for more storage space. 310-e.book Page 17 Tuesday, October 27, 1998 5:17 PM Storage Storage This computer comes...

User Guide
Page 59
... time-out), the computer stops some or all of the following devices: keyboard, mouse, floppy drive, hard disk, peripherals connected to a brighter level. System activity refers to any activity involving one or more of these devices in power management unit that monitors system activity. 310-e.book Page 39 Tuesday, October 27, 1998 5:17 PM Power Management Power Management This computer has a built-in order to conserve energy. If you enable power management to save...
... time-out), the computer stops some or all of the following devices: keyboard, mouse, floppy drive, hard disk, peripherals connected to a brighter level. System activity refers to any activity involving one or more of these devices in power management unit that monitors system activity. 310-e.book Page 39 Tuesday, October 27, 1998 5:17 PM Power Management Power Management This computer has a built-in order to conserve energy. If you enable power management to save...

User Guide
Page 60
... any system activity u Closing the display cover u Allowing the computer to normal once the computer accesses it 40 User's Guide The hard disk returns to enter Hibernation mode when battery is low, but u the Hibernation file is drained. These include audio, serial ports, floppy drive and parallel port. All data remains intact in Standby mode. In this state, the power supplied to a minimum. Peripheral Standby Modes The peripheral connections in...
... any system activity u Closing the display cover u Allowing the computer to normal once the computer accesses it 40 User's Guide The hard disk returns to enter Hibernation mode when battery is low, but u the Hibernation file is drained. These include audio, serial ports, floppy drive and parallel port. All data remains intact in Standby mode. In this state, the power supplied to a minimum. Peripheral Standby Modes The peripheral connections in...
User Guide
Page 63
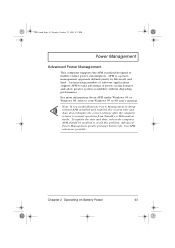
... Power Management Advanced Power Management This computer supports the APM standard designed to your Windows 95 or 98 user's manual. APM is a powermanagement approach defined jointly by Microsoft and Intel. An increasing number of software applications support APM to take advantage of power saving features and allow greater system availability without APM installed and enabled, the system time and date do not display the correct settings...
... Power Management Advanced Power Management This computer supports the APM standard designed to your Windows 95 or 98 user's manual. APM is a powermanagement approach defined jointly by Microsoft and Intel. An increasing number of software applications support APM to take advantage of power saving features and allow greater system availability without APM installed and enabled, the system time and date do not display the correct settings...

User Guide
Page 66
Note: If an external monitor is not connected, closing the display cover puts the computer into standby mode. 46 User's Guide 310-e.book Page 46 Tuesday, October 27, 1998 5:17 PM External Monitor External Monitor To show graphical effects on a larger display, connect an external monitor to the CRT port. Read the monitor manual for additional instructions.
Note: If an external monitor is not connected, closing the display cover puts the computer into standby mode. 46 User's Guide 310-e.book Page 46 Tuesday, October 27, 1998 5:17 PM External Monitor External Monitor To show graphical effects on a larger display, connect an external monitor to the CRT port. Read the monitor manual for additional instructions.

User Guide
Page 70
To enable the serial mouse, use a serial mouse, plug it into the serial port. 310-e.book Page 50 Tuesday, October 27, 1998 5:17 PM External Pointing Device External Serial Mouse If you use the Add New Hardware tool in the Windows Control Panel. 50 User's Guide
To enable the serial mouse, use a serial mouse, plug it into the serial port. 310-e.book Page 50 Tuesday, October 27, 1998 5:17 PM External Pointing Device External Serial Mouse If you use the Add New Hardware tool in the Windows Control Panel. 50 User's Guide

User Guide
Page 98
... to power management. u Enable display always on battery. Select to make presentations on , useful when you need to enable heuristic power management. Select to allow the computer to wake-up from standby mode when an incoming modem ring is used to set various settings related to give off warning beeps when the computer runs low on . 310-e.book Page 78 Tuesday, October 27, 1998 5:17 PM Notebook Manager Power Management Power Management is...
... to power management. u Enable display always on battery. Select to make presentations on , useful when you need to enable heuristic power management. Select to allow the computer to wake-up from standby mode when an incoming modem ring is used to set various settings related to give off warning beeps when the computer runs low on . 310-e.book Page 78 Tuesday, October 27, 1998 5:17 PM Notebook Manager Power Management Power Management is...

User Guide
Page 99
Display Device Display Device is selected. Sets the default display device on the button to set and matched. Sets the current display device. Chapter 5 Software 79 u Switching Display Device. The items in this screen include: u Boot Display Device. Note: Make sure an external monitor is connected before External monitor is used to control various settings related to wake-up from standby mode if the resume timer is selected, click on boot-up. When Enable system resume timer is set the System Resume Timer. Select to...
Display Device Display Device is selected. Sets the default display device on the button to set and matched. Sets the current display device. Chapter 5 Software 79 u Switching Display Device. The items in this screen include: u Boot Display Device. Note: Make sure an external monitor is connected before External monitor is used to control various settings related to wake-up from standby mode if the resume timer is selected, click on boot-up. When Enable system resume timer is set the System Resume Timer. Select to...
User Guide
Page 102
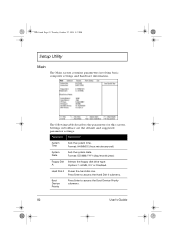
..., 1998 5:17 PM Setup Utility Main The Main screen contains parameters involving basic computer settings and hardware information. Settings in this screen. A Options: 1.44 MB, 3½" or Disabled. Parameter Description System Time Sets the system time. Format: DD/MM/YYYY (day/month/year) Floppy Disk Selects the floppy disk drive type. Boot Device Priority Press Enter to access the Hard Disk 0 submenu. Press Enter to access the Boot Device Priority submenu. 82 User's Guide Format: HH:MM:SS...
..., 1998 5:17 PM Setup Utility Main The Main screen contains parameters involving basic computer settings and hardware information. Settings in this screen. A Options: 1.44 MB, 3½" or Disabled. Parameter Description System Time Sets the system time. Format: DD/MM/YYYY (day/month/year) Floppy Disk Selects the floppy disk drive type. Boot Device Priority Press Enter to access the Hard Disk 0 submenu. Press Enter to access the Boot Device Priority submenu. 82 User's Guide Format: HH:MM:SS...
User Guide
Page 116
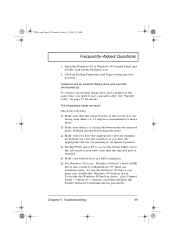
.... Press any key, the power button or tap on . 96 User's Guide I pressed the power switch and opened the display, but the computer does not start or boot-up. Connect the AC adapter to save power. Press any key to turn the display back on the touchpad to resume. Insert the startup disk you are running on the screen. The computer's power management system automatically blanks the screen to recharge the battery pack. 310-e.book Page 96...
.... Press any key, the power button or tap on . 96 User's Guide I pressed the power switch and opened the display, but the computer does not start or boot-up. Connect the AC adapter to save power. Press any key to turn the display back on the touchpad to resume. Insert the startup disk you are running on the screen. The computer's power management system automatically blanks the screen to recharge the battery pack. 310-e.book Page 96...

User Guide
Page 117
.../or brightness level might be muted. u The display device might be turned off. No audio from the computer. In Windows 95 or Windows 98, look at the volume control icon on the computer's right panel, the internal speaker automatically turns off. If it is set to adjust the volume. Click on the icon and de-select the Mute option. Right-click on your Windows 95 or Windows 98...
.../or brightness level might be muted. u The display device might be turned off. No audio from the computer. In Windows 95 or Windows 98, look at the volume control icon on the computer's right panel, the internal speaker automatically turns off. If it is set to adjust the volume. Click on the icon and de-select the Mute option. Right-click on your Windows 95 or Windows 98...
User Guide
Page 119
See "Parallel Cable" on the Modems icon. 2. Check the following: u Make sure that the infrared ports of 1 meter apart. u For Windows 98 users: Windows 98 have the appropriate drivers (for printing to access the Setup Utility. The infrared port does not work. To disable the Windows 98 built-in FIR driver that the infrared port is a clear path between the two infrared ports. Open the Windows 95 or Windows 98 Control Panel and double-click...
See "Parallel Cable" on the Modems icon. 2. Check the following: u Make sure that the infrared ports of 1 meter apart. u For Windows 98 users: Windows 98 have the appropriate drivers (for printing to access the Setup Utility. The infrared port does not work. To disable the Windows 98 built-in FIR driver that the infrared port is a clear path between the two infrared ports. Open the Windows 95 or Windows 98 Control Panel and double-click...

User Guide
Page 127
... Power Management audio connecting externally 52 B battery installing xiv battery pack battery-low warning 32 caring for xix characteristics 32 charging modes 34 checking charge level 35 installing 33 low conditions 38 optimizing 36 removing 33 using the first time 32 boot order setting in Notebook Manager 74 setting in Setup Utility 85 brightness setting in Notebook Manager 80 C caps lock on xv connections AC adapter xv audio 52 computer xiv file transfer cable 58 floppy drive, external 18 keyboard, external 47 keypad, external 48 mouse, PS/2 49 mouse, serial...
... Power Management audio connecting externally 52 B battery installing xiv battery pack battery-low warning 32 caring for xix characteristics 32 charging modes 34 checking charge level 35 installing 33 low conditions 38 optimizing 36 removing 33 using the first time 32 boot order setting in Notebook Manager 74 setting in Setup Utility 85 brightness setting in Notebook Manager 80 C caps lock on xv connections AC adapter xv audio 52 computer xiv file transfer cable 58 floppy drive, external 18 keyboard, external 47 keypad, external 48 mouse, PS/2 49 mouse, serial...
User Guide
Page 128
... lock keys 8 troubleshooting 98 Windows keys 10 keypad connecting externally 48 L LEDs 6 108 User's Guide See Heuristic Power Management I indicator lights 6 infrared 19 ITW. See infrared floppy drive 17 frequently-asked questions file transfer cable connecting 58 FIR. See frequently-asked questions 96 H hard disk upgrade 60 help Internet home page xvi online help xvi support information xvii Heuristic Power Management 91 Hibernation mode 41 conditions 42 entering 42 hot key 11 resuming from 42 utility 71 hot keys 11 HPM. 310-e.book...
... lock keys 8 troubleshooting 98 Windows keys 10 keypad connecting externally 48 L LEDs 6 108 User's Guide See Heuristic Power Management I indicator lights 6 infrared 19 ITW. See infrared floppy drive 17 frequently-asked questions file transfer cable connecting 58 FIR. See frequently-asked questions 96 H hard disk upgrade 60 help Internet home page xvi online help xvi support information xvii Heuristic Power Management 91 Hibernation mode 41 conditions 42 entering 42 hot key 11 resuming from 42 utility 71 hot keys 11 HPM. 310-e.book...

User Guide
Page 129
... PM M media activity on indicator 6 memory configurations 59 upgrading 59 messages error 100 modem 23 monitor connecting 46 mouse connecting externally 49 troubleshooting 98 N Notebook Manager 72-80 Boot Sequence 74 Display Device 79 Information Viewer 73 Password 75 Power Management 78 starting 72 num lock 13 on indicator 6 numeric keypad embedded 9 O options cables 56 hard disk upgrade 60 memory upgrade 59 PC Cards 53 spare AC adapter 56 spare battery pack 56 Index Index P palm rest 14 password 28 changing in Setup Utility 90 checking during boot 89...
... PM M media activity on indicator 6 memory configurations 59 upgrading 59 messages error 100 modem 23 monitor connecting 46 mouse connecting externally 49 troubleshooting 98 N Notebook Manager 72-80 Boot Sequence 74 Display Device 79 Information Viewer 73 Password 75 Power Management 78 starting 72 num lock 13 on indicator 6 numeric keypad embedded 9 O options cables 56 hard disk upgrade 60 memory upgrade 59 PC Cards 53 spare AC adapter 56 spare battery pack 56 Index Index P palm rest 14 password 28 changing in Setup Utility 90 checking during boot 89...
User Guide
Page 130
..., xix security keylocks 28 passwords 28 serial mouse connecting 50 serial port setting in Setup Utility 86 service when to call xvii, xix Setup Utility 81-94 Advanced menu 86 Boot Device Priority submenu 85 entering 81 Exit menu 93 Hard Disk 0 submenu 84 Main menu 82 navigating 81 Power Saving menu 91 Security menu 88 software bundled 70 speakers hot keys 12 T time setting in Setup Utility 82 U utility BIOS Setup 81-94 Notebook Manager 72-80 PhDISK 71 W warranty International Traveler's Warranty 110 User's Guide
..., xix security keylocks 28 passwords 28 serial mouse connecting 50 serial port setting in Setup Utility 86 service when to call xvii, xix Setup Utility 81-94 Advanced menu 86 Boot Device Priority submenu 85 entering 81 Exit menu 93 Hard Disk 0 submenu 84 Main menu 82 navigating 81 Power Saving menu 91 Security menu 88 software bundled 70 speakers hot keys 12 T time setting in Setup Utility 82 U utility BIOS Setup 81-94 Notebook Manager 72-80 PhDISK 71 W warranty International Traveler's Warranty 110 User's Guide


