
TM 230/280 User Guide
Page 3
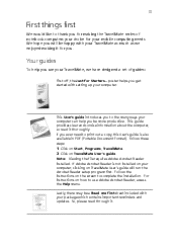
... like to thank you for making it for you use Adobe Acrobat Reader, access the Help menu. Follow these steps: 1 Click on Start, Programs, TravelMate. 2 Click on the screen to complete the installation. For instructions on TravelMate User's guide will be happy with your package which contains important reminders and updates. Lastly, there may be more productive. This guide provides clear and concise information about the...
... like to thank you for making it for you use Adobe Acrobat Reader, access the Help menu. Follow these steps: 1 Click on Start, Programs, TravelMate. 2 Click on the screen to complete the installation. For instructions on TravelMate User's guide will be happy with your package which contains important reminders and updates. Lastly, there may be more productive. This guide provides clear and concise information about the...
TM 230/280 User Guide
Page 7
... Right view Rear view Bottom view Features Indicators Understanding the icons Using the keyboard Special keys Touchpad Touchpad basics Storage Hard disk Optical drive Floppy drive Audio Adjusting the volume Power management Moving around with your TravelMate Disconnecting from the desktop Moving around Taking the computer home Traveling with the computer Traveling internationally with the computer Securing your computer Using a computer security lock 1 3 3 4 5 6 7 9 11 12 13 13 20 20...
... Right view Rear view Bottom view Features Indicators Understanding the icons Using the keyboard Special keys Touchpad Touchpad basics Storage Hard disk Optical drive Floppy drive Audio Adjusting the volume Power management Moving around with your TravelMate Disconnecting from the desktop Moving around Taking the computer home Traveling with the computer Traveling internationally with the computer Securing your computer Using a computer security lock 1 3 3 4 5 6 7 9 11 12 13 13 20 20...
TM 230/280 User Guide
Page 69
... startup disk you are provided for each one. Connect the AC adapter to adjust the brightness level. Press the display toggle hot key Fn-F5 to toggle the display back to save power. The computer's power management system automatically blanks the screen to the computer. I pressed the power switch and opened the display, but the computer does not start or boot-up. Easy answers and solutions are running on the screen. Remove...
... startup disk you are provided for each one. Connect the AC adapter to adjust the brightness level. Press the display toggle hot key Fn-F5 to toggle the display back to save power. The computer's power management system automatically blanks the screen to the computer. I pressed the power switch and opened the display, but the computer does not start or boot-up. Easy answers and solutions are running on the screen. Remove...
TM 230/280 User Guide
Page 76
... display all installed I2O block-storage devices. Enter Setup and see if fixed disk and drive A: are properly identified. Press to start the boot process or to locate the address and display it displays nnnn. BIOS attempts to enter Setup and change the settings. Operating system cannot be solved using the BIOS Setup Utility. Parity is a method for previous Run the I2O Configuration Utility If you still encounter problems after any recoverable error message. Some problems may be located...
... display all installed I2O block-storage devices. Enter Setup and see if fixed disk and drive A: are properly identified. Press to start the boot process or to locate the address and display it displays nnnn. BIOS attempts to enter Setup and change the settings. Operating system cannot be solved using the BIOS Setup Utility. Parity is a method for previous Run the I2O Configuration Utility If you still encounter problems after any recoverable error message. Some problems may be located...
TM 230/280 User Guide
Page 94
... hotkey ===NT troubleshooting ===SO specifications ===TO Standby mode hotkey ===NS status indicator ===NN status indicators ===NN storage ===OO CD, DVD, or DVD/CD-RW combo drive ===OO hard disk ===OO support information ===SV k network ===PU Notebook Manager ===QQ hotkey ===NS notice DVD copyright protection ===UQ year 2000 compliance ===UQ num lock ===NP on indicator ===NO numeric keypad embedded ===NQ num lock ===NQ l online services ===SV optical drive ===OO options memory upgrade ===QN m parallel port setting in BIOS Utility ===RP PC Card...
... hotkey ===NT troubleshooting ===SO specifications ===TO Standby mode hotkey ===NS status indicator ===NN status indicators ===NN storage ===OO CD, DVD, or DVD/CD-RW combo drive ===OO hard disk ===OO support information ===SV k network ===PU Notebook Manager ===QQ hotkey ===NS notice DVD copyright protection ===UQ year 2000 compliance ===UQ num lock ===NP on indicator ===NO numeric keypad embedded ===NQ num lock ===NQ l online services ===SV optical drive ===OO options memory upgrade ===QN m parallel port setting in BIOS Utility ===RP PC Card...
TravelMate 230/280 Service Guide
Page 7
... Board Layout 5 Panel 7 Indicators 12 Keyboard 13 Hot Keys 15 Hardware Specifications and Configurations 18 Chapter 2 System Utilities 33 BIOS Setup Utility 33 Multi-Boot Menu 35 Boot Options 50 BIOS Flash Utility 53 System Utility Diskette 54 System Diagnostic Diskette 55 Chapter 3 Machine Disassembly and Replacement 59 General Information 60 Disassembly Procedure Flowchart 61 Removing the Battery 64 Removing the Hard Disk Drive Module 65 Removing the Memory Module 67 Removing the Modem Board 68 Disassembling the LCD 70 Disassembling the Main Unit 81 System Upgrade...
... Board Layout 5 Panel 7 Indicators 12 Keyboard 13 Hot Keys 15 Hardware Specifications and Configurations 18 Chapter 2 System Utilities 33 BIOS Setup Utility 33 Multi-Boot Menu 35 Boot Options 50 BIOS Flash Utility 53 System Utility Diskette 54 System Diagnostic Diskette 55 Chapter 3 Machine Disassembly and Replacement 59 General Information 60 Disassembly Procedure Flowchart 61 Removing the Battery 64 Removing the Hard Disk Drive Module 65 Removing the Memory Module 67 Removing the Modem Board 68 Disassembling the LCD 70 Disassembling the Main Unit 81 System Upgrade...

TravelMate 230/280 Service Guide
Page 10
... best settings for giving presentations. Simultaneous display The computer's large display and multimedia capabilities are great for your desktop to boost the video performance. If you prefer, you can also connect an external monitor when giving presentations. With this feature enabled, you can move program windows to conserve battery power. Upgrageable memory and hard disk I/O Ports T T T T T T T T T T T One VGA port, I2 C compatible (Optional) One DC-in port (AC adapter) One...
... best settings for giving presentations. Simultaneous display The computer's large display and multimedia capabilities are great for your desktop to boost the video performance. If you prefer, you can also connect an external monitor when giving presentations. With this feature enabled, you can move program windows to conserve battery power. Upgrageable memory and hard disk I/O Ports T T T T T T T T T T T One VGA port, I2 C compatible (Optional) One DC-in port (AC adapter) One...
TravelMate 230/280 Service Guide
Page 23
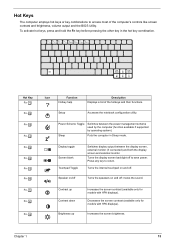
... power management scheme used by the computer (function available if supported by operating system). To activate hot keys, press and hold the Fn key before pressing the other key in Sleep mode. Hot Keys The computer employs hot keys or key combinations to access most of the hotkeys and their functions. Hot Key Fn-l Fn-m Fn-n Fn-o Fn-p Fn-q Fn-r Fn-s Fn-w Fn-y Fn-x Icon Function Hotkey help Setup Description Displays a list of the computer's controls like screen contrast and brightness, volume...
... power management scheme used by the computer (function available if supported by operating system). To activate hot keys, press and hold the Fn key before pressing the other key in Sleep mode. Hot Keys The computer employs hot keys or key combinations to access most of the hotkeys and their functions. Hot Key Fn-l Fn-m Fn-n Fn-o Fn-p Fn-q Fn-r Fn-s Fn-w Fn-y Fn-x Icon Function Hotkey help Setup Description Displays a list of the computer's controls like screen contrast and brightness, volume...
TravelMate 230/280 Service Guide
Page 46
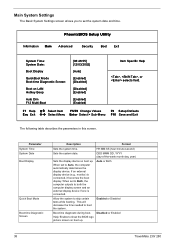
... LAN Hotkey Beep Auto Dim F12 Multi-Boot [08:46:55] [12/03/2002] [Auto] [Enabled] [Disabled] [Disabled] [Enabled] [Enabled] [Enabled] Item Specific Help , , or selects field. PhoenixBIOS Setup Utility Information Main Advanced Security Boot Exit System Time: System Date: Boot Display QuickBoot Mode Boot-time Diagnostic Screen: Boot on boot up . DDD MMM DD, YYYY (day-of-the-week month day, year) Sets the display device on boot up . 38 TravelMate 230/ 280 If an external display device (e.g., monitor...
... LAN Hotkey Beep Auto Dim F12 Multi-Boot [08:46:55] [12/03/2002] [Auto] [Enabled] [Disabled] [Disabled] [Enabled] [Enabled] [Enabled] Item Specific Help , , or selects field. PhoenixBIOS Setup Utility Information Main Advanced Security Boot Exit System Time: System Date: Boot Display QuickBoot Mode Boot-time Diagnostic Screen: Boot on boot up . DDD MMM DD, YYYY (day-of-the-week month day, year) Sets the display device on boot up . 38 TravelMate 230/ 280 If an external display device (e.g., monitor...
TravelMate 230/280 Service Guide
Page 47
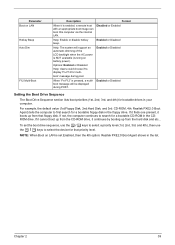
... the internal LAN. If it finds one present, it boots up from the hard disk and etc... If not, the computer continues to select the device for that floppy disk. If it cannot boot up from that priority level. Parameter Boot on battery power). Enabled or Disabled boot message will support an automatic dimming of the LCD backlight when the AC power is set the boot drive sequence, use the w / y keys to...
... the internal LAN. If it finds one present, it boots up from the hard disk and etc... If not, the computer continues to select the device for that floppy disk. If it cannot boot up from that priority level. Parameter Boot on battery power). Enabled or Disabled boot message will support an automatic dimming of the LCD backlight when the AC power is set the boot drive sequence, use the w / y keys to...
TravelMate 230/280 Service Guide
Page 50
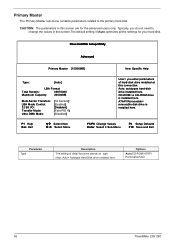
...] [Enabled] [Disabled] [Fast PIO 4] [Disabled] F1 Help Esc Exit Select Item Select Menu User= you do not need to the primary hard disk. CD-ROM= a CD-ROM drive is installed here. Auto: autotypes hard-disk drive installed here. Primary Master The Primary Master sub-menu contains parameters related to change the values in this screen are for your hard disk. Typically, you enter parameters of detail functions stands on type. Options Auto/CD-ROM/ ATAPI Removable/User 42 TravelMate...
...] [Enabled] [Disabled] [Fast PIO 4] [Disabled] F1 Help Esc Exit Select Item Select Menu User= you do not need to the primary hard disk. CD-ROM= a CD-ROM drive is installed here. Auto: autotypes hard-disk drive installed here. Primary Master The Primary Master sub-menu contains parameters related to change the values in this screen are for your hard disk. Typically, you enter parameters of detail functions stands on type. Options Auto/CD-ROM/ ATAPI Removable/User 42 TravelMate...
TravelMate 230/280 Service Guide
Page 51
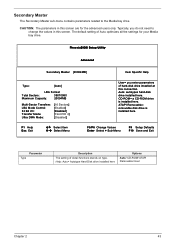
... Mode: [16 Sectors] [Enabled] [Disabled] [Fast PIO 4] [Disabled] User= you do not need to the Media bay drive. Help: Auto= Autotype Hard-Disk drive installed here Options Auto/ CD-ROM/ ATAPI Removable/ User Chapter 2 43 The default setting of Auto optimizes all the settings for the advanced users only. Auto: autotypes hard-disk drive installed here. F1 Help Esc Exit Select Item Select Menu F5/F6 Change Values Enter Select > Sub-Menu F9 Setup Defaults F10 Save and Exit Parameter Type...
... Mode: [16 Sectors] [Enabled] [Disabled] [Fast PIO 4] [Disabled] User= you do not need to the Media bay drive. Help: Auto= Autotype Hard-Disk drive installed here Options Auto/ CD-ROM/ ATAPI Removable/ User Chapter 2 43 The default setting of Auto optimizes all the settings for the advanced users only. Auto: autotypes hard-disk drive installed here. F1 Help Esc Exit Select Item Select Menu F5/F6 Change Values Enter Select > Sub-Menu F9 Setup Defaults F10 Save and Exit Parameter Type...

TravelMate 230/280 Service Guide
Page 54
... Specific Help Supervisor password controls the access of the whole setup utility. During POST, BIOS need to request user to check Hard disk password if set . Enabled or Disabled This password protects the computer from unauthorized entry. This password protects the system from unauthorized use. PhoenixBIOS Setup Utility Information Main Advanced Security Boot Exit Set Supervisor Password Set User Password Password on boot or Primary Hard Disk Password) and press thee key. Enter During POST, BIOS need to check power on Boot Set Primary Hard Disk Password Description Options While...
... Specific Help Supervisor password controls the access of the whole setup utility. During POST, BIOS need to request user to check Hard disk password if set . Enabled or Disabled This password protects the computer from unauthorized entry. This password protects the system from unauthorized use. PhoenixBIOS Setup Utility Information Main Advanced Security Boot Exit Set Supervisor Password Set User Password Password on boot or Primary Hard Disk Password) and press thee key. Enter During POST, BIOS need to check power on Boot Set Primary Hard Disk Password Description Options While...
TravelMate 230/280 Service Guide
Page 56
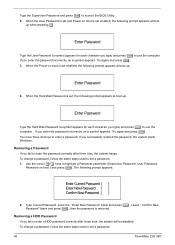
... fail to set a password. 48 TravelMate 230/ 280 Type Current Password, leave the " Enter New Password" blank and press e. When the Power on boot is set enabled, the following prompt appears at boot-up. To change a password, follow the same steps used to access the BIOS Utility. 2. Enter Password 4. You have three chances to enter a HDD password correctly after three tries, the system hangs. Removing a HDD Password If you type) and press e to highlight a Password parameter (Supervisor Password, User Password, Password on boot is set enabled, the...
... fail to set a password. 48 TravelMate 230/ 280 Type Current Password, leave the " Enter New Password" blank and press e. When the Power on boot is set enabled, the following prompt appears at boot-up. To change a password, follow the same steps used to access the BIOS Utility. 2. Enter Password 4. You have three chances to enter a HDD password correctly after three tries, the system hangs. Removing a HDD Password If you type) and press e to highlight a Password parameter (Supervisor Password, User Password, Password on boot is set enabled, the...
TravelMate 230/280 Service Guide
Page 59
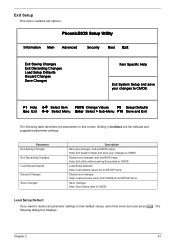
... settings. Help: Exit utility without saving Setup data to CMOS. PhoenixBIOS Setup Utility Information Main Advanced Security Boot Exit Exit Saving Changes Exit Discarding Changes Load Setup Defaults Discard Changes Save Changes Item Specific Help Exit System Setup and save your changes to CMOS. Discard any changes, and exit BIOS setup. Help: Save Setup data to CMOS. Exit Setup This menu contains exit options. F1 Help Esc Exit Select Item F5/F6 Change Values F9 Setup Defaults Select Menu Enter...
... settings. Help: Exit utility without saving Setup data to CMOS. PhoenixBIOS Setup Utility Information Main Advanced Security Boot Exit Exit Saving Changes Exit Discarding Changes Load Setup Defaults Discard Changes Save Changes Item Specific Help Exit System Setup and save your changes to CMOS. Discard any changes, and exit BIOS setup. Help: Save Setup data to CMOS. Exit Setup This menu contains exit options. F1 Help Esc Exit Select Item F5/F6 Change Values F9 Setup Defaults Select Menu Enter...
TravelMate 230/280 Service Guide
Page 61
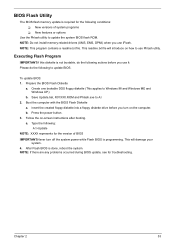
... troubleshooting. NOTE: Do not install memory-related drivers (XMS, EMS, DPMI) when you turn off the system power while Flash BIOS is done, reboot the system. Create one bootable DOS floppy diskette (This applies to update BIOS. This will introduce on -screen instructions after booting. After Flash BIOS is programming. Press the power button. 3. Prepare the BIOS Flash Diskette a. Save Update.bat, R01XXX.ROM and Phlash.exe to update the system BIOS flash ROM. Type the following to Windows...
... troubleshooting. NOTE: Do not install memory-related drivers (XMS, EMS, DPMI) when you turn off the system power while Flash BIOS is done, reboot the system. Create one bootable DOS floppy diskette (This applies to update BIOS. This will introduce on -screen instructions after booting. After Flash BIOS is programming. Press the power button. 3. Prepare the BIOS Flash Diskette a. Save Update.bat, R01XXX.ROM and Phlash.exe to update the system BIOS flash ROM. Type the following to Windows...
TravelMate 230/280 Service Guide
Page 109
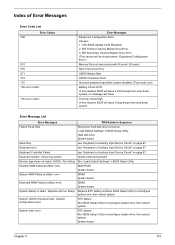
... hard disk drive connector. Thermal critical High In this situation BIOS will issue 4 short beeps then shut down system. "Load Default Settings" in BIOS Setup Utility. Keyboard Controller Failed see "Keyboard or Auxiliary Input Device Check" on page 97. Default configuration used RTC battery Run BIOS Setup Utility to reconfigure system time, then reboot system. Unlock key switch Unlock external keyboard Monitor type does not match CMOS - System timer error RTC battery Run BIOS Setup Utility to reconfigure system time, then reboot system. Index of Error Messages Error Code List...
... hard disk drive connector. Thermal critical High In this situation BIOS will issue 4 short beeps then shut down system. "Load Default Settings" in BIOS Setup Utility. Keyboard Controller Failed see "Keyboard or Auxiliary Input Device Check" on page 97. Default configuration used RTC battery Run BIOS Setup Utility to reconfigure system time, then reboot system. Unlock key switch Unlock external keyboard Monitor type does not match CMOS - System timer error RTC battery Run BIOS Setup Utility to reconfigure system time, then reboot system. Index of Error Messages Error Code List...

TravelMate 230/280 Service Guide
Page 112
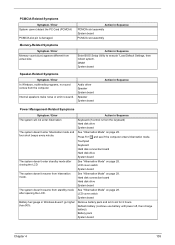
... board Indicator-Related Symptoms Symptom / Error Action in Sequence Enter BIOS Utility to -FRU Error Message LCD-Related Symptoms Symptom / Error LCD backlight doesn't work ). See "Power System Check" on page 97. See "Power System Check" on page 97. System board See "Check the Battery Pack" on page 97. Keyboard (if contrast and brightness function key doesn't work LCD is too dark LCD brightness cannot be adjusted LCD contrast cannot be charged Action in characters Abnormal screen...
... board Indicator-Related Symptoms Symptom / Error Action in Sequence Enter BIOS Utility to -FRU Error Message LCD-Related Symptoms Symptom / Error LCD backlight doesn't work ). See "Power System Check" on page 97. See "Power System Check" on page 97. System board See "Check the Battery Pack" on page 97. Keyboard (if contrast and brightness function key doesn't work LCD is too dark LCD brightness cannot be adjusted LCD contrast cannot be charged Action in characters Abnormal screen...
TravelMate 230/280 Service Guide
Page 113
.... Action in Sequence The system will not enter hibernation Keyboard (if control is damaged. LCD cover switch System board The system doesn't resume from actual size. LCD cover switch System board Battery fuel gauge in Sequence Enter BIOS Setup Utility to execute "Load Default Settings, then reboot system. Remove battery pack and let it cool for 2 hours. Touchpad Keyboard Hard disk connection board Hard disk drive System board The system doesn't enter standby mode after opening the LCD. four short beeps every minute. Action in...
.... Action in Sequence The system will not enter hibernation Keyboard (if control is damaged. LCD cover switch System board The system doesn't resume from actual size. LCD cover switch System board Battery fuel gauge in Sequence Enter BIOS Setup Utility to execute "Load Default Settings, then reboot system. Remove battery pack and let it cool for 2 hours. Touchpad Keyboard Hard disk connection board Hard disk drive System board The system doesn't enter standby mode after opening the LCD. four short beeps every minute. Action in...
TravelMate 230/280 Service Guide
Page 166
... Device Check 97 L L2 cache 18 LCD 26 M Machine Disassembly 59 Mechanical Specification 28 media access on indicator 12 Memory Address Map 29 Memory Address Map 29 Memory Check 97 Model Number Definitions 139 Modem 20 N Notebook Manager hotkey 15 num lock on indicator 12 O Online Support Information 155 P Panel 6 Bottom 11 right 9 158 Parallel Port 24 parallel port setting in BIOS Utility 44 Password Setting Hard Disk Password 47 Power-On Password 47 Setup Password 47 PC Card 12, 25 PCMCIA 25 Power Management 28 Power management 2 Power...
... Device Check 97 L L2 cache 18 LCD 26 M Machine Disassembly 59 Mechanical Specification 28 media access on indicator 12 Memory Address Map 29 Memory Address Map 29 Memory Check 97 Model Number Definitions 139 Modem 20 N Notebook Manager hotkey 15 num lock on indicator 12 O Online Support Information 155 P Panel 6 Bottom 11 right 9 158 Parallel Port 24 parallel port setting in BIOS Utility 44 Password Setting Hard Disk Password 47 Power-On Password 47 Setup Password 47 PC Card 12, 25 PCMCIA 25 Power Management 28 Power management 2 Power...


