
TravelMate 210 Service Guide
Page 5
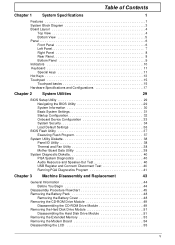
... Block Diagram 3 Board Layout 4 Top View 4 Bottom View 5 Panel 6 Front Panel 6 Left Panel 7 Right Panel 8 Rear Panel 8 Bottom Panel 9 Indicators 10 Keyboard 11 Special keys 11 Hot Keys 13 Touchpad 15 Touchpad basics 15 Hardware Specifications and Configurations 17 Chapter 2 System Utilities 29 BIOS Setup Utility 29 Navigating the BIOS Utility 29 System Information 30 Basic System Settings 31 Startup Configuration 32 Onboard Device Configuration 33 System Security 34 Load Default Settings 36 BIOS Flash Utility 37 Executing Flash Program 37 System Utility Diskette...
... Block Diagram 3 Board Layout 4 Top View 4 Bottom View 5 Panel 6 Front Panel 6 Left Panel 7 Right Panel 8 Rear Panel 8 Bottom Panel 9 Indicators 10 Keyboard 11 Special keys 11 Hot Keys 13 Touchpad 15 Touchpad basics 15 Hardware Specifications and Configurations 17 Chapter 2 System Utilities 29 BIOS Setup Utility 29 Navigating the BIOS Utility 29 System Information 30 Basic System Settings 31 Startup Configuration 32 Onboard Device Configuration 33 System Security 34 Load Default Settings 36 BIOS Flash Utility 37 Executing Flash Program 37 System Utility Diskette...
TravelMate 210 Service Guide
Page 6
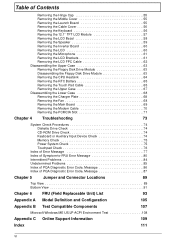
... Floppy Disk Drive Module 63 Removing the CPU Heatsink 64 Removing the RTC Battery 65 Removing the Touch Pad Cable 65 Removing the Upper Case 67 Disassembling the Lower Case 68 Removing the Charger Plate 68 Removing the Fan 68 Removing the Main Board 69 Removing the Modem Cable 70 Removing the PCMCIA Slot 71 Chapter 4 Troubleshooting 73 System Check Procedures 74 Diskette Drive Check 74 CD-ROM Drive Check 74 Keyboard or Auxiliary Input Device Check 74 Memory...
... Floppy Disk Drive Module 63 Removing the CPU Heatsink 64 Removing the RTC Battery 65 Removing the Touch Pad Cable 65 Removing the Upper Case 67 Disassembling the Lower Case 68 Removing the Charger Plate 68 Removing the Fan 68 Removing the Main Board 69 Removing the Modem Cable 70 Removing the PCMCIA Slot 71 Chapter 4 Troubleshooting 73 System Check Procedures 74 Diskette Drive Check 74 CD-ROM Drive Check 74 Keyboard or Auxiliary Input Device Check 74 Memory...

TravelMate 210 Service Guide
Page 8
... (CD-ROM, floppy disk drive, hard disk drive) ! This computer has built-in -one Type II CardBus PC card (formerly PCMCIA) slot with 8MB shared from the computer LCD and the external monitor. The computer employs a microswitch that automatically dims the LCD when the computer is powered by a battery pack to support simultaneous LCD and CRT display. Simultaneous display allows you to conserve power when you can move program windows to...
... (CD-ROM, floppy disk drive, hard disk drive) ! This computer has built-in -one Type II CardBus PC card (formerly PCMCIA) slot with 8MB shared from the computer LCD and the external monitor. The computer employs a microswitch that automatically dims the LCD when the computer is powered by a battery pack to support simultaneous LCD and CRT display. Simultaneous display allows you to conserve power when you can move program windows to...
TravelMate 210 Service Guide
Page 19
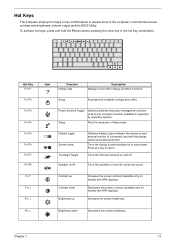
... Description Displays a list of the computer's controls like screen contrast and brightness, volume output and the BIOS Utility. Turns the display screen backlight off Switches display output between the power management scheme used by the computer (function available if supported by operating system). Contrast up Increases the screen contrast (available only for models with HPA displays). Chapter 1 13 Increases the screen brightness. Turns the internal touchpad on and off . Brightness down Brightness up Contrast down Decreases the screen brightness. Turns the...
... Description Displays a list of the computer's controls like screen contrast and brightness, volume output and the BIOS Utility. Turns the display screen backlight off Switches display output between the power management scheme used by the computer (function available if supported by operating system). Contrast up Increases the screen contrast (available only for models with HPA displays). Chapter 1 13 Increases the screen brightness. Turns the internal touchpad on and off . Brightness down Brightness up Contrast down Decreases the screen brightness. Turns the...
TravelMate 210 Service Guide
Page 23
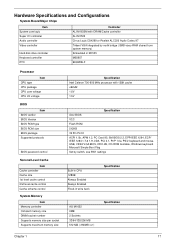
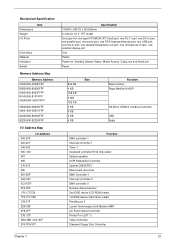
Hardware Specifications and Configurations System Board Major Chips Item System core logic Super I/O controller Audio controller Video controller Hard disk drive controller Keyboard controller RTC Controller ALI M1632M with DRAM/Cache controller ALI M1535 Cirrus Logic CS4299 or Realtek ALC200 Audio Codec 97 Trident VGA integrated by north bridge ( 8MB viseo RAM shared from system memory) Embedded in M1535 M38867 BQ3285LF Processor Item CPU type CPU package CPU core voltage CPU I/O voltage BIOS Item BIOS vendor BIOS Version BIOS ROM type BIOS ROM size...
Hardware Specifications and Configurations System Board Major Chips Item System core logic Super I/O controller Audio controller Video controller Hard disk drive controller Keyboard controller RTC Controller ALI M1632M with DRAM/Cache controller ALI M1535 Cirrus Logic CS4299 or Realtek ALC200 Audio Codec 97 Trident VGA integrated by north bridge ( 8MB viseo RAM shared from system memory) Embedded in M1535 M38867 BQ3285LF Processor Item CPU type CPU package CPU core voltage CPU I/O voltage BIOS Item BIOS vendor BIOS Version BIOS ROM type BIOS ROM size...
TravelMate 210 Service Guide
Page 24
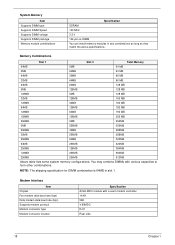
... connector type Modem connector location Specification Ambit MDC module with various capacities to form other combinations. NOTE: The shipping specification for DIMM combination is 64MB in any combinations as long as they match the above specifications . System Memory Item Supports DIMM type Supports DIMM Speed Supports DIMM voltage Supports DIMM package Memory module combinations Specification SDRAM 100 MHz 3.3 V 144-pin so-DIMM You can install memory modules in slot 1.
... connector type Modem connector location Specification Ambit MDC module with various capacities to form other combinations. NOTE: The shipping specification for DIMM combination is 64MB in any combinations as long as they match the above specifications . System Memory Item Supports DIMM type Supports DIMM Speed Supports DIMM voltage Supports DIMM package Memory module combinations Specification SDRAM 100 MHz 3.3 V 144-pin so-DIMM You can install memory modules in slot 1.
TravelMate 210 Service Guide
Page 33
... Size Function Base memory Rage Mobility-M AGP O2 Micro OZ6812 Cardbus Controller USB Audio Function DMA controller-1 Interrupt controller-1 Timer 1 Keyboard controller 8742 chip select System speaker ACPI Embedded Controller System CMOS/RTC Main board resources DMA Controller-1 Interrupt controller-2 DMA controller-2 Numeric data processor 2nd EIDE device (CD-ROM) select 1st EIDE device (hard drive) select Parallel port 3 Lucent Technologies Soft Modem AMR ALi Fast Infrared Controller Printer Port (LPT 1) Video Controller Standard Floppy Disk Controller Chapter...
... Size Function Base memory Rage Mobility-M AGP O2 Micro OZ6812 Cardbus Controller USB Audio Function DMA controller-1 Interrupt controller-1 Timer 1 Keyboard controller 8742 chip select System speaker ACPI Embedded Controller System CMOS/RTC Main board resources DMA Controller-1 Interrupt controller-2 DMA controller-2 Numeric data processor 2nd EIDE device (CD-ROM) select 1st EIDE device (hard drive) select Parallel port 3 Lucent Technologies Soft Modem AMR ALi Fast Infrared Controller Printer Port (LPT 1) Video Controller Standard Floppy Disk Controller Chapter...
TravelMate 210 Service Guide
Page 38
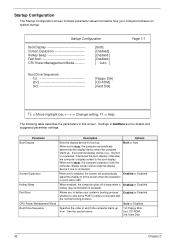
... set to enabled, the screen will automatically Enabled or Disabled adjust the display to 640 x 480. Enabled or Disabled whether to define your computer behaves on boot-up from. Startup Configuration Boot Display Screen Expansion Hotkey Beep Fast Boot CPU Power Management Mode---------- [Both] [Enabled] [Enabled ] [Enabled ] [ Auto ] Boot Drive Sequence: 1st 2nd 3rd [Floppy Disk] [CD-ROM] [Hard Disk] Page 1/1 ↑↓ = Move highlight bar, ←→ = Change setting, F1 = Help The following table describes the parameters in boldface are the default...
... set to enabled, the screen will automatically Enabled or Disabled adjust the display to 640 x 480. Enabled or Disabled whether to define your computer behaves on boot-up from. Startup Configuration Boot Display Screen Expansion Hotkey Beep Fast Boot CPU Power Management Mode---------- [Both] [Enabled] [Enabled ] [Enabled ] [ Auto ] Boot Drive Sequence: 1st 2nd 3rd [Floppy Disk] [CD-ROM] [Hard Disk] Page 1/1 ↑↓ = Move highlight bar, ←→ = Change setting, F1 = Help The following table describes the parameters in boldface are the default...

TravelMate 210 Service Guide
Page 43
... Error Code Message" for the following actions before you use AFlash utility. This readme.txt file will damage your system. 4. This will introduce on how to update the system BIOS flash ROM. After Flash BIOS is programming. BIOS Flash Utility The BIOS flash memory update is required for troubleshooting. NOTE: This program contains a readme.txt file. Copy all AFlash files into TravelMate 210 series module, then reboot. Create a bootable disk. 2. New features or options Use the AFlash utility to use...
... Error Code Message" for the following actions before you use AFlash utility. This readme.txt file will damage your system. 4. This will introduce on how to update the system BIOS flash ROM. After Flash BIOS is programming. BIOS Flash Utility The BIOS flash memory update is required for troubleshooting. NOTE: This program contains a readme.txt file. Copy all AFlash files into TravelMate 210 series module, then reboot. Create a bootable disk. 2. New features or options Use the AFlash utility to use...
TravelMate 210 Service Guide
Page 83
... POST. Unlock key switch Monitor type does not match CMOS - System board RTC battery Run BIOS Setup Utility to reconfigure system time, then reboot system. System board Run "Load Default Settings" in Sequence Reconnect hard disk drive connector. This index can also help you make changes in the computer. If the symptom is not listed, see "Undetermined Problems" on the screen and the error symptoms classified by function. "Load Default Settings" in BIOS Setup Utility. Hard disk drive System board "Keyboard or Auxiliary Input Device Check...
... POST. Unlock key switch Monitor type does not match CMOS - System board RTC battery Run BIOS Setup Utility to reconfigure system time, then reboot system. System board Run "Load Default Settings" in Sequence Reconnect hard disk drive connector. This index can also help you make changes in the computer. If the symptom is not listed, see "Undetermined Problems" on the screen and the error symptoms classified by function. "Load Default Settings" in BIOS Setup Utility. Hard disk drive System board "Keyboard or Auxiliary Input Device Check...
TravelMate 210 Service Guide
Page 87
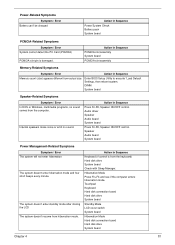
...hibernation mode. Power-Related Symptoms Symptom / Error Battery can't be charged Action in Sequence Power System Check Battery pack System board PCMCIA-Related Symptoms Symptom / Error System cannot detect the PC Card (PCMCIA) PCMCIA slot pin is from the keyboard) Hard disk drive System board Check with Sleep Manager. Touchpad Keyboard Hard disk connection board Hard disk drive System board Standby Mode LCD cover switch System board Hibernation Mode Hard disk connection board Hard disk drive System board Chapter 4 81 Enter BIOS Setup Utility to execute "Load Default Settings...
...hibernation mode. Power-Related Symptoms Symptom / Error Battery can't be charged Action in Sequence Power System Check Battery pack System board PCMCIA-Related Symptoms Symptom / Error System cannot detect the PC Card (PCMCIA) PCMCIA slot pin is from the keyboard) Hard disk drive System board Check with Sleep Manager. Touchpad Keyboard Hard disk connection board Hard disk drive System board Standby Mode LCD cover switch System board Hibernation Mode Hard disk connection board Hard disk drive System board Chapter 4 81 Enter BIOS Setup Utility to execute "Load Default Settings...

TravelMate 210 Service Guide
Page 88
...from standby mode after opening the LCD. Reconnect hard disk/CD-ROM drives. External display does not work . Device driver Device cable Device System board Action in Sequence Standby Mode LCD cover switch System board Remove battery pack and let it cool for 2 hours. Touchpad does not work correctly. Printer driver Printer cable Printer System Board Ensure that the "Parallel Port" in the "Onboard Devices Configuration" of BIOS Setup Utility is set to Enabled. Action in Sequence Reconnect the keyboard cable. Refresh battery (continue to execute "Load Default Settings...
...from standby mode after opening the LCD. Reconnect hard disk/CD-ROM drives. External display does not work . Device driver Device cable Device System board Action in Sequence Standby Mode LCD cover switch System board Remove battery pack and let it cool for 2 hours. Touchpad does not work correctly. Printer driver Printer cable Printer System Board Ensure that the "Parallel Port" in the "Onboard Devices Configuration" of BIOS Setup Utility is set to Enabled. Action in Sequence Reconnect the keyboard cable. Refresh battery (continue to execute "Load Default Settings...
TravelMate 210 Service Guide
Page 90
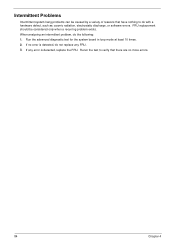
... loop mode at least 10 times. 2. Rerun the test to verify that have nothing to do with a hardware defect, such as: cosmic radiation, electrostatic discharge, or software errors. If no more errors. 84 Chapter 4 If any FRU. 3. Intermittent Problems Intermittent system hang problems can be considered only when a recurring problem exists. When analyzing an intermittent problem, do not replace any error...
... loop mode at least 10 times. 2. Rerun the test to verify that have nothing to do with a hardware defect, such as: cosmic radiation, electrostatic discharge, or software errors. If no more errors. 84 Chapter 4 If any FRU. 3. Intermittent Problems Intermittent system hang problems can be considered only when a recurring problem exists. When analyzing an intermittent problem, do not replace any error...

TravelMate 210 Service Guide
Page 92
make sure to connect AC adapter make sure to install a highly charged battery, and reboot system. 86 Chapter 4 Index of PQA Diagnostic Error Code, Message Error Message Hardware Error BIOS Update Program Error System Error Without AC adapter Battery Low Action in Sequence See "System Diagnostic Diskette" on page 40 Turn off the power and restart the system. Make sure this AFlash BIOS diskette for this model.
make sure to connect AC adapter make sure to install a highly charged battery, and reboot system. 86 Chapter 4 Index of PQA Diagnostic Error Code, Message Error Message Hardware Error BIOS Update Program Error System Error Without AC adapter Battery Low Action in Sequence See "System Diagnostic Diskette" on page 40 Turn off the power and restart the system. Make sure this AFlash BIOS diskette for this model.
TravelMate 210 Service Guide
Page 117
... AFLASH Utility 37 Audio 17, 21 B Battery 23 battery pack charging indicator 10 BIOS 17 package 17 ROM size 17 ROM type 17 vendor 17 Version 17 BIOS Setup Utility 29 BIOS Supports protocol 17 BIOS Utility 29-36 Basic System Settings 31 Load Default Settings 36 Navigating 29 Onboard Device Configuration 33 Startup Configuration 32 System Information 30 System Security 34 Board Layout 4 Bottom View 5 Top View 4 brightness hotkeys 13 C Cache controller 17 size 17 caps lock on indicator...
... AFLASH Utility 37 Audio 17, 21 B Battery 23 battery pack charging indicator 10 BIOS 17 package 17 ROM size 17 ROM type 17 vendor 17 Version 17 BIOS Setup Utility 29 BIOS Supports protocol 17 BIOS Utility 29-36 Basic System Settings 31 Load Default Settings 36 Navigating 29 Onboard Device Configuration 33 Startup Configuration 32 System Information 30 System Security 34 Board Layout 4 Bottom View 5 Top View 4 brightness hotkeys 13 C Cache controller 17 size 17 caps lock on indicator...
TravelMate 210 Service Guide
Page 118
... Device Check 74 L L2 cache 17 LCD 24 M Machine Disassembly and Replacement 43 Mechanical Specification 27 media access on indicator 10 Memory Address Map 27 Memory Address Map 27 Memory Check 75 Model Number Definitions 105 Modem 18 N 112 Notebook Manager hotkey 13 num lock on indicator 10 O Online Support Information 109 P Panel 5 Bottom 9 Rear 8 right 8 Parallel Port 22 parallel port setting in BIOS Utility 33 Password Setting Hard Disk Password 35 Power-On Password 35 Setup Password 35 PC Card 10, 23 PCMCIA 23 Power Management...
... Device Check 74 L L2 cache 17 LCD 24 M Machine Disassembly and Replacement 43 Mechanical Specification 27 media access on indicator 10 Memory Address Map 27 Memory Address Map 27 Memory Check 75 Model Number Definitions 105 Modem 18 N 112 Notebook Manager hotkey 13 num lock on indicator 10 O Online Support Information 109 P Panel 5 Bottom 9 Rear 8 right 8 Parallel Port 22 parallel port setting in BIOS Utility 33 Password Setting Hard Disk Password 35 Power-On Password 35 Setup Password 35 PC Card 10, 23 PCMCIA 23 Power Management...
TravelMate 210 User's Guide
Page 3
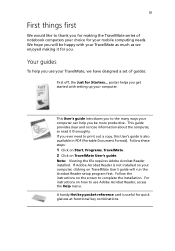
... Reader installed. A handy Hot key pocket reference card is also available in PDF (Portable Document Format). Follow these steps: 1 Click on Start, Programs, TravelMate. 2 Click on how to use your mobile computing needs. If Adobe Acrobat Reader is not installed on your computer. Follow the instructions on TravelMate User's guide will be more productive. Your guides To help you be happy with setting up your computer, clicking on the screen...
... Reader installed. A handy Hot key pocket reference card is also available in PDF (Portable Document Format). Follow these steps: 1 Click on Start, Programs, TravelMate. 2 Click on how to use your mobile computing needs. If Adobe Acrobat Reader is not installed on your computer. Follow the instructions on TravelMate User's guide will be more productive. Your guides To help you be happy with setting up your computer, clicking on the screen...
TravelMate 210 User's Guide
Page 38
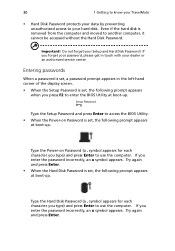
... authorized service center. Try again and press Enter. • When the Hard Disk Password is set, the following prompt appears at boot-up . Entering passwords When a password is set, a password prompt appears in touch with your password, please get in the left-hand corner of the display screen. • When the Setup Password is removed from the computer and moved to another computer, it cannot be accessed without the Hard Disk Password. Type the Hard Disk Password...
... authorized service center. Try again and press Enter. • When the Hard Disk Password is set, the following prompt appears at boot-up . Entering passwords When a password is set, a password prompt appears in touch with your password, please get in the left-hand corner of the display screen. • When the Setup Password is removed from the computer and moved to another computer, it cannot be accessed without the Hard Disk Password. Type the Hard Disk Password...
TravelMate 210 User's Guide
Page 53
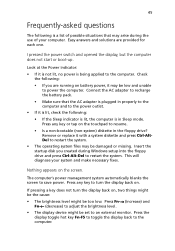
... on the screen. Remove or replace it is lit, check the following : • If you created during the use of your system and make necessary fixes. Connect the AC adapter to recharge the battery pack. • Make sure that may be low and unable to restart the system. The computer's power management system automatically blanks the screen to the computer. Press the display toggle hot key Fn...
... on the screen. Remove or replace it is lit, check the following : • If you created during the use of your system and make necessary fixes. Connect the AC adapter to recharge the battery pack. • Make sure that may be low and unable to restart the system. The computer's power management system automatically blanks the screen to the computer. Press the display toggle hot key Fn...
TravelMate 210 User's Guide
Page 57
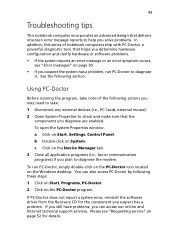
... System. See the following actions you may need to take note of notebook computers ship with PC-Doctor, a powerful diagnostic tool, that helps you determine hardware configuration and clarify hardware or software problems. • If the system reports an error message or an error symptom occurs, see "Requesting service" on Start, Settings, Control Panel. b Double-click on the Device Manager tab. 3 Close all application programs (i.e., fax or...
... System. See the following actions you may need to take note of notebook computers ship with PC-Doctor, a powerful diagnostic tool, that helps you determine hardware configuration and clarify hardware or software problems. • If the system reports an error message or an error symptom occurs, see "Requesting service" on Start, Settings, Control Panel. b Double-click on the Device Manager tab. 3 Close all application programs (i.e., fax or...


