
User Manual (3D)
Page 3
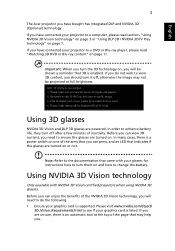
... card is a power switch on , you should turn off , otherwise the image may help you need to do not wish to view 3D content, you will need to ensure the glasses are powered. In many cases, there is supported. Please visit www.nvidia.com/object/ 3D_Vision_Requirements.html to see if your projector to enhance battery life, they turn it off after...
... card is a power switch on , you should turn off , otherwise the image may help you need to do not wish to view 3D content, you will need to ensure the glasses are powered. In many cases, there is supported. Please visit www.nvidia.com/object/ 3D_Vision_Requirements.html to see if your projector to enhance battery life, they turn it off after...

User Manual (3D)
Page 4
... anywhere on the desktop and select NVIDIA Control Panel. Plug the USB cable in to view 3D content. Note: You may need to purchase additional software. 4 Ensure you will open the setup Wizard if you haven't previously set up the 3D environment. 3 Follow the onscreen instructions to set up a 3D environment Once you have installed the drivers, you have the NVIDIA 3D glasses...
... anywhere on the desktop and select NVIDIA Control Panel. Plug the USB cable in to view 3D content. Note: You may need to purchase additional software. 4 Ensure you will open the setup Wizard if you haven't previously set up the 3D environment. 3 Follow the onscreen instructions to set up a 3D environment Once you have installed the drivers, you have the NVIDIA 3D glasses...

User Manual (3D)
Page 7
... graphics card supports 3D playback. English 7 1 Open the stereoscopic player and set the viewing method by going to View > Viewing Method > NVIDIA 3D Vision. 2 Open the 3D content in order to get the 3D effects. Note: You need to the NVIDIA 3DTV Play website: www.nvidia.com/3dtv. To download software and use an NVIDIA 3DTV Play ready projector with DLP glasses...
... graphics card supports 3D playback. English 7 1 Open the stereoscopic player and set the viewing method by going to View > Viewing Method > NVIDIA 3D Vision. 2 Open the 3D content in order to get the 3D effects. Note: You need to the NVIDIA 3DTV Play website: www.nvidia.com/3dtv. To download software and use an NVIDIA 3DTV Play ready projector with DLP glasses...

User Manual
Page 5
... and refer servicing to qualified service personnel when: • the power cord or plug is damaged, cut or frayed • liquid was spilled into the projector's lens when the lamp is on the projector first and then signal sources. • Do not place the product in the following the operating instructions Note: Adjust only those controls that is something wrong with an ambient temperature above...
... and refer servicing to qualified service personnel when: • the power cord or plug is damaged, cut or frayed • liquid was spilled into the projector's lens when the lamp is on the projector first and then signal sources. • Do not place the product in the following the operating instructions Note: Adjust only those controls that is something wrong with an ambient temperature above...

User Manual
Page 6
To temporarily turn off the main power abruptly or unplug the projector during operation. It could cause the object to become hot. • Clean the air filter frequently. Only use acer ceiling mount kit for mounting the projector and ensure it is to wait for changing the lamp, when lamp warning message displays. • Do not attempt to disassemble this could cause it to break or drop it. In this...
To temporarily turn off the main power abruptly or unplug the projector during operation. It could cause the object to become hot. • Clean the air filter frequently. Only use acer ceiling mount kit for mounting the projector and ensure it is to wait for changing the lamp, when lamp warning message displays. • Do not attempt to disassemble this could cause it to break or drop it. In this...

User Manual
Page 8
... lamp, contact your local dealer or Acer service center for changing the lamp, when lamp warning message displays. • When switching the projector off the product before disconnecting power. • Turn on the projector first and then the signal sources. • Do not use lens cap when projector is in direct sunlight. Warning: • Do not look into the projector's lens when the lamp is on until the lamp module has been replaced. The bright light...
... lamp, contact your local dealer or Acer service center for changing the lamp, when lamp warning message displays. • When switching the projector off the product before disconnecting power. • Turn on the projector first and then the signal sources. • Do not use lens cap when projector is in direct sunlight. Warning: • Do not look into the projector's lens when the lamp is on until the lamp module has been replaced. The bright light...
User Manual
Page 11
... compliant • LAN settings enable remote management of projectors via DLP Link Technology: Blu-Ray 3D supported • One-touch "3D" button on , the projector dynamically adjusts the power consumption of the lamp according to the brightness of the lamp by up to the 3D functions • Acer ColorBoost technology delivers vivid, life-like images • High brightness and contrast ratio • Versatile display modes enable optimum performance...
... compliant • LAN settings enable remote management of projectors via DLP Link Technology: Blu-Ray 3D supported • One-touch "3D" button on , the projector dynamically adjusts the power consumption of the lamp according to the brightness of the lamp by up to the 3D functions • Acer ColorBoost technology delivers vivid, life-like images • High brightness and contrast ratio • Versatile display modes enable optimum performance...

User Manual
Page 13
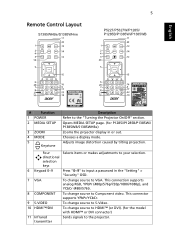
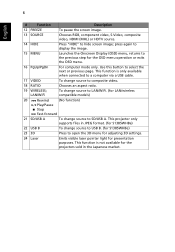
... # Description 1 Control panel 4 HDMI (MHL) connector Micro USB cable 2 Power key and Power indicator LED 5 Projection lens 3 Zoom ring and Focus ring Focus ring 6 Remote control receiver 7 Lens cap Rear side 123 4 5 6 8 9 10 11 AUDIO IN S-VIDEO MIC IN AUDIO OUT VIDEO HDMI -1/ MHL USB MINI-B VGA IN -2 VGA IN -1 LAN USB -A 16 12 P5227/P5327W VGA-OUT RS232 DC 12V OUT 15 123 4 5 678 9 AUDIO IN S-VIDEO MIC IN AUDIO OUT VIDEO HDMI -1/ MHL USB MINI-B VGA IN -2 VGA IN -1 LAN USB -A 16 12 S1385WHne 10 VGA-OUT 11...
... # Description 1 Control panel 4 HDMI (MHL) connector Micro USB cable 2 Power key and Power indicator LED 5 Projection lens 3 Zoom ring and Focus ring Focus ring 6 Remote control receiver 7 Lens cap Rear side 123 4 5 6 8 9 10 11 AUDIO IN S-VIDEO MIC IN AUDIO OUT VIDEO HDMI -1/ MHL USB MINI-B VGA IN -2 VGA IN -1 LAN USB -A 16 12 P5227/P5327W VGA-OUT RS232 DC 12V OUT 15 123 4 5 678 9 AUDIO IN S-VIDEO MIC IN AUDIO OUT VIDEO HDMI -1/ MHL USB MINI-B VGA IN -2 VGA IN -1 LAN USB -A 16 12 S1385WHne 10 VGA-OUT 11...
User Manual
Page 15
Adjusts image distortion caused by tilting projection. This connection supports analog RGB, YPbPr (480p/576p/720p/1080i/1080p), and YCbCr (480i/576i). 8 COMPONENT To change source to HDMI™ (or DVI). (for P1285i/P1285B/P1385Wi/ P1385WB/S1385WHBe) Zooms the projector display in the "Setting" > "Security" OSD. 7 VGA To change source to VGA. Chooses a display mode. Opens MEDIA SETUP page. (for the model with HDMI™ or DVI connector) 11 Infrared transmitter Sends signals to...
Adjusts image distortion caused by tilting projection. This connection supports analog RGB, YPbPr (480p/576p/720p/1080i/1080p), and YCbCr (480i/576i). 8 COMPONENT To change source to HDMI™ (or DVI). (for P1285i/P1285B/P1385Wi/ P1385WB/S1385WHBe) Zooms the projector display in the "Setting" > "Security" OSD. 7 VGA To change source to VGA. Chooses a display mode. Opens MEDIA SETUP page. (for the model with HDMI™ or DVI connector) 11 Infrared transmitter Sends signals to...
User Manual
Page 16
... the screen image. 13 SOURCE Chooses RGB, component video, S-Video, composite video, HDMI (MHL) or HDTV source. 14 HIDE Press "HIDE" to select the next or previous page. This function is not available for the projectors sold in JPEG format. (for S1385WHBe) 22 USB B To change source to open the 3D menu for adjusting 3D settings. 24 Laser Emits visible laser pointer light for presentation purposes. Use this button...
... the screen image. 13 SOURCE Chooses RGB, component video, S-Video, composite video, HDMI (MHL) or HDTV source. 14 HIDE Press "HIDE" to select the next or previous page. This function is not available for the projectors sold in JPEG format. (for S1385WHBe) 22 USB B To change source to open the 3D menu for adjusting 3D settings. 24 Laser Emits visible laser pointer light for presentation purposes. Use this button...

User Manual
Page 35
English Color Display Mode Wall Color Brightness Contrast Saturation 25 There are several choices, including White, Light Yellow, Light Blue, Pink and Dark Green. Adjusting the contrast changes the amount of images. • Bright: For brightness optimization. • Presentation: For meeting presentation with higher brightness. • Standard: For common environment. • Movie: For brighter and general movie/video/photo playing. • Dark Cinema: For dark...
English Color Display Mode Wall Color Brightness Contrast Saturation 25 There are several choices, including White, Light Yellow, Light Blue, Pink and Dark Green. Adjusting the contrast changes the amount of images. • Bright: For brightness optimization. • Presentation: For meeting presentation with higher brightness. • Standard: For common environment. • Movie: For brighter and general movie/video/photo playing. • Dark Cinema: For dark...

User Manual
Page 36
Effects the representation of dark scenery. Adjusts the color temperature. at lower color temperatures, the screen looks warmer. When projecting darker images the power consumption will be enhanced. If turned on, the projector dynamically adjusts the power consumption of the lamp according to increase the amount of red in the image. • Press to the brightness of the image being projected. With greater gamma value, dark scenery will also...
Effects the representation of dark scenery. Adjusts the color temperature. at lower color temperatures, the screen looks warmer. When projecting darker images the power consumption will be enhanced. If turned on, the projector dynamically adjusts the power consumption of the lamp according to increase the amount of red in the image. • Press to the brightness of the image being projected. With greater gamma value, dark scenery will also...

User Manual
Page 37
.../1080p models): The image will be displayed making full use of image. • Desktop • Ceiling: Turns the image upside down for ceiling- Use this function to choose your desired aspect ratio. • Auto: Keeps the image with ceiling mounted projection. • Front: The factory default setting. • Rear: Reverses the image so you select this function, the projector reverses and inverts the image at same time. 27 English Image Projection Projection Mode Projection Location Aspect Ratio • Front-Desktop: The factory default setting...
.../1080p models): The image will be displayed making full use of image. • Desktop • Ceiling: Turns the image upside down for ceiling- Use this function to choose your desired aspect ratio. • Auto: Keeps the image with ceiling mounted projection. • Front: The factory default setting. • Rear: Reverses the image so you select this function, the projector reverses and inverts the image at same time. 27 English Image Projection Projection Mode Projection Location Aspect Ratio • Front-Desktop: The factory default setting...

User Manual
Page 40
...; Change the "Startup Screen" from the default setting "Acer" to "User". • Select "Screen Capture" to customize the startup screen. • A dialog box appears to press "SOURCE" on the control panel or remote control, or the direct source key on the remote control. Selecting "On" enables the function and when switching input signals, you exit the OSD menu. • Acer: The default startup screen of your desired startup screen. To capture the image that the "Keystone...
...; Change the "Startup Screen" from the default setting "Acer" to "User". • Select "Screen Capture" to customize the startup screen. • A dialog box appears to press "SOURCE" on the control panel or remote control, or the direct source key on the remote control. Selecting "On" enables the function and when switching input signals, you exit the OSD menu. • Acer: The default startup screen of your desired startup screen. To capture the image that the "Keystone...

User Manual
Page 43
... local Acer service center. Lock User Startup Screen This function is set to enable the LAN connection. English Security LAN 33 User Password • Press to set up or change "Administrator Password". • The factory default of "Administrator Password" is printed on . LAN Reset Press after plugging power cord", you are requested to "ON", the startup screen is turned on the Security Card that came with your administrator password, do the following to change "User Password". • Use...
... local Acer service center. Lock User Startup Screen This function is set to enable the LAN connection. English Security LAN 33 User Password • Press to set up or change "Administrator Password". • The factory default of "Administrator Password" is printed on . LAN Reset Press after plugging power cord", you are requested to "ON", the startup screen is turned on the Security Card that came with your administrator password, do the following to change "User Password". • Use...

User Manual
Page 46
... a shadow or it connected. The battery light stays on the back of the Acer SmartPen Nib Link light Left mouse button Right mouse button Information key USB connector Power switch Note 3: Charging the battery 1. The pen cannot work if its tip is in the Setting > SmartPen > Pen Function menu. AUDIO IN S-VIDEO MIC IN AUDIO OUT VIDEO HDMI -1/ MHL USB MINI-B VGA IN -2 VGA IN -1 VGA-OUT RS232 LAN USB -A Wireless Dongle DC 12V...
... a shadow or it connected. The battery light stays on the back of the Acer SmartPen Nib Link light Left mouse button Right mouse button Information key USB connector Power switch Note 3: Charging the battery 1. The pen cannot work if its tip is in the Setting > SmartPen > Pen Function menu. AUDIO IN S-VIDEO MIC IN AUDIO OUT VIDEO HDMI -1/ MHL USB MINI-B VGA IN -2 VGA IN -1 VGA-OUT RS232 LAN USB -A Wireless Dongle DC 12V...

User Manual
Page 47
... the High Altitude mode. Lamp Hour Elapse Displays the lamp's elapsed operating time (in hours). The projector will also lower the power consumption, reduce noise, and extend the lamp life. Select this function to adjust the volume of life. Select this function to adjust the notification volume when turning the projector on when power is supplied via the power cord. Auto Shutdown The projector will show or hide warning message Lamp Reminding when the changing lamp message is (Minutes) no signal input...
... the High Altitude mode. Lamp Hour Elapse Displays the lamp's elapsed operating time (in hours). The projector will also lower the power consumption, reduce noise, and extend the lamp life. Select this function to adjust the volume of life. Select this function to adjust the notification volume when turning the projector on when power is supplied via the power cord. Auto Shutdown The projector will show or hide warning message Lamp Reminding when the changing lamp message is (Minutes) no signal input...

User Manual
Page 51
...; Mac® OS based notebook: In System Preferences, open Display and select Video Mirroring "On." 5 Image is unstable • Use "Tracking" to make it . Refer to flickering bar the "Image" section for more information. • Change the display color setting on your computer. 6 Image has vertical • Use "Frequency" to correct it compatible with the projector. 7 Image is out of focus • Adjust the focus ring on the projector lens. •...
...; Mac® OS based notebook: In System Preferences, open Display and select Video Mirroring "On." 5 Image is unstable • Use "Tracking" to make it . Refer to flickering bar the "Image" section for more information. • Change the display color setting on your computer. 6 Image has vertical • Use "Frequency" to correct it compatible with the projector. 7 Image is out of focus • Adjust the focus ring on the projector lens. •...
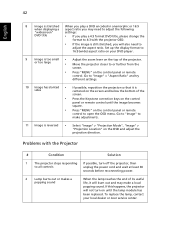
User Manual
Page 52
... the screen. • Press "MENU" on until the image becomes square. • Press "MENU" on the OSD and adjust the projection direction. To replace the lamp, contact your DVD player. 9 Image is reversed • Select "Image" > "Projection Mode", "Image" > "Projection Location" on the control panel or remote control to 16:9 (wide) aspect ratio on your local dealer or Acer service center. Set up the display format to open the OSD menu. If this happens, the projector...
... the screen. • Press "MENU" on until the image becomes square. • Press "MENU" on the OSD and adjust the projection direction. To replace the lamp, contact your DVD player. 9 Image is reversed • Select "Image" > "Projection Mode", "Image" > "Projection Location" on the control panel or remote control to 16:9 (wide) aspect ratio on your local dealer or Acer service center. Set up the display format to open the OSD menu. If this happens, the projector...

User Manual
Page 54
V LAMP LED Red -- ---- -- --- Error (Color wheel -- Quick flashing V V Quick flashing -- -- -- Error (Lamp breakdown) -- V Quick flashing --- 44 LED & Alarm Definition Listing LED Messages English Message Standby (Power cord plugged in) Power on Lamp retry Turning off (Cooling state) Turning off (Cooling completed) Error (Thermal failure) Error (Fan lock failure) Power LED Red Blue V -- --- failure) V V V Quick flashing TEMP LED Red -- --- -- -- V --
V LAMP LED Red -- ---- -- --- Error (Color wheel -- Quick flashing V V Quick flashing -- -- -- Error (Lamp breakdown) -- V Quick flashing --- 44 LED & Alarm Definition Listing LED Messages English Message Standby (Power cord plugged in) Power on Lamp retry Turning off (Cooling state) Turning off (Cooling completed) Error (Thermal failure) Error (Fan lock failure) Power LED Red Blue V -- --- failure) V V V Quick flashing TEMP LED Red -- --- -- -- V --


