
Safety Guide
Page 3
... instructions 10 Product servicing 10 Cleaning and servicing 10 Battery and adapter information 11 Accessing the power 11 Disconnecting the power source 11 Using electrical power 11 Guidelines for safe battery usage 13 Internal battery 15 Warnings and regulatory information 16 Optical drives 16 Telephone line safety 17 Emergency calls 17 Medical devices 17 Vehicles 18 Potentially explosive environments........ 18 Disposal instructions 19 ENERGY STAR 19 Wireless adapter regulatory...
... instructions 10 Product servicing 10 Cleaning and servicing 10 Battery and adapter information 11 Accessing the power 11 Disconnecting the power source 11 Using electrical power 11 Guidelines for safe battery usage 13 Internal battery 15 Warnings and regulatory information 16 Optical drives 16 Telephone line safety 17 Emergency calls 17 Medical devices 17 Vehicles 18 Potentially explosive environments........ 18 Disposal instructions 19 ENERGY STAR 19 Wireless adapter regulatory...

Safety Guide
Page 6
... your muscles or shrugging your shoulders. • Install the external display, keyboard and mouse properly and within comfortable reach. • If you view your monitor more than the top edge of the display so your eyes point downward when looking away from the monitor and focusing on a distant point. • Blink frequently to keep your eyes from drying out...
... your muscles or shrugging your shoulders. • Install the external display, keyboard and mouse properly and within comfortable reach. • If you view your monitor more than the top edge of the display so your eyes point downward when looking away from the monitor and focusing on a distant point. • Blink frequently to keep your eyes from drying out...
Safety Guide
Page 9
... during normal operation, particularly when plugged in a tightly packed suitcase or bag. The openings should never be blocked or covered. Do not pack your computer carefully Use a quality carrying case that could be seriously damaged. • Slots and openings are provided for ventilation to ensure reliable operation of the product and to protect it from the lithium battery pack. •...
... during normal operation, particularly when plugged in a tightly packed suitcase or bag. The openings should never be blocked or covered. Do not pack your computer carefully Use a quality carrying case that could be seriously damaged. • Slots and openings are provided for ventilation to ensure reliable operation of the product and to protect it from the lithium battery pack. •...

Safety Guide
Page 10
... service. • The product does not operate normally after following the operating instructions. • The product exhibits a distinct change in performance, indicating a need for service. • The product does not operate normally after following the operating instructions. Refer all servicing to dangerous voltage points or other controls may expose you to qualified service personnel. Unplug this product yourself, as opening or removing covers may result in sleep mode...
... service. • The product does not operate normally after following the operating instructions. • The product exhibits a distinct change in performance, indicating a need for service. • The product does not operate normally after following the operating instructions. Refer all servicing to dangerous voltage points or other controls may expose you to qualified service personnel. Unplug this product yourself, as opening or removing covers may result in sleep mode...
Safety Guide
Page 11
... type of information deletion from the computer. Do not locate this product where people will walk on the marking label. Use a soft, moist cloth. When you plug into is easily accessible and located as close to unplug from the power supplies. Disconnecting the power source Observe the following guidelines when connecting and disconnecting power to the power supply unit: Install the power supply unit before removing the power supply...
... type of information deletion from the computer. Do not locate this product where people will walk on the marking label. Use a soft, moist cloth. When you plug into is easily accessible and located as close to unplug from the power supplies. Disconnecting the power source Observe the following guidelines when connecting and disconnecting power to the power supply unit: Install the power supply unit before removing the power supply...
Safety Guide
Page 14
... pierce, open or disassemble the battery. Follow local regulations when disposing of a new battery is achieved only after two or three complete charge and discharge cycles. Precautions when replacing the battery Improper replacement or mishandling could damage the battery, cause overheating, result in injury, and risk fire or explosion. • Device with removable battery: The battery should only be replaced by Acer. Do not use it...
... pierce, open or disassemble the battery. Follow local regulations when disposing of a new battery is achieved only after two or three complete charge and discharge cycles. Precautions when replacing the battery Improper replacement or mishandling could damage the battery, cause overheating, result in injury, and risk fire or explosion. • Device with removable battery: The battery should only be replaced by Acer. Do not use it...
Safety Guide
Page 15
... the battery or the connecting object. Basic care and tips for using your pocket or purse. A device with a hot or cold battery may not work temporarily, even when the battery is left in your computer - 15 Use the battery only for battery shipping documents. Dispose of batteries in rechargeable battery, battery replacement must be susceptible to www.acer.com for its intended purpose. Wireless devices may explode. Internal battery...
... the battery or the connecting object. Basic care and tips for using your pocket or purse. A device with a hot or cold battery may not work temporarily, even when the battery is left in your computer - 15 Use the battery only for battery shipping documents. Dispose of batteries in rechargeable battery, battery replacement must be susceptible to www.acer.com for its intended purpose. Wireless devices may explode. Internal battery...

Safety Guide
Page 18
... operation of your vehicle is improperly installed, and the air bag inflates, serious injury could cause an Faulty installation or service may be illegal. Switch off your device before boarding an aircraft. The use of wireless devices in an aircraft may be qualified for such use. Sparks in motor vehicles such as the device, its representative, of the aircraft, disrupt the wireless telephone network...
... operation of your vehicle is improperly installed, and the air bag inflates, serious injury could cause an Faulty installation or service may be illegal. Switch off your device before boarding an aircraft. The use of wireless devices in an aircraft may be qualified for such use. Sparks in motor vehicles such as the device, its representative, of the aircraft, disrupt the wireless telephone network...
Safety Guide
Page 20
... and regulatory information Note Information in Power Management). • Wake the computer from sleep mode by pushing keyboard or moving mouse. • Computers will save more than 80% energy at "sleep" mode. Use the device only in any special regulations in force in its use is available. Parts of data files or messages may be delayed until such a connection is prohibited or when it...
... and regulatory information Note Information in Power Management). • Wake the computer from sleep mode by pushing keyboard or moving mouse. • Computers will save more than 80% energy at "sleep" mode. Use the device only in any special regulations in force in its use is available. Parts of data files or messages may be delayed until such a connection is prohibited or when it...
Safety Guide
Page 22
...-channel mobile satellite systems. High power radars are provided for U.S operation according to device supporting IEEE 802.11a/ac wireless adapters. Warnings and regulatory information supplement C, 2001, and ANSI/IEEE C95.1, 1992. Proper operation of authorization for this wireless adapter allowing any change in the frequency of operations outside the FCC grant of this radio according to the instructions found in this...
...-channel mobile satellite systems. High power radars are provided for U.S operation according to device supporting IEEE 802.11a/ac wireless adapters. Warnings and regulatory information supplement C, 2001, and ANSI/IEEE C95.1, 1992. Proper operation of authorization for this wireless adapter allowing any change in the frequency of operations outside the FCC grant of this radio according to the instructions found in this...
Safety Guide
Page 23
... modifications not expressly approved by entering the FCC ID number on ), the user is encouraged to try to operate the equipment. There is not installed and used in such a manner that such interference will not occur in a residential installation. If this wireless adapter does cause harmful interference to radio communications. Interference statement This wireless adapter has been tested and found at least...
... modifications not expressly approved by entering the FCC ID number on ), the user is encouraged to try to operate the equipment. There is not installed and used in such a manner that such interference will not occur in a residential installation. If this wireless adapter does cause harmful interference to radio communications. Interference statement This wireless adapter has been tested and found at least...

Safety Guide
Page 24
... - This Transmitter must not be installed and operated with the wireless adapter to an outlet on a circuit different from that to the following two conditions: (1) this device may cause undesired operation of Industry Canada. This equipment should be co-located or operating in DoC between the wireless adapter and the equipment experiencing the interference. • Connect the computer with a minimum distance...
... - This Transmitter must not be installed and operated with the wireless adapter to an outlet on a circuit different from that to the following two conditions: (1) this device may cause undesired operation of Industry Canada. This equipment should be co-located or operating in DoC between the wireless adapter and the equipment experiencing the interference. • Connect the computer with a minimum distance...

User Manual
Page 3
...installation instructions 6 System Upgrade 7 Removing the left side system cover....7 Installing the left side system cover......8 Removing the right side system cover .9 Installing the right side system cover .10 Hard drives 11 Removing the 3.5-inch hard drives .....11 Installing the 3.5-inch hard drives .......15 Memory 18 Memory configuration guidelines .......18 Removing a memory module (for Water Cooler 19 Installing a memory module (for Water Cooler 20 Removing a memory module (for Air Cooler 21 Installing a memory module (for Air Cooler 23 Graphic board 26 Removing the Graphic...
...installation instructions 6 System Upgrade 7 Removing the left side system cover....7 Installing the left side system cover......8 Removing the right side system cover .9 Installing the right side system cover .10 Hard drives 11 Removing the 3.5-inch hard drives .....11 Installing the 3.5-inch hard drives .......15 Memory 18 Memory configuration guidelines .......18 Removing a memory module (for Water Cooler 19 Installing a memory module (for Water Cooler 20 Removing a memory module (for Air Cooler 21 Installing a memory module (for Air Cooler 23 Graphic board 26 Removing the Graphic...

User Manual
Page 6
... service technician. Open your Computer Pre-installation instructions Always observe the following after installing a computer component: 1. step instructions in the following sections for specific instructions on page 10. 4. Replace the system covers. 6 - Turn off the computer properly before you wish to the computer and all connected peripheral devices from the computer. 4. Warning Not turning off the power to install. Upgrading your computer according to the instructions on removing the...
... service technician. Open your Computer Pre-installation instructions Always observe the following after installing a computer component: 1. step instructions in the following sections for specific instructions on page 10. 4. Replace the system covers. 6 - Turn off the computer properly before you wish to the computer and all connected peripheral devices from the computer. 4. Warning Not turning off the power to install. Upgrading your computer according to the instructions on removing the...

User Manual
Page 9
Set the cover aside for re-installation later. Read the Pre- installation instructions on page 6. 2. Slide the cover toward the back of the computer and pull away from the side of the computer. 4. Upgrading your computer and all peripherals connected to the computer. 3. Remove the two screws that you proceed, make sure that secure the system cover to it. Before you have turned off your Computer - 9 Removing the right side system cover 1.
Set the cover aside for re-installation later. Read the Pre- installation instructions on page 6. 2. Slide the cover toward the back of the computer and pull away from the side of the computer. 4. Upgrading your computer and all peripherals connected to the computer. 3. Remove the two screws that you proceed, make sure that secure the system cover to it. Before you have turned off your Computer - 9 Removing the right side system cover 1.

User Manual
Page 13
Upgrading your Computer - 13 6. Disconnect the power and data cables from HDD cage and take it off. Pull green rack out from the hard drives. 7.
Upgrading your Computer - 13 6. Disconnect the power and data cables from HDD cage and take it off. Pull green rack out from the hard drives. 7.

User Manual
Page 15
Upgrading your Computer - 15 Installing the 3.5-inch hard drives 1. Insert the new hard drive into HDD cage. Remove the new hard drive from their packaging. 2. Insert green rack into the green rack. 3.
Upgrading your Computer - 15 Installing the 3.5-inch hard drives 1. Insert the new hard drive into HDD cage. Remove the new hard drive from their packaging. 2. Insert green rack into the green rack. 3.

User Manual
Page 16
Connect the power and data cables to the hard drive. 5. Upgrading your Computer 4. 16 - Insert the Power Cover and fix it.
Connect the power and data cables to the hard drive. 5. Upgrading your Computer 4. 16 - Insert the Power Cover and fix it.
User Manual
Page 26
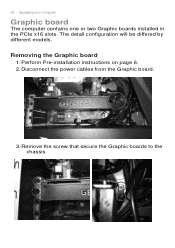
The detail configuration will be differed by different models. Removing the Graphic board 1. Remove the screw that secure the Graphic boards to the chassis. Perform Pre-installation instructions on page 6. 2. Disconnect the power cables from the Graphic board. 3. 26 - Upgrading your Computer Graphic board The computer contains one or two Graphic boards installed in the PCIe x16 slots.
The detail configuration will be differed by different models. Removing the Graphic board 1. Remove the screw that secure the Graphic boards to the chassis. Perform Pre-installation instructions on page 6. 2. Disconnect the power cables from the Graphic board. 3. 26 - Upgrading your Computer Graphic board The computer contains one or two Graphic boards installed in the PCIe x16 slots.

User Manual
Page 38
... (last one is rainbow color), 9 recent Colors which connects Front LED/ Fan lighting. Lighting profile Provide CPU Overclocking. PredatorSense Category Home Lighting Overclocking Fan control Monitoring Description Provide overview of all features with quick adjustment CPU/GPU/System health information Fan speed control (Auto, Gaming and Silence) Provide control and adjustment for CPU and GPU and System. Temperature in C/F Loading...
... (last one is rainbow color), 9 recent Colors which connects Front LED/ Fan lighting. Lighting profile Provide CPU Overclocking. PredatorSense Category Home Lighting Overclocking Fan control Monitoring Description Provide overview of all features with quick adjustment CPU/GPU/System health information Fan speed control (Auto, Gaming and Silence) Provide control and adjustment for CPU and GPU and System. Temperature in C/F Loading...


