
User Manual
Page 2
... Acer Incorporated. Copyright© 2005 Acer Incorporated All Rights Reserved AcerPower F3 User's Guide Changes may be reproduced, stored in a retrieval system, or transmitted, in any form or by any person of such revision or changes. Record the model number, serial number, purchase date, and place of purchase information in new editions of this publication without obligation to the contents hereof and specifically...
... Acer Incorporated. Copyright© 2005 Acer Incorporated All Rights Reserved AcerPower F3 User's Guide Changes may be reproduced, stored in a retrieval system, or transmitted, in any form or by any person of such revision or changes. Record the model number, serial number, purchase date, and place of purchase information in new editions of this publication without obligation to the contents hereof and specifically...
User Manual
Page 3
... panel 1 Rear Panel 3 System Features 4 Performance 4 Multimedia 4 Connectivity 4 System peripherals 4 Mouse (PS/2 or USB, manufacturing option) 5 Keyboard (PS/2 or USB, manufacturing option) 5 Speakers 6 System upgrade 7 Opening the computer 7 Setting up new components 7 Setting up your computer 9 Before commencing setup 9 Selecting location 9 Opening the package 9 Connecting the peripherals 10 Starting your computer 10 Shutting down your computer 10 Troubleshooting 11 Taking Care of your computer 13 Important tips 13 Cleaning and servicing 13...
... panel 1 Rear Panel 3 System Features 4 Performance 4 Multimedia 4 Connectivity 4 System peripherals 4 Mouse (PS/2 or USB, manufacturing option) 5 Keyboard (PS/2 or USB, manufacturing option) 5 Speakers 6 System upgrade 7 Opening the computer 7 Setting up new components 7 Setting up your computer 9 Before commencing setup 9 Selecting location 9 Opening the package 9 Connecting the peripherals 10 Starting your computer 10 Shutting down your computer 10 Troubleshooting 11 Taking Care of your computer 13 Important tips 13 Cleaning and servicing 13...

User Manual
Page 4
Remark: All the drawings in the Guide are diagrams. About components's quantity and style, substances shall take precedence.
Remark: All the drawings in the Guide are diagrams. About components's quantity and style, substances shall take precedence.
User Manual
Page 5
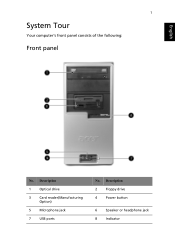
English 1 System Tour Your computer's front panel consists of the following: Front panel No. Description 1 Optical drive 3 Card reader(Manufacturing Option) 5 Microphone jack 7 USB ports No. Description 2 Floppy drive 4 Power button 6 Speaker or headphone jack 8 Indicator
English 1 System Tour Your computer's front panel consists of the following: Front panel No. Description 1 Optical drive 3 Card reader(Manufacturing Option) 5 Microphone jack 7 USB ports No. Description 2 Floppy drive 4 Power button 6 Speaker or headphone jack 8 Indicator
User Manual
Page 6
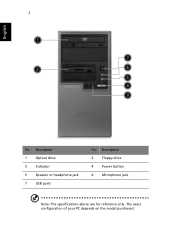
Description 1 Optical drive 3 Indicator 5 Speaker or headphone jack 7 USB ports No. Description 2 Floppy drive 4 Power button 6 Microphone jack Note: The specifications above are for reference only. The exact configuration of your PC depends on the model purchased. 2 English No.
Description 1 Optical drive 3 Indicator 5 Speaker or headphone jack 7 USB ports No. Description 2 Floppy drive 4 Power button 6 Microphone jack Note: The specifications above are for reference only. The exact configuration of your PC depends on the model purchased. 2 English No.
User Manual
Page 7
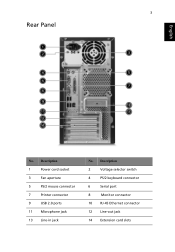
3 Rear Panel English No. Description 2 Voltage selector switch 4 PS/2 keyboard connector 6 Serial port 8 Monitor connector 10 RJ-45 Ethernet connector 12 Line-out jack 14 Extension card slots Description 1 Power cord socket 3 Fan aperture 5 PS/2 mouse connector 7 Printer connector 9 USB 2.0 ports 11 Microphone jack 13 Line-in jack No.
3 Rear Panel English No. Description 2 Voltage selector switch 4 PS/2 keyboard connector 6 Serial port 8 Monitor connector 10 RJ-45 Ethernet connector 12 Line-out jack 14 Extension card slots Description 1 Power cord socket 3 Fan aperture 5 PS/2 mouse connector 7 Printer connector 9 USB 2.0 ports 11 Microphone jack 13 Line-in jack No.
User Manual
Page 8
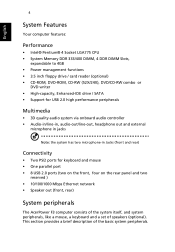
... LGA775 CPU • System Memory DDR 333/400 DIMM, 4 DDR DIMM Slots, expandable to 4GB • Power management functions • 3.5 inch floppy drive / card reader (optional) • CD-ROM, DVD-ROM, CD-RW (52X/24X), DVD/CD-RW combo or DVD writer • High-capacity, Enhanced-IDE drive / SATA • Support for USB 2.0 high performance peripherals Multimedia • 3D quality audio system via onboard audio controller • Audio-in/line-in, audio-out...
... LGA775 CPU • System Memory DDR 333/400 DIMM, 4 DDR DIMM Slots, expandable to 4GB • Power management functions • 3.5 inch floppy drive / card reader (optional) • CD-ROM, DVD-ROM, CD-RW (52X/24X), DVD/CD-RW combo or DVD writer • High-capacity, Enhanced-IDE drive / SATA • Support for USB 2.0 high performance peripherals Multimedia • 3D quality audio system via onboard audio controller • Audio-in/line-in, audio-out...
User Manual
Page 9
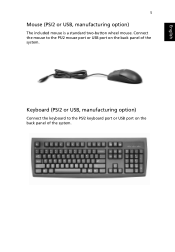
English 5 Mouse (PS/2 or USB, manufacturing option) The included mouse is a standard two-button wheel mouse. Keyboard (PS/2 or USB, manufacturing option) Connect the keyboard to the PS/2 mouse port or USB port on the back panel of the system. Connect the mouse to the PS/2 keyboard port or USB port on the back panel of the system.
English 5 Mouse (PS/2 or USB, manufacturing option) The included mouse is a standard two-button wheel mouse. Keyboard (PS/2 or USB, manufacturing option) Connect the keyboard to the PS/2 mouse port or USB port on the back panel of the system. Connect the mouse to the PS/2 keyboard port or USB port on the back panel of the system.
User Manual
Page 10
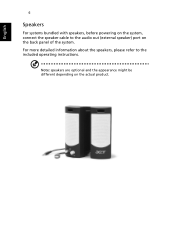
Note: speakers are optional and the appearance might be different depending on the back panel of the system. For more detailed information about the speakers, please refer to the audio out (external speaker) port on the actual product. English 6 Speakers For systems bundled with speakers, before powering on the system, connect the speaker cable to the included operating instructions.
Note: speakers are optional and the appearance might be different depending on the back panel of the system. For more detailed information about the speakers, please refer to the audio out (external speaker) port on the actual product. English 6 Speakers For systems bundled with speakers, before powering on the system, connect the speaker cable to the included operating instructions.
User Manual
Page 11
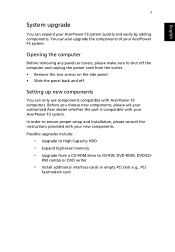
...-level memory • Upgrade from a CD-ROM drive to shut off the computer and unplug the power cord from the outlet. • Remove the two screws on the side panel. • Slide the panel back and off. Opening the computer Before removing any panels or covers, please make sure to CD-RW, DVD-ROM, DVD/CDRW combo or DVD writer • Install additional interface cards in empty PCI slots e.g., PCI fax/modem card...
...-level memory • Upgrade from a CD-ROM drive to shut off the computer and unplug the power cord from the outlet. • Remove the two screws on the side panel. • Slide the panel back and off. Opening the computer Before removing any panels or covers, please make sure to CD-RW, DVD-ROM, DVD/CDRW combo or DVD writer • Install additional interface cards in empty PCI slots e.g., PCI fax/modem card...
User Manual
Page 13
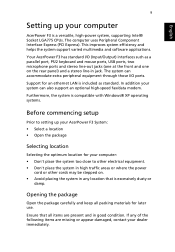
... use. English 9 Setting up your AcerPower F3 System: • Select a location • Open the package Selecting location Selecting the optimum location for your computer: • Don't place the system too close to setting up your computer AcerPower F3 is a versatile, high-power system, supporting Intel® Socket LGA775 CPUs. Your AcerPower F3 has standard I /O ports. Ensure that is included as a parallel port, PS/2 keyboard and mouse ports, USB ports...
... use. English 9 Setting up your AcerPower F3 System: • Select a location • Open the package Selecting location Selecting the optimum location for your computer: • Don't place the system too close to setting up your computer AcerPower F3 is a versatile, high-power system, supporting Intel® Socket LGA775 CPUs. Your AcerPower F3 has standard I /O ports. Ensure that is included as a parallel port, PS/2 keyboard and mouse ports, USB ports...
User Manual
Page 14
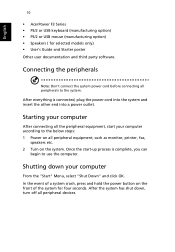
..., speakers etc. 2 Turn on the front of the system for selected models only) • User's Guide and Starter poster Other user documentation and third party software. Shutting down , turn off all the peripheral equipment, start -up process is connected, plug the power cord into the system and insert the other end into a power outlet. After everything is complete, you can begin to use the...
..., speakers etc. 2 Turn on the front of the system for selected models only) • User's Guide and Starter poster Other user documentation and third party software. Shutting down , turn off all the peripheral equipment, start -up process is connected, plug the power cord into the system and insert the other end into a power outlet. After everything is complete, you can begin to use the...
User Manual
Page 15
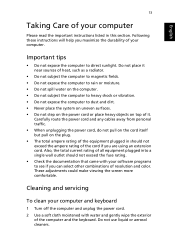
... plugged in this section. Carefully route the power cord and any cables away from personal traffic. • When unplugging the power cord, do not pull on the cord itself but pull on top of your computer Please read the important instructions listed in...servicing To clean your computer and keyboard 1 Turn off the computer and unplug the power cord. 2 Use a soft cloth moistened with your software programs to see if you can select other combinations of your computer. Do not use liquid or aerosol cleaners. Do not place it . Following these instructions will help you are using...
... plugged in this section. Carefully route the power cord and any cables away from personal traffic. • When unplugging the power cord, do not pull on the cord itself but pull on top of your computer Please read the important instructions listed in...servicing To clean your computer and keyboard 1 Turn off the computer and unplug the power cord. 2 Use a soft cloth moistened with your software programs to see if you can select other combinations of your computer. Do not use liquid or aerosol cleaners. Do not place it . Following these instructions will help you are using...
User Manual
Page 16
... is not operating normally. English 14 To clean your pointing device To clean your mouse (with rubber ball) 1 Open the circular cover underneath the mouse. 2 Take out the rubber ball and wipe it with your monitor. You may also access the acer web site (www.acersupport.com) for maintenance instructions. To clean your optical mouse For users of an optical mouse, refer to contact the service centers available...
... is not operating normally. English 14 To clean your pointing device To clean your mouse (with rubber ball) 1 Open the circular cover underneath the mouse. 2 Take out the rubber ball and wipe it with your monitor. You may also access the acer web site (www.acersupport.com) for maintenance instructions. To clean your optical mouse For users of an optical mouse, refer to contact the service centers available...

User Manual
Page 17
...and instructions marked on every PSTN termination point. However, due to the Public Switched Telephone Network (PSTN). Save them for pan-European single terminal connection to differences between the individual PSTNs provided in the first instance. Notice: Shielded cables All connections to ... Peripheral devices Only peripherals (input/output devices, terminals, printers, etc.) certified to radio and TV reception. Operation with non-certified peripherals is in compliance with the essential requirements and other computing devices must be made using shielded cables to maintain...
...and instructions marked on every PSTN termination point. However, due to the Public Switched Telephone Network (PSTN). Save them for pan-European single terminal connection to differences between the individual PSTNs provided in the first instance. Notice: Shielded cables All connections to ... Peripheral devices Only peripherals (input/output devices, terminals, printers, etc.) certified to radio and TV reception. Operation with non-certified peripherals is in compliance with the essential requirements and other computing devices must be made using shielded cables to maintain...

User Manual
Page 18
... the type of any kind into the extension cord does not exceed the extension cord ampere rating. Use a damp cloth for ventilation; Do not locate this product through cabinet slots as opening or removing covers may touch dangerous voltage points or short out parts that the total rating of all servicing to rain or water. Refer all products plugged into...
... the type of any kind into the extension cord does not exceed the extension cord ampere rating. Use a damp cloth for ventilation; Do not locate this product through cabinet slots as opening or removing covers may touch dangerous voltage points or short out parts that the total rating of all servicing to rain or water. Refer all products plugged into...
User Manual
Page 19
... til leverandøren. Benytt samme batteritype eller en tilsvarende type anbefalt av apparatfabrikanten. Maximum length is incorrectly replaced. ADVARSEL Eksplosjonsfare ved feilaktig skifte av batteri. VORSICHT! English 17 f If the product exhibits a distinct change in performance, indicating a need for service. 12 Use only the proper type of power supply cord set (provided in your accessories box) for this equipment. 14...
... til leverandøren. Benytt samme batteritype eller en tilsvarende type anbefalt av apparatfabrikanten. Maximum length is incorrectly replaced. ADVARSEL Eksplosjonsfare ved feilaktig skifte av batteri. VORSICHT! English 17 f If the product exhibits a distinct change in performance, indicating a need for service. 12 Use only the proper type of power supply cord set (provided in your accessories box) for this equipment. 14...
User Manual
Page 21
... the trade name and model number specified above was tested conforming to the applicable Rules under the most accurate measurement standards possible, and that all the necessary steps have been taken and are in lowvoltage supply systems Conforms to Council Decision 98/482/EC (CTR21) for pan- European single terminal connection to comply with the...
... the trade name and model number specified above was tested conforming to the applicable Rules under the most accurate measurement standards possible, and that all the necessary steps have been taken and are in lowvoltage supply systems Conforms to Council Decision 98/482/EC (CTR21) for pan- European single terminal connection to comply with the...

User Manual
Page 23
... LED is being applied to the system. Do any key to restart your computer. Q: Nothing appears on . A: Your computer's power management function automatically blanks the screen to the situation. If pressing a key does not work, try restarting your dealer or the technical support center for assistance. If yes, remove or replace it is plugged in the floppy drive? Press any of the following : • Make...
... LED is being applied to the system. Do any key to restart your computer. Q: Nothing appears on . A: Your computer's power management function automatically blanks the screen to the situation. If pressing a key does not work, try restarting your dealer or the technical support center for assistance. If yes, remove or replace it is plugged in the floppy drive? Press any of the following : • Make...
User Manual
Page 24
..., hard disk, CD or DVD information. If your computer, the internal or built-in speakers are using a good (i.e., undamaged) diskette or a good disc. Q: System cannot write to toggle the mute function. • If headphones, earphones, or external speakers are using the correct type of diskette. A: Check the following: • Make sure the media is not write-protected. • Make sure that you are automatically turned...
..., hard disk, CD or DVD information. If your computer, the internal or built-in speakers are using a good (i.e., undamaged) diskette or a good disc. Q: System cannot write to toggle the mute function. • If headphones, earphones, or external speakers are using the correct type of diskette. A: Check the following: • Make sure the media is not write-protected. • Make sure that you are automatically turned...


