

Quick Start Guide
Page 1
... servicing of the following instructions carefully. 1. OLED Monitor Quick Start Guide - 1 To clean the OLED monitor screen: Be sure that your location. • Turn off the OLED monitor and unplug the power cord. • Spray a non-solvent cleaning solution onto a rag and clean the screen gently. • NEVER SPRAY OR POUR ANY LIQUID DIRECTLY ONTO THE SCREEN OR CASE. • PLEASE DO NOT USE ANY AMMONIA OR ALCOHOL-BASED...
... servicing of the following instructions carefully. 1. OLED Monitor Quick Start Guide - 1 To clean the OLED monitor screen: Be sure that your location. • Turn off the OLED monitor and unplug the power cord. • Spray a non-solvent cleaning solution onto a rag and clean the screen gently. • NEVER SPRAY OR POUR ANY LIQUID DIRECTLY ONTO THE SCREEN OR CASE. • PLEASE DO NOT USE ANY AMMONIA OR ALCOHOL-BASED...

Quick Start Guide
Page 5
... Premium and HDR function. Connect DP Cable (Only DP-input model) a. Connect HDMI Cable (Only HDMI-input model) a. Connect Type-C Cable (Only DP ALT-input model) a. DP: Support max timing resolution 3440x1440-175Hz, also support FreeSync Premium and HDR function. 3. Make sure both the monitor and computer are powered-OFF. OLED Monitor Quick Start Guide - 5 b. Connect the DP cable to a Computer 1. DP ALT: Support max timing resolution 3440x1440-175Hz, also support FreeSync Premium. 4. Plug the power cords of your computer and your...
... Premium and HDR function. Connect DP Cable (Only DP-input model) a. Connect HDMI Cable (Only HDMI-input model) a. Connect Type-C Cable (Only DP ALT-input model) a. DP: Support max timing resolution 3440x1440-175Hz, also support FreeSync Premium and HDR function. 3. Make sure both the monitor and computer are powered-OFF. OLED Monitor Quick Start Guide - 5 b. Connect the DP cable to a Computer 1. DP ALT: Support max timing resolution 3440x1440-175Hz, also support FreeSync Premium. 4. Plug the power cords of your computer and your...

Quick Start Guide
Page 6
English External Controls No. Move down in the menu. FreeSync Premium (HDMI/DP Only): It can allow a FreeSync Premium supported graphics source to dynamically adjust display refresh rate based on the monitor, while press more than 5 seconds to turn on typical content frame rates for power efficient, virtually stutter free and low-latency display. Enter sub-menus. OLED Monitor Quick Start Guide - 6 Item 1 Power button 2 Exit/Left button 3 Down button 4 Menu button 5 Up button Description Press the key to...
English External Controls No. Move down in the menu. FreeSync Premium (HDMI/DP Only): It can allow a FreeSync Premium supported graphics source to dynamically adjust display refresh rate based on the monitor, while press more than 5 seconds to turn on typical content frame rates for power efficient, virtually stutter free and low-latency display. Enter sub-menus. OLED Monitor Quick Start Guide - 6 Item 1 Power button 2 Exit/Left button 3 Down button 4 Menu button 5 Up button Description Press the key to...

Quick Start Guide
Page 7
... to establishing a framework for the setting of ecodesign requirements for a Class B digital device pursuant to Part 15 of the FCC rules. Notice: Acer monitor is connected. • Consult the dealer or an experienced radio/television technician for video and visual display of the following two conditions: (1) this device may be made using shielded cables to maintain compliance with EMC regulations...
... to establishing a framework for the setting of ecodesign requirements for a Class B digital device pursuant to Part 15 of the FCC rules. Notice: Acer monitor is connected. • Consult the dealer or an experienced radio/television technician for video and visual display of the following two conditions: (1) this device may be made using shielded cables to maintain compliance with EMC regulations...
User Manual
Page 3
... distortion. • After setting the volume level, do not indicate a problem. • Due to the nature of the previous screen may remain after switching the image, when the same image is recovered slowly by changing the image or turning off the power switch and then turn it after your hearing, follow these instructions. • Gradually increase the volume until you plug the power cord into is easily accessible...
... distortion. • After setting the volume level, do not indicate a problem. • Due to the nature of the previous screen may remain after switching the image, when the same image is recovered slowly by changing the image or turning off the power switch and then turn it after your hearing, follow these instructions. • Gradually increase the volume until you plug the power cord into is easily accessible...

User Manual
Page 4
... liquid of any kind into this product through cabinet slots as opening or removing covers may touch dangerous voltage points or short-out parts that the total ampere rating of power indicated on a vibrating surface. • Never use this product near or over a radiator or heat register, or in a built-in performance, indicating a need for ventilation to qualified service personnel.
... liquid of any kind into this product through cabinet slots as opening or removing covers may touch dangerous voltage points or short-out parts that the total ampere rating of power indicated on a vibrating surface. • Never use this product near or over a radiator or heat register, or in a built-in performance, indicating a need for ventilation to qualified service personnel.
User Manual
Page 5
... and instructions. Disposal instructions Do not throw this website: https://www.acer-group.com/sustainability/en/our-products-environment.html Visit www.acer-group.com for video and visual display of information obtained from Electrical and Electronics Equipment (WEEE) regulations, visit https://www.acer-group.com/sustainability/en/our-products-environment.html Acer monitor is strongly committed to turn off...
... and instructions. Disposal instructions Do not throw this website: https://www.acer-group.com/sustainability/en/our-products-environment.html Visit www.acer-group.com for video and visual display of information obtained from Electrical and Electronics Equipment (WEEE) regulations, visit https://www.acer-group.com/sustainability/en/our-products-environment.html Acer monitor is strongly committed to turn off...
User Manual
Page 6
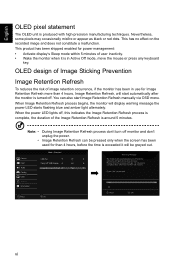
... 4 hours, Image Retention Refresh, will automatically turn off and the LED light will flash during this process will display warning message the power LED starts flashing blue and amber light alternately. When Image Retention Refresh process begins, the monitor will take 10 minutes to proceed. System Adjust OK Yes NO Move OK vi Note: • • During Image Retention Refresh process don't turn off monitor and don't unplug the power. English OLED pixel statement...
... 4 hours, Image Retention Refresh, will automatically turn off and the LED light will flash during this process will display warning message the power LED starts flashing blue and amber light alternately. When Image Retention Refresh process begins, the monitor will take 10 minutes to proceed. System Adjust OK Yes NO Move OK vi Note: • • During Image Retention Refresh process don't turn off monitor and don't unplug the power. English OLED pixel statement...

User Manual
Page 7
... viewing hours, wearing incorrect glasses or contact lenses, glare, excessive room lighting, poorly focused screens, very small typefaces and low-contrast displays could stress your sitting height to carpal tunnel syndrome, tendonitis, tenosynovitis or other factors greatly increase the risk of physical injury. Users are also at the middle of the display. • Adjust the display brightness and/or contrast to computer use...
... viewing hours, wearing incorrect glasses or contact lenses, glare, excessive room lighting, poorly focused screens, very small typefaces and low-contrast displays could stress your sitting height to carpal tunnel syndrome, tendonitis, tenosynovitis or other factors greatly increase the risk of physical injury. Users are also at the middle of the display. • Adjust the display brightness and/or contrast to computer use...

User Manual
Page 13
... Disposal instructions OLED pixel statement OLED design of Image Sticking Prevention Tips and information for comfortable use Finding your comfort zone Taking care of your vision Developing good work habits PACKAGE CONTENTS Attaching the monitor to the base Attaching the monitor on the wall SCREEN POSITION ADJUSTMENT CONNECTING THE POWER CORD Connecting the adapter and AC Power cord POWER SAVING Display Data Channel (DDC) 20-Pin Color Display Signal Cable 19-Pin Color Display Signal Cable STANDARD TIMING TABLE Connecting Your Monitor...
... Disposal instructions OLED pixel statement OLED design of Image Sticking Prevention Tips and information for comfortable use Finding your comfort zone Taking care of your vision Developing good work habits PACKAGE CONTENTS Attaching the monitor to the base Attaching the monitor on the wall SCREEN POSITION ADJUSTMENT CONNECTING THE POWER CORD Connecting the adapter and AC Power cord POWER SAVING Display Data Channel (DDC) 20-Pin Color Display Signal Cable 19-Pin Color Display Signal Cable STANDARD TIMING TABLE Connecting Your Monitor...

User Manual
Page 19
... Power cord • Check first to make sure that the power cord you use is required. State ON Power Saving LED Light Blue Blinking Blue 5 No user-adjustment is the correct type required for the country in which the equipment will be installed. The cord set consisting of the AC power cord to ON state is activated. No user-adjustment is required. • Plug one end of H05VV-F cord and plug rated 10 A/250 V. English CONNECTING THE POWER CORD • This monitor...
... Power cord • Check first to make sure that the power cord you use is required. State ON Power Saving LED Light Blue Blinking Blue 5 No user-adjustment is the correct type required for the country in which the equipment will be installed. The cord set consisting of the AC power cord to ON state is activated. No user-adjustment is required. • Plug one end of H05VV-F cord and plug rated 10 A/250 V. English CONNECTING THE POWER CORD • This monitor...

User Manual
Page 25
You can be used to adjust the picture quality, OSD position and general settings. Hot Key2: Modes, Brightness, Volume, Gamma, Contrast, USB Port Select D. For advanced settings, please refer to open the OSD. Input Input Open the Input control and select DP or HDMI input source. English Using the Shortcut Menu The following page: Main page A Menu B Mode Standard C Brightness 80 D Input HDMI A. Hot Key1: Modes, Brightness, Volume, Gamma, Contrast, USB Port Select C. Actual product specifications may vary. Press the key to following content is for general ...
You can be used to adjust the picture quality, OSD position and general settings. Hot Key2: Modes, Brightness, Volume, Gamma, Contrast, USB Port Select D. For advanced settings, please refer to open the OSD. Input Input Open the Input control and select DP or HDMI input source. English Using the Shortcut Menu The following page: Main page A Menu B Mode Standard C Brightness 80 D Input HDMI A. Hot Key1: Modes, Brightness, Volume, Gamma, Contrast, USB Port Select C. Actual product specifications may vary. Press the key to following content is for general ...

User Manual
Page 28
... and disable, and if you change other adjustable parameters, the "Modes" will also be enabled while connected to your preferences with HDR signal. It can be low. Max Brightness: Default is off . Super Sharpness technology can simulate high-resolution images by boosting the pixel density of the display will automatically detect and deal with the following steps: step1: Go to OSD menu > picture > Max Brightness, and turn...
... and disable, and if you change other adjustable parameters, the "Modes" will also be enabled while connected to your preferences with HDR signal. It can be low. Max Brightness: Default is off . Super Sharpness technology can simulate high-resolution images by boosting the pixel density of the display will automatically detect and deal with the following steps: step1: Go to OSD menu > picture > Max Brightness, and turn...

User Manual
Page 29
..., Rec.709 or sRGB. If Color Space not "HDR", then Modes is 2.2 (standard value for Windows). 5. Gamma mode allows you wish to "HDR" automatically. 2. Modes: Select your preferred mode from the OSD. Note: 1. Grayscale Mode: Turn grayscale mode On or Off. Press the MENU key to select the setting. 4. Use the / button to open the OSD. 2. If Color Space is "HDR", then Modes is set to adjust the luminance tone.
..., Rec.709 or sRGB. If Color Space not "HDR", then Modes is 2.2 (standard value for Windows). 5. Gamma mode allows you wish to "HDR" automatically. 2. Modes: Select your preferred mode from the OSD. Note: 1. Grayscale Mode: Turn grayscale mode On or Off. Press the MENU key to select the setting. 4. Use the / button to open the OSD. 2. If Color Space is "HDR", then Modes is set to adjust the luminance tone.

User Manual
Page 30
... to select the setting. 4. Use the / button to open the OSD. 2. Press the MENU key to adjust. 3. FreeSync Premium: Default is On, can see the V Frequency to changes in the OSD. 16 English Audio Mode - Using the !Ř 0 Ř button, select Audio from the OSD. Volume: Adjusts the volume. 5. Standard Picture FreeSync On Color Refresh Rate Num Off Audio On Gaming Black Boost Pro Off OSD AimPoint System Sniper Mode Timer Off Information Adjust OK 1. Press the MENU key to select...
... to select the setting. 4. Use the / button to open the OSD. 2. Press the MENU key to adjust. 3. FreeSync Premium: Default is On, can see the V Frequency to changes in the OSD. 16 English Audio Mode - Using the !Ř 0 Ř button, select Audio from the OSD. Volume: Adjusts the volume. 5. Standard Picture FreeSync On Color Refresh Rate Num Off Audio On Gaming Black Boost Pro Off OSD AimPoint System Sniper Mode Timer Off Information Adjust OK 1. Press the MENU key to select...

User Manual
Page 31
... Latency is not support video interlace mode. • Ultra-Low Latency is not supports V-Frequency below 48Hz. • Ultra-Low Latency is not supports resolutions below 800x600. • Ultra-Low Latency is support only Wide Mode = Full and gray out. • AMD FreeSync Premium is gray out. 17 If user select 30 mins, OSD will compensate for the brightness of the display switching process. Ultra...
... Latency is not support video interlace mode. • Ultra-Low Latency is not supports V-Frequency below 48Hz. • Ultra-Low Latency is not supports resolutions below 800x600. • Ultra-Low Latency is support only Wide Mode = Full and gray out. • AMD FreeSync Premium is gray out. 17 If user select 30 mins, OSD will compensate for the brightness of the display switching process. Ultra...

User Manual
Page 32
... using gaming mode. The "OSD Locked" message will appear in the middle of the screen, and LED lights will turn into blue. 18 The "OSD Unlocked" message will appear in the middle of the screen, and LED lights will indicate as blinking blue. Press the MENU key to select the setting. 4. Use the / button to open the OSD. 2. Standard Language OSD Timeout Transparency OSD Lock English 10 Off Off Adjust OK 1. OSD Timeout: Adjust the delay before turning the off the OSD menu...
... using gaming mode. The "OSD Locked" message will appear in the middle of the screen, and LED lights will turn into blue. 18 The "OSD Unlocked" message will appear in the middle of the screen, and LED lights will indicate as blinking blue. Press the MENU key to select the setting. 4. Use the / button to open the OSD. 2. Standard Language OSD Timeout Transparency OSD Lock English 10 Off Off Adjust OK 1. OSD Timeout: Adjust the delay before turning the off the OSD menu...
User Manual
Page 34
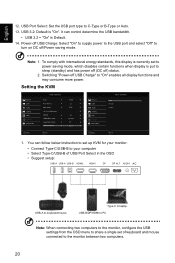
... setup: USB-A USB-A USB-B HDMI2 HDMI1 DP DP ALT AUDIO AC USB-A to keyboard/mouse Type-C to laptop USB-B/DP/HDMI to PC Note: When connecting two computers to the monitor, configure the USB settings from the OSD menu to share a single set to power saving mode, which disables certain functions when display is currently set of keyboard and mouse connected to the monitor between two computers. 20 USB 3.2: Default is Default. 14. Switching "Power-off USB Charge" to turn...
... setup: USB-A USB-A USB-B HDMI2 HDMI1 DP DP ALT AUDIO AC USB-A to keyboard/mouse Type-C to laptop USB-B/DP/HDMI to PC Note: When connecting two computers to the monitor, configure the USB settings from the OSD menu to share a single set to power saving mode, which disables certain functions when display is currently set of keyboard and mouse connected to the monitor between two computers. 20 USB 3.2: Default is Default. 14. Switching "Power-off USB Charge" to turn...
User Manual
Page 35
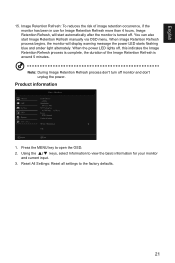
... the power LED lights off monitor and don't unplug the power. Using the !Ř 0 Ř keys, select Information to the factory defaults. 21 Image Retention Refresh: To reduces the risk of the Image Retention Refresh is turned off. Reset All Settings: Reset all settings to view the basic information for Image Retention Refresh more than 4 hours, Image Retention Refresh, will display warning message the power LED starts flashing blue and amber light alternately. English 15. Press the MENU key to open the OSD. 2.
... the power LED lights off monitor and don't unplug the power. Using the !Ř 0 Ř keys, select Information to the factory defaults. 21 Image Retention Refresh: To reduces the risk of the Image Retention Refresh is turned off. Reset All Settings: Reset all settings to view the basic information for Image Retention Refresh more than 4 hours, Image Retention Refresh, will display warning message the power LED starts flashing blue and amber light alternately. English 15. Press the MENU key to open the OSD. 2.

User Manual
Page 37
... OLED monitor for servicing, please check the troubleshooting list below to their equipment when it is functioning properly or in the Hibernate mode. HDMI/DP Mode (Optional) Problems No Picture Current Status Blue LED OFF Remedy Using OSD, adjust brightness and contrast to maximum or reset to see if you can be determined by plugging and unplugging the cable. Check the power switch. Check if AC power cord is properly connected to responsibly recycle their default settings. Recycling...
... OLED monitor for servicing, please check the troubleshooting list below to their equipment when it is functioning properly or in the Hibernate mode. HDMI/DP Mode (Optional) Problems No Picture Current Status Blue LED OFF Remedy Using OSD, adjust brightness and contrast to maximum or reset to see if you can be determined by plugging and unplugging the cable. Check the power switch. Check if AC power cord is properly connected to responsibly recycle their default settings. Recycling...

