User Manual
Page 3
... desktop pattern you use . It may flicker during initial use . • The LCD screen has 99.99% or more effective pixels. Turn off the power switch for a few hours. In this document for future reference. Keep this case, the screen is displayed for hours. Cleaning your safety and comfort Safety instructions Read these guidelines when cleaning the monitor: • Always unplug the monitor before cleaning. • Use a soft cloth...
... desktop pattern you use . It may flicker during initial use . • The LCD screen has 99.99% or more effective pixels. Turn off the power switch for a few hours. In this document for future reference. Keep this case, the screen is displayed for hours. Cleaning your safety and comfort Safety instructions Read these guidelines when cleaning the monitor: • Always unplug the monitor before cleaning. • Use a soft cloth...
User Manual
Page 4
... product should never be used for this product through cabinet slots as they may touch dangerous voltage points or short-out parts that the power outlet you plug the power cord into this monitor, do not be placed near or over a radiator or heat register, or in a built-in a fire or electric shock. The openings should be blocked or covered.
... product should never be used for this product through cabinet slots as they may touch dangerous voltage points or short-out parts that the power outlet you plug the power cord into this monitor, do not be placed near or over a radiator or heat register, or in a built-in a fire or electric shock. The openings should be blocked or covered.
User Manual
Page 5
... power outlet. Refer all products plugged into the extension cord does not exceed the extension cord ampere rating. If power strips are used with this product. • Use the product only with the supplied power supply cord set , make sure that the new power cord meets the following the operating instructions Note: The grounding pin also provides good protection from the wall outlet and refer servicing to replace the power cord set . Also, make...
... power outlet. Refer all products plugged into the extension cord does not exceed the extension cord ampere rating. If power strips are used with this product. • Use the product only with the supplied power supply cord set , make sure that the new power cord meets the following the operating instructions Note: The grounding pin also provides good protection from the wall outlet and refer servicing to replace the power cord set . Also, make...
User Manual
Page 7
... after long hours of working conditions, personal health and other factors greatly increase the risk of the monitor, using a footrest, or raising your comfort zone by adjusting the viewing angle of physical injury. Incorrect computer usage may complain of a computer. The following section provides tips for power management: • Activate display's Sleep mode within 5 minutes of user inactivity. • Wake...
... after long hours of working conditions, personal health and other factors greatly increase the risk of the monitor, using a footrest, or raising your comfort zone by adjusting the viewing angle of physical injury. Incorrect computer usage may complain of a computer. The following section provides tips for power management: • Activate display's Sleep mode within 5 minutes of user inactivity. • Wake...
User Manual
Page 13
...; 9 FCC/ISED/CE-RED Caution: 9 Radiation Exposure Statement: 9 Déclaration d'exposition aux radiations: 9 Federal Communications Commission 12 Supplier's Declaration of Conformity 12 Unpacking 14 Attaching the Base 15 Connecting the adapter and AC Power cord 17 Power saving 17 Display Data Channel (DDC) 18 20-pin color display signal cable 18 19-pin color display signal cable 19 Standard timing table 20 Installation 21 Troubleshooting 32 HDMI/DP Mode (Optional) 32
...; 9 FCC/ISED/CE-RED Caution: 9 Radiation Exposure Statement: 9 Déclaration d'exposition aux radiations: 9 Federal Communications Commission 12 Supplier's Declaration of Conformity 12 Unpacking 14 Attaching the Base 15 Connecting the adapter and AC Power cord 17 Power saving 17 Display Data Channel (DDC) 18 20-pin color display signal cable 18 19-pin color display signal cable 19 Standard timing table 20 Installation 21 Troubleshooting 32 HDMI/DP Mode (Optional) 32

User Manual
Page 14
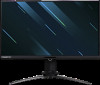
English Unpacking Please check that the following items are present when you unpack the box, and save the packing materials in case you need to ship or transport the monitor in the future. LCD monitor Quick start guide AC Power cord DP Cable (Optional) Predator X25 Quick Guide HDMI cable (Optional) USB cable (Optional)
English Unpacking Please check that the following items are present when you unpack the box, and save the packing materials in case you need to ship or transport the monitor in the future. LCD monitor Quick start guide AC Power cord DP Cable (Optional) Predator X25 Quick Guide HDMI cable (Optional) USB cable (Optional)
User Manual
Page 17
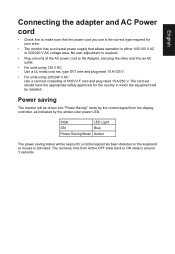
... power supply that allows operation in which the equipment will be kept until a control signal has been detected or the keyboard or mouse is activated. Power saving The monitor will be installed. The cord set consisting of H05VV-F cord and plug rated 10 A/250 V. No user-adjustment is required. • Plug one end of the AC power cord to the Adapter, and plug the other end into "Power Saving" mode by the amber-color power LED...
... power supply that allows operation in which the equipment will be kept until a control signal has been detected or the keyboard or mouse is activated. Power saving The monitor will be installed. The cord set consisting of H05VV-F cord and plug rated 10 A/250 V. No user-adjustment is required. • Plug one end of the AC power cord to the Adapter, and plug the other end into "Power Saving" mode by the amber-color power LED...
User Manual
Page 18
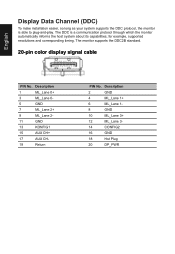
... 15 AUX CH+ 17 AUX CH- 19 Return PIN No. The DDC is able to plug-and-play. for example, supported resolutions and corresponding timing. English Display Data Channel (DDC) To make installation easier, so long as your system supports the DDC protocol, the monitor is a communication protocol through which the monitor automatically informs the host system about its capabilities;
... 15 AUX CH+ 17 AUX CH- 19 Return PIN No. The DDC is able to plug-and-play. for example, supported resolutions and corresponding timing. English Display Data Channel (DDC) To make installation easier, so long as your system supports the DDC protocol, the monitor is a communication protocol through which the monitor automatically informs the host system about its capabilities;
User Manual
Page 22
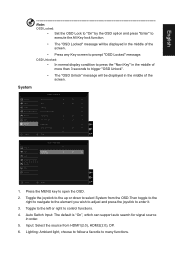
Amber indicates standby/ power saving mode. a. b. Press to view Main page.Press again to select desired option. Press to view Main page.Press again to the factory defaults. The single toggle button on . When the Function Menu is active, this key to view the basic information for your monitor and current input or reset the custom color settings to enter next function in four directions. a. Press...
Amber indicates standby/ power saving mode. a. b. Press to view Main page.Press again to select desired option. Press to view Main page.Press again to the factory defaults. The single toggle button on . When the Function Menu is active, this key to view the basic information for your monitor and current input or reset the custom color settings to enter next function in four directions. a. Press...
User Manual
Page 23
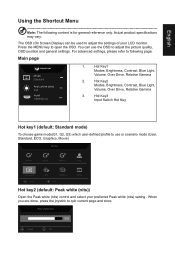
... Input HDMI1(2.0) 1. Actual product specifications may vary. Press the MENU key to quit current page and store. Hot Key1 Modes, Brightness, Contrast, Blue Light, Volume, Over Drive, Relative Gamma 2. The OSD (On Screen Display) can use or scenario mode (User, Standard, ECO, Graphics, Movie) Modes Action Racing Sports User Standard Move ECO Graphics OK Movie Hot key2 (default: Peak white (nits)) Open the Peak white (nits) control and select your LCD monitor. For advanced settings...
... Input HDMI1(2.0) 1. Actual product specifications may vary. Press the MENU key to quit current page and store. Hot Key1 Modes, Brightness, Contrast, Blue Light, Volume, Over Drive, Relative Gamma 2. The OSD (On Screen Display) can use or scenario mode (User, Standard, ECO, Graphics, Movie) Modes Action Racing Sports User Standard Move ECO Graphics OK Movie Hot key2 (default: Peak white (nits)) Open the Peak white (nits) control and select your LCD monitor. For advanced settings...
User Manual
Page 25
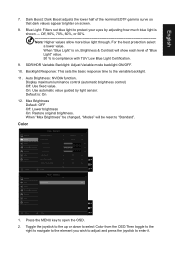
... curve so that dark values appear brighter on , Brightness & Contrast will be reset to protect your eyes by light sensor. Backlight Response: This sets the basic response time to the variable backlight. 11. English 7. Display maximum luminance control (automatic brightness control) Off: Use fixed value. Red Color Green Color Blue Color ColorSense DP YCbCr sRGB HDMI YCbCr sRGB Default Warm 50 50 50 Off On Off Move Enter X Picture Color Audio G-Sync® Processor Gaming OSD System Mode -
... curve so that dark values appear brighter on , Brightness & Contrast will be reset to protect your eyes by light sensor. Backlight Response: This sets the basic response time to the variable backlight. 11. English 7. Display maximum luminance control (automatic brightness control) Off: Use fixed value. Red Color Green Color Blue Color ColorSense DP YCbCr sRGB HDMI YCbCr sRGB Default Warm 50 50 50 Off On Off Move Enter X Picture Color Audio G-Sync® Processor Gaming OSD System Mode -
User Manual
Page 28
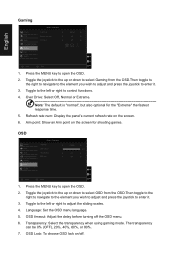
...: The default is "normal", but also optional for shooting games. Transparency: Select the transparency when using gaming mode. English Gaming Picture Color Audio G-Sync® Processor Gaming OSD System Mode - Refresh rate num: Display the panel's current refresh rate on the screen for the "Extreme" the fastest response time. 5. Press the MENU key to control functions. 4. OSD timeout: Adjust the delay before turning off . OSD Picture Color Audio G-Sync® Processor Gaming OSD System Mode - Standard Language OSD Timeout Transparency OSD Lock English Off...
...: The default is "normal", but also optional for shooting games. Transparency: Select the transparency when using gaming mode. English Gaming Picture Color Audio G-Sync® Processor Gaming OSD System Mode - Refresh rate num: Display the panel's current refresh rate on the screen for the "Extreme" the fastest response time. 5. Press the MENU key to control functions. 4. OSD timeout: Adjust the delay before turning off . OSD Picture Color Audio G-Sync® Processor Gaming OSD System Mode - Standard Language OSD Timeout Transparency OSD Lock English Off...
User Manual
Page 29
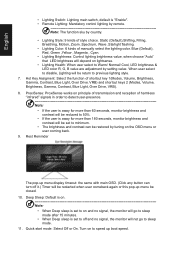
... Picture Color Power-off USB charge Off Audio G-Sync® Processor Gaming OSD System Move Enter X Quick Start Mode 1. Lighting: Ambient light, choose to follow a favorite to open the OSD. 2. Press the MENU key to many functions. OSD Unlocked: • In normal display condition to press the "Navi Key" in the middle of more than 3 seconds to trigger "OSD Unlock". • The "OSD Unlock" message will be displayed in the middle of the screen...
... Picture Color Power-off USB charge Off Audio G-Sync® Processor Gaming OSD System Move Enter X Quick Start Mode 1. Lighting: Ambient light, choose to follow a favorite to open the OSD. 2. Press the MENU key to many functions. OSD Unlocked: • In normal display condition to press the "Navi Key" in the middle of more than 3 seconds to trigger "OSD Unlock". • The "OSD Unlock" message will be displayed in the middle of the screen...
User Manual
Page 30
... 1(Modes, Volume, Brightness, Gamma, Contrast, Blue Light, Over Drive, VRB) and shortcut keys 2 (Modes, Volume, Brightness, Gamma, Contrast, Blue Light, Over Drive, VRB). 8. Blue (Default), Red, Green ,Yellow , Magenta , Cyan. • Lighting Brightness: Control lighting brightness value ,when choose "Auto" that LED brightness will be restarted when user comeback again or this pop-up menu display timeout: the same with main OSD. (Click any button can be restored by remote. Deep Sleep: Default is on Note: • When Deep sleep is set to sleep mode after...
... 1(Modes, Volume, Brightness, Gamma, Contrast, Blue Light, Over Drive, VRB) and shortcut keys 2 (Modes, Volume, Brightness, Gamma, Contrast, Blue Light, Over Drive, VRB). 8. Blue (Default), Red, Green ,Yellow , Magenta , Cyan. • Lighting Brightness: Control lighting brightness value ,when choose "Auto" that LED brightness will be restarted when user comeback again or this pop-up menu display timeout: the same with main OSD. (Click any button can be restored by remote. Deep Sleep: Default is on Note: • When Deep sleep is set to sleep mode after...
User Manual
Page 31
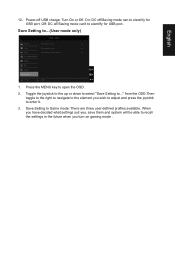
... select "Save Setting to ...(User mode only) English Mode - 12. Save Setting to ..." Power-off /Saving mode can 't to Game mode: There are three user-defined profiles available. from the OSD.Then toggle to the right to navigate to the element you turn on gaming mode . Game Mode: Action Game Mode: Racing Game Mode: G-SYNC Esports Move Enter X 1. User Picture Color Audio G-Sync® Processor Gaming OSD System Save setting to enter it. 3. Press the MENU key to open the OSD. 2.
... select "Save Setting to ...(User mode only) English Mode - 12. Save Setting to ..." Power-off /Saving mode can 't to Game mode: There are three user-defined profiles available. from the OSD.Then toggle to the right to navigate to the element you turn on gaming mode . Game Mode: Action Game Mode: Racing Game Mode: G-SYNC Esports Move Enter X 1. User Picture Color Audio G-Sync® Processor Gaming OSD System Save setting to enter it. 3. Press the MENU key to open the OSD. 2.
User Manual
Page 32
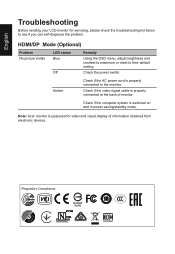
... Mode (Optional) Problem No picture visible LED status Blue Off Remedy Using the OSD menu, adjust brightness and contrast to maximum or reset to see if you can self-diagnose the problem. Amber Check if the AC power cord is switched on and in power saving/standby mode. Note: Acer monitor is properly connected at the back of information obtained from electronic devices. Check if the computer system is properly connected to the monitor. Check if the video signal cable...
... Mode (Optional) Problem No picture visible LED status Blue Off Remedy Using the OSD menu, adjust brightness and contrast to maximum or reset to see if you can self-diagnose the problem. Amber Check if the AC power cord is switched on and in power saving/standby mode. Note: Acer monitor is properly connected at the back of information obtained from electronic devices. Check if the computer system is properly connected to the monitor. Check if the video signal cable...

Lifecycle Extension Guide
Page 41
...'t solve I, please replace a PC or replace a tool and try again. 5. Use windows 10 system 64 bit. 41 1.1.3 Flash the code Now click the "AUTO PROG" Button. The tool connecting cable red pin need close the software. After finished, the screen should look like this error, please check: 1. When you need writing other machine, only need connect ok and press "space key" it will flashing red and green across When you update the FW...
...'t solve I, please replace a PC or replace a tool and try again. 5. Use windows 10 system 64 bit. 41 1.1.3 Flash the code Now click the "AUTO PROG" Button. The tool connecting cable red pin need close the software. After finished, the screen should look like this error, please check: 1. When you need writing other machine, only need connect ok and press "space key" it will flashing red and green across When you update the FW...

Quick Start Guide
Page 1
...; F). English Acer LCD Monitor Quick Start Guide (QSG) Important safety instructions Please read the following circumstances occur: • Monitor-to-PC signal cable is frayed or damaged. • Liquid spills onto the LCD monitor or the monitor is exposed to rain. • The LCD monitor or case is only for audio output model. To clean the LCD monitor screen: • Turn off your computer and unplug your computer's power cord. 2. Attach the footstand to the base...
...; F). English Acer LCD Monitor Quick Start Guide (QSG) Important safety instructions Please read the following circumstances occur: • Monitor-to-PC signal cable is frayed or damaged. • Liquid spills onto the LCD monitor or the monitor is exposed to rain. • The LCD monitor or case is only for audio output model. To clean the LCD monitor screen: • Turn off your computer and unplug your computer's power cord. 2. Attach the footstand to the base...

Quick Start Guide
Page 2
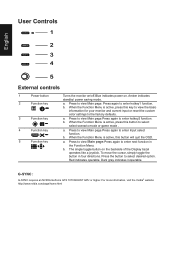
... about where you can radiate radio frequency energy and, if not installed and used in the European Union This symbol on the product or on , the user is active, press this device must be attached to view Main page. 1 2 3 4 English 5 External controls 1 Power button Turns the monitor on/off.Blue indicates power on the backside of the Display bezel operates like a joystick. The single...
... about where you can radiate radio frequency energy and, if not installed and used in the European Union This symbol on the product or on , the user is active, press this device must be attached to view Main page. 1 2 3 4 English 5 External controls 1 Power button Turns the monitor on/off.Blue indicates power on the backside of the Display bezel operates like a joystick. The single...
Quick Start Guide
Page 3
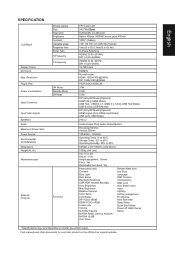
... Pixel pitch Brightness Contrast Viewable angle Response time Panel Type H-Frequency V-Frequency ON Mode Standby Mode Off Mode Input Video Signal Speakers Audio Maximum Screen Size Power Source Environmental Considerations Dimensions Weight (N. ColorSense DP YCbCr sRGB HDMI YCbCr sRGB 6-axis color Volume G-SYNC Esports NVIDIA Reflex Latency Analyzer NVIDIA ULMB Over Drive Refresh Rate Num Aim Point Language OSD Timeout Transparency OSD Lock Auto Switch Input Input Lighting Hot Key Assignment ProxiSense Rest Reminder Deep Sleep Quick Start Mode Power-off USB Charge Reset * Specifications...
... Pixel pitch Brightness Contrast Viewable angle Response time Panel Type H-Frequency V-Frequency ON Mode Standby Mode Off Mode Input Video Signal Speakers Audio Maximum Screen Size Power Source Environmental Considerations Dimensions Weight (N. ColorSense DP YCbCr sRGB HDMI YCbCr sRGB 6-axis color Volume G-SYNC Esports NVIDIA Reflex Latency Analyzer NVIDIA ULMB Over Drive Refresh Rate Num Aim Point Language OSD Timeout Transparency OSD Lock Auto Switch Input Input Lighting Hot Key Assignment ProxiSense Rest Reminder Deep Sleep Quick Start Mode Power-off USB Charge Reset * Specifications...


