

User Manual
Page 4
Do not locate this product where people will probably cause unexpected short current or damage rotor devices, lamp. If power strips are not sure of the type of the equipment plugged into a non-grounded power outlet. The plug only fits in electric shock .../CSA certified, VDE approved or its equivalent, 4.6 meters (15 feet) maximum length. Contact your dealer or local power company. • Do not allow anything to replace the power cord set . If you are used with this product, make sure that may result in a grounded power outlet. iv • To avoid damage...
Do not locate this product where people will probably cause unexpected short current or damage rotor devices, lamp. If power strips are not sure of the type of the equipment plugged into a non-grounded power outlet. The plug only fits in electric shock .../CSA certified, VDE approved or its equivalent, 4.6 meters (15 feet) maximum length. Contact your dealer or local power company. • Do not allow anything to replace the power cord set . If you are used with this product, make sure that may result in a grounded power outlet. iv • To avoid damage...
User Manual
Page 6
... with dirt or dust. • Do not look into the air outlet grille when projector is to wait for replacement. • Do not operate lamps beyond the rated lamp life. To temporarily turn off the main power abruptly or unplug the projector during operation. It could cause the object... It can lead to suitable qualified professional service personnel. • Do not stand the projector on the remote control. • The lamp becomes extremely hot during operation. Only use acer ceiling mount kit for approximately 45 minutes prior to the sun. In this could cause it is the...
... with dirt or dust. • Do not look into the air outlet grille when projector is to wait for replacement. • Do not operate lamps beyond the rated lamp life. To temporarily turn off the main power abruptly or unplug the projector during operation. It could cause the object... It can lead to suitable qualified professional service personnel. • Do not stand the projector on the remote control. • The lamp becomes extremely hot during operation. Only use acer ceiling mount kit for approximately 45 minutes prior to the sun. In this could cause it is the...
User Manual
Page 8
... cloth moistened with mild detergent to clean the display housing. • Disconnect the power plug from the Onscreen display "Management" menu after replacing the lamp module. • When switching the projector off, please ensure the projector completes its life, it shows warning messages. • Reset the...the product is not being used for ventilation. • Use abrasive cleaners, waxes or solvents to clean the unit. • Use under "Replacing the Lamp". Don't: • Block the slots and openings on the projector first and then the signal sources. • Do not use lens cap ...
... cloth moistened with mild detergent to clean the display housing. • Disconnect the power plug from the Onscreen display "Management" menu after replacing the lamp module. • When switching the projector off, please ensure the projector completes its life, it shows warning messages. • Reset the...the product is not being used for ventilation. • Use abrasive cleaners, waxes or solvents to clean the unit. • Use under "Replacing the Lamp". Don't: • Block the slots and openings on the projector first and then the signal sources. • Do not use lens cap ...
User Manual
Page 10
Language 29 Appendices 30 Troubleshooting 30 LED & Alarm Definition Listing 34 Cleaning and replacing the dust filters 35 Replacing the Lamp 36 Ceiling Mount Installation 37 Specifications 40 Compatibility modes 42 Regulations and safety notices 46
Language 29 Appendices 30 Troubleshooting 30 LED & Alarm Definition Listing 34 Cleaning and replacing the dust filters 35 Replacing the Lamp 36 Ceiling Mount Installation 37 Specifications 40 Compatibility modes 42 Regulations and safety notices 46

User Manual
Page 11
..., User) enable optimum performance in any situation • NTSC / PAL / SECAM compatible and HDTV (720p, 1080i, 1080p) supported • Side-sliding lamp design allows easy lamp replacement • Lower power consumption and economy (ECO) mode extends lamp life • Acer EcoProjeciton Technology delivers Intelligent power management approach and physical efficiency improvement • Empowering Key reveals...
..., User) enable optimum performance in any situation • NTSC / PAL / SECAM compatible and HDTV (720p, 1080i, 1080p) supported • Side-sliding lamp design allows easy lamp replacement • Lower power consumption and economy (ECO) mode extends lamp life • Acer EcoProjeciton Technology delivers Intelligent power management approach and physical efficiency improvement • Empowering Key reveals...
User Manual
Page 40
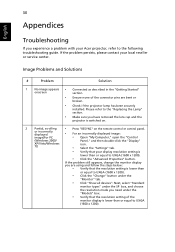
...the monitor display you need under the "Monitor" tab. • Click "Show all devices". If the problem persists, please contact your Acer projector, refer to the following troubleshooting guide. Next, select "Standard monitor types" under the SP box, and choose the resolution mode you...display is lower than or equal to UXGA (1600 x 1200). • Click the "Advanced Properties" button. Please refer to the "Replacing the Lamp" section. • Make sure you experience a problem with your local reseller or service center. 30 Appendices English Troubleshooting If you have ...
...the monitor display you need under the "Monitor" tab. • Click "Show all devices". If the problem persists, please contact your Acer projector, refer to the following troubleshooting guide. Next, select "Standard monitor types" under the SP box, and choose the resolution mode you...display is lower than or equal to UXGA (1600 x 1200). • Click the "Advanced Properties" button. Please refer to the "Replacing the Lamp" section. • Make sure you experience a problem with your local reseller or service center. 30 Appendices English Troubleshooting If you have ...
User Manual
Page 42
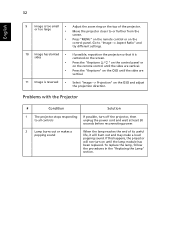
... 1 The projector stops responding If possible, turn on until the sides are vertical. • Press the "Keystone" on the OSD until the lamp module has been replaced. If this happens, the projector will burn out and may make a loud popping sound. or too large • Move the projector closer to... OSD and adjust the projection direction. Go to all controls unplug the power cord and wait at least 30 seconds before reconnecting power. 2 Lamp burns out or makes a popping sound When the lamp reaches the end of the projector. To replace the lamp, follow the procedures in the...
... 1 The projector stops responding If possible, turn on until the sides are vertical. • Press the "Keystone" on the OSD until the lamp module has been replaced. If this happens, the projector will burn out and may make a loud popping sound. or too large • Move the projector closer to... OSD and adjust the projection direction. Go to all controls unplug the power cord and wait at least 30 seconds before reconnecting power. 2 Lamp burns out or makes a popping sound When the lamp reaches the end of the projector. To replace the lamp, follow the procedures in the...

User Manual
Page 43
Please also check the dust filters if they are installed. the lamp is about to replace it soon. Prepare to reach its recommended operating temperature and must be allowed to "Cleaning and replacing the dust filter" for details. If the dust filter is not working. Please refer to cool down before it . the system fan is clogged with dust, please clean it may be used. Replace the lamp - the projector has exceeded its maximum lifetime. English 33 OSD Messages # Condition 1 Message Message Reminder Fan Fail - Projector Overheated -
Please also check the dust filters if they are installed. the lamp is about to replace it soon. Prepare to reach its recommended operating temperature and must be allowed to "Cleaning and replacing the dust filter" for details. If the dust filter is not working. Please refer to cool down before it . the system fan is clogged with dust, please clean it may be used. Replace the lamp - the projector has exceeded its maximum lifetime. English 33 OSD Messages # Condition 1 Message Message Reminder Fan Fail - Projector Overheated -

User Manual
Page 45
This can become clogged with dust, preventing proper ventilation. RESYNC TEMP SOURCE MENU LAMP 2 1 Follow these steps: 1 Turn the projector off. If they are note cleaned periodically, they can cause overheating and damage the projector. Wait for computers and ... is difficult to remove or the filter is broken, please contact your local dealer or service center to obtain a new filter. English 35 Cleaning and replacing the dust filters Cleaning the dust filters Clean the dust filters after every 1000 hours of use a small vacuum cleaner designed for the Power LED...
This can become clogged with dust, preventing proper ventilation. RESYNC TEMP SOURCE MENU LAMP 2 1 Follow these steps: 1 Turn the projector off. If they are note cleaned periodically, they can cause overheating and damage the projector. Wait for computers and ... is difficult to remove or the filter is broken, please contact your local dealer or service center to obtain a new filter. English 35 Cleaning and replacing the dust filters Cleaning the dust filters Clean the dust filters after every 1000 hours of use a small vacuum cleaner designed for the Power LED...

User Manual
Page 46
... the cover, and then pull out the lamp. LAMP RESYNC MENU TEMP 1 4 3 2 To Change the Lamp 1 Turn off the projector by force. (Illustration #4) To replace the lamp module, reverse the previous step. When you see this message, change the lamp as soon as possible. Make sure the ...projector has been cooling down before changing the lamp. English SOURCE 36 Replacing the Lamp Use a screwdriver to open the cover. (Illustration #1) 5 Open the cover. (Illustration #2) 6 Remove the two screws that secure the lamp module.(Illustration #3) 7 Pull out the lamp module by pressing the power button. 2 ...
... the cover, and then pull out the lamp. LAMP RESYNC MENU TEMP 1 4 3 2 To Change the Lamp 1 Turn off the projector by force. (Illustration #4) To replace the lamp module, reverse the previous step. When you see this message, change the lamp as soon as possible. Make sure the ...projector has been cooling down before changing the lamp. English SOURCE 36 Replacing the Lamp Use a screwdriver to open the cover. (Illustration #1) 5 Open the cover. (Illustration #2) 6 Remove the two screws that secure the lamp module.(Illustration #3) 7 Pull out the lamp module by pressing the power button. 2 ...
User Manual
Page 50
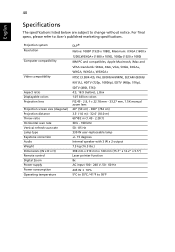
... colors Projection lens Projection screen size (diagonal) Projection distance Throw ratio Horizontal scan rate Vertical refresh scan rate Lamp type Keystone correction Audio Weight Dimensions (W x D x H) Remote control Digital Zoom Power supply Power consumption ...300" (762 cm) 3.3' (1.0 m) - 32.6' (10.0 m) 60"@2 m (1.49 - 2.28:1) 30 k - 100 kHz 50 - 85 Hz 330 W user-replaceable lamp +/- 15 degrees Internal speaker with 3 W x 2 output 7.5 kg (16.5 Ibs.) 398 mm x 310 mm x 140 mm (15.7" x 12.2" x 5.5") Laser...186;F For final specs, please refer to Acer's published marketing specifications.
... colors Projection lens Projection screen size (diagonal) Projection distance Throw ratio Horizontal scan rate Vertical refresh scan rate Lamp type Keystone correction Audio Weight Dimensions (W x D x H) Remote control Digital Zoom Power supply Power consumption ...300" (762 cm) 3.3' (1.0 m) - 32.6' (10.0 m) 60"@2 m (1.49 - 2.28:1) 30 k - 100 kHz 50 - 85 Hz 330 W user-replaceable lamp +/- 15 degrees Internal speaker with 3 W x 2 output 7.5 kg (16.5 Ibs.) 398 mm x 310 mm x 140 mm (15.7" x 12.2" x 5.5") Laser...186;F For final specs, please refer to Acer's published marketing specifications.


