

User Manual
Page 2
... periodically to your unit should include the serial number, model number and purchase information. Acer LCD Monitor User Guide Model number Serial number Date of purchase Place of purchase Acer and the Acer logo are recorded on the label affixed to the information in any form or by ...any person of such revisions or changes. Acer Incorporated. English Copyright © 2012. All Rights Reserved. ...
... periodically to your unit should include the serial number, model number and purchase information. Acer LCD Monitor User Guide Model number Serial number Date of purchase Place of purchase Acer and the Acer logo are recorded on the label affixed to the information in any form or by ...any person of such revisions or changes. Acer Incorporated. English Copyright © 2012. All Rights Reserved. ...
User Manual
Page 3
... the nature of 0.01% or less such as a missing pixel or pixel lit all warnings and instructions marked on LCD monitors The following are normal with the LCD monitor and do not indicate a problem. • Due to make sure the flicker disappears. • You may flicker during ...for future reference. Special notes on the product. iii Keep this case, the screen is displayed for hours. English Information for your monitor Please carefully follow these instructions carefully. It may include blemishes of the fluorescent light, the screen may find slightly uneven brightness on the ...
... the nature of 0.01% or less such as a missing pixel or pixel lit all warnings and instructions marked on LCD monitors The following are normal with the LCD monitor and do not indicate a problem. • Due to make sure the flicker disappears. • You may flicker during ...for future reference. Special notes on the product. iii Keep this case, the screen is displayed for hours. English Information for your monitor Please carefully follow these instructions carefully. It may include blemishes of the fluorescent light, the screen may find slightly uneven brightness on the ...

User Manual
Page 4
...are provided for this product on a vibrating surface. • Never use this product near water. • Do not place this monitor, do not increase it could result in installation unless proper ventilation is easily accessible and located as close to disconnect power from the ... outlet. English Accessibility Be sure that could be blocked or covered. The openings should never be operated from overheating. Model:DA-40A19 (P238HL Model) Using electrical power • This product should never be placed near you can hear it clearly and comfortably and without distortion....
...are provided for this product on a vibrating surface. • Never use this product near water. • Do not place this monitor, do not increase it could result in installation unless proper ventilation is easily accessible and located as close to disconnect power from the ... outlet. English Accessibility Be sure that could be blocked or covered. The openings should never be operated from overheating. Model:DA-40A19 (P238HL Model) Using electrical power • This product should never be placed near you can hear it clearly and comfortably and without distortion....

User Manual
Page 7
... or throbbing • stiffness or tightness • coldness or weakness If you have these symptoms, or any other factors greatly increase the risk of the monitor, using a footrest, or raising your leg muscles vii Users are also at risk of a computer. English LCD pixel statement The LCD unit is produced with...
... or throbbing • stiffness or tightness • coldness or weakness If you have these symptoms, or any other factors greatly increase the risk of the monitor, using a footrest, or raising your leg muscles vii Users are also at risk of a computer. English LCD pixel statement The LCD unit is produced with...

User Manual
Page 8
... looking at bright light sources, such as open windows, for extended periods of the display so your eyes point downward when looking away from the monitor and focusing on how to keep your eyes from drying out.
... looking at bright light sources, such as open windows, for extended periods of the display so your eyes point downward when looking away from the monitor and focusing on how to keep your eyes from drying out.

User Manual
Page 9
.../EC as attested by conformity with regard to begin affixing CE marking 2012. Acer Incorporated 8F, 88, Sec. 1, Xintai 5th Rd., Xizhi New Taipei City 221, Taiwan English Declaration of Conformity We, Acer Incorporated 8F, 88, Sec. 1, Xintai 5th Rd., Xizhi, New Taipei... Lepetit, 40, 20020 Lainate (MI) Italy Tel: +39-02-939-921, Fax: +39-02 9399-2913 www.acer.it Hereby declare that: Product: Trade Name: Model Number: SKU Number: LCD Monitor Acer P238HL P238HL xxxxxx ("x" = 0~9, a ~ z, A ~ Z, or blank) Is compliant with the essential requirements and other relevant provisions...
.../EC as attested by conformity with regard to begin affixing CE marking 2012. Acer Incorporated 8F, 88, Sec. 1, Xintai 5th Rd., Xizhi New Taipei City 221, Taiwan English Declaration of Conformity We, Acer Incorporated 8F, 88, Sec. 1, Xintai 5th Rd., Xizhi, New Taipei... Lepetit, 40, 20020 Lainate (MI) Italy Tel: +39-02-939-921, Fax: +39-02 9399-2913 www.acer.it Hereby declare that: Product: Trade Name: Model Number: SKU Number: LCD Monitor Acer P238HL P238HL xxxxxx ("x" = 0~9, a ~ z, A ~ Z, or blank) Is compliant with the essential requirements and other relevant provisions...

User Manual
Page 10
...-4000 Fax No.: 254-298-4147 x S. Tel : 254-298-4000 Fax : 254-298-4147 www.acer.com Federal Communications Commission Declaration of Conformity This device complies with Part 15 of Responsible Party: Contact Person: 333... including interference that may not cause harmful interference, and (2) this declaration: Product: LCD Monitor Model Number: P238HL SKU Number: P238HL xxxxxx ("x" = 0~9, a ~ z, A ~ Z or Blank) Name of Responsible Party: Acer America Corporation Address of the FCC Rules. The following local Manufacturer /Importer is subject to ...
...-4000 Fax No.: 254-298-4147 x S. Tel : 254-298-4000 Fax : 254-298-4147 www.acer.com Federal Communications Commission Declaration of Conformity This device complies with Part 15 of Responsible Party: Contact Person: 333... including interference that may not cause harmful interference, and (2) this declaration: Product: LCD Monitor Model Number: P238HL SKU Number: P238HL xxxxxx ("x" = 0~9, a ~ z, A ~ Z or Blank) Name of Responsible Party: Acer America Corporation Address of the FCC Rules. The following local Manufacturer /Importer is subject to ...

User Manual
Page 11
Contents English Information for your safety and comfort iii Safety instructions iii Special notes on LCD monitors iii Cleaning your monitor iii Accessibility iv Safe listening iv Warnings iv Using electrical power iv Product servicing v Potentially explosive environments vi Additional safety information vi IT Equipment Recycling ...
Contents English Information for your safety and comfort iii Safety instructions iii Special notes on LCD monitors iii Cleaning your monitor iii Accessibility iv Safe listening iv Warnings iv Using electrical power iv Product servicing v Potentially explosive environments vi Additional safety information vi IT Equipment Recycling ...
User Manual
Page 13
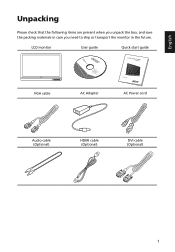
English Unpacking Please check that the following items are present when you unpack the box, and save the packing materials in case you need to ship or transport the monitor in the future. LCD monitor User guide Quick start guide VGA cable AC Adapter AC Power cord Audio cable (Optional) HDMI cable (Optional) DVI cable (Optional) 1
English Unpacking Please check that the following items are present when you unpack the box, and save the packing materials in case you need to ship or transport the monitor in the future. LCD monitor User guide Quick start guide VGA cable AC Adapter AC Power cord Audio cable (Optional) HDMI cable (Optional) DVI cable (Optional) 1

User Manual
Page 14
...instructions provided with the Wall Mount items. Warning! It may result in the upright position. 3 Pull the stand away from its packaging. 2 Place the monitor on a stable surface in personal injury due to electric shock. 1 Purchase a VESA compatible wall bracket. 2 Locate your preference. • The maximum ...separately) allow you can be adjusted approximately 10º or 30º to suit your ideal monitor position on the wall. 3 Fix the wall bracket firmly on the wall. 4 Secure the monitor to the bracket using the 4 mount holes on the wall. For detailed information on . English ...
...instructions provided with the Wall Mount items. Warning! It may result in the upright position. 3 Pull the stand away from its packaging. 2 Place the monitor on a stable surface in personal injury due to electric shock. 1 Purchase a VESA compatible wall bracket. 2 Locate your preference. • The maximum ...separately) allow you can be adjusted approximately 10º or 30º to suit your ideal monitor position on the wall. 3 Fix the wall bracket firmly on the wall. 4 Secure the monitor to the bracket using the 4 mount holes on the wall. For detailed information on . English ...

User Manual
Page 15
... (DDC) To make sure that the power cord you use is the correct type required for your system supports the DDC protocol, the monitor is able to plug-and-play. Mode On Standby/Power saving LED light Blue Blinking Blue The power saving mode will be installed. for... voltage area. The DDC is a communication protocol through which the equipment will be switched to "power saving" mode by the blinking blue light. The monitor supports the DDC2B standard. 3 English Connecting the adapter and AC Power cord • Check first to make installation easier, so long as indicated by ...
... (DDC) To make sure that the power cord you use is the correct type required for your system supports the DDC protocol, the monitor is able to plug-and-play. Mode On Standby/Power saving LED light Blue Blinking Blue The power saving mode will be installed. for... voltage area. The DDC is a communication protocol through which the equipment will be switched to "power saving" mode by the blinking blue light. The monitor supports the DDC2B standard. 3 English Connecting the adapter and AC Power cord • Check first to make installation easier, so long as indicated by ...

User Manual
Page 19
... computer are powered-OFF. Note: Audio output is only available when the input signal is very important. 5 If the monitor does not function properly, please refer to the troubleshooting section to diagnose the problem. b. b. Connect the HDMI cable to the computer. 2 Connect the audio cable (...Optional, only Audio-Input Model) a Connect an earphone to the audio port of the adapter to the monitor and the other end to the adapter. HDMI 1 HDMI 2 VGA IN AUDIO IN DC IN 2 HDMI DVI-D D-SUB AUDIO 2 DC AUDIO HDMI 1 HDMI 2 DVI-D IN...
... computer are powered-OFF. Note: Audio output is only available when the input signal is very important. 5 If the monitor does not function properly, please refer to the troubleshooting section to diagnose the problem. b. b. Connect the HDMI cable to the computer. 2 Connect the audio cable (...Optional, only Audio-Input Model) a Connect an earphone to the audio port of the adapter to the monitor and the other end to the adapter. HDMI 1 HDMI 2 VGA IN AUDIO IN DC IN 2 HDMI DVI-D D-SUB AUDIO 2 DC AUDIO HDMI 1 HDMI 2 DVI-D IN...

User Manual
Page 20
... • When the OSD menu is inactive, press this button for two seconds to activate the Auto Adjustment function and the monitor will automatically optimize the display position, focus, and clock of the current function. button 3 Menu/Enter button Press the + / - ...Press to open the Acer eColor Management OSD and access the scenario modes. 8 Blue indicates power on /off. Item 1 Power button/ indicator Description Turn the monitor on . Press the + / - Users controls English Panel controls 54 3 2 1 No.
... • When the OSD menu is inactive, press this button for two seconds to activate the Auto Adjustment function and the monitor will automatically optimize the display position, focus, and clock of the current function. button 3 Menu/Enter button Press the + / - ...Press to open the Acer eColor Management OSD and access the scenario modes. 8 Blue indicates power on /off. Item 1 Power button/ indicator Description Turn the monitor on . Press the + / - Users controls English Panel controls 54 3 2 1 No.

User Manual
Page 21
Press the Menu button to open the Acer eColor Management and access the scenario modes. Icon AUTO Item Empowering Description Press the Empowering Key to activate the OSD menu. The shortcut menu lets ... Key, Auto button, or Menu button) to open the shortcut menu. 2 Select to activate the Auto Adjustment function and the monitor will automatically optimize the display position, focus, and clock of your monitor. (Optional, only Dual-Input Model) Volume Management Operation instructions 1 Press any of the function buttons (Empowering Key, Auto button...
Press the Menu button to open the Acer eColor Management and access the scenario modes. Icon AUTO Item Empowering Description Press the Empowering Key to activate the OSD menu. The shortcut menu lets ... Key, Auto button, or Menu button) to open the shortcut menu. 2 Select to activate the Auto Adjustment function and the monitor will automatically optimize the display position, focus, and clock of your monitor. (Optional, only Dual-Input Model) Volume Management Operation instructions 1 Press any of the function buttons (Empowering Key, Auto button...

User Manual
Page 23
.... 11 button to adjust/select the setting and press the Auto button to enter its sub-menu. 4 Press the + / - Your LCD monitor is used for adjusting the picture quality. Picture Menu The Picture menu is equipped with an on-screen display (OSD) menu for general reference only.... Picture Acer eColor Management Brightness 100 Contrast 50 H.Position 50 V.Position 50 Focus 60 Clock 50 Colour Temp Warm Auto Config 1 Press the Menu button...
.... 11 button to adjust/select the setting and press the Auto button to enter its sub-menu. 4 Press the + / - Your LCD monitor is used for adjusting the picture quality. Picture Menu The Picture menu is equipped with an on-screen display (OSD) menu for general reference only.... Picture Acer eColor Management Brightness 100 Contrast 50 H.Position 50 V.Position 50 Focus 60 Clock 50 Colour Temp Warm Auto Config 1 Press the Menu button...

User Manual
Page 26
English Information Menu The Information menu displays the basic information of the LCD monitor, press the + / - Information 1280x1024 H:64kHz V:60Hz VGA S/N: 1 Press the Menu button to select Information. 14 button to bring up the OSD menu. 2 To view the basic information of the LCD monitor.
English Information Menu The Information menu displays the basic information of the LCD monitor, press the + / - Information 1280x1024 H:64kHz V:60Hz VGA S/N: 1 Press the Menu button to select Information. 14 button to bring up the OSD menu. 2 To view the basic information of the LCD monitor.

User Manual
Page 27
Check if the video signal cable is properly connected at the back of graphics adapter and monitor is missing, off the monitor. 15 Check if the specification of monitor. Wait for servicing, please check the troubleshooting list below to see if you can self-diagnose the problem. In case ...on the screen.) Blue Remedy Using the OSD menu, adjust brightness and contrast to maximum or reset to the monitor. Check if the power cord is switched on your LCD monitor for a few seconds after adjusting the size of a missing image, please select another resolution or vertical refresh ...
Check if the video signal cable is properly connected at the back of graphics adapter and monitor is missing, off the monitor. 15 Check if the specification of monitor. Wait for servicing, please check the troubleshooting list below to see if you can self-diagnose the problem. In case ...on the screen.) Blue Remedy Using the OSD menu, adjust brightness and contrast to maximum or reset to the monitor. Check if the power cord is switched on your LCD monitor for a few seconds after adjusting the size of a missing image, please select another resolution or vertical refresh ...

User Manual
Page 28
Check if the AC power cord is properly connected to their default settings. Check if the computer system is properly connected at the back of monitor. Blinking Blue Check if the video signal cable is switched on and in power saving/standby mode. 16 English DVI/HDMI Mode (Optional) Problem No picture visible LED status Blue Off Remedy Using the OSD menu, adjust brightness and contrast to maximum or reset to the monitor. Check the power switch.
Check if the AC power cord is properly connected to their default settings. Check if the computer system is properly connected at the back of monitor. Blinking Blue Check if the video signal cable is switched on and in power saving/standby mode. 16 English DVI/HDMI Mode (Optional) Problem No picture visible LED status Blue Off Remedy Using the OSD menu, adjust brightness and contrast to maximum or reset to the monitor. Check the power switch.


