

User Manual
Page 2
... on the label affixed to the contents hereof and specifically disclaims the implied warranties of such revisions or changes. The serial number and model number are used herein for a particular purpose. English Copyright © 2012. Acer LCD Monitor User Guide Original Issue: 2/2012 Changes may be incorporated in this manual or supplementary documents and publications. Record the model number, serial number, purchase date and place of purchase information in...
... on the label affixed to the contents hereof and specifically disclaims the implied warranties of such revisions or changes. The serial number and model number are used herein for a particular purpose. English Copyright © 2012. Acer LCD Monitor User Guide Original Issue: 2/2012 Changes may be incorporated in this manual or supplementary documents and publications. Record the model number, serial number, purchase date and place of purchase information in...

User Manual
Page 3
... image, when the same image is recovered slowly by changing the image or turning off the power switch and then turn it on again to make sure the flicker disappears. • You may flicker during initial use . • The LCD screen has 99.99% or more effective pixels. Turn off the power switch for future reference. It may include blemishes of the fluorescent light, the screen may find slightly uneven brightness...
... image, when the same image is recovered slowly by changing the image or turning off the power switch and then turn it on again to make sure the flicker disappears. • You may flicker during initial use . • The LCD screen has 99.99% or more effective pixels. Turn off the power switch for future reference. It may include blemishes of the fluorescent light, the screen may find slightly uneven brightness...

User Manual
Page 4
...; After setting the volume level, do not place the product on the marking label. Model:DA-40A19 (P238HL Model) Using electrical power • This product should never be blocked by placing the product on the power cord. Safe listening To protect your hearing, follow these instructions. • Gradually increase the volume until you can hear it could result in installation unless proper...
...; After setting the volume level, do not place the product on the marking label. Model:DA-40A19 (P238HL Model) Using electrical power • This product should never be blocked by placing the product on the power cord. Safe listening To protect your hearing, follow these instructions. • Gradually increase the volume until you can hear it could result in installation unless proper...

User Manual
Page 5
... performance of this product. • Use the product only with the supplied power supply cord set , make sure that the new power cord meets the following the operating instructions v Make sure the power outlet is a safety feature. Note: The grounding pin also provides good protection from the wall outlet and refer servicing to qualified service personnel when: • the power cord or plug is equipped with a three-wire...
... performance of this product. • Use the product only with the supplied power supply cord set , make sure that the new power cord meets the following the operating instructions v Make sure the power outlet is a safety feature. Note: The grounding pin also provides good protection from the wall outlet and refer servicing to qualified service personnel when: • the power cord or plug is equipped with a three-wire...

User Manual
Page 6
.../Sustainability/sustainability01.htm Visit www.acer-group.com for further information on the use of small children. or where blasting operations are very conscious of the environmental effects of our business and strive to identify and provide the best working procedures to turn off your vehicle engine. English Note: Adjust only those controls that are often, but not...
.../Sustainability/sustainability01.htm Visit www.acer-group.com for further information on the use of small children. or where blasting operations are very conscious of the environmental effects of our business and strive to identify and provide the best working procedures to turn off your vehicle engine. English Note: Adjust only those controls that are often, but not...

User Manual
Page 7
This product has been shipped enabled for power management: • Activate display's Sleep mode within 15 minutes of user inactivity. • Activate computer's Sleep mode within 30 minutes of the monitor, using a footrest, or raising your sitting height to remove the strain on the recorded image and does not constitute a malfunction. The following section provides tips for comfortable use . Tips and information for more...
This product has been shipped enabled for power management: • Activate display's Sleep mode within 15 minutes of user inactivity. • Activate computer's Sleep mode within 30 minutes of the monitor, using a footrest, or raising your sitting height to remove the strain on the recorded image and does not constitute a malfunction. The following section provides tips for comfortable use . Tips and information for more...

User Manual
Page 8
... display. • Adjust the display brightness and/or contrast to reduce eyestrain. The following work habits to an awkward viewing angle. • Avoid looking away from the monitor and focusing on how to a comfortable level for enhanced text readability and graphics clarity. • Eliminate glare and reflections by using drapes, shades or blinds • using a task light • changing the display's viewing angle • using...
... display. • Adjust the display brightness and/or contrast to reduce eyestrain. The following work habits to an awkward viewing angle. • Avoid looking away from the monitor and focusing on how to a comfortable level for enhanced text readability and graphics clarity. • Eliminate glare and reflections by using drapes, shades or blinds • using a task light • changing the display's viewing angle • using...

User Manual
Page 11
...care of your vision viii Developing good work habits viii Declaration of Conformity ix Federal Communications Commission Declaration of Conformity x Unpacking 1 Screen position adjustment 2 Wall Mount kit installation 2 Connecting the adapter and AC Power cord 3 Power saving 3 Display Data Channel (DDC) 3 Connector pin assignment 4 15-pin color display signal cable 4 19-pin color display signal cable 4 24-pin color display signal cable 5 Standard timing table 6 Installation 7 Users controls 8 Panel controls 8 Using the Shortcut Menu 9 Volume Management 9
...care of your vision viii Developing good work habits viii Declaration of Conformity ix Federal Communications Commission Declaration of Conformity x Unpacking 1 Screen position adjustment 2 Wall Mount kit installation 2 Connecting the adapter and AC Power cord 3 Power saving 3 Display Data Channel (DDC) 3 Connector pin assignment 4 15-pin color display signal cable 4 19-pin color display signal cable 4 24-pin color display signal cable 5 Standard timing table 6 Installation 7 Users controls 8 Panel controls 8 Using the Shortcut Menu 9 Volume Management 9

User Manual
Page 12
English Acer eColor Management 10 Operation instructions 10 Features and benefits 10 Using the OSD Menus 11 Picture Menu 11 OSD Menu 12 Setting Menu 13 Information Menu 14 Troubleshooting 15 VGA Mode 15 DVI/HDMI Mode (Optional) 16
English Acer eColor Management 10 Operation instructions 10 Features and benefits 10 Using the OSD Menus 11 Picture Menu 11 OSD Menu 12 Setting Menu 13 Information Menu 14 Troubleshooting 15 VGA Mode 15 DVI/HDMI Mode (Optional) 16
User Manual
Page 13
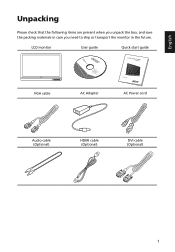
English Unpacking Please check that the following items are present when you unpack the box, and save the packing materials in case you need to ship or transport the monitor in the future. LCD monitor User guide Quick start guide VGA cable AC Adapter AC Power cord Audio cable (Optional) HDMI cable (Optional) DVI cable (Optional) 1
English Unpacking Please check that the following items are present when you unpack the box, and save the packing materials in case you need to ship or transport the monitor in the future. LCD monitor User guide Quick start guide VGA cable AC Adapter AC Power cord Audio cable (Optional) HDMI cable (Optional) DVI cable (Optional) 1

User Manual
Page 14
English Screen position adjustment 1 Carefully remove the monitor from its packaging. 2 Place the monitor on a stable surface in personal injury due to electric shock. 1 Purchase a VESA compatible wall bracket. 2 Locate your ideal monitor position on the wall. 3 Fix the wall bracket firmly on the wall. 4 Secure the monitor to suit your monitor is turned on installing the wall mount, see the instructions provided with the Wall Mount items. Warning! Do not install your Wall Mount Kit while your preference...
English Screen position adjustment 1 Carefully remove the monitor from its packaging. 2 Place the monitor on a stable surface in personal injury due to electric shock. 1 Purchase a VESA compatible wall bracket. 2 Locate your ideal monitor position on the wall. 3 Fix the wall bracket firmly on the wall. 4 Secure the monitor to suit your monitor is turned on installing the wall mount, see the instructions provided with the Wall Mount items. Warning! Do not install your Wall Mount Kit while your preference...

User Manual
Page 15
... the blinking blue light. English Connecting the adapter and AC Power cord • Check first to make installation easier, so long as indicated by the control signal from "power saving" mode back to "on" is around 3 seconds. Mode On Standby/Power saving LED light Blue Blinking Blue The power saving mode will be installed. The cord set consisting of H05VV-F cord and plug rated 10 A/250 V. for example, supported resolutions and corresponding timing. The recovery time from the display controller, as your area. • The monitor has a universal power supply...
... the blinking blue light. English Connecting the adapter and AC Power cord • Check first to make installation easier, so long as indicated by the control signal from "power saving" mode back to "on" is around 3 seconds. Mode On Standby/Power saving LED light Blue Blinking Blue The power saving mode will be installed. The cord set consisting of H05VV-F cord and plug rated 10 A/250 V. for example, supported resolutions and corresponding timing. The recovery time from the display controller, as your area. • The monitor has a universal power supply...

User Manual
Page 19
... monitor and computer are powered-OFF. Connect the HDMI cable to the computer. 2 Connect the audio cable (Optional, only Audio-Input Model) a Connect an earphone to the computer. HDMI 1 HDMI 2 VGA IN AUDIO IN DC IN 2 HDMI DVI-D D-SUB AUDIO 2 DC AUDIO HDMI 1 HDMI 2 DVI-D IN VGA IN AUDIO IN DC IN 7 c Connect the digital cable (1) Make sure both the monitor and computer are switched off . b. English Installation To install the monitor on the monitor first, then the computer. b Connect the VGA video cable to the audio port of the adapter to the monitor...
... monitor and computer are powered-OFF. Connect the HDMI cable to the computer. 2 Connect the audio cable (Optional, only Audio-Input Model) a Connect an earphone to the computer. HDMI 1 HDMI 2 VGA IN AUDIO IN DC IN 2 HDMI DVI-D D-SUB AUDIO 2 DC AUDIO HDMI 1 HDMI 2 DVI-D IN VGA IN AUDIO IN DC IN 7 c Connect the digital cable (1) Make sure both the monitor and computer are switched off . b. English Installation To install the monitor on the monitor first, then the computer. b Connect the VGA video cable to the audio port of the adapter to the monitor...

User Manual
Page 20
... the Menu button to view the OSD menu. Blinking blue indicates standby/ power saving mode. 2 + / - Press to select the function. Press the + / - button to change the settings of your display. 5 Empowering Key Press this button for two seconds to open the Acer eColor Management OSD and access the scenario modes. 8 button 3 Menu/Enter button Press the + / - Users controls English Panel controls 54 3 2 1 No. Item 1 Power button/ indicator Description Turn the monitor on . Press it again to enter a selection in the OSD menu. 4 Auto/Exit button...
... the Menu button to view the OSD menu. Blinking blue indicates standby/ power saving mode. 2 + / - Press to select the function. Press the + / - button to change the settings of your display. 5 Empowering Key Press this button for two seconds to open the Acer eColor Management OSD and access the scenario modes. 8 button 3 Menu/Enter button Press the + / - Users controls English Panel controls 54 3 2 1 No. Item 1 Power button/ indicator Description Turn the monitor on . Press it again to enter a selection in the OSD menu. 4 Auto/Exit button...

User Manual
Page 21
... automatically optimize the display position, focus, and clock of your monitor. (Optional, only Dual-Input Model) Volume Management Operation instructions 1 Press any of the function buttons (Empowering Key, Auto button, or Menu button) to open the shortcut menu. 2 Select to access the Volume menu. Volume Input Input Press the Volume button to adjust volume. (Optional, only Audio-Input Model) Press the Input button to select from different video sources that may be connected to your display. Volume 95 3 Press the + / - The shortcut menu lets you quickly...
... automatically optimize the display position, focus, and clock of your monitor. (Optional, only Dual-Input Model) Volume Management Operation instructions 1 Press any of the function buttons (Empowering Key, Auto button, or Menu button) to open the shortcut menu. 2 Select to access the Volume menu. Volume Input Input Press the Volume button to adjust volume. (Optional, only Audio-Input Model) Press the Input button to select from different video sources that may be connected to your display. Volume 95 3 Press the + / - The shortcut menu lets you quickly...

User Manual
Page 22
... in clearest detail. Standard mode Default settings. Graphics mode Movie mode Enhances colors and emphasizes fine detail. button to select the desired mode. 3 Press the Auto button to suit any situation. Reflects native display capability. English Acer eColor Management Operation instructions 1 Press the Empowering Key to reduce power consumption. mpowering Technology User ECO Standard Graphics Movie 2 Press the + / - Adjusts the settings to open the Acer eColor Management OSD menu and access the scenario...
... in clearest detail. Standard mode Default settings. Graphics mode Movie mode Enhances colors and emphasizes fine detail. button to select the desired mode. 3 Press the Auto button to suit any situation. Reflects native display capability. English Acer eColor Management Operation instructions 1 Press the Empowering Key to reduce power consumption. mpowering Technology User ECO Standard Graphics Movie 2 Press the + / - Adjusts the settings to open the Acer eColor Management OSD menu and access the scenario...

User Manual
Page 23
Your LCD monitor is used for adjusting the picture quality. Picture Acer eColor Management Brightness 100 Contrast 50 H.Position 50 V.Position 50 Focus 60 Clock 50 Colour Temp Warm Auto Config 1 Press the Menu button to open the OSD menu. Position, Focus, Clock, Colour Temp, and Auto Config. 3 Press the + / - Press the Menu button to bring up the OSD menu. 2 Press the + / - Position, V. button to scroll through the Picture options, and press the Menu button to confirm. 11 Actual...
Your LCD monitor is used for adjusting the picture quality. Picture Acer eColor Management Brightness 100 Contrast 50 H.Position 50 V.Position 50 Focus 60 Clock 50 Colour Temp Warm Auto Config 1 Press the Menu button to open the OSD menu. Position, Focus, Clock, Colour Temp, and Auto Config. 3 Press the + / - Press the Menu button to bring up the OSD menu. 2 Press the + / - Position, V. button to scroll through the Picture options, and press the Menu button to confirm. 11 Actual...

User Manual
Page 25
... current input signal such as aspect ratio, OSD language, and etc. The following options are available in the Setting menu: Wide Mode, DDC/CI, ACM, Input, Language, and Reset. 3 Press the + / - button to select Setting and press the Menu button to enter its sub-menu. 4 Press the + / - button to scroll through the Setting options, and press the Menu button to enter the Setting menu. Setting Wide Mode DDC/CI ACM Input Language Reset Full ON OFF VGA English 1 Press the Menu button...
... current input signal such as aspect ratio, OSD language, and etc. The following options are available in the Setting menu: Wide Mode, DDC/CI, ACM, Input, Language, and Reset. 3 Press the + / - button to select Setting and press the Menu button to enter its sub-menu. 4 Press the + / - button to scroll through the Setting options, and press the Menu button to enter the Setting menu. Setting Wide Mode DDC/CI ACM Input Language Reset Full ON OFF VGA English 1 Press the Menu button...

User Manual
Page 27
... of graphics adapter and monitor is switched on the screen.) Blue Remedy Using the OSD menu, adjust brightness and contrast to maximum or reset to see if you can self-diagnose the problem. Wait for servicing, please check the troubleshooting list below to their default settings. Check if the specification of a missing image, please select another resolution or vertical refresh rate. Check if the computer system is in power saving/standby mode. VGA Mode Problem No picture visible LED status Blue Off Blinking Blue Unstable picture Blue Abnormal picture (Image is...
... of graphics adapter and monitor is switched on the screen.) Blue Remedy Using the OSD menu, adjust brightness and contrast to maximum or reset to see if you can self-diagnose the problem. Wait for servicing, please check the troubleshooting list below to their default settings. Check if the specification of a missing image, please select another resolution or vertical refresh rate. Check if the computer system is in power saving/standby mode. VGA Mode Problem No picture visible LED status Blue Off Blinking Blue Unstable picture Blue Abnormal picture (Image is...

User Manual
Page 28
Blinking Blue Check if the video signal cable is switched on and in power saving/standby mode. 16 Check if the AC power cord is properly connected to their default settings. Check if the computer system is properly connected at the back of monitor. English DVI/HDMI Mode (Optional) Problem No picture visible LED status Blue Off Remedy Using the OSD menu, adjust brightness and contrast to maximum or reset to the monitor. Check the power switch.
Blinking Blue Check if the video signal cable is switched on and in power saving/standby mode. 16 Check if the AC power cord is properly connected to their default settings. Check if the computer system is properly connected at the back of monitor. English DVI/HDMI Mode (Optional) Problem No picture visible LED status Blue Off Remedy Using the OSD menu, adjust brightness and contrast to maximum or reset to the monitor. Check the power switch.


