

User Guide
Page 1
TABLE OF CONTENTS Special notes on LCD monitors 1 Information for your safety and comfort 2 Unpacking 5 Attaching/Removing the base 6 Screen position adjustment 6 Connecting the power cord 7 Safety precaution 7 Cleaning your monitor 7 Power saving 8 DDC 8 Connector Pin Assignment 9 Standard Timing Table 11 Installation 12 User controls 13 How to adjust a setting 14 Troubleshooting 19
TABLE OF CONTENTS Special notes on LCD monitors 1 Information for your safety and comfort 2 Unpacking 5 Attaching/Removing the base 6 Screen position adjustment 6 Connecting the power cord 7 Safety precaution 7 Cleaning your monitor 7 Power saving 8 DDC 8 Connector Pin Assignment 9 Standard Timing Table 11 Installation 12 User controls 13 How to adjust a setting 14 Troubleshooting 19
User Guide
Page 2
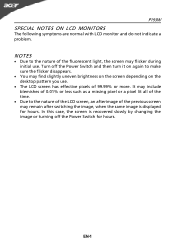
Turn off the Power Switch for hours. EN-1 In this case, the screen is displayed for hours. P193W SPECIAL NOTES ON LCD MONITORS The following symptoms are normal with LCD monitor and do not indicate a problem. It may include blemishes of 0.01% or less such as a missing pixel or a pixel lit all of...
Turn off the Power Switch for hours. EN-1 In this case, the screen is displayed for hours. P193W SPECIAL NOTES ON LCD MONITORS The following symptoms are normal with LCD monitor and do not indicate a problem. It may include blemishes of 0.01% or less such as a missing pixel or a pixel lit all of...

User Guide
Page 4
... up and walk around regularly to remove the strain on the recorded image and does not constitute a malfunction. Nevertheless, some pixels may complain of the monitor, using a footrest, or raising your company's health and safety department. Incorrect computer usage may appear in the hands, wrists, arms, shoulders, neck or back: •...
... up and walk around regularly to remove the strain on the recorded image and does not constitute a malfunction. Nevertheless, some pixels may complain of the monitor, using a footrest, or raising your company's health and safety department. Incorrect computer usage may appear in the hands, wrists, arms, shoulders, neck or back: •...

User Guide
Page 5
...an awkward viewing angle. • Avoid looking away from drying out. Developing good work habits Develop the following websites: Worldwide: http://global.acer.com/about/sustainability.htm EN-4 We do some stretching exercises. • Breathe fresh air as often as a piece of time. P193W &#...shrugging your shoulders • install the external display, keyboard and mouse properly and within comfort able reach • if you view your monitor more information and help in such a way that the side faces the window or any light source • minimizing room light by...
...an awkward viewing angle. • Avoid looking away from drying out. Developing good work habits Develop the following websites: Worldwide: http://global.acer.com/about/sustainability.htm EN-4 We do some stretching exercises. • Breathe fresh air as often as a piece of time. P193W &#...shrugging your shoulders • install the external display, keyboard and mouse properly and within comfort able reach • if you view your monitor more information and help in such a way that the side faces the window or any light source • minimizing room light by...

User Guide
Page 6
P193W UNPACKING Please check the following items are present when you unpack the box, and save the packing materials in case you will need to ship or transport the monitor in future. · LCD Monitor · 15-pin D-Sub Cable · DVI Cable · AC Power Cord (Only Dual-Input Model) · User Manual · Quick Start Guide EN-5
P193W UNPACKING Please check the following items are present when you unpack the box, and save the packing materials in case you will need to ship or transport the monitor in future. · LCD Monitor · 15-pin D-Sub Cable · DVI Cable · AC Power Cord (Only Dual-Input Model) · User Manual · Quick Start Guide EN-5

User Guide
Page 7
... shown in the figure below . Remove: Depress the release button as indicated by using both of the monitor by arrow below . EN-6 The monitor can adjust the tilt of your hands to remove it. SCREEN POSITION ADJUSTMENT In oder to optimize the best viewing position, you can be adjusted ...
... shown in the figure below . Remove: Depress the release button as indicated by using both of the monitor by arrow below . EN-6 The monitor can adjust the tilt of your hands to remove it. SCREEN POSITION ADJUSTMENT In oder to optimize the best viewing position, you can be adjusted ...
User Guide
Page 8
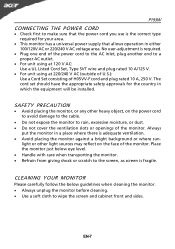
... shock or scratch to wipe the screen and cabinet front and sides. Always put the monitor in which the equipment will be installed. Place the monitor just below guidelines when cleaning the monitor. · Always unplug the monitor before cleaning. · Use a soft cloth to the screen, as screen is adequate...for the country in a place where there is fragile. EN-7 light or other heavy object, on the face of the monitor. SAFETY PRECAUTION · Avoid placing the monitor, or any other light sources may reflect on the power cord to avoid damage to the cable. · Do not ...
... shock or scratch to wipe the screen and cabinet front and sides. Always put the monitor in which the equipment will be installed. Place the monitor just below guidelines when cleaning the monitor. · Always unplug the monitor before cleaning. · Use a soft cloth to the screen, as screen is adequate...for the country in a place where there is fragile. EN-7 light or other heavy object, on the face of the monitor. SAFETY PRECAUTION · Avoid placing the monitor, or any other light sources may reflect on the power cord to avoid damage to the cable. · Do not ...

User Guide
Page 9
..., as indicated by the amber-color power LED. DDC To make your installation easier, the monitor is able to ON state is a communication protocol through which the monitor automatically informs the host system about its capabilities, for example, supported resolutions and corresponding timing. ...P193W Power saving The monitor will be driven into Power Saving" mode by the control signal from ...
..., as indicated by the amber-color power LED. DDC To make your installation easier, the monitor is able to ON state is a communication protocol through which the monitor automatically informs the host system about its capabilities, for example, supported resolutions and corresponding timing. ...P193W Power saving The monitor will be driven into Power Saving" mode by the control signal from ...

User Guide
Page 10
DESCRIPTION Red Green Blue Monitor Ground DDC-return R-Ground G-Ground B-Ground PIN NO. 9. 10. 11. 12. 13. 14. 15. CONNECTOR PIN ASSIGNMENT P193W 15-Pin Color Display Signal Cable PIN NO. 1. 2. 3. 4. 5. 6. 7. 8. DESCRIPTION +5V Logic Ground Monitor Ground DDC-Serial Data H-Sync V-Sync DDC-Serial Clock EN-9
DESCRIPTION Red Green Blue Monitor Ground DDC-return R-Ground G-Ground B-Ground PIN NO. 9. 10. 11. 12. 13. 14. 15. CONNECTOR PIN ASSIGNMENT P193W 15-Pin Color Display Signal Cable PIN NO. 1. 2. 3. 4. 5. 6. 7. 8. DESCRIPTION +5V Logic Ground Monitor Ground DDC-Serial Data H-Sync V-Sync DDC-Serial Clock EN-9
User Guide
Page 12
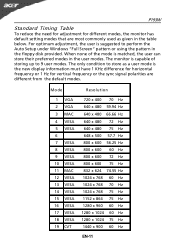
... mode is the new display information must have 1 KHz difference for horizontal frequency or 1 Hz for different modes, the monitor has default setting modes that are different from the default modes. The monitor is suggested to store as given in the table below. Mode 1 VGA 2 VGA 3 MAC 4 VESA 5 VESA 6 7 VESA 8 VESA 9 VESA...
... mode is the new display information must have 1 KHz difference for horizontal frequency or 1 Hz for different modes, the monitor has default setting modes that are different from the default modes. The monitor is suggested to store as given in the table below. Mode 1 VGA 2 VGA 3 MAC 4 VESA 5 VESA 6 7 VESA 8 VESA 9 VESA...

User Guide
Page 13
... sequence is very important. 4. Connect power cord Connect the power cord to the monitor, then to the computer's port. 2. b. Make sure both the monitor and computer are powered-OFF. If the monitor still does not function properly, please refer to the troubleshooting section to your host ...system, please follow the steps as given below: Steps 1. 1-1 Connect Video Cable a. Make sure both the monitor and computer are powered-OFF. EN-12 P193W INSTALLATION To install the monitor to diagnose the problem. Connect the VGA video cable to the computer. 1-2 Digital Cable (Only Dual-Input...
... sequence is very important. 4. Connect power cord Connect the power cord to the monitor, then to the computer's port. 2. b. Make sure both the monitor and computer are powered-OFF. If the monitor still does not function properly, please refer to the troubleshooting section to your host ...system, please follow the steps as given below: Steps 1. 1-1 Connect Video Cable a. Make sure both the monitor and computer are powered-OFF. EN-12 P193W INSTALLATION To install the monitor to diagnose the problem. Connect the VGA video cable to the computer. 1-2 Digital Cable (Only Dual-Input...
User Guide
Page 20
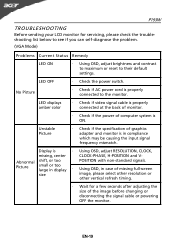
... Current Status Remedy LED ON · Using OSD, adjust brightness and contrast to maximum or reset to the monitor. Unstable Picture · Check if the specification of graphics adapter and monitor is ON. LED displays amber color · Check if video signal cable is properly connected at the back of... which may be causing the input signal frequency mismatch. LED OFF · Check the power switch. P193W TROUBLESHOOTING Before sending your LCD monitor for a few seconds after adjusting the size of the image before changing or disconnecting the signal cable or powering OFF the...
... Current Status Remedy LED ON · Using OSD, adjust brightness and contrast to maximum or reset to the monitor. Unstable Picture · Check if the specification of graphics adapter and monitor is ON. LED displays amber color · Check if video signal cable is properly connected at the back of... which may be causing the input signal frequency mismatch. LED OFF · Check the power switch. P193W TROUBLESHOOTING Before sending your LCD monitor for a few seconds after adjusting the size of the image before changing or disconnecting the signal cable or powering OFF the...
User Guide
Page 21
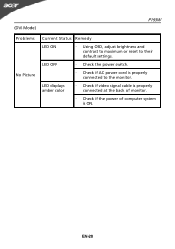
LED displays amber color · Check if video signal cable is properly connected at the back of monitor. · Check if the power of computer system is properly connected to their default settings. LED OFF · Check the power switch. · Check if AC power cord is ON. EN-20 (DVI Mode) P193W Problems No Picture Current Status Remedy LED ON · Using OSD, adjust brightness and contrast to maximum or reset to the monitor.
LED displays amber color · Check if video signal cable is properly connected at the back of monitor. · Check if the power of computer system is properly connected to their default settings. LED OFF · Check the power switch. · Check if AC power cord is ON. EN-20 (DVI Mode) P193W Problems No Picture Current Status Remedy LED ON · Using OSD, adjust brightness and contrast to maximum or reset to the monitor.


