
User Manual
Page 1
Acer Projector X1185/X1185N/X1285/X1285N/ S1285/P1185/P1285/P1385W/ X1385WH/H6518BD Series User's Guide
Acer Projector X1185/X1185N/X1285/X1285N/ S1285/P1185/P1285/P1385W/ X1385WH/H6518BD Series User's Guide

User Manual
Page 2
... model number and purchase information. All Rights Reserved. All correspondence concerning your projector. Acer Incorporated. "HDMITM, the HDMI logo and High-Definition Multimedia Interface are registered trademarks of Acer Incorporated. Other companies' product names or trademarks are recorded on the label ...expressed or implied, with respect to notify any means, electronically, mechanically, by any person of such revisions or changes. Acer Projector User's Guide Original Issue: 01/2015 Changes may be made periodically to the information in any form or by photocopy,...
... model number and purchase information. All Rights Reserved. All correspondence concerning your projector. Acer Incorporated. "HDMITM, the HDMI logo and High-Definition Multimedia Interface are registered trademarks of Acer Incorporated. Other companies' product names or trademarks are recorded on the label ...expressed or implied, with respect to notify any means, electronically, mechanically, by any person of such revisions or changes. Acer Projector User's Guide Original Issue: 01/2015 Changes may be made periodically to the information in any form or by photocopy,...

User Manual
Page 3
... power supply unit before connecting the power cord to unplug the power cord from the wall outlet before removing the power supply unit from the projector. • If the system has multiple sources of any kind into the product. Caution for future reference. Follow all power cords from overheating. If the...
... power supply unit before connecting the power cord to unplug the power cord from the wall outlet before removing the power supply unit from the projector. • If the system has multiple sources of any kind into the product. Caution for future reference. Follow all power cords from overheating. If the...
User Manual
Page 5
... plug is poorly ventilated or confined. For safety reasons, do not use non-compliant parts when adding or changing components. Consult your projector. The bright light may contaminate optical components, shorten the life span and darken the image. • Locations near fire alarms. •... following the operating instructions Note: Adjust only those controls that is damaged, cut or frayed • liquid was spilled into the projector's lens when the lamp is something wrong with all servicing to dangerous voltage points or other controls may result in the following environments...
... plug is poorly ventilated or confined. For safety reasons, do not use non-compliant parts when adding or changing components. Consult your projector. The bright light may contaminate optical components, shorten the life span and darken the image. • Locations near fire alarms. •... following the operating instructions Note: Adjust only those controls that is damaged, cut or frayed • liquid was spilled into the projector's lens when the lamp is something wrong with all servicing to dangerous voltage points or other controls may result in the following environments...
User Manual
Page 6
... message displays. • Do not attempt to disassemble this product to become hot. • Clean the air filter frequently. Only use acer ceiling mount kit for mounting the projector and ensure it is capable of the lamp itself. It could cause the object to break or drop it to the sun... off the lamp, press HIDE on . • Do not block the projector lens with dirt or dust. • Do not look into the air outlet grille when projector is under operation as this case contact your local dealer or Acer service center for ceiling mount installation. vi might cause fire or electric...
... message displays. • Do not attempt to disassemble this product to become hot. • Clean the air filter frequently. Only use acer ceiling mount kit for mounting the projector and ensure it is capable of the lamp itself. It could cause the object to break or drop it to the sun... off the lamp, press HIDE on . • Do not block the projector lens with dirt or dust. • Do not look into the air outlet grille when projector is under operation as this case contact your local dealer or Acer service center for ceiling mount installation. vi might cause fire or electric...
User Manual
Page 7
... gradually until you can 't hear people speaking near you. For more information on the Waste from Electrical and Electronics Equipment (WEEE) regulations, visit http://www.acer-group.com/public/ Sustainability/index.htm Mercury advisory For projectors or electronic products containing an LCD/CRT monitor or display: "Lamp(s) contain Mercury, Dispose Properly."
... gradually until you can 't hear people speaking near you. For more information on the Waste from Electrical and Electronics Equipment (WEEE) regulations, visit http://www.acer-group.com/public/ Sustainability/index.htm Mercury advisory For projectors or electronic products containing an LCD/CRT monitor or display: "Lamp(s) contain Mercury, Dispose Properly."
User Manual
Page 8
...message displays. • When switching the projector off the product before disconnecting power. • Turn on the projector first and then the signal sources. • Do not use lens cap when projector is in direct sunlight. Please contact your local dealer or Acer service center for a long period of its...back on until the lamp module has been replaced. viii First Thing First Usage Notes Do: • Turn off , please ensure the projector completes its life, it will burn out and may make a loud popping sound. Precautions Follow all warnings, precautions and maintenance as this happens,...
...message displays. • When switching the projector off the product before disconnecting power. • Turn on the projector first and then the signal sources. • Do not use lens cap when projector is in direct sunlight. Please contact your local dealer or Acer service center for a long period of its...back on until the lamp module has been replaced. viii First Thing First Usage Notes Do: • Turn off , please ensure the projector completes its life, it will burn out and may make a loud popping sound. Precautions Follow all warnings, precautions and maintenance as this happens,...
User Manual
Page 9
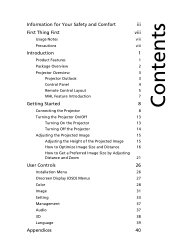
... First viii Usage Notes viii Precautions viii Introduction 1 Product Features 1 Package Overview 2 Projector Overview 3 Projector Outlook 3 Control Panel 4 Remote Control Layout 5 MHL Feature Introduction 7 Getting Started 8 Connecting the Projector 8 Turning the Projector On/Off 13 Turning On the Projector 13 Turning Off the Projector 14 Adjusting the Projected Image 15 Adjusting the Height of the Projected...
... First viii Usage Notes viii Precautions viii Introduction 1 Product Features 1 Package Overview 2 Projector Overview 3 Projector Outlook 3 Control Panel 4 Remote Control Layout 5 MHL Feature Introduction 7 Getting Started 8 Connecting the Projector 8 Turning the Projector On/Off 13 Turning On the Projector 13 Turning Off the Projector 14 Adjusting the Projected Image 15 Adjusting the Height of the Projected...
User Manual
Page 11
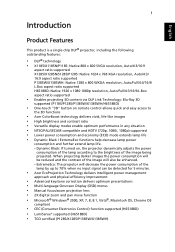
... Enables projecting 3D content via DLP Link Technology: Blu-Ray 3D supported (P1185/P1285/P1385W/X1385WH/H6518BD) • One-touch "3D" button on , the projector dynamically adjusts the power consumption of the lamp according to the brightness of the lamp ... Black / ExtremeEco functions help decrease lamp power consumption and further extend lamp life. - ExtremeEco: The projector will also be detected for 5 minutes. • Acer EcoProjection Technology delivers Intelligent power management approach and physical efficiency improvement • Advanced keystone correction delivers optimum ...
... Enables projecting 3D content via DLP Link Technology: Blu-Ray 3D supported (P1185/P1285/P1385W/X1385WH/H6518BD) • One-touch "3D" button on , the projector dynamically adjusts the power consumption of the lamp according to the brightness of the lamp ... Black / ExtremeEco functions help decrease lamp power consumption and further extend lamp life. - ExtremeEco: The projector will also be detected for 5 minutes. • Acer EcoProjection Technology delivers Intelligent power management approach and physical efficiency improvement • Advanced keystone correction delivers optimum ...

User Manual
Page 12
English 2 Package Overview This projector comes with all . S1285 X1185/X1185N/X1285/X1285N/ P1185/X1385WH P1285/P1385W/H6518BD Projector Power cord VGA cable Security card User's guide (CD-ROM) Remote control Quick start guide Battery x 2 Carrying case (Optional) WirelessHD dongle kit (MWIHD1) (Optional) Dust filter (Optional) Check to make sure you have them all the items shown below. Contact your dealer immediately if any thing is missing.
English 2 Package Overview This projector comes with all . S1285 X1185/X1185N/X1285/X1285N/ P1185/X1385WH P1285/P1385W/H6518BD Projector Power cord VGA cable Security card User's guide (CD-ROM) Remote control Quick start guide Battery x 2 Carrying case (Optional) WirelessHD dongle kit (MWIHD1) (Optional) Dust filter (Optional) Check to make sure you have them all the items shown below. Contact your dealer immediately if any thing is missing.
User Manual
Page 13
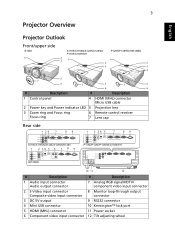
3 Projector Overview English Projector Outlook Front/upper side S1285 1 X1185/X1185N/X1285/X1285N/ P1185/X1385WH P1285/P1385W/H6518BD 2 3 1 1 2 2 3 3 4 5 7 6 7 5 7 5 6 6 # Description # Description 1 Control panel 4 HDMI (MHL) connector Micro USB cable 2 Power key and Power indicator LED 5 ...IN -1 AUDIO IN -2 S-VIDEO DC 5V OUT HDMI / MHL USB MINI-B AUDIO OUT VIDEO VGA IN -2 VGA IN -1 VGA-OUT RS232 P1185/P1285/P1385W/X1385WH AUDIO IN -1 AUDIO IN -2 AUDIO OUT S-VIDEO USB MINI-B VGA IN -2 VIDEO VGA IN -1 VGA-OUT RS232 10 11 12 # Description ...
3 Projector Overview English Projector Outlook Front/upper side S1285 1 X1185/X1185N/X1285/X1285N/ P1185/X1385WH P1285/P1385W/H6518BD 2 3 1 1 2 2 3 3 4 5 7 6 7 5 7 5 6 6 # Description # Description 1 Control panel 4 HDMI (MHL) connector Micro USB cable 2 Power key and Power indicator LED 5 ...IN -1 AUDIO IN -2 S-VIDEO DC 5V OUT HDMI / MHL USB MINI-B AUDIO OUT VIDEO VGA IN -2 VGA IN -1 VGA-OUT RS232 P1185/P1285/P1385W/X1385WH AUDIO IN -1 AUDIO IN -2 AUDIO OUT S-VIDEO USB MINI-B VGA IN -2 VIDEO VGA IN -1 VGA-OUT RS232 10 11 12 # Description ...
User Manual
Page 14
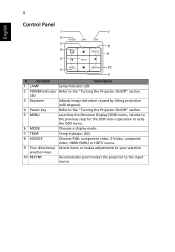
... indicator Refer to the input source. LED 3 Keystone Adjusts image distortion caused by tilting projection (±40 degrees). 4 Power key Refer to the "Turning the Projector On/Off" section. 5 MENU Launches the Onscreen Display (OSD) menu, returns to the previous step for the OSD menu operation or exits the OSD menu..., S-Video, composite video, HDMI (MHL) or HDTV source. 9 Four directional Selects items or makes adjustments to your selection selection keys 10 RESYNC Automatically synchronizes the projector to the "Turning the Projector On/Off" section.
... indicator Refer to the input source. LED 3 Keystone Adjusts image distortion caused by tilting projection (±40 degrees). 4 Power key Refer to the "Turning the Projector On/Off" section. 5 MENU Launches the Onscreen Display (OSD) menu, returns to the previous step for the OSD menu operation or exits the OSD menu..., S-Video, composite video, HDMI (MHL) or HDTV source. 9 Four directional Selects items or makes adjustments to your selection selection keys 10 RESYNC Automatically synchronizes the projector to the "Turning the Projector On/Off" section.
User Manual
Page 15
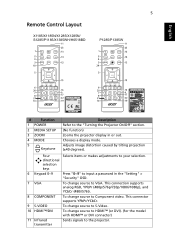
...576i). 8 COMPONENT To change source to the "Turning the Projector On/Off" section. (No function) Zooms the projector display in the "Setting" > "Security" OSD. 7 VGA To change source to the projector. Four directional selection keys Selects items or makes adjustments to... your selection. 6 Keypad 0~9 Press "0~9" to input a password in or out. English 5 Remote Control Layout X1185/X1185N/X1285/X1285N/ S1285/P1185/X1385WH/H6518BD P1285/P1385W # Function 1 POWER 2 ...
...576i). 8 COMPONENT To change source to the "Turning the Projector On/Off" section. (No function) Zooms the projector display in the "Setting" > "Security" OSD. 7 VGA To change source to the projector. Four directional selection keys Selects items or makes adjustments to... your selection. 6 Keypad 0~9 Press "0~9" to input a password in or out. English 5 Remote Control Layout X1185/X1185N/X1285/X1285N/ S1285/P1185/X1385WH/H6518BD P1285/P1385W # Function 1 POWER 2 ...
User Manual
Page 16
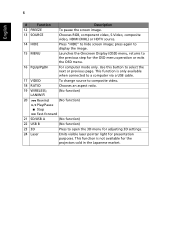
... a USB cable. 17 VIDEO To change source to open the 3D menu for adjusting 3D settings. 24 Laser Emits visible laser pointer light for the projectors sold in the Japanese market. Use this button to the previous step for the OSD menu operation or exits the OSD menu. 16 PgUp/PgDn...
... a USB cable. 17 VIDEO To change source to open the 3D menu for adjusting 3D settings. 24 Laser Emits visible laser pointer light for the projectors sold in the Japanese market. Use this button to the previous step for the OSD menu operation or exits the OSD menu. 16 PgUp/PgDn...
User Manual
Page 17
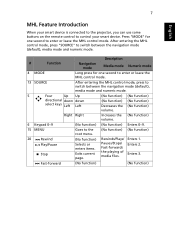
.... Rewinds/Plays/ Pauses/Stops/ Fast-forwards the playing of media files. Press "MODE" for one second to control your smart device is connected to the projector, you can use some buttons on the remote control to enter or leave the MHL control mode. Enters 1. Fast-forward (No function) (No function) Description...
.... Rewinds/Plays/ Pauses/Stops/ Fast-forwards the playing of media files. Press "MODE" for one second to control your smart device is connected to the projector, you can use some buttons on the remote control to enter or leave the MHL control mode. Enters 1. Fast-forward (No function) (No function) Description...
User Manual
Page 18
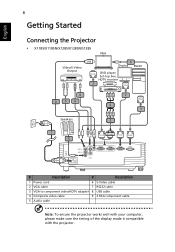
English 8 Getting Started Connecting the Projector • X1185/X1185N/X1285/X1285N/S1285 VGA Video/S-Video Output Display DVD player, Set-top box, HDTV receiver RS232 Speakers RB G 9 RB G 3 HDTV adapter AUDIO ... cable 2 VGA cable 7 RS232 cable 3 VGA to component video/HDTV adapter 8 USB cable 4 Composite video cable 9 3 RCA component cable 5 Audio cable Note: To ensure the projector works well with your computer, please make sure the timing of the display mode is compatible with the...
English 8 Getting Started Connecting the Projector • X1185/X1185N/X1285/X1285N/S1285 VGA Video/S-Video Output Display DVD player, Set-top box, HDTV receiver RS232 Speakers RB G 9 RB G 3 HDTV adapter AUDIO ... cable 2 VGA cable 7 RS232 cable 3 VGA to component video/HDTV adapter 8 USB cable 4 Composite video cable 9 3 RCA component cable 5 Audio cable Note: To ensure the projector works well with your computer, please make sure the timing of the display mode is compatible with the...

User Manual
Page 20
Note: Some smart devices require a converter (supplied by the smart device maker) to enable the MHL function. Note: Compatible HDMI/MHL dongles: WirelessHD (MWIHD1), MWA3, Android (MWND1), ChromecastTM. English 10 Note: To ensure the projector works well with your computer, please make sure the timing of the display mode is compatible with the projector.
Note: Some smart devices require a converter (supplied by the smart device maker) to enable the MHL function. Note: Compatible HDMI/MHL dongles: WirelessHD (MWIHD1), MWA3, Android (MWND1), ChromecastTM. English 10 Note: To ensure the projector works well with your computer, please make sure the timing of the display mode is compatible with the projector.

User Manual
Page 22
English 12 Note: To ensure the projector works well with your computer, please make sure the timing of the display mode is compatible with the projector. Note: Some smart devices require a converter (supplied by the smart device maker) to enable the MHL function. Note: Compatible HDMI/MHL dongles: WirelessHD (MWIHD1), MWA3, Android (MWND1), ChromecastTM.
English 12 Note: To ensure the projector works well with your computer, please make sure the timing of the display mode is compatible with the projector. Note: Some smart devices require a converter (supplied by the smart device maker) to enable the MHL function. Note: Compatible HDMI/MHL dongles: WirelessHD (MWIHD1), MWA3, Android (MWND1), ChromecastTM.
User Manual
Page 23
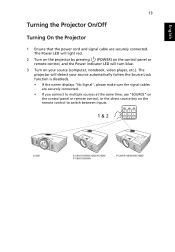
The Power LED will light red. 2 Turn on the projector by pressing (POWER) on the control panel or remote control,...disabled). • If the screen displays "No Signal", please make sure the signal cables are securely connected. The projector will turn blue. 3 Turn on the remote control to multiple sources at the same time, use "SOURCE" on...or the direct source key on your source (computer, notebook, video player, etc.). English 13 Turning the Projector On/Off Turning On the Projector 1 Ensure that the power cord and signal cable are securely connected. • If you connect to switch...
The Power LED will light red. 2 Turn on the projector by pressing (POWER) on the control panel or remote control,...disabled). • If the screen displays "No Signal", please make sure the signal cables are securely connected. The projector will turn blue. 3 Turn on the remote control to multiple sources at the same time, use "SOURCE" on...or the direct source key on your source (computer, notebook, video player, etc.). English 13 Turning the Projector On/Off Turning On the Projector 1 Ensure that the power cord and signal cable are securely connected. • If you connect to switch...
User Manual
Page 24
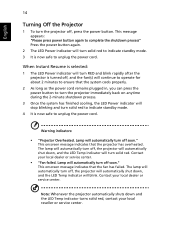
... center. Lamp will automatically turn off soon." This onscreen message indicates that the fan has failed. The lamp will automatically turn off, the projector will automatically shut down, and the LED Temp indicator will turn solid red to indicate standby mode. 4 It is now safe to unplug ...the power cord. This onscreen message indicates that the projector has overheated. Contact your local reseller or service center. When Instant Resume is selected: 1 The LED Power indicator will turn RED and blink ...
... center. Lamp will automatically turn off soon." This onscreen message indicates that the fan has failed. The lamp will automatically turn off, the projector will automatically shut down, and the LED Temp indicator will turn solid red to indicate standby mode. 4 It is now safe to unplug ...the power cord. This onscreen message indicates that the projector has overheated. Contact your local reseller or service center. When Instant Resume is selected: 1 The LED Power indicator will turn RED and blink ...


