
User Manual
Page 3
... unplugging all warnings and instructions marked on the product. These openings must not be seriously damaged. • Slots and openings are provided for Accessibility Be sure that could be blocked or covered. Caution for ventilation to ensure reliable operation of the product and to the AC power outlet. • Unplug the power cord before removing the power supply unit from overheating. If the...
... unplugging all warnings and instructions marked on the product. These openings must not be seriously damaged. • Slots and openings are provided for Accessibility Be sure that could be blocked or covered. Caution for ventilation to ensure reliable operation of the product and to the AC power outlet. • Unplug the power cord before removing the power supply unit from overheating. If the...
User Manual
Page 5
... operating instructions, since improper adjustment of other risks. Consult your projector. For safety reasons, do not use non-compliant parts when adding or changing components. Your device and its enhancements may contain small parts. v Product servicing Do not attempt to service this product from walls and free flow of air around the projector is necessary. • Locations where temperatures may become excessively high, such as opening or removing covers...
... operating instructions, since improper adjustment of other risks. Consult your projector. For safety reasons, do not use non-compliant parts when adding or changing components. Your device and its enhancements may contain small parts. v Product servicing Do not attempt to service this product from walls and free flow of air around the projector is necessary. • Locations where temperatures may become excessively high, such as opening or removing covers...
User Manual
Page 6
...; Clean the air filter frequently if have. It may hurt you. It could cause the object to change the lamp when is operating. The only user serviceable part is securely installed. To temporarily turn off the main power abruptly or unplug the projector during operation. There are dangerous high voltages inside may cause the projector to ensure the projector completes its own removable cover. Allow the projector to cool for ceiling mount installation...
...; Clean the air filter frequently if have. It may hurt you. It could cause the object to change the lamp when is operating. The only user serviceable part is securely installed. To temporarily turn off the main power abruptly or unplug the projector during operation. There are dangerous high voltages inside may cause the projector to ensure the projector completes its own removable cover. Allow the projector to cool for ceiling mount installation...
User Manual
Page 8
... user's guide to maximize the life of your unit. Warning: • Do not look into the projector's lens when the lamp is on until the lamp module has been replaced. Precautions Follow all changing instructions. • This product will not turn back on . Don't: • Block the slots and openings on the projector first and then the signal sources. • Do not use lens cap when projector is in operation...
... user's guide to maximize the life of your unit. Warning: • Do not look into the projector's lens when the lamp is on until the lamp module has been replaced. Precautions Follow all changing instructions. • This product will not turn back on . Don't: • Block the slots and openings on the projector first and then the signal sources. • Do not use lens cap when projector is in operation...

User Manual
Page 9
... Started 11 Connecting the Projector (P1101/P1201/P1203P/P1206P/ P1303PW) 11 Connecting the Projector (P1101C/P1201B/P1203PB/ P1203Pi/P1201i/P1201n) 12 Turning the Projector On/Off 14 Turning on the Projector 14 Turning the projector off 15 Adjusting the Projected Image 16 Adjusting the Height of Projected Image 16 How to optimize image size and distance 17 How to get a preferred image size by adjusting distance and zoom 21 User Controls 25 Installation menu 25 Acer Empowering Technology 26 Onscreen Display (OSD...
... Started 11 Connecting the Projector (P1101/P1201/P1203P/P1206P/ P1303PW) 11 Connecting the Projector (P1101C/P1201B/P1203PB/ P1203Pi/P1201i/P1201n) 12 Turning the Projector On/Off 14 Turning on the Projector 14 Turning the projector off 15 Adjusting the Projected Image 16 Adjusting the Height of Projected Image 16 How to optimize image size and distance 17 How to get a preferred image size by adjusting distance and zoom 21 User Controls 25 Installation menu 25 Acer Empowering Technology 26 Onscreen Display (OSD...
User Manual
Page 11
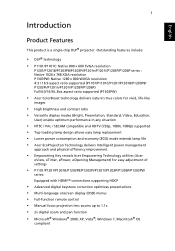
.../P1206P/P1303PW series: Equipped with HDMI™ connections supporting HDCP • Advanced digital keystone correction optimizes presentations • Multi-language onscreen display (OSD) menus • Full-function remote control • Manual focus projection lens zooms up to 1.1x • 2x digital zoom and pan function • Microsoft® Windows® 2000, XP, Vista®, Windows 7, Macintosh® OS compliant English 1 Introduction Product Features This product is a single-chip DLP® projector.
.../P1206P/P1303PW series: Equipped with HDMI™ connections supporting HDCP • Advanced digital keystone correction optimizes presentations • Multi-language onscreen display (OSD) menus • Full-function remote control • Manual focus projection lens zooms up to 1.1x • 2x digital zoom and pan function • Microsoft® Windows® 2000, XP, Vista®, Windows 7, Macintosh® OS compliant English 1 Introduction Product Features This product is a single-chip DLP® projector.

User Manual
Page 16
... 6 Control Panel 1 6 2 7 3 8 4 9 5 2 # Icon Function Description 1 LAMP Lamp Indicator LED 2 Keystone Adjusts the image to compensate for distortion caused by tilting the projector (± 40 degrees). 3 RESYNC 4 MENU Automatically synchronizes the projector to the input source. • Press "MENU" to launch the Onscreen display (OSD) menu, back to the previous step for the OSD menu operation or exit the OSD menu. • Confirm your selection of items. 5 POWER See the contents in "Turning...
... 6 Control Panel 1 6 2 7 3 8 4 9 5 2 # Icon Function Description 1 LAMP Lamp Indicator LED 2 Keystone Adjusts the image to compensate for distortion caused by tilting the projector (± 40 degrees). 3 RESYNC 4 MENU Automatically synchronizes the projector to the input source. • Press "MENU" to launch the Onscreen display (OSD) menu, back to the previous step for the OSD menu operation or exit the OSD menu. • Confirm your selection of items. 5 POWER See the contents in "Turning...
User Manual
Page 17
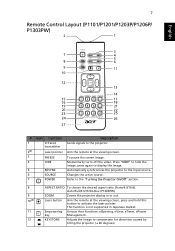
.... Press "HIDE" to hide the image, press again to display the image. 5 RESYNC Automatically synchronizes the projector to the input source. 6 SOURCE Changes the active source. 7 POWER Refer to compensate for distortion caused by tilting the projector (± 40 degrees). Laser button Aim the remote at the viewing screen. 3 FREEZE To pause the screen image. 4 HIDE Momentarily turns off the video. KEYSTONE Adjusts the image to the "Turning the Projector On/Off" section. 8 9 10...
.... Press "HIDE" to hide the image, press again to display the image. 5 RESYNC Automatically synchronizes the projector to the input source. 6 SOURCE Changes the active source. 7 POWER Refer to compensate for distortion caused by tilting the projector (± 40 degrees). Laser button Aim the remote at the viewing screen. 3 FREEZE To pause the screen image. 4 HIDE Momentarily turns off the video. KEYSTONE Adjusts the image to the "Turning the Projector On/Off" section. 8 9 10...
User Manual
Page 18
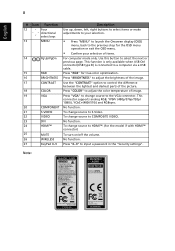
Use this button to input a password in the "Security settings". This connector supports analog RGB, YPbPr (480p/576p/720p/ 1080i), YCbCr (480i/576i) and RGBsync. 20 COMPONENT No function. 21 S-VIDEO To change source to S-Video. 22 VIDEO To change source to COMPOSITE VIDEO. 23 DVI No function. 24 HDMI™ To change source to the VGA connector. select keys 13 MENU • Press "MENU" to launch the Onscreen display (OSD) menu, back...
Use this button to input a password in the "Security settings". This connector supports analog RGB, YPbPr (480p/576p/720p/ 1080i), YCbCr (480i/576i) and RGBsync. 20 COMPONENT No function. 21 S-VIDEO To change source to S-Video. 22 VIDEO To change source to COMPOSITE VIDEO. 23 DVI No function. 24 HDMI™ To change source to the VGA connector. select keys 13 MENU • Press "MENU" to launch the Onscreen display (OSD) menu, back...
User Manual
Page 19
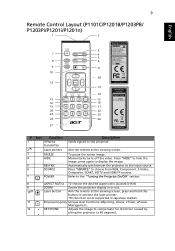
... compensate for distortion caused by tilting the projector (± 40 degrees). Laser button Aim the remote at the viewing screen. KEYSTONE Adjusts the image to choose from RGB, Component, S-Video, Composite, SCART, HDTV and HDMI™ sources. 9 Remote Control Layout (P1101C/P1201B/P1203PB/ P1203Pi/P1201i/P1201n) 1 2 English 3 7 4 5 8 6 9 11 10 28 12 13 14 15 17 16 18 19 21 20 22 23 25...
... compensate for distortion caused by tilting the projector (± 40 degrees). Laser button Aim the remote at the viewing screen. KEYSTONE Adjusts the image to choose from RGB, Component, S-Video, Composite, SCART, HDTV and HDMI™ sources. 9 Remote Control Layout (P1101C/P1201B/P1203PB/ P1203Pi/P1201i/P1201n) 1 2 English 3 7 4 5 8 6 9 11 10 28 12 13 14 15 17 16 18 19 21 20 22 23 25...
User Manual
Page 24
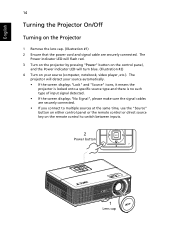
... locked onto a specific source type and there is no such type of input signal detected. • If the screen displays "No Signal", please make sure the signal cables are securely connected. • If you connect to multiple sources at the same time, use the "Source" button on either control panel or the remote control or direct source key on the Projector 1 Remove the lens cap. (Illustration #1) 2 Ensure that the power cord and signal cable are securely connected. English 14 Turning the Projector...
... locked onto a specific source type and there is no such type of input signal detected. • If the screen displays "No Signal", please make sure the signal cables are securely connected. • If you connect to multiple sources at the same time, use the "Source" button on either control panel or the remote control or direct source key on the Projector 1 Remove the lens cap. (Illustration #1) 2 Ensure that the power cord and signal cable are securely connected. English 14 Turning the Projector...
User Manual
Page 29
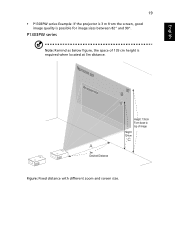
English 19 • P1303PW series Example: If the projector is 3 m from the screen, good image quality is required when located at 3m distance. P1303PW series Note: Remind as below figure, the space of image Height: 124cm C Figure: Fixed distance with different zoom and screen size. Max screen size Min screen size 90" B 82" A 3m Desired Distance Height: 135cm Form base to top of 135 cm height is possible for image sizes between 82" and 90".
English 19 • P1303PW series Example: If the projector is 3 m from the screen, good image quality is required when located at 3m distance. P1303PW series Note: Remind as below figure, the space of image Height: 124cm C Figure: Fixed distance with different zoom and screen size. Max screen size Min screen size 90" B 82" A 3m Desired Distance Height: 135cm Form base to top of 135 cm height is possible for image sizes between 82" and 90".
User Manual
Page 35
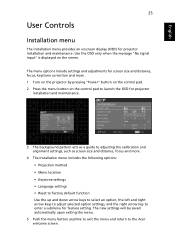
... input" is displayed on the control pad to launch the OSD for projector installation and maintenance. English 25 User Controls Installation menu The installation menu provides an onscreen display (OSD) for projector installation and maintenance. 3 The background pattern acts as a guide to adjusting the calibration and alignment settings, such as screen size and distance, focus and more . 4 The Installation menu includes the following options: • Projection method • Menu location • Keystone settings • Language settings • Reset to factory default function Use...
... input" is displayed on the control pad to launch the OSD for projector installation and maintenance. English 25 User Controls Installation menu The installation menu provides an onscreen display (OSD) for projector installation and maintenance. 3 The background pattern acts as a guide to adjusting the calibration and alignment settings, such as screen size and distance, focus and more . 4 The Installation menu includes the following options: • Projection method • Menu location • Keystone settings • Language settings • Reset to factory default function Use...
User Manual
Page 43
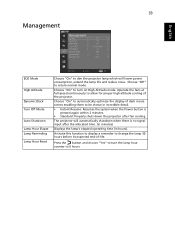
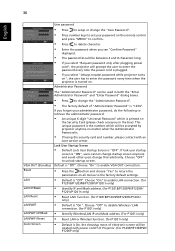
... ECO Mode High Altitude Dynamic Black Turn Off Mode Auto Shutdown Lamp Hour Elapse Lamp Reminding Lamp Hour Reset Choose "On" to dim the projector lamp which will automatically shutdown when there is pressed again within 2 minutes. • Standard: Properly shuts down the projector after the allocated time. (in minutes) Displays the lamp's elapsed operating time (in incredible detail. • Instant Resume: Resumes the system when the Power button is no signal input after fan...
... ECO Mode High Altitude Dynamic Black Turn Off Mode Auto Shutdown Lamp Hour Elapse Lamp Reminding Lamp Hour Reset Choose "On" to dim the projector lamp which will automatically shutdown when there is pressed again within 2 minutes. • Standard: Properly shuts down the projector after the allocated time. (in minutes) Displays the lamp's elapsed operating time (in incredible detail. • Instant Resume: Resumes the system when the Power button is no signal input after fan...

User Manual
Page 45
...; When the time is up, the projector will request user to enter password when switch on the projector without password. This function is only available when a composite video or S-Video input signal is selected and its system format is "16:9" or "Auto". Note: For XGA models, to get best quality for you desired image, suggest end-user set PC resolution to enter the password again. • The factory default setting of the...
...; When the time is up, the projector will request user to enter password when switch on the projector without password. This function is only available when a composite video or S-Video input signal is selected and its system format is "16:9" or "Auto". Note: For XGA models, to get best quality for you desired image, suggest end-user set PC resolution to enter the password again. • The factory default setting of the...
User Manual
Page 46
...", users cannot change startup screen anymore and avoid other users change that arbitrarily. This unique password is the number which is "1234". Choose "Off" to disable Wireless / LAN connection. (for P1201i only) • Identify Wireless/LAN IP and Mask address. (For P1201i only) • Reset LAN or Wireless function. (for P1203P/P1303PW/ P1206P only) Lock User Startup Screen • Default Lock User Startup Screen is "Off". Default is "OFF". If you forgot your password on the remote control...
...", users cannot change startup screen anymore and avoid other users change that arbitrarily. This unique password is the number which is "1234". Choose "Off" to disable Wireless / LAN connection. (for P1201i only) • Identify Wireless/LAN IP and Mask address. (For P1201i only) • Reset LAN or Wireless function. (for P1203P/P1303PW/ P1206P only) Lock User Startup Screen • Default Lock User Startup Screen is "Off". Default is "OFF". If you forgot your password on the remote control...
User Manual
Page 53
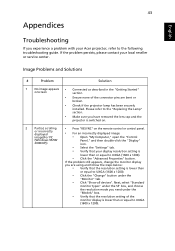
..." on the remote control or control panel. • For an incorrectly displayed image: • Open "My Computer," open the "Control (Windows 95/98/ 2000/XP)) Panel," and then double-click the "Display" icon. • Select the "Settings" tab. • Verify that your display resolution setting is lower than or equal to the following troubleshooting guide. Image Problems and Solutions # Problem Solution 1 No image appears • Connected as described in the "Getting Started" onscreen section...
..." on the remote control or control panel. • For an incorrectly displayed image: • Open "My Computer," open the "Control (Windows 95/98/ 2000/XP)) Panel," and then double-click the "Display" icon. • Select the "Settings" tab. • Verify that your display resolution setting is lower than or equal to the following troubleshooting guide. Image Problems and Solutions # Problem Solution 1 No image appears • Connected as described in the "Getting Started" onscreen section...

User Manual
Page 54
... resolution of your monitor freezes, restart all equipment including the projector. 4 The screen of the • If you are using an Apple® Mac® OS based notebook: In System Preferences, open Display and select Video Mirroring "On". 5 Image is unstable • Adjust the "Tracking" to correct it compatible with the projector. 7 Image is out of focus • Make sure the lens cap is removed...
... resolution of your monitor freezes, restart all equipment including the projector. 4 The screen of the • If you are using an Apple® Mac® OS based notebook: In System Preferences, open Display and select Video Mirroring "On". 5 Image is unstable • Adjust the "Tracking" to correct it compatible with the projector. 7 Image is out of focus • Make sure the lens cap is removed...
User Manual
Page 59
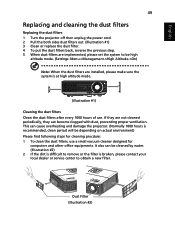
... difficult to obtain a new filter. It also can become clogged with dust, preventing proper ventilation. Dust Filter (Illustration #2) If they are installed, please make sure the system is broken, please contact your local dealer or service center to remove or the filter is at high altitude mode. (Illustration #1) Cleaning the dust filters Clean the dust filters after every 1000 hours of use a small vacuum cleaner...
... difficult to obtain a new filter. It also can become clogged with dust, preventing proper ventilation. Dust Filter (Illustration #2) If they are installed, please make sure the system is broken, please contact your local dealer or service center to remove or the filter is at high altitude mode. (Illustration #1) Cleaning the dust filters Clean the dust filters after every 1000 hours of use a small vacuum cleaner...

User Manual
Page 64
... specifications. Projection system Resolution Computer compatibility Video compatibility Aspect ratio Displayable colors Projection lens Projection screen size (diagonal) Projection distance Throw ratio Horizontal scan rate Vertical refresh scan rate Lamp type Keystone correction Audio Weight Dimensions (W x D x H) Remote control Digital Zoom Power supply DLP® P1101/P1101C: Native: SVGA (800 x 600) , Maximum: UXGA (1600 x 1200), 1080p(1920x1080) P1201/P1201B/P1203PB/P1203Pi/P1201n/P1201i/P1203P/ P1206P: Native: XGA (1024 x 768), Maximum: UXGA (1600 x 1200), 1080p(1920x1080) P1303PW...
... specifications. Projection system Resolution Computer compatibility Video compatibility Aspect ratio Displayable colors Projection lens Projection screen size (diagonal) Projection distance Throw ratio Horizontal scan rate Vertical refresh scan rate Lamp type Keystone correction Audio Weight Dimensions (W x D x H) Remote control Digital Zoom Power supply DLP® P1101/P1101C: Native: SVGA (800 x 600) , Maximum: UXGA (1600 x 1200), 1080p(1920x1080) P1201/P1201B/P1203PB/P1203Pi/P1201n/P1201i/P1203P/ P1206P: Native: XGA (1024 x 768), Maximum: UXGA (1600 x 1200), 1080p(1920x1080) P1303PW...


