

User Manual
Page 4
... • This product should never be blocked or covered. If you . Warnings • Do not use it clearly and comfortably and without distortion. • After setting the volume level, do not be used for this product on the power cord. These openings must not be blocked by placing the product on...
... • This product should never be blocked or covered. If you . Warnings • Do not use it clearly and comfortably and without distortion. • After setting the volume level, do not be used for this product on the power cord. These openings must not be blocked by placing the product on...

User Manual
Page 5
...(15 feet) maximum length. Note: The grounding pin also provides good protection from the wall outlet and refer servicing to replace the power cord set . If you to service this product. • Use the product only with the performance of this product yourself, as opening or removing covers ...may interfere with the supplied power supply cord set , make sure that the total ampere rating of the power strip's input rating. • This product's power cord is properly grounded before...
...(15 feet) maximum length. Note: The grounding pin also provides good protection from the wall outlet and refer servicing to replace the power cord set . If you to service this product. • Use the product only with the performance of this product yourself, as opening or removing covers ...may interfere with the supplied power supply cord set , make sure that the total ampere rating of the power strip's input rating. • This product's power cord is properly grounded before...
User Manual
Page 14
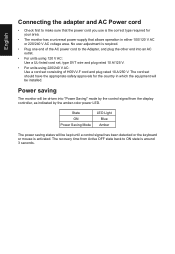
... AC Power cord • Check first to make sure that the power cord you use is activated. No user-adjustment is around 3 seconds. The cord set consisting of the AC power cord to the Adapter, and plug the other end into an AC outlet. • For units using 120 V AC: Use... a UL-listed cord set, type SVT wire and plug rated 10 A/125 V. • For units using 220/240 V AC: Use a cord set should have the appropriate safety approvals for your area. • The monitor has a universal power supply that...
... AC Power cord • Check first to make sure that the power cord you use is activated. No user-adjustment is around 3 seconds. The cord set consisting of the AC power cord to the Adapter, and plug the other end into an AC outlet. • For units using 120 V AC: Use... a UL-listed cord set, type SVT wire and plug rated 10 A/125 V. • For units using 220/240 V AC: Use a cord set should have the appropriate safety approvals for your area. • The monitor has a universal power supply that...

User Manual
Page 20
...Over Drive Aim point Extrama Off Adjusting the volume Open the Volume control and set the Volume using the arrows. The OSD (onscreen display) can use to adjust the picture quality, OSD position and general settings. When you are done, use to go back one level. When you are done...use the OSD to go back one level. 9 9 Press the MENU key to adjust the settings of your preferred OD setting using the arrows. Mode - Picture Color Audio Gaming OSD System Information Save Setting to following content is for general reference only. You can be used to open the OSD....
...Over Drive Aim point Extrama Off Adjusting the volume Open the Volume control and set the Volume using the arrows. The OSD (onscreen display) can use to adjust the picture quality, OSD position and general settings. When you are done, use to go back one level. When you are done...use the OSD to go back one level. 9 9 Press the MENU key to adjust the settings of your preferred OD setting using the arrows. Mode - Picture Color Audio Gaming OSD System Information Save Setting to following content is for general reference only. You can be used to open the OSD....
User Manual
Page 21
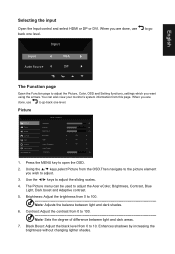
...back one level. Enhances shadows by increasing the brightness without changing lighter shades. Picture Picture Color Audio Gaming OSD System Information Save Setting to adjust the sliding scales. 4. Black Boost: Adjust the black level from this page. to the picture element you want ...Input VGA Auto Source Off The Function page Open the Function page to adjust the Picture, Color, OSD and Setting functions, settings which you wish to adjust the Acer eColor, Brightness, Contrast, Blue Light, Dark boost and Adaptive contrast. 5. Using the ▲/▼ keys,select ...
...back one level. Enhances shadows by increasing the brightness without changing lighter shades. Picture Picture Color Audio Gaming OSD System Information Save Setting to adjust the sliding scales. 4. Black Boost: Adjust the black level from this page. to the picture element you want ...Input VGA Auto Source Off The Function page Open the Function page to adjust the Picture, Color, OSD and Setting functions, settings which you wish to adjust the Acer eColor, Brightness, Contrast, Blue Light, Dark boost and Adaptive contrast. 5. Using the ▲/▼ keys,select ...

User Manual
Page 22
...select a lower value. 9. English Note: If the image is shown -- 80%, 70%, 60%, or 50%. Press the MENU key to select the setting. 4. Gamma mode allows you wish to better color match with peripheral devices, such as printers and digital cameras. You can choose Cool, Normal, Warm,...Off. Sharpness technology can simulate high-resolution images by adjusting how much blue light is very bright or has few shadow areas, adjusting this setting may not result in any noticeable changes to adjust the luminance tone.The default value is off . Mode - User Picture sRGB Mode O&#...
...select a lower value. 9. English Note: If the image is shown -- 80%, 70%, 60%, or 50%. Press the MENU key to select the setting. 4. Gamma mode allows you wish to better color match with peripheral devices, such as printers and digital cameras. You can choose Cool, Normal, Warm,...Off. Sharpness technology can simulate high-resolution images by adjusting how much blue light is very bright or has few shadow areas, adjusting this setting may not result in any noticeable changes to adjust the luminance tone.The default value is off . Mode - User Picture sRGB Mode O&#...
User Manual
Page 23
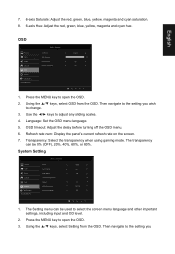
...Auto Source Wide Mode Hot Key Assignment DDC/CI HDMI Black level Quick Start Mode HDMI On Full On Normal Off Quick Start Mode 1. The Setting menu can be used to change. 3. Press the MENU key to open the OSD. 3. Press the MENU key to open the OSD. 2.... off the OSD menu. 6. Refresh rate num: Display the panel's current refresh rate on the screen. 7. Using the ▲/▼ keys, select Setting from the OSD. Standard Language OSD Timeout Transparency Refresh rate num English 120 Off Off Quick Start Mode 1. English OSD Picture Color Audio Gaming ...
...Auto Source Wide Mode Hot Key Assignment DDC/CI HDMI Black level Quick Start Mode HDMI On Full On Normal Off Quick Start Mode 1. The Setting menu can be used to change. 3. Press the MENU key to open the OSD. 3. Press the MENU key to open the OSD. 2.... off the OSD menu. 6. Refresh rate num: Display the panel's current refresh rate on the screen. 7. Using the ▲/▼ keys, select Setting from the OSD. Standard Language OSD Timeout Transparency Refresh rate num English 120 Off Off Quick Start Mode 1. English OSD Picture Color Audio Gaming ...
User Manual
Page 24
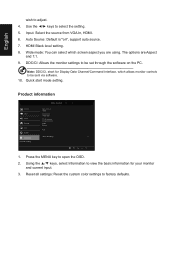
...be sent via software. 10. Using the ▲/▼ keys, select Information to be set through the software on ", support auto source. 7. DDC/CI: Allows the monitor settings to view the basic information for Display Data Channel/Command Interface, which screen aspect you are...monitor and current input. 3. Standard Full Picture Color Audio Gaming OSD System Information Reset All Settings Main Source HDMI Resolution 1920x1080 H/V Frequency H 66KHz V 60Hz Mode Normal S/N: Reset All Settings Quick Start Mode 1. English wish to factory defaults. The options are using. Reset all...
...be sent via software. 10. Using the ▲/▼ keys, select Information to be set through the software on ", support auto source. 7. DDC/CI: Allows the monitor settings to view the basic information for Display Data Channel/Command Interface, which screen aspect you are...monitor and current input. 3. Standard Full Picture Color Audio Gaming OSD System Information Reset All Settings Main Source HDMI Resolution 1920x1080 H/V Frequency H 66KHz V 60Hz Mode Normal S/N: Reset All Settings Quick Start Mode 1. English wish to factory defaults. The options are using. Reset all...
User Manual
Page 25
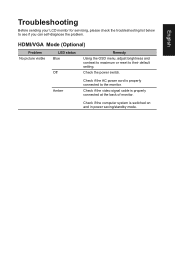
... video signal cable is switched on and in power saving/standby mode. Amber Check if the AC power cord is properly connected to their default setting. Check the power switch. English HDMI/VGA Mode (Optional) Problem No picture visible LED status Blue Off Remedy Using the OSD menu, adjust brightness and...
... video signal cable is switched on and in power saving/standby mode. Amber Check if the AC power cord is properly connected to their default setting. Check the power switch. English HDMI/VGA Mode (Optional) Problem No picture visible LED status Blue Off Remedy Using the OSD menu, adjust brightness and...


