User Manual
Page 12
... Connecting the power cord Power saving Display Data Channel (DDC) Connector pin assignment Standard timing table Installation User controls How to adjust a setting Acer eColor Management User Troubleshooting HDMI mode DVI mode DP mode 1 iii iii iii iii iii iv iv iv iv v vi vi vii vii viii xi 1 2 2 5 5 5 6 8 9 10 11 12...
... Connecting the power cord Power saving Display Data Channel (DDC) Connector pin assignment Standard timing table Installation User controls How to adjust a setting Acer eColor Management User Troubleshooting HDMI mode DVI mode DP mode 1 iii iii iii iii iii iv iv iv iv v vi vi vii vii viii xi 1 2 2 5 5 5 6 8 9 10 11 12...
User Manual
Page 13
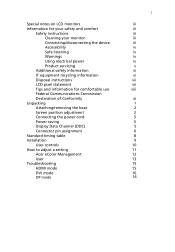
English 1 Unpacking Please check that the following items are present when you unpack the box, and save the packing materials in case you need to ship or transport the monitor in the future. LCD monitor Quick start guide DP cable (Option) HDMI Cable (Optional) DVI cable (Option) AC power cord Audio Cable (Option)
English 1 Unpacking Please check that the following items are present when you unpack the box, and save the packing materials in case you need to ship or transport the monitor in the future. LCD monitor Quick start guide DP cable (Option) HDMI Cable (Optional) DVI cable (Option) AC power cord Audio Cable (Option)
User Manual
Page 19
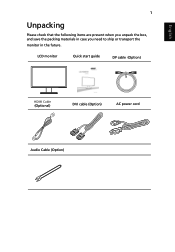
d HDMI Cable (Only HDMI-Input Model) a. English Installation 9 To install the monitor on your host system, please follow the steps below: Steps 1 Connect the video cable a Make sure both ... not function properly, please refer to the troubleshooting section to the computer's port. Make sure both the monitor and computer are powered-OFF. b. Connect the HDMI cable to the computer. 2 Connect the power cord Connect the power cord to the monitor, then to a properly grounded AC outlet. 3 Optional:Connect the audio...
d HDMI Cable (Only HDMI-Input Model) a. English Installation 9 To install the monitor on your host system, please follow the steps below: Steps 1 Connect the video cable a Make sure both ... not function properly, please refer to the troubleshooting section to the computer's port. Make sure both the monitor and computer are powered-OFF. b. Connect the HDMI cable to the computer. 2 Connect the power cord Connect the power cord to the monitor, then to a properly grounded AC outlet. 3 Optional:Connect the audio...
User Manual
Page 20
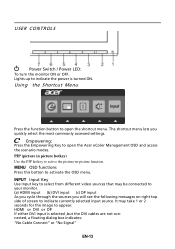
It may be connected to your monitor. (a) HDMI input (b) DVI input (c) DP input As you cycle through the sources you quickly select ...Input key to select from different video sources that may take 1 or 2 seconds for the image to open the Acer eColor Management OSD and access the scenario modes. The shortcut menu lets you will see the following messages on right top...a floating dialog box indicates: "No Cable Connect" or "No Signal" EN-13 Lights up to open the shortcut menu. HDMI or DVI or DP If either DVI input is turned ON. PIP (picture in picture hotkey) Use the PIP hotkey to...
It may be connected to your monitor. (a) HDMI input (b) DVI input (c) DP input As you cycle through the sources you quickly select ...Input key to select from different video sources that may take 1 or 2 seconds for the image to open the Acer eColor Management OSD and access the scenario modes. The shortcut menu lets you will see the following messages on right top...a floating dialog box indicates: "No Cable Connect" or "No Signal" EN-13 Lights up to open the shortcut menu. HDMI or DVI or DP If either DVI input is turned ON. PIP (picture in picture hotkey) Use the PIP hotkey to...
User Manual
Page 26
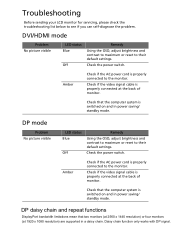
... Remedy Using the OSD, adjust brightness and contrast to maximum or reset to their default settings. Daisy chain function only works with DP signal. DVI/HDMI mode Problem No picture visible LED status Blue Off Remedy Using the OSD, adjust brightness and contrast to maximum or reset to their default settings...
... Remedy Using the OSD, adjust brightness and contrast to maximum or reset to their default settings. Daisy chain function only works with DP signal. DVI/HDMI mode Problem No picture visible LED status Blue Off Remedy Using the OSD, adjust brightness and contrast to maximum or reset to their default settings...


