

Quick Guide
Page 1
Acer Projectors with 3D Technology Quick Guide
Acer Projectors with 3D Technology Quick Guide

Quick Guide
Page 2
Acer Projector Series Quick Guide Original Issue: 8/2012 Model number Serial number Date of purchase Place of purchase © 2012 All Rights Reserved.
Acer Projector Series Quick Guide Original Issue: 8/2012 Model number Serial number Date of purchase Place of purchase © 2012 All Rights Reserved.
Quick Guide
Page 3
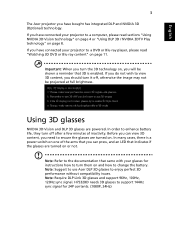
... glasses to support 144Hz sync signal for instructions how to turn off , otherwise the image may not be shown a reminder that came with your projector to a computer, please read "Watching 3D DVD or Blu-ray content" on page 11. Using 3D glasses NVIDIA 3D Vision and DLP 3D ... the battery. If you have bought has integrated DLP and NVIDIA 3D (Optional) technology. In many cases, there is enabled. English 3 The Acer projector you have connected your projector to a DVD or Blu-ray player, please read sections "Using NVIDIA 3D Vision technology" on page 4 or "Using DLP 3D / NVIDIA ...
... glasses to support 144Hz sync signal for instructions how to turn off , otherwise the image may not be shown a reminder that came with your projector to a computer, please read "Watching 3D DVD or Blu-ray content" on page 11. Using 3D glasses NVIDIA 3D Vision and DLP 3D ... the battery. If you have bought has integrated DLP and NVIDIA 3D (Optional) technology. In many cases, there is enabled. English 3 The Acer projector you have connected your projector to a DVD or Blu-ray player, please read sections "Using NVIDIA 3D Vision technology" on page 4 or "Using DLP 3D / NVIDIA ...
Quick Guide
Page 4
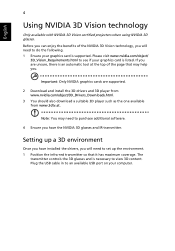
.... Please visit www.nvidia.com/object/ 3D_Vision_Requirements.html to view 3D content. English 4 Using NVIDIA 3D Vision technology Only available with NVIDIA 3D Vision certified projectors when using NVIDIA 3D glasses. Setting up the environment. 1 Position the infra-red transmitter so that may need to purchase additional software. 4 Ensure you will...
.... Please visit www.nvidia.com/object/ 3D_Vision_Requirements.html to view 3D content. English 4 Using NVIDIA 3D Vision technology Only available with NVIDIA 3D Vision certified projectors when using NVIDIA 3D glasses. Setting up the environment. 1 Position the infra-red transmitter so that may need to purchase additional software. 4 Ensure you will...
Quick Guide
Page 6
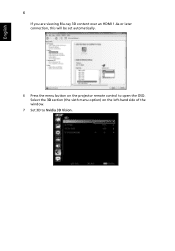
Select the 3D section (the sixth menu option) on the projector remote control to Nvidia 3D Vision. English 6 If you are viewing Blu-ray 3D content over an HDMI 1.4a or later connection, this will be set automatically. 6 Press the menu button on the left-hand side of the window. 7 Set 3D to open the OSD.
Select the 3D section (the sixth menu option) on the projector remote control to Nvidia 3D Vision. English 6 If you are viewing Blu-ray 3D content over an HDMI 1.4a or later connection, this will be set automatically. 6 Press the menu button on the left-hand side of the window. 7 Set 3D to open the OSD.
Quick Guide
Page 7
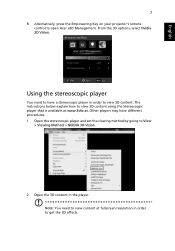
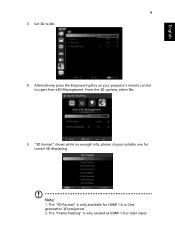
... by going to get the 3D effects. Using the stereoscopic player You need to view content at . English 7 8 Alternatively, press the Empowering Key on your projector's remote control to view 3D content. The instructions below explain how to view 3D content using the Stereoscopic player that is available at www.3dtv....at fullscreen resolution in order to View > Viewing Method > NVIDIA 3D Vision. 2 Open the 3D content in order to open Acer e3D Management. From the 3D options, select Nvidia 3D Vision.
... by going to get the 3D effects. Using the stereoscopic player You need to view content at . English 7 8 Alternatively, press the Empowering Key on your projector's remote control to view 3D content. The instructions below explain how to view 3D content using the Stereoscopic player that is available at www.3dtv....at fullscreen resolution in order to View > Viewing Method > NVIDIA 3D Vision. 2 Open the 3D content in order to open Acer e3D Management. From the 3D options, select Nvidia 3D Vision.
Quick Guide
Page 8
... latest drivers for your graphics card vendor's website for frame/field sequential 3D formats. To download software and use an NVIDIA 3DTV Play ready projector with DLP glasses, refer to your graphics card. Others, please set up a 3D environment Once you have the correct DLP-compatible 3D glasses...the window. Note: You may need to open the OSD. Setting up the environment. 1 Set the refresh rate to 100/120 Hz on the projector remote control to do the following. 1 Ensure your graphics card for the latest driver version. 3 You should also download a suitable 3D player ...
... latest drivers for your graphics card vendor's website for frame/field sequential 3D formats. To download software and use an NVIDIA 3DTV Play ready projector with DLP glasses, refer to your graphics card. Others, please set up a 3D environment Once you have the correct DLP-compatible 3D glasses...the window. Note: You may need to open the OSD. Setting up the environment. 1 Set the refresh rate to 100/120 Hz on the projector remote control to do the following. 1 Ensure your graphics card for the latest driver version. 3 You should also download a suitable 3D player ...
Quick Guide
Page 9
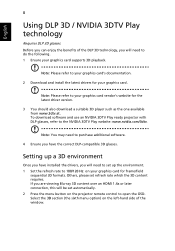
English 9 3 Set 3D to On. 4 Alternatively, press the Empowering Key on your projector's remote control to open Acer e3D Management. The "Frame Packing" is only available for correct 3D displaying. The "3D Format" is only existed at HDMI 1.4 or later input. From the 3D options, select On. 5 "3D Format" shows while no enough info, please choose suitable one for HDMI 1.4 or 2nd generation 3D projectors. 2. Note: 1.
English 9 3 Set 3D to On. 4 Alternatively, press the Empowering Key on your projector's remote control to open Acer e3D Management. The "Frame Packing" is only available for correct 3D displaying. The "3D Format" is only existed at HDMI 1.4 or later input. From the 3D options, select On. 5 "3D Format" shows while no enough info, please choose suitable one for HDMI 1.4 or 2nd generation 3D projectors. 2. Note: 1.
Quick Guide
Page 10
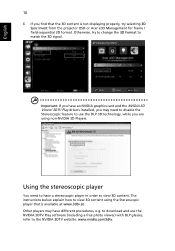
... need to have a stereoscopic player in order to view 3D content using non-NVIDIA 3D Players. Otherwise, try selecting 3D Sync Invert from the projector OSD or Acer e3D Management for frame / field sequential 3D format. Important: If you have an NVIDIA graphics card and the NVIDIA 3D Vision/ 3DTV Play drivers...
... need to have a stereoscopic player in order to view 3D content using non-NVIDIA 3D Players. Otherwise, try selecting 3D Sync Invert from the projector OSD or Acer e3D Management for frame / field sequential 3D format. Important: If you have an NVIDIA graphics card and the NVIDIA 3D Vision/ 3DTV Play drivers...
Quick Guide
Page 11
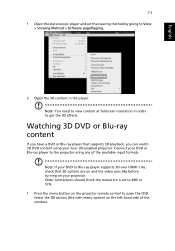
... or Blu-ray player that 3D options are on and the video uses 24p before turning on your DVD or Blu-ray player to the projector using your Acer 3D-enabled projector. English 11 1 Open the stereoscopic player and set to 480i or 576i. 1 Press the menu button on the...
... or Blu-ray player that 3D options are on and the video uses 24p before turning on your DVD or Blu-ray player to the projector using your Acer 3D-enabled projector. English 11 1 Open the stereoscopic player and set to 480i or 576i. 1 Press the menu button on the...

Quick Guide
Page 12
The "Frame Packing" is only available for correct 3D displaying. English 12 2 Set 3D to On. 3 Alternatively, press the Empowering Key on your projector's remote control to open Acer e3D Management. From the 3D options, select On. 4 "3D Format" shows while no enough info, please choose suitable one for HDMI 1.4 or 2nd generation 3D projectors. 2. Note: 1. The "3D Format" is only existed at HDMI 1.4 or later input.
The "Frame Packing" is only available for correct 3D displaying. English 12 2 Set 3D to On. 3 Alternatively, press the Empowering Key on your projector's remote control to open Acer e3D Management. From the 3D options, select On. 4 "3D Format" shows while no enough info, please choose suitable one for HDMI 1.4 or 2nd generation 3D projectors. 2. Note: 1. The "3D Format" is only existed at HDMI 1.4 or later input.
Quick Guide
Page 13
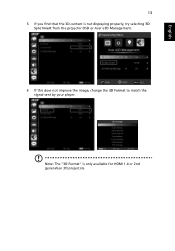
Note: The "3D Format" is not displaying properly, try selecting 3D Sync Invert from the projector OSD or Acer e3D Management. 6 If this does not improve the image, change the 3D Format to match the signal sent by your player. English 13 5 If you find that the 3D content is only available for HDMI 1.4 or 2nd generation 3D projectors.
Note: The "3D Format" is not displaying properly, try selecting 3D Sync Invert from the projector OSD or Acer e3D Management. 6 If this does not improve the image, change the 3D Format to match the signal sent by your player. English 13 5 If you find that the 3D content is only available for HDMI 1.4 or 2nd generation 3D projectors.

Instruction Manual
Page 2
... Model number Serial number Date of purchase Place of Acer Incorporated. Record the model number, serial number, purchase date and place of HDMI Licensing LLC." All correspondence concerning your projector. Other companies' product names or trademarks are trademarks ...or registered trademarks of purchase information in this manual or supplementary documents and publications. Acer Projector Series User's Guide Original Issue: 10/2013 ...
... Model number Serial number Date of purchase Place of Acer Incorporated. Record the model number, serial number, purchase date and place of HDMI Licensing LLC." All correspondence concerning your projector. Other companies' product names or trademarks are trademarks ...or registered trademarks of purchase information in this manual or supplementary documents and publications. Acer Projector Series User's Guide Original Issue: 10/2013 ...

Instruction Manual
Page 3
... covered. This product should never be sure to the equipment operator as possible. Turning the product off before removing the power supply unit from the projector. • If the system has multiple sources of any kind onto or into this product on the product. Do not use this product near or...
... covered. This product should never be sure to the equipment operator as possible. Turning the product off before removing the power supply unit from the projector. • If the system has multiple sources of any kind onto or into this product on the product. Do not use this product near or...

Instruction Manual
Page 5
... outlet and refer servicing to qualified service personnel when: • the power cord or plug is poorly ventilated or confined. Consult your projector. Warning! For safety reasons, do not use non-compliant parts when adding or changing components. Additional safety information • Do not ...look into the product • the product was spilled into the projector's lens when the light is something wrong with an ambient temperature above 40 ºC/104 ºF. • Locations where the altitudes ...
... outlet and refer servicing to qualified service personnel when: • the power cord or plug is poorly ventilated or confined. Consult your projector. Warning! For safety reasons, do not use non-compliant parts when adding or changing components. Additional safety information • Do not ...look into the product • the product was spilled into the projector's lens when the light is something wrong with an ambient temperature above 40 ºC/104 ºF. • Locations where the altitudes ...

Instruction Manual
Page 6
.... • Clean the air filter frequently if have adjusted. • Do not listen to music at high volumes for inspection. • Do not face the projector lens to block out noisy surroundings. • Decrease the volume if you can lead to fire. • When switching the... not touch air outlet grille and bottom plate which may rise and cause damage when the filter/ventilation slots clogged with any object when the projector is operating. There are dangerous high voltages inside may hurt you . It may hurt your ears have . It may cause the...
.... • Clean the air filter frequently if have adjusted. • Do not listen to music at high volumes for inspection. • Do not face the projector lens to block out noisy surroundings. • Decrease the volume if you can lead to fire. • When switching the... not touch air outlet grille and bottom plate which may rise and cause damage when the filter/ventilation slots clogged with any object when the projector is operating. There are dangerous high voltages inside may hurt you . It may hurt your ears have . It may cause the...
Instruction Manual
Page 8
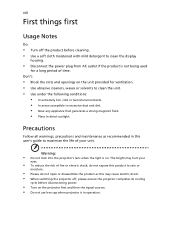
.... The bright may cause electric shock. • When switching the projector off the product before disconnecting power. • Turn on the projector first and then the signal sources. • Do not use lens cap when projector is not being used for a long period of fire or electric shock... not open or disassemble the product as recommended in operation. viii First things first Usage Notes Do: • Turn off , please ensure the projector completes its cooling cycle before cleaning. • Use a soft cloth moistened with mild detergent to excessive dust and dirt. • Near any ...
.... The bright may cause electric shock. • When switching the projector off the product before disconnecting power. • Turn on the projector first and then the signal sources. • Do not use lens cap when projector is not being used for a long period of fire or electric shock... not open or disassemble the product as recommended in operation. viii First things first Usage Notes Do: • Turn off , please ensure the projector completes its cooling cycle before cleaning. • Use a soft cloth moistened with mild detergent to excessive dust and dirt. • Near any ...
Instruction Manual
Page 9
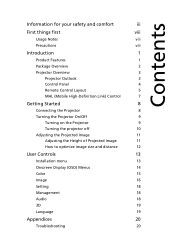
... first viii Usage Notes viii Precautions viii Introduction 1 Product Features 1 Package Overview 2 Projector Overview 3 Projector Outlook 3 Control Panel 4 Remote Control Layout 5 MHL (Mobile High-Definition Link) Control 7 Getting Started 8 Connecting the Projector 8 Turning the Projector On/Off 9 Turning on the Projector 9 Turning the projector off 10 Adjusting the Projected Image 11 Adjusting the Height of Projected...
... first viii Usage Notes viii Precautions viii Introduction 1 Product Features 1 Package Overview 2 Projector Overview 3 Projector Outlook 3 Control Panel 4 Remote Control Layout 5 MHL (Mobile High-Definition Link) Control 7 Getting Started 8 Connecting the Projector 8 Turning the Projector On/Off 9 Turning on the Projector 9 Turning the projector off 10 Adjusting the Projected Image 11 Adjusting the Height of Projected...
Instruction Manual
Page 11
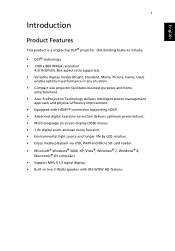
...supported. • Versatile display modes (Bright, Standard, Movie, Picture, Game, User) enable optimum performance in any situation. • Compact size projector facilitates business purposes and home entertainment. • Acer EcoProjeciton Technology delivers Intelligent power management approach and physical efficiency improvement. • Equipped with HDMI™ connection supporting HDCP. • Advanced digital...signal display. • Built-in two 3 Watts speaker with SRS WOW HD feature. English 1 Introduction Product Features This product is a single-chip DLP® projector.
...supported. • Versatile display modes (Bright, Standard, Movie, Picture, Game, User) enable optimum performance in any situation. • Compact size projector facilitates business purposes and home entertainment. • Acer EcoProjeciton Technology delivers Intelligent power management approach and physical efficiency improvement. • Equipped with HDMI™ connection supporting HDCP. • Advanced digital...signal display. • Built-in two 3 Watts speaker with SRS WOW HD feature. English 1 Introduction Product Features This product is a single-chip DLP® projector.

Instruction Manual
Page 12
Projector POWER ZOOM HIDE RATIO MODE SOURCE MEDIA HOME MEDIA SETUP BACK MENU ENTER Remote control Power cord AC to DC power adapter XXXXXX 3V Battery (... to make sure your dealer immediately if any thing is complete. Contact your unit is missing. Check to D-sub cable (option) English 2 Package Overview This projector comes with all the items shown below.
Projector POWER ZOOM HIDE RATIO MODE SOURCE MEDIA HOME MEDIA SETUP BACK MENU ENTER Remote control Power cord AC to DC power adapter XXXXXX 3V Battery (... to make sure your dealer immediately if any thing is complete. Contact your unit is missing. Check to D-sub cable (option) English 2 Package Overview This projector comes with all the items shown below.


