
User Manual (3D)
Page 6
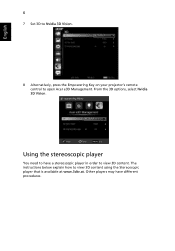
English 6 7 Set 3D to Nvidia 3D Vision. 8 Alternatively, press the Empowering Key on your projector's remote control to view 3D content using the Stereoscopic player that is available at www.3dtv.at. The instructions below explain how to open Acer e3D Management. From the 3D options, select Nvidia 3D Vision. Using the stereoscopic player You need to have different procedures. Other players may have a stereoscopic player in order to view 3D content.
English 6 7 Set 3D to Nvidia 3D Vision. 8 Alternatively, press the Empowering Key on your projector's remote control to view 3D content using the Stereoscopic player that is available at www.3dtv.at. The instructions below explain how to open Acer e3D Management. From the 3D options, select Nvidia 3D Vision. Using the stereoscopic player You need to have different procedures. Other players may have a stereoscopic player in order to view 3D content.
User Manual (3D)
Page 8
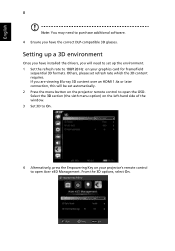
... environment Once you have the correct DLP-compatible 3D glasses. Others, please set automatically. 2 Press the menu button on the projector remote control to open Acer e3D Management. From the 3D options, select On. English 8 Note: You may need to purchase additional software. 4 Ensure you have installed the drivers, you will... formats. Select the 3D section (the sixth menu option) on the left-hand side of the window. 3 Set 3D to On. 4 Alternatively, press the Empowering Key on your projector's remote control to open the OSD.
... environment Once you have the correct DLP-compatible 3D glasses. Others, please set automatically. 2 Press the menu button on the projector remote control to open Acer e3D Management. From the 3D options, select On. English 8 Note: You may need to purchase additional software. 4 Ensure you have installed the drivers, you will... formats. Select the 3D section (the sixth menu option) on the left-hand side of the window. 3 Set 3D to On. 4 Alternatively, press the Empowering Key on your projector's remote control to open the OSD.
User Manual (3D)
Page 11
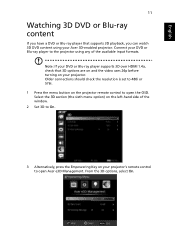
... content If you can watch 3D DVD content using any of the window. 2 Set 3D to On. 3 Alternatively, press the Empowering Key on your projector's remote control to open Acer e3D Management. Older connections should check the resolution is set to 480i or 576i. 1 Press the menu button on your projector. Connect... player that 3D options are on and the video uses 24p before turning on the projector remote control to open the OSD. Note: If your Acer 3D-enabled projector.
... content If you can watch 3D DVD content using any of the window. 2 Set 3D to On. 3 Alternatively, press the Empowering Key on your projector's remote control to open Acer e3D Management. Older connections should check the resolution is set to 480i or 576i. 1 Press the menu button on your projector. Connect... player that 3D options are on and the video uses 24p before turning on the projector remote control to open the OSD. Note: If your Acer 3D-enabled projector.

User Manual
Page 15
Changes the active source. 4 LAMP Lamp Indicator LED 5 TEMP Temp Indicator LED 6 Four directional select Use the keys to select items or make keys adjustments to the previous step for the OSD menu operation or exit the OSD menu. Press "MENU" to launch the Onscreen display (OSD) menu, back ...
Changes the active source. 4 LAMP Lamp Indicator LED 5 TEMP Temp Indicator LED 6 Four directional select Use the keys to select items or make keys adjustments to the previous step for the OSD menu operation or exit the OSD menu. Press "MENU" to launch the Onscreen display (OSD) menu, back ...

User Manual
Page 16
...exit the OSD menu. Media setup Press to your selection. Four directional Use up, down, left, right buttons to select items or make select keys adjustments to enter media OSD setting. Refer to enter/ play/ pause media file. Zooms the projector display in or out. Enter/ Play/ Pause ... POWER FREEZE HIDE RATIO MODE SOURCE BACK ENTER MENU 7 19 12 BACK 15 INFO 14 ENTER 13 20 16 21 ZOOM 22 MUTE 23 K135/K135P/K135S/L221/LK-W12 K132/L221F/LK-W12L # Icon Function 1 Infrared transmitter 2 Zoom ZOOM 3 POWER Power Description Sends signals to upper data folder...
...exit the OSD menu. Media setup Press to your selection. Four directional Use up, down, left, right buttons to select items or make select keys adjustments to enter media OSD setting. Refer to enter/ play/ pause media file. Zooms the projector display in or out. Enter/ Play/ Pause ... POWER FREEZE HIDE RATIO MODE SOURCE BACK ENTER MENU 7 19 12 BACK 15 INFO 14 ENTER 13 20 16 21 ZOOM 22 MUTE 23 K135/K135P/K135S/L221/LK-W12 K132/L221F/LK-W12L # Icon Function 1 Infrared transmitter 2 Zoom ZOOM 3 POWER Power Description Sends signals to upper data folder...

User Manual
Page 18
English 8 MHL (Mobile High-Definition Link) Control K135/K135P/K135S/L221/LK-W12 POWER ZOOM HIDE 1 2 RATIO MODE SOURCE MEDIA HOME 3 5 MEDIA SETUP 4 MENU BACK 6 ENTER 7 8 INFO 9 # Icon Component Description 1 MODE MODE • Press "MODE" ... for Navigation mode) Play/Pause Toggles between Navigation or Multi-Media mode. 3 MENU MENU Press to launch the root memu. (only for Navigation mode) 4 Direction Keys Use up, down, left, right buttons to select items or make adjustments to your selection. (only for Multi-Media mode)
English 8 MHL (Mobile High-Definition Link) Control K135/K135P/K135S/L221/LK-W12 POWER ZOOM HIDE 1 2 RATIO MODE SOURCE MEDIA HOME 3 5 MEDIA SETUP 4 MENU BACK 6 ENTER 7 8 INFO 9 # Icon Component Description 1 MODE MODE • Press "MODE" ... for Navigation mode) Play/Pause Toggles between Navigation or Multi-Media mode. 3 MENU MENU Press to launch the root memu. (only for Navigation mode) 4 Direction Keys Use up, down, left, right buttons to select items or make adjustments to your selection. (only for Multi-Media mode)

User Manual
Page 19
Press the "SOURCE" button to toggle Navigation mode. 3 Exit BACK To exit the file. 4 Select/Enter ENTER Press to select/enter the file. 5 Direction Keys Use up, down, left, right buttons to select items or make adjustments to your selection. 6 MENU MENU Press to launch the root memu. 7 Volume Up ...
Press the "SOURCE" button to toggle Navigation mode. 3 Exit BACK To exit the file. 4 Select/Enter ENTER Press to select/enter the file. 5 Direction Keys Use up, down, left, right buttons to select items or make adjustments to your selection. 6 MENU MENU Press to launch the root memu. 7 Volume Up ...

User Manual
Page 21
...; If you connect to multiple sources at the same time, use the "Source" button on either control panel or the remote control or direct source key on the remote control to switch between inputs. 1 Power button The Power indicator LED will flash red. 2 Turn on the projector by pressing "Power" button...
...; If you connect to multiple sources at the same time, use the "Source" button on either control panel or the remote control or direct source key on the remote control to switch between inputs. 1 Power button The Power indicator LED will flash red. 2 Turn on the projector by pressing "Power" button...
User Manual
Page 26
... •Language settings •Reset to factory default function Use the up and down arrow keys to select an option, the left and right arrow keys to adjust selected option settings, and the right arrow key to the Acer welcome screen. The new settings will be saved automatically upon exiting the menu. 5 Push the...
... •Language settings •Reset to factory default function Use the up and down arrow keys to select an option, the left and right arrow keys to adjust selected option settings, and the right arrow key to the Acer welcome screen. The new settings will be saved automatically upon exiting the menu. 5 Push the...

User Manual
Page 27
...projector will return to the main menu. • To exit OSD, press "MENU" on the remote control. • When the OSD is displayed, use the keys to make image adjustments and change a variety of settings. After selecting the desired main menu item, press submenu for feature setting. Using the OSD menus... • To open the OSD menu, press "MENU" on the remote control again. Main menu Setting Sub menu to enter • Use the keys to select the desired item and adjust the settings by using the keys. • Select the next item to be adjusted in the main menu.
...projector will return to the main menu. • To exit OSD, press "MENU" on the remote control. • When the OSD is displayed, use the keys to make image adjustments and change a variety of settings. After selecting the desired main menu item, press submenu for feature setting. Using the OSD menus... • To open the OSD menu, press "MENU" on the remote control again. Main menu Setting Sub menu to enter • Use the keys to select the desired item and adjust the settings by using the keys. • Select the next item to be adjusted in the main menu.

User Manual
Page 34
.../download/TriDef-3-D-Experience-4.0.2.html Note: "3D Sync Invert" is only available when 3D is enabled. Language Language Choose the multilingual OSD menu. Use the or key to display the 3D warning message. Note: It needs correct settings on projector. English 24 3D Warning Message Choose "On" to select your purpose.
.../download/TriDef-3-D-Experience-4.0.2.html Note: "3D Sync Invert" is only available when 3D is enabled. Language Language Choose the multilingual OSD menu. Use the or key to display the 3D warning message. Note: It needs correct settings on projector. English 24 3D Warning Message Choose "On" to select your purpose.
User Manual
Page 39
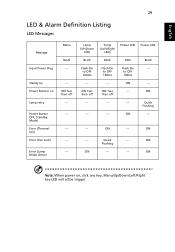
... --ON 1sec then off --- --- --- English 29 LED & Alarm Definition Listing LED Messages Message Input Power Plug Standy by Power buttom on , click any key, Menu/Up/Down/Left/Right key LED will all be trigger. then off --- --- ON Power LED BLUE --- --ON Quick Flashing --- --- Standby Mode) Error (Thermal fail) Error (Fan Lock...
... --ON 1sec then off --- --- --- English 29 LED & Alarm Definition Listing LED Messages Message Input Power Plug Standy by Power buttom on , click any key, Menu/Up/Down/Left/Right key LED will all be trigger. then off --- --- ON Power LED BLUE --- --ON Quick Flashing --- --- Standby Mode) Error (Thermal fail) Error (Fan Lock...