User Manual
Page 3
... utilities, data recovery, expansion options and troubleshooting. In addition it : 1 Click on Start > All Programs > Documentation. 2 Click on your home country. Such instances are only contained in certain models of your computer, clicking on such subjects as using the keyboard and audio, etc. For instructions on the screen to its nature, the Generic User Guide will run the Adobe Reader setup program first. It is specific...
... utilities, data recovery, expansion options and troubleshooting. In addition it : 1 Click on Start > All Programs > Documentation. 2 Click on your home country. Such instances are only contained in certain models of your computer, clicking on such subjects as using the keyboard and audio, etc. For instructions on the screen to its nature, the Generic User Guide will run the Adobe Reader setup program first. It is specific...

User Manual
Page 4
... adapter Here are some ways to shut down the computer. Taking care of it near sources of the computer. • Do not slam the computer display when you cannot power off the computer normally, press and hold the power button for more than four seconds to take care of the power button....Use the Windows shutdown command Click on Start then click on top of your computer Your computer will serve you well if you turn off the computer and want to rain or moisture. • Do not spill water or any cables away from foot traffic. • When unplugging the power cord, do any other device...
... adapter Here are some ways to shut down the computer. Taking care of it near sources of the computer. • Do not slam the computer display when you cannot power off the computer normally, press and hold the power button for more than four seconds to take care of the power button....Use the Windows shutdown command Click on Start then click on top of your computer Your computer will serve you well if you turn off the computer and want to rain or moisture. • Do not spill water or any cables away from foot traffic. • When unplugging the power cord, do any other device...

User Manual
Page 7
... sure to the power supply unit: Install the power supply unit before removing the power supply unit from the computer. Turning the product off before cleaning. Safety instructions vii Information for cleaning. Follow all power cords from the type of the equipment plugged into is used with this product, make sure that the power outlet you need to disconnect power to rest on...
... sure to the power supply unit: Install the power supply unit before removing the power supply unit from the computer. Turning the product off before cleaning. Safety instructions vii Information for cleaning. Follow all power cords from the type of the equipment plugged into is used with this product, make sure that the power outlet you need to disconnect power to rest on...
User Manual
Page 9
... openings are provided for service. • The product does not operate normally after following the operating instructions. Safety instructions ix General • Do not use this product near or over a radiator or heat register, or in a built-in installation unless proper ventilation is damaged, cut or frayed. • Liquid was spilled into this product through cabinet slots as opening or removing covers...
... openings are provided for service. • The product does not operate normally after following the operating instructions. Safety instructions ix General • Do not use this product near or over a radiator or heat register, or in a built-in installation unless proper ventilation is damaged, cut or frayed. • Liquid was spilled into this product through cabinet slots as opening or removing covers...
User Manual
Page 10
... pierce, open or disassemble the battery. The full performance of the battery. (These look like metal strips on the battery.) This might happen, for this device. Do not dispose of batteries in summer or winter. Do not dispose as a coin, clip or pen causes direct connection of the positive (+) and negative (-) terminals of a new battery is fully charged. Use only Acer approved batteries, and...
... pierce, open or disassemble the battery. The full performance of the battery. (These look like metal strips on the battery.) This might happen, for this device. Do not dispose of batteries in summer or winter. Do not dispose as a coin, clip or pen causes direct connection of the positive (+) and negative (-) terminals of a new battery is fully charged. Use only Acer approved batteries, and...
User Manual
Page 11
... functionality of any radio transmitting equipment, including wireless phones, may cause interference or danger. Radio frequency interference Warning! Remember to : wireless lan (WLAN), Bluetooth and/or 3G. Radio frequency interference xi Note: Please refer to the network. Parts of data files or messages may explode if not handled properly. This device meets RF exposure guidelines when used batteries. Replacing the battery pack The computer uses...
... functionality of any radio transmitting equipment, including wireless phones, may cause interference or danger. Radio frequency interference Warning! Remember to : wireless lan (WLAN), Bluetooth and/or 3G. Radio frequency interference xi Note: Please refer to the network. Parts of data files or messages may explode if not handled properly. This device meets RF exposure guidelines when used batteries. Replacing the battery pack The computer uses...

User Manual
Page 17
... Medical devices xi Vehicles xii Potentially explosive environments xii Emergency calls xiii Disposal instructions xiii Tips and information for comfortable use xiii Your Acer tablet PC tour 1 Tablet PC 1 Front view 1 Back view 2 Top view 3 Bottom view 3 Left view 4 Right view 4 Booting your tablet 5 Key functions for boot menus 5 Connect the tablet to the keyboard dock 5 Secure the tablet to the keyboard dock 6 Keyboard dock 6 Top view 6 Front view 7 Left view 7 Right view 8 Environment 8 Acer Ring 9 Sync function 10 Clean Disk function 10...
... Medical devices xi Vehicles xii Potentially explosive environments xii Emergency calls xiii Disposal instructions xiii Tips and information for comfortable use xiii Your Acer tablet PC tour 1 Tablet PC 1 Front view 1 Back view 2 Top view 3 Bottom view 3 Left view 4 Right view 4 Booting your tablet 5 Key functions for boot menus 5 Connect the tablet to the keyboard dock 5 Secure the tablet to the keyboard dock 6 Keyboard dock 6 Top view 6 Front view 7 Left view 7 Right view 8 Environment 8 Acer Ring 9 Sync function 10 Clean Disk function 10...
User Manual
Page 18
... media 19 Media sharing settings 19 Device Control 20 Using the virtual keyboard 22 SocialJogger 23 Sharing content 25 Settings 26 Acer Backup Manager 27 Power management 29 Recovering your system 29 Battery pack 30 Battery pack characteristics 30 Maximizing the battery's life 30 Charging the battery 31 Checking the battery level 31 Battery low warning 32 Expanding through options 33 Connectivity options 33 Network feature 33 Universal Serial Bus (USB...
... media 19 Media sharing settings 19 Device Control 20 Using the virtual keyboard 22 SocialJogger 23 Sharing content 25 Settings 26 Acer Backup Manager 27 Power management 29 Recovering your system 29 Battery pack 30 Battery pack characteristics 30 Maximizing the battery's life 30 Charging the battery 31 Checking the battery level 31 Battery low warning 32 Expanding through options 33 Connectivity options 33 Network feature 33 Universal Serial Bus (USB...
User Manual
Page 20
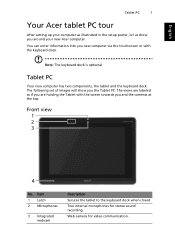
... the screen towards you the Tablet PC. Two internal microphones for video communication. You can enter information into you around your computer as if you are labeled as illustrated in the setup poster, let us show you and the cameras at the top. Front view 1 2 3 4 No. Web camera for stereo sound recording. Note: The keyboard dock is optional. English Tablet PC 1 Your Acer tablet PC tour After setting...
... the screen towards you the Tablet PC. Two internal microphones for video communication. You can enter information into you around your computer as if you are labeled as illustrated in the setup poster, let us show you and the cameras at the top. Front view 1 2 3 4 No. Web camera for stereo sound recording. Note: The keyboard dock is optional. English Tablet PC 1 Your Acer tablet PC tour After setting...
User Manual
Page 21
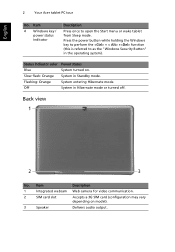
... webcam Web camera for video communication. 2 SIM card slot Accepts a 3G SIM card (configuration may vary depending on . Back view 1 2 3 No. Press the power button while holding the Windows key to perform the + < Alt> + function (this is referred to open the Start menu or wake tablet from Sleep mode. System entering Hibernate mode. Status indicator color Blue Slow flash: Orange Flashing: Orange Off Power status System turned on model). 3 Speaker Delivers audio output. Item 4 Windows key / power status indicator...
... webcam Web camera for video communication. 2 SIM card slot Accepts a 3G SIM card (configuration may vary depending on . Back view 1 2 3 No. Press the power button while holding the Windows key to perform the + < Alt> + function (this is referred to open the Start menu or wake tablet from Sleep mode. System entering Hibernate mode. Status indicator color Blue Slow flash: Orange Flashing: Orange Off Power status System turned on model). 3 Speaker Delivers audio output. Item 4 Windows key / power status indicator...
User Manual
Page 22
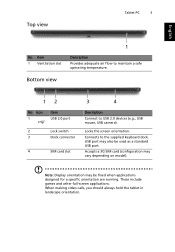
... 1 Item USB 2.0 port 2 Lock switch 3 Dock connector 4 SIM card slot 3 4 Description Connect to the supplied keyboard dock. Note: Display orientation may vary depending on model). Accepts a 3G SIM card (configuration may be used as a standard USB port. Top view Tablet PC 3 English No. Locks the screen orientation. When making video calls, you should always hold the tablet in landscape orientation. Connects to USB 2.0 devices (e.g., USB mouse, USB camera). These include games and other full-screen applications. Item 1 Ventilation slot Bottom view 1 Description...
... 1 Item USB 2.0 port 2 Lock switch 3 Dock connector 4 SIM card slot 3 4 Description Connect to the supplied keyboard dock. Note: Display orientation may vary depending on model). Accepts a 3G SIM card (configuration may be used as a standard USB port. Top view Tablet PC 3 English No. Locks the screen orientation. When making video calls, you should always hold the tablet in landscape orientation. Connects to USB 2.0 devices (e.g., USB mouse, USB camera). These include games and other full-screen applications. Item 1 Ventilation slot Bottom view 1 Description...
User Manual
Page 23
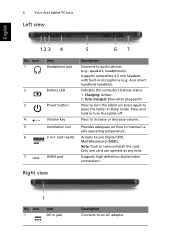
... video connections. Press and hold to maintain a safe operating temperature. Supports compatible 3.5 mm headsets with built-in Sleep mode. Charging: Amber. 2. Right view 1 No. Only one card can operate at any time. Acer smart handheld headsets). Fully charged: Blue when plugged in jack Description Connects to place the tablet in microphone (e.g. Icon 1 Item DC-in . Icon 1 2 3 4 +/- 5 6 7 Item Headphone jack Battery LED Power button Volume key Ventilation slot 2-in-1 card reader HDMI port Description Connects to remove/install the card. 4 Your Acer tablet...
... video connections. Press and hold to maintain a safe operating temperature. Supports compatible 3.5 mm headsets with built-in Sleep mode. Charging: Amber. 2. Right view 1 No. Only one card can operate at any time. Acer smart handheld headsets). Fully charged: Blue when plugged in jack Description Connects to place the tablet in microphone (e.g. Icon 1 Item DC-in . Icon 1 2 3 4 +/- 5 6 7 Item Headphone jack Battery LED Power button Volume key Ventilation slot 2-in-1 card reader HDMI port Description Connects to remove/install the card. 4 Your Acer tablet...
User Manual
Page 24
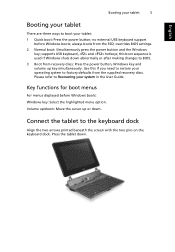
... the User Guide. Please refer to Recovering your operating system to BIOS. 3 Boot from recovery discs: Press the power button, Windows key and volume up or down : Move the cursor up key simultaneously. no external USB keyboard support before Windows boots: Windows key: Select the highlighted menu option. Key functions for boot menus For menus displayed before Windows boots; Volume up/down . Press the tablet down abnormally or after making changes to factory defaults from the SSD; supports USB keyboard, and hotkeys; Use this boot sequence is used if Windows...
... the User Guide. Please refer to Recovering your operating system to BIOS. 3 Boot from recovery discs: Press the power button, Windows key and volume up or down : Move the cursor up key simultaneously. no external USB keyboard support before Windows boots: Windows key: Select the highlighted menu option. Key functions for boot menus For menus displayed before Windows boots; Volume up/down . Press the tablet down abnormally or after making changes to factory defaults from the SSD; supports USB keyboard, and hotkeys; Use this boot sequence is used if Windows...
User Manual
Page 25
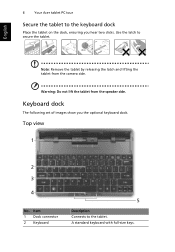
English Note: Remove the tablet by releasing the latch and lifting the tablet from the speaker side. Item 1 Dock connector 2 Keyboard 5 Description Connects to secure the tablet. Top view 1 2 3 4 No. A standard keyboard with full-size keys. 6 Your Acer tablet PC tour Secure the tablet to the keyboard dock Place the tablet on the dock, ensuring you the optional keyboard dock. Keyboard dock The following set of images show you hear two clicks. Warning: Do not lift the tablet from the camera side. Use the latch to the tablet.
English Note: Remove the tablet by releasing the latch and lifting the tablet from the speaker side. Item 1 Dock connector 2 Keyboard 5 Description Connects to secure the tablet. Top view 1 2 3 4 No. A standard keyboard with full-size keys. 6 Your Acer tablet PC tour Secure the tablet to the keyboard dock Place the tablet on the dock, ensuring you the optional keyboard dock. Keyboard dock The following set of images show you hear two clicks. Warning: Do not lift the tablet from the camera side. Use the latch to the tablet.
User Manual
Page 26
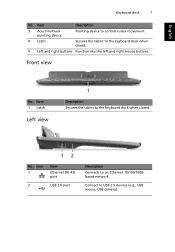
Connect to an Ethernet 10/100/1000based network. Front view No. Item Description 3 Acer FineTrack pointing device Pointing device to control cursor movement. 4 Latch Secures the tablet to the keyboard dock when closed . 5 Left and right buttons Function like the left and right mouse buttons. Icon 1 2 Item Ethernet (RJ-45) port USB 2.0 port Description Connects to USB 2.0 devices (e.g., USB mouse, USB camera). Item 1 Latch Left view 1 Description Secures the tablet to the keyboard dock when closed . 12 No. English Keyboard dock 7 No.
Connect to an Ethernet 10/100/1000based network. Front view No. Item Description 3 Acer FineTrack pointing device Pointing device to control cursor movement. 4 Latch Secures the tablet to the keyboard dock when closed . 5 Left and right buttons Function like the left and right mouse buttons. Icon 1 2 Item Ethernet (RJ-45) port USB 2.0 port Description Connects to USB 2.0 devices (e.g., USB mouse, USB camera). Item 1 Latch Left view 1 Description Secures the tablet to the keyboard dock when closed . 12 No. English Keyboard dock 7 No.
User Manual
Page 48
... one or more of recovery DVDS that contains the system recovery information. This computer employs a power management scheme that monitors system activity. Windows handles all of these devices in order to the computer, and video memory. English 29 Power management This computer has a built-in an external DVD drive, insert the first disc into the DVD drive. While the tablet is detected for a period of time (called an inactivity...
... one or more of recovery DVDS that contains the system recovery information. This computer employs a power management scheme that monitors system activity. Windows handles all of these devices in order to the computer, and video memory. English 29 Power management This computer has a built-in an external DVD drive, insert the first disc into the DVD drive. While the tablet is detected for a period of time (called an inactivity...
User Manual
Page 54
... connect a USB keybaord, and hold the Windows key while pressing the power button. while the computer logo is a hardware configuration program built into your tablet PC and press during the POST; Boot sequence To set the boot sequence in the BIOS utility, activate the BIOS utility, then select Boot from the categories listed at the top of the screen. To activate the BIOS utility, connect a USB keybaord to run it. English BIOS utility 35 BIOS utility The BIOS utility is displayed...
... connect a USB keybaord, and hold the Windows key while pressing the power button. while the computer logo is a hardware configuration program built into your tablet PC and press during the POST; Boot sequence To set the boot sequence in the BIOS utility, activate the BIOS utility, then select Boot from the categories listed at the top of the screen. To activate the BIOS utility, connect a USB keybaord to run it. English BIOS utility 35 BIOS utility The BIOS utility is displayed...
User Manual
Page 55
... computer does not start or boot up. If pressing a key does not turn the display back on. No audio is In Windows, look at the volume control (speaker) icon on , three things might be the cause: • The brightness level might be too low. Connect the AC adapter to power the computer. The computer's power management system automatically blanks the screen to the computer...
... computer does not start or boot up. If pressing a key does not turn the display back on. No audio is In Windows, look at the volume control (speaker) icon on , three things might be the cause: • The brightness level might be too low. Connect the AC adapter to power the computer. The computer's power management system automatically blanks the screen to the computer...
User Manual
Page 57
... call Please have the following information: Name Address Telephone number Machine and model type Serial number Date of purchase Place your problems efficiently. You are required to provide the following information available when you call takes and help solve your proof-of-purchase in the case of beeps). Our worldwide network of service centers are there to give you travel, to...
... call Please have the following information: Name Address Telephone number Machine and model type Serial number Date of purchase Place your problems efficiently. You are required to provide the following information available when you call takes and help solve your proof-of-purchase in the case of beeps). Our worldwide network of service centers are there to give you travel, to...
User Manual
Page 58
... authorized service center. Solutions to reboot. See "Requesting service" on page 37. CMOS checksum error Contact your dealer or an authorized service center. Hard disk 0 error Contact your dealer or an authorized service center. Disk boot failure Insert a system (bootable) disk into an external drive, then press to more serious problems require opening up the computer. Hard disk 0 extended Contact your dealer or an authorized service center. Troubleshooting tips 39 Troubleshooting English This...
... authorized service center. Solutions to reboot. See "Requesting service" on page 37. CMOS checksum error Contact your dealer or an authorized service center. Hard disk 0 error Contact your dealer or an authorized service center. Disk boot failure Insert a system (bootable) disk into an external drive, then press to more serious problems require opening up the computer. Hard disk 0 extended Contact your dealer or an authorized service center. Troubleshooting tips 39 Troubleshooting English This...


