
User Manual
Page 3
... (PDF) and comes preloaded on such subjects as system utilities, data recovery, expansion options and troubleshooting. Note: Viewing the file requires Adobe Reader. Warranty information is included on a separate leaflet in the documentation pack included with your computer. Such instances are only contained in certain models of guides: First off, the setup poster helps you purchased. For instructions on ICONIA TAB Generic User Guide. It is specific to access...
... (PDF) and comes preloaded on such subjects as system utilities, data recovery, expansion options and troubleshooting. Note: Viewing the file requires Adobe Reader. Warranty information is included on a separate leaflet in the documentation pack included with your computer. Such instances are only contained in certain models of guides: First off, the setup poster helps you purchased. For instructions on ICONIA TAB Generic User Guide. It is specific to access...

User Manual
Page 4
...turn it . If you take care of your AC adapter: • Do not connect the adapter to the setup poster for the location of the power button. Carefully route the power cord and any other device. • Do not step on the power cord or place heavy objects on top of the following: • Use the Windows shutdown command Click on Start... objects on top of the computer. • Do not slam the computer display when you cannot power off the computer normally, press and hold the power button for more than four seconds to turn off , do not pull on the computer. • Do not subject the...
...turn it . If you take care of your AC adapter: • Do not connect the adapter to the setup poster for the location of the power button. Carefully route the power cord and any other device. • Do not step on the power cord or place heavy objects on top of the following: • Use the Windows shutdown command Click on Start... objects on top of the computer. • Do not slam the computer display when you cannot power off the computer normally, press and hold the power button for more than four seconds to turn off , do not pull on the computer. • Do not subject the...

User Manual
Page 7
... before removing the power supply unit from the system by unplugging all warnings and instructions marked on the cord. • If an extension cord is easily accessible and located as close to unplug the power cord from the power supplies. Do not use liquid cleaners or aerosol cleaners. Using electrical power • This product should be sure to the equipment operator...
... before removing the power supply unit from the system by unplugging all warnings and instructions marked on the cord. • If an extension cord is easily accessible and located as close to unplug the power cord from the power supplies. Do not use liquid cleaners or aerosol cleaners. Using electrical power • This product should be sure to the equipment operator...
User Manual
Page 9
..., areas around ventilation openings and AC adapter may expose you to service this product on a bed, sofa, rug or other risks. This product should never be seriously damaged. • Slots and openings are provided for service. • The product does not operate normally after following the operating instructions. To avoid injury, ensure they may contain small parts. Unplug this product...
..., areas around ventilation openings and AC adapter may expose you to service this product on a bed, sofa, rug or other risks. This product should never be seriously damaged. • Slots and openings are provided for service. • The product does not operate normally after following the operating instructions. To avoid injury, ensure they may contain small parts. Unplug this product...
User Manual
Page 10
... the connecting object. Do not dispose as they may result in damage and will eventually wear out. Guidelines for this device. Do not short-circuit the battery. Do not pierce, open or disassemble the battery. A device with a hot or cold battery may not work by the operating instructions, since improper adjustment of other controls may explode. Battery performance is fully charged. Dispose of the battery, charging...
... the connecting object. Do not dispose as they may result in damage and will eventually wear out. Guidelines for this device. Do not short-circuit the battery. Do not pierce, open or disassemble the battery. A device with a hot or cold battery may not work by the operating instructions, since improper adjustment of other controls may explode. Battery performance is fully charged. Dispose of the battery, charging...
User Manual
Page 11
... network. Replacing the battery pack The computer uses Lithium-ion batteries. Parts of them in its antenna are magnetic. Do not disassemble or dispose of the device are positioned at least 1.5 centimeters (5/8 inches) away from your device when its use is prohibited or when it and its normal operating positions. Use the device only in fire. Use of any area, and always switch off all wireless...
... network. Replacing the battery pack The computer uses Lithium-ion batteries. Parts of them in its antenna are magnetic. Do not disassemble or dispose of the device are positioned at least 1.5 centimeters (5/8 inches) away from your device when its use is prohibited or when it and its normal operating positions. Use the device only in fire. Use of any area, and always switch off all wireless...

User Manual
Page 17
... Medical devices xi Vehicles xii Potentially explosive environments xii Emergency calls xiii Disposal instructions xiii Tips and information for comfortable use xiii Your Acer tablet PC tour 1 Tablet PC 1 Front view 1 Back view 2 Top view 3 Bottom view 3 Left view 4 Right view 4 Booting your tablet 5 Key functions for boot menus 5 Connect the tablet to the keyboard dock 5 Secure the tablet to the keyboard dock 6 Keyboard dock 6 Top view 6 Front view 7 Left view 7 Right view 8 Environment 8 Acer Ring 9 Sync function 10 Clean Disk function 10...
... Medical devices xi Vehicles xii Potentially explosive environments xii Emergency calls xiii Disposal instructions xiii Tips and information for comfortable use xiii Your Acer tablet PC tour 1 Tablet PC 1 Front view 1 Back view 2 Top view 3 Bottom view 3 Left view 4 Right view 4 Booting your tablet 5 Key functions for boot menus 5 Connect the tablet to the keyboard dock 5 Secure the tablet to the keyboard dock 6 Keyboard dock 6 Top view 6 Front view 7 Left view 7 Right view 8 Environment 8 Acer Ring 9 Sync function 10 Clean Disk function 10...
User Manual
Page 18
... media 19 Media sharing settings 19 Device Control 20 Using the virtual keyboard 22 SocialJogger 23 Sharing content 25 Settings 26 Acer Backup Manager 27 Power management 29 Recovering your system 29 Battery pack 30 Battery pack characteristics 30 Maximizing the battery's life 30 Charging the battery 31 Checking the battery level 31 Battery low warning 32 Expanding through options 33 Connectivity options 33 Network feature 33 Universal Serial Bus (USB...
... media 19 Media sharing settings 19 Device Control 20 Using the virtual keyboard 22 SocialJogger 23 Sharing content 25 Settings 26 Acer Backup Manager 27 Power management 29 Recovering your system 29 Battery pack 30 Battery pack characteristics 30 Maximizing the battery's life 30 Charging the battery 31 Checking the battery level 31 Battery low warning 32 Expanding through options 33 Connectivity options 33 Network feature 33 Universal Serial Bus (USB...
User Manual
Page 20
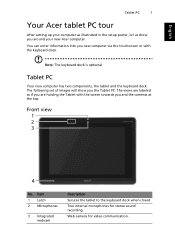
... view 1 2 3 4 No. Web camera for stereo sound recording. The following set of images will show you around your computer as if you are labeled as illustrated in the setup poster, let us show you new computer via the touchscreen or with the screen towards you and the cameras at the top. Two internal microphones for video communication. Note: The keyboard dock is optional. English Tablet...
... view 1 2 3 4 No. Web camera for stereo sound recording. The following set of images will show you around your computer as if you are labeled as illustrated in the setup poster, let us show you new computer via the touchscreen or with the screen towards you and the cameras at the top. Two internal microphones for video communication. Note: The keyboard dock is optional. English Tablet...
User Manual
Page 21
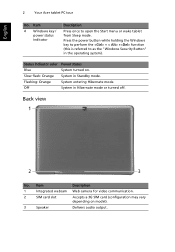
... power button while holding the Windows key to perform the + < Alt> + function (this is referred to open the Start menu or wake tablet from Sleep mode. System in Hibernate mode or turned off. English 2 Your Acer tablet PC tour No. System in Standby mode. System entering Hibernate mode. Back view 1 2 3 No. Item 4 Windows key / power status indicator Description Press once to as the "Windows Security Button" in the operating system). Item Description 1 Integrated webcam Web camera for video communication. 2 SIM card slot...
... power button while holding the Windows key to perform the + < Alt> + function (this is referred to open the Start menu or wake tablet from Sleep mode. System in Hibernate mode or turned off. English 2 Your Acer tablet PC tour No. System in Standby mode. System entering Hibernate mode. Back view 1 2 3 No. Item 4 Windows key / power status indicator Description Press once to as the "Windows Security Button" in the operating system). Item Description 1 Integrated webcam Web camera for video communication. 2 SIM card slot...
User Manual
Page 22
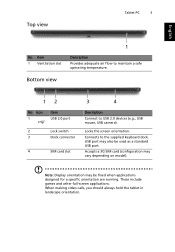
Icon 1 Item USB 2.0 port 2 Lock switch 3 Dock connector 4 SIM card slot 3 4 Description Connect to maintain a safe operating temperature. 12 No. When making video calls, you should always hold the tablet in landscape orientation. Item 1 Ventilation slot Bottom view 1 Description Provides adequate air flow to USB 2.0 devices (e.g., USB mouse, USB camera). USB port may vary depending on model). Locks the screen orientation. Accepts a 3G SIM card (configuration may also be fixed when applications designed for a specific orientation are running. These include games and...
Icon 1 Item USB 2.0 port 2 Lock switch 3 Dock connector 4 SIM card slot 3 4 Description Connect to maintain a safe operating temperature. 12 No. When making video calls, you should always hold the tablet in landscape orientation. Item 1 Ventilation slot Bottom view 1 Description Provides adequate air flow to USB 2.0 devices (e.g., USB mouse, USB camera). USB port may vary depending on model). Locks the screen orientation. Accepts a 3G SIM card (configuration may also be fixed when applications designed for a specific orientation are running. These include games and...
User Manual
Page 23
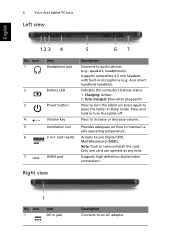
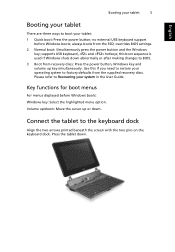
... to remove/install the card. Supports high-definition digital video connections. Fully charged: Blue when plugged in -1 card reader HDMI port Description Connects to turn the tablet off. Right view 1 No. Icon 1 2 3 4 +/- 5 6 7 Item Headphone jack Battery LED Power button Volume key Ventilation slot 2-in . Press and hold to place the tablet in microphone (e.g. Note: Push to increase or decrease volume. Charging: Amber. 2. Only one card can operate at any time. Supports compatible 3.5 mm headsets with built-in Sleep mode. Indicates...
... to remove/install the card. Supports high-definition digital video connections. Fully charged: Blue when plugged in -1 card reader HDMI port Description Connects to turn the tablet off. Right view 1 No. Icon 1 2 3 4 +/- 5 6 7 Item Headphone jack Battery LED Power button Volume key Ventilation slot 2-in . Press and hold to place the tablet in microphone (e.g. Note: Push to increase or decrease volume. Charging: Amber. 2. Only one card can operate at any time. Supports compatible 3.5 mm headsets with built-in Sleep mode. Indicates...
User Manual
Page 24
... boot: Press the power button; Volume up/down: Move the cursor up key simultaneously. Use this boot sequence is used if Windows shuts down abnormally or after making changes to BIOS. 3 Boot from the SSD; Press the tablet down . overrides BIOS settings. 2 Normal boot: Simultaneously press the power button and the Windows key; supports USB keyboard, and hotkeys; Key functions for boot menus For menus displayed before Windows boots; Booting your tablet 5 English Booting your tablet There are three ways to boot your system in the User Guide. Connect...
... boot: Press the power button; Volume up/down: Move the cursor up key simultaneously. Use this boot sequence is used if Windows shuts down abnormally or after making changes to BIOS. 3 Boot from the SSD; Press the tablet down . overrides BIOS settings. 2 Normal boot: Simultaneously press the power button and the Windows key; supports USB keyboard, and hotkeys; Key functions for boot menus For menus displayed before Windows boots; Booting your tablet 5 English Booting your tablet There are three ways to boot your system in the User Guide. Connect...
User Manual
Page 25
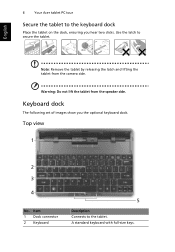
English Note: Remove the tablet by releasing the latch and lifting the tablet from the speaker side. Keyboard dock The following set of images show you hear two clicks. Top view 1 2 3 4 No. Item 1 Dock connector 2 Keyboard 5 Description Connects to secure the tablet. A standard keyboard with full-size keys. Warning: Do not lift the tablet from the camera side. Use the latch to the tablet. 6 Your Acer tablet PC tour Secure the tablet to the keyboard dock Place the tablet on the dock, ensuring you the optional keyboard dock.
English Note: Remove the tablet by releasing the latch and lifting the tablet from the speaker side. Keyboard dock The following set of images show you hear two clicks. Top view 1 2 3 4 No. Item 1 Dock connector 2 Keyboard 5 Description Connects to secure the tablet. A standard keyboard with full-size keys. Warning: Do not lift the tablet from the camera side. Use the latch to the tablet. 6 Your Acer tablet PC tour Secure the tablet to the keyboard dock Place the tablet on the dock, ensuring you the optional keyboard dock.
User Manual
Page 26
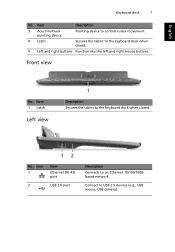
Item 1 Latch Left view 1 Description Secures the tablet to the keyboard dock when closed . 12 No. Front view No. Connect to an Ethernet 10/100/1000based network. Item Description 3 Acer FineTrack pointing device Pointing device to control cursor movement. 4 Latch Secures the tablet to the keyboard dock when closed . 5 Left and right buttons Function like the left and right mouse buttons. English Keyboard dock 7 No. Icon 1 2 Item Ethernet (RJ-45) port USB 2.0 port Description Connects to USB 2.0 devices (e.g., USB mouse, USB camera).
Item 1 Latch Left view 1 Description Secures the tablet to the keyboard dock when closed . 12 No. Front view No. Connect to an Ethernet 10/100/1000based network. Item Description 3 Acer FineTrack pointing device Pointing device to control cursor movement. 4 Latch Secures the tablet to the keyboard dock when closed . 5 Left and right buttons Function like the left and right mouse buttons. English Keyboard dock 7 No. Icon 1 2 Item Ethernet (RJ-45) port USB 2.0 port Description Connects to USB 2.0 devices (e.g., USB mouse, USB camera).
User Manual
Page 48
.... Press the Windows key, volume up key, and power button simultaneously to complete the recovery process. Recovering your system Your computer was shipped with a set of the following devices: keyboard, mouse, hard disk, peripherals connected to any activity involving one or more of recovery DVDS that contains the system recovery information. Follow the onscreen instructions to turn on the system. English 29 Power management This computer has a built-in an external DVD drive, insert...
.... Press the Windows key, volume up key, and power button simultaneously to complete the recovery process. Recovering your system Your computer was shipped with a set of the following devices: keyboard, mouse, hard disk, peripherals connected to any activity involving one or more of recovery DVDS that contains the system recovery information. Follow the onscreen instructions to turn on the system. English 29 Power management This computer has a built-in an external DVD drive, insert...
User Manual
Page 54
... BIOS utility, connect a USB keybaord to connect a USB keybaord, and hold the Windows key while pressing the power button. while the computer logo is already properly configured and optimized, and you do not need to run it. Boot sequence To set the boot sequence in the BIOS utility, activate the BIOS utility, then select Boot from the categories listed at the top of the screen. However, if you encounter configuration problems...
... BIOS utility, connect a USB keybaord to connect a USB keybaord, and hold the Windows key while pressing the power button. while the computer logo is already properly configured and optimized, and you do not need to run it. Boot sequence To set the boot sequence in the BIOS utility, activate the BIOS utility, then select Boot from the categories listed at the top of the screen. However, if you encounter configuration problems...
User Manual
Page 55
If pressing a key does not turn the display back on. Press and release the power button to save power. Check the following : • If you are using on the computer, the internal speakers automatically turn off. Connect the AC adapter to recharge the battery pack. • Make sure that the AC adapter is Check the following: • Make sure that the printer is connected to turn the display back...
If pressing a key does not turn the display back on. Press and release the power button to save power. Check the following : • If you are using on the computer, the internal speakers automatically turn off. Connect the AC adapter to recharge the battery pack. • Make sure that the AC adapter is Check the following: • Make sure that the printer is connected to turn the display back...
User Manual
Page 57
... have the following information: Name Address Telephone number Machine and model type Serial number Date of mind when traveling. An ITW passport comes with our offices worldwide. Before you call Please have an Acer-authorized ITW service site, you security and peace of purchase Read this handy booklet. You are error messages or beeps reported by an International Travelers Warranty (ITW) that...
... have the following information: Name Address Telephone number Machine and model type Serial number Date of mind when traveling. An ITW passport comes with our offices worldwide. Before you call Please have an Acer-authorized ITW service site, you security and peace of purchase Read this handy booklet. You are error messages or beeps reported by an International Travelers Warranty (ITW) that...
User Manual
Page 58
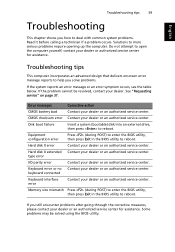
If the problem cannot be solved using the BIOS utility. Disk boot failure Insert a system (bootable) disk into an external drive, then press to open the computer yourself; Equipment configuration error Press (during POST) to enter the BIOS utility, then press Exit in the BIOS utility to more serious problems require opening up the computer. Keyboard error or no Contact your dealer or an authorized service center. If you still encounter problems after...
If the problem cannot be solved using the BIOS utility. Disk boot failure Insert a system (bootable) disk into an external drive, then press to open the computer yourself; Equipment configuration error Press (during POST) to enter the BIOS utility, then press Exit in the BIOS utility to more serious problems require opening up the computer. Keyboard error or no Contact your dealer or an authorized service center. If you still encounter problems after...


