
Quick Start Guide
Page 1
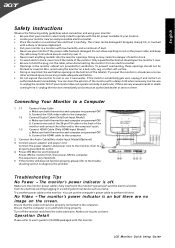
...; Never use the computer's power cable to the computer's port. Connect HDMI Cable (Only HDMI-Input Model) a. Test the electrical oulet by plugging in your location. • Locate your monitor near water. You can be sure to the computer. 2. No Video - Do not allow anything metallic into the monitor openings. b. Power-ON Monitor and Computer Power-ON the monitor first, then power-ON the computer. Try another power cable on the screen. Make sure...
...; Never use the computer's power cable to the computer's port. Connect HDMI Cable (Only HDMI-Input Model) a. Test the electrical oulet by plugging in your location. • Locate your monitor near water. You can be sure to the computer. 2. No Video - Do not allow anything metallic into the monitor openings. b. Power-ON Monitor and Computer Power-ON the monitor first, then power-ON the computer. Try another power cable on the screen. Make sure...
Quick Start Guide
Page 2
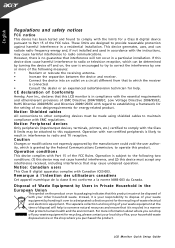
... waste electrical and electronic equipment. LCD Monitor Quick Setup Guide Notice: Shielded cables All connections to other household waste. For more of disposal will not occur in a manner that may cause harmful interference to which is subject to operate this product must not be made using shielded cables to Part 15 of the FCC Rules. English Regulations and safety notices FCC...
... waste electrical and electronic equipment. LCD Monitor Quick Setup Guide Notice: Shielded cables All connections to other household waste. For more of disposal will not occur in a manner that may cause harmful interference to which is subject to operate this product must not be made using shielded cables to Part 15 of the FCC Rules. English Regulations and safety notices FCC...

User Manual
Page 1
TABLE OF CONTENTS Special notes on LCD monitors 1 Information for your safety and comfort 2 Unpacking 5 Attaching/Removing the base 6 Screen position adjustment 6 Connecting the power cord 7 Safety precaution 7 Cleaning your monitor 7 Power saving 8 DDC 8 Power adaptor 8 Connector Pin Assignment 9 Standard/3D Timing Table 11 Installation 12 User controls 13 Troubleshooting 19
TABLE OF CONTENTS Special notes on LCD monitors 1 Information for your safety and comfort 2 Unpacking 5 Attaching/Removing the base 6 Screen position adjustment 6 Connecting the power cord 7 Safety precaution 7 Cleaning your monitor 7 Power saving 8 DDC 8 Power adaptor 8 Connector Pin Assignment 9 Standard/3D Timing Table 11 Installation 12 User controls 13 Troubleshooting 19
User Manual
Page 2
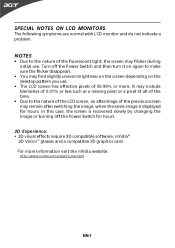
...; 3D visual effects require 3D compatible software, nVidia® 3D Vision™ glasses and a compatible 3D graphics card. NOTES • Due to make sure the flicker disappears. • You may flicker during initial use . • The LCD screen has effective pixels of the fluorescent light, the screen may find slightly uneven brightness on the screen depending on the desktop pattern you use . Turn off the Power Switch for hours.
...; 3D visual effects require 3D compatible software, nVidia® 3D Vision™ glasses and a compatible 3D graphics card. NOTES • Due to make sure the flicker disappears. • You may flicker during initial use . • The LCD screen has effective pixels of the fluorescent light, the screen may find slightly uneven brightness on the screen depending on the desktop pattern you use . Turn off the Power Switch for hours.

User Manual
Page 3
...volume. • Avoid turning up the volume to block out noisy surroundings. • Turn the volume down if you need to disconnect power to protect it from overheating. If the product falls, it afteryour ears adjust. • Limit the amount of the product and to the equipment, be blocked or covered... warnings and instructions marked on a vibrating surface. • Never use this product near you plug the power cord into this product through cabinet slots as they may touch dangerous voltage points or short-out parts that the power outlet you . These openings must not ...
...volume. • Avoid turning up the volume to block out noisy surroundings. • Turn the volume down if you need to disconnect power to protect it from overheating. If the product falls, it afteryour ears adjust. • Limit the amount of the product and to the equipment, be blocked or covered... warnings and instructions marked on a vibrating surface. • Never use this product near you plug the power cord into this product through cabinet slots as they may touch dangerous voltage points or short-out parts that the power outlet you . These openings must not ...
User Manual
Page 4
... opening or removing covers may expose you have these symptoms, or any other controls may complain of the monitor, using a footrest, or raising your company's health and safety department. Tips and information for comfortable use Computer users may result in damage and will often require extensive work habits, stress, inadequate working in front of physical injury. Users are covered by the operating instructions...
... opening or removing covers may expose you have these symptoms, or any other controls may complain of the monitor, using a footrest, or raising your company's health and safety department. Tips and information for comfortable use Computer users may result in damage and will often require extensive work habits, stress, inadequate working in front of physical injury. Users are covered by the operating instructions...

User Manual
Page 5
... breaks by using drapes, shades or blinds • using a task light • changing the display's viewing angle • using a glare-reduction filter • using the product on a couch or bed. We do some stretching exercises. • Breathe fresh air as often as open windows, for enhanced...install the external display, keyboard and mouse properly and within comfort able reach • if you view your monitor more than the top edge of the display so your eyes point downward when looking at the middle of the display. • Adjust the display brightness and/or contrast...
... breaks by using drapes, shades or blinds • using a task light • changing the display's viewing angle • using a glare-reduction filter • using the product on a couch or bed. We do some stretching exercises. • Breathe fresh air as often as open windows, for enhanced...install the external display, keyboard and mouse properly and within comfort able reach • if you view your monitor more than the top edge of the display so your eyes point downward when looking at the middle of the display. • Adjust the display brightness and/or contrast...

User Manual
Page 8
... (outside of U.S.): Use a Cord Set consisting of H05VV-F cord and plug rated 10 A, 250 V. Place the monitor just below guidelines when cleaning the monitor. • Always unplug the monitor before cleaning. • Use a soft cloth to wipe the screen and cabinet front and sides. SAFETY PRECAUTION • Avoid placing the monitor, or any other light sources may reflect on the power cord to avoid damage to the cable. •...
... (outside of U.S.): Use a Cord Set consisting of H05VV-F cord and plug rated 10 A, 250 V. Place the monitor just below guidelines when cleaning the monitor. • Always unplug the monitor before cleaning. • Use a soft cloth to wipe the screen and cabinet front and sides. SAFETY PRECAUTION • Avoid placing the monitor, or any other light sources may reflect on the power cord to avoid damage to the cable. •...
User Manual
Page 9
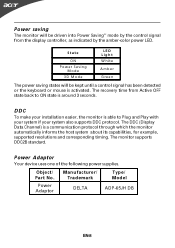
..., supported resolutions and corresponding timing. State ON P o w e r S a v in g Mode 3D Mode LED Lig h t W h ite A mber G reen The power saving states will be kept until a control signal has been detected or the keyboard or mouse is activated. Power saving The monitor will be driven into Power Saving" mode by the amber-color power LED. The recovery time from the display controller, as indicated by the control signal from Active OFF state back to Plug...
..., supported resolutions and corresponding timing. State ON P o w e r S a v in g Mode 3D Mode LED Lig h t W h ite A mber G reen The power saving states will be kept until a control signal has been detected or the keyboard or mouse is activated. Power saving The monitor will be driven into Power Saving" mode by the amber-color power LED. The recovery time from the display controller, as indicated by the control signal from Active OFF state back to Plug...
User Manual
Page 13
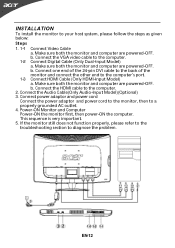
.... 2. Connect the Audio Cable(Only Audio-Input Model)(Optional) 3. Connect the HDMI cable to the computer. 1-2 Connect Digital Cable (Only Dual-Input Model) a. Connect one end of the 24-pin DVI cable to the back of the monitor and connect the other end to your host system, please follow the steps as given below: Steps 1. 1-1 Connect Video Cable a. This sequence is very important. 5. Make sure both the monitor and computer are powered-OFF. INSTALLATION To install the monitor...
.... 2. Connect the Audio Cable(Only Audio-Input Model)(Optional) 3. Connect the HDMI cable to the computer. 1-2 Connect Digital Cable (Only Dual-Input Model) a. Connect one end of the 24-pin DVI cable to the back of the monitor and connect the other end to your host system, please follow the steps as given below: Steps 1. 1-1 Connect Video Cable a. This sequence is very important. 5. Make sure both the monitor and computer are powered-OFF. INSTALLATION To install the monitor...
User Manual
Page 14
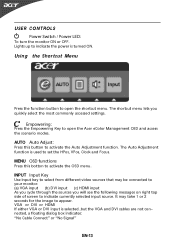
... of screen to appear. The Auto Adjustment function is used to activate the OSD menu. MENU OSD functions Press this button to indicate the power is selected ,but the VGA and DVI cables are not connected, a floating dialog box indicates: "No Cable Connect" or "No Signal" EN-13 VGA or DVI or HDMI If either VGA or DVI input is turned ON. USER CONTROLS Power Switch / Power LED: To turn the monitor ON or OFF. INPUT Input Key Use Input key to select from different video sources that...
... of screen to appear. The Auto Adjustment function is used to activate the OSD menu. MENU OSD functions Press this button to indicate the power is selected ,but the VGA and DVI cables are not connected, a floating dialog box indicates: "No Cable Connect" or "No Signal" EN-13 VGA or DVI or HDMI If either VGA or DVI input is turned ON. USER CONTROLS Power Switch / Power LED: To turn the monitor ON or OFF. INPUT Input Key Use Input key to select from different video sources that...

User Manual
Page 15
... Menu icon Sub Menu icon Sub Menu it e m D escrip tio n N /A User mode User defined. Acer eColor Management Operation instructions Step 1: Press " " Key to open the Acer eColor Management OSD and access the scenario modes Step 2: Press " " or " " to select the mode Step 3: Press " Adjust/Exit " Key to reduce powerconsumption N /A S ta n d a rd mode Default Setting. EN-14 Features and Benefits Ma in clearest detail. Reflects native display capability N /A G rahpic mode Enhances colors...
... Menu icon Sub Menu icon Sub Menu it e m D escrip tio n N /A User mode User defined. Acer eColor Management Operation instructions Step 1: Press " " Key to open the Acer eColor Management OSD and access the scenario modes Step 2: Press " " or " " to select the mode Step 3: Press " Adjust/Exit " Key to reduce powerconsumption N /A S ta n d a rd mode Default Setting. EN-14 Features and Benefits Ma in clearest detail. Reflects native display capability N /A G rahpic mode Enhances colors...
User Manual
Page 16
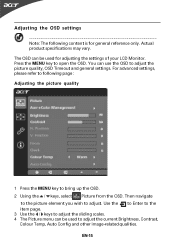
... adjust the current Brightness, Contrast, Colour Temp, Auto Config and other image-related qualities. Use the to Enter to the item page. 3 Use the / keys to adjust the sliding scales. 4 The Picture menu can be used for general reference only. The OSD can be used to adjust the picture quality, OSD Timeout and general settings. Press the MENU key to adjust. Then navigate to the picture element you wish to open...
... adjust the current Brightness, Contrast, Colour Temp, Auto Config and other image-related qualities. Use the to Enter to the item page. 3 Use the / keys to adjust the sliding scales. 4 The Picture menu can be used for general reference only. The OSD can be used to adjust the picture quality, OSD Timeout and general settings. Press the MENU key to adjust. Then navigate to the picture element you wish to open...
User Manual
Page 20
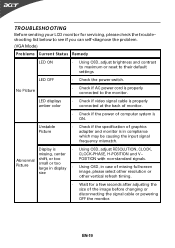
... the signal cable or powering OFF the monitor. LED displays amber color · Check if video signal cable is properly connected at the back of monitor. · Check if the power of graphics adapter and monitor is ON. Unstable Picture · Check if the specification of computer system is in compliance which may be causing the input signal frequency mismatch. Display is properly connected to their default settings. EN-19 No Picture · Check if AC power cord is · Using OSD, adjust RESOLUTION, CLOCK...
... the signal cable or powering OFF the monitor. LED displays amber color · Check if video signal cable is properly connected at the back of monitor. · Check if the power of graphics adapter and monitor is ON. Unstable Picture · Check if the specification of computer system is in compliance which may be causing the input signal frequency mismatch. Display is properly connected to their default settings. EN-19 No Picture · Check if AC power cord is · Using OSD, adjust RESOLUTION, CLOCK...
User Manual
Page 21
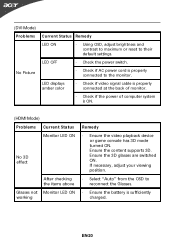
... properly connected to the monitor. Ensure the content supports 3D. (DVI Mode) P ro b le ms No Picture Current Status Remedy LED ON · Using OSD, adjust brightness and contrast to maximum or reset to reconnect the Glasses. · Ensure the battery is sufficiently charged. EN-20 LED OFF · Check the power switch. · Check if AC power cord is ON. (HDMI Mode) Problems Current Status Monitor LED ON No 3D effect Glasses not working After checking...
... properly connected to the monitor. Ensure the content supports 3D. (DVI Mode) P ro b le ms No Picture Current Status Remedy LED ON · Using OSD, adjust brightness and contrast to maximum or reset to reconnect the Glasses. · Ensure the battery is sufficiently charged. EN-20 LED OFF · Check the power switch. · Check if AC power cord is ON. (HDMI Mode) Problems Current Status Monitor LED ON No 3D effect Glasses not working After checking...
User Manual
Page 32
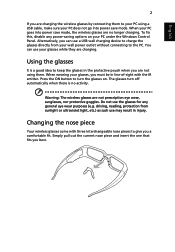
... PC goes into power save mode, the wireless glasses are no activity. Do not use may result in the protective pouch when you are not using them to your PC using a USB cable, make sure your PC under the Windows Control Panel. Using the glasses It is no longer charging. When wearing your wall power outlet without connecting to charge the glasses directly from sunlight or ultraviolet light...
... PC goes into power save mode, the wireless glasses are no activity. Do not use may result in the protective pouch when you are not using them to your PC using a USB cable, make sure your PC under the Windows Control Panel. Using the glasses It is no longer charging. When wearing your wall power outlet without connecting to charge the glasses directly from sunlight or ultraviolet light...

User Manual
Page 33
Note: Compatible graphics cards include: NVIDIA GeForce 8 Series (8800GT+), 9 Series (9600GT+) or GTX 200 Series. Use the dual-link DVI-to connecting the USB IR Emitter. The driver and software must be installed prior to -DVI cable supplied with the display) English 3 Hardware Installation Setting up 3D Vision (Dual DVI to PC) Connecting the display Connect your 3D Vision Ready display to your NVIDIA graphics card. Note: Connect ONLY the display now. For more information, please visit: www...
Note: Compatible graphics cards include: NVIDIA GeForce 8 Series (8800GT+), 9 Series (9600GT+) or GTX 200 Series. Use the dual-link DVI-to connecting the USB IR Emitter. The driver and software must be installed prior to -DVI cable supplied with the display) English 3 Hardware Installation Setting up 3D Vision (Dual DVI to PC) Connecting the display Connect your 3D Vision Ready display to your NVIDIA graphics card. Note: Connect ONLY the display now. For more information, please visit: www...
User Manual
Page 34
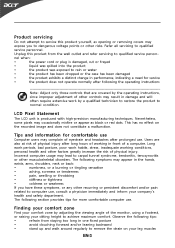
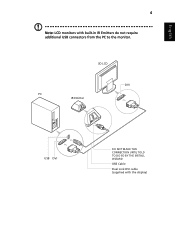
English 4 Note: LCD monitors with built-in IR Emitters do not require additional USB connectors from the PC to the monitor. 3D LCD DVI PC IR Emitter USB DVI DO NOT MAKE THIS CONNECTION UNTIL TOLD TO DO SO BY THE INSTALL WIZARD USB Cable Dual Link DVI cable (supplied with the display)
English 4 Note: LCD monitors with built-in IR Emitters do not require additional USB connectors from the PC to the monitor. 3D LCD DVI PC IR Emitter USB DVI DO NOT MAKE THIS CONNECTION UNTIL TOLD TO DO SO BY THE INSTALL WIZARD USB Cable Dual Link DVI cable (supplied with the display)
User Manual
Page 36
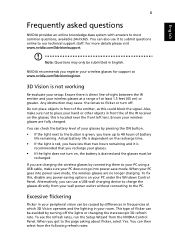
... then select from the following refresh rates: Alternatively, you are fully charged. To see the refresh rates, run the Setup Wizard from your wall power outlet without connecting to the PC. You can use it is recommended that you get to our technical support staff. Also, make sure your PC under the Windows Control Panel. You can be submitted in English. NVIDIA recommends you have...
... then select from the following refresh rates: Alternatively, you are fully charged. To see the refresh rates, run the Setup Wizard from your wall power outlet without connecting to the PC. You can use it is recommended that you get to our technical support staff. Also, make sure your PC under the Windows Control Panel. You can be submitted in English. NVIDIA recommends you have...
User Manual
Page 37
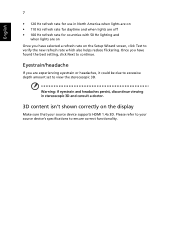
... depth amount set to verify the new refresh rate which also helps reduce flickering. Eyestrain/headache If you are on Once you have selected a refresh rate on the Setup Wizard screen, click Test to view the stereoscopic 3D. English 7 • 120 Hz refresh rate for use in stereoscopic 3D and consult a doctor. 3D content isn't shown correctly on the display Make sure that your source device's specifications to...
... depth amount set to verify the new refresh rate which also helps reduce flickering. Eyestrain/headache If you are on Once you have selected a refresh rate on the Setup Wizard screen, click Test to view the stereoscopic 3D. English 7 • 120 Hz refresh rate for use in stereoscopic 3D and consult a doctor. 3D content isn't shown correctly on the display Make sure that your source device's specifications to...


