
User Manual
Page 2
... the serial number, model number and purchase information. Record the model number, serial number, purchase date and place of this manual or supplementary documents and publications. All correspondence concerning your computer. No part of this publication without obligation to notify any means, electronically, mechanically, by photocopy, recording or otherwise, without the prior written permission of Acer Incorporated. All Rights Reserved. Acer Incorporated. Acer LCD Monitor User Guide Model number Serial number...
... the serial number, model number and purchase information. Record the model number, serial number, purchase date and place of this manual or supplementary documents and publications. All correspondence concerning your computer. No part of this publication without obligation to notify any means, electronically, mechanically, by photocopy, recording or otherwise, without the prior written permission of Acer Incorporated. All Rights Reserved. Acer Incorporated. Acer LCD Monitor User Guide Model number Serial number...

User Manual
Page 3
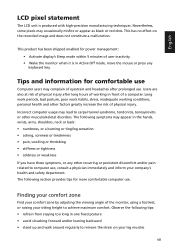
... and instructions marked on the desktop pattern you use . iii English Special notes on LCD monitors The following guidelines when connecting and disconnecting power from the LCD monitor: • Make sure the monitor is recovered slowly by unplugging all power cords from the system by changing the image or turning off the power switch and then turn it on again to wipe the screen and cabinet front and sides. Keep this...
... and instructions marked on the desktop pattern you use . iii English Special notes on LCD monitors The following guidelines when connecting and disconnecting power from the LCD monitor: • Make sure the monitor is recovered slowly by unplugging all power cords from the system by changing the image or turning off the power switch and then turn it on again to wipe the screen and cabinet front and sides. Keep this...

User Manual
Page 4
... high volume. • Avoid turning up the volume to prevent battery leakage, do not increase it under sporting, exercising, or any kind into is provided. • Never push objects of power indicated on the marking label. If you need to rest on the power cord. Do not locate this product through cabinet slots as they may touch dangerous...
... high volume. • Avoid turning up the volume to prevent battery leakage, do not increase it under sporting, exercising, or any kind into is provided. • Never push objects of power indicated on the marking label. If you need to rest on the power cord. Do not locate this product through cabinet slots as they may touch dangerous...

User Manual
Page 5
... product only with the supplied power supply cord set , make sure that is not properly grounded may interfere with a three-wire grounded plug. If power strips are used with this product, make sure that the new power cord meets the following the operating instructions v Refer all products plugged into the extension cord does not exceed the extension cord ampere rating. Contact your electrician for service • the product...
... product only with the supplied power supply cord set , make sure that is not properly grounded may interfere with a three-wire grounded plug. If power strips are used with this product, make sure that the new power cord meets the following the operating instructions v Refer all products plugged into the extension cord does not exceed the extension cord ampere rating. Contact your electrician for service • the product...

User Manual
Page 6
...instructions. Keep them out of the reach of the global environment, please recycle. IT Equipment Recycling Information Acer is strongly committed to this electronic device into the trash when discarding. We at service stations. For more information and help when recycling, please go to environmental protection and views... and provide the best working procedures to reduce the environmental impact of our products. English Note: Adjust only those controls that are covered by a qualified technician to restore the product to turn off the device near gas pumps at Acer are often, but...
...instructions. Keep them out of the reach of the global environment, please recycle. IT Equipment Recycling Information Acer is strongly committed to this electronic device into the trash when discarding. We at service stations. For more information and help when recycling, please go to environmental protection and views... and provide the best working procedures to reduce the environmental impact of our products. English Note: Adjust only those controls that are covered by a qualified technician to restore the product to turn off the device near gas pumps at Acer are often, but...
User Manual
Page 7
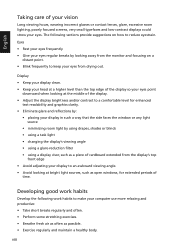
... computer use . Users are also at risk of working conditions, personal health and other musculoskeletal disorders. Observe the following section provides tips for power management: • Activate display's Sleep mode within 5 minutes of physical injury. The following tips: • refrain from staying too long in one fixed posture • avoid slouching forward and/or leaning backward • stand up...
... computer use . Users are also at risk of working conditions, personal health and other musculoskeletal disorders. Observe the following section provides tips for power management: • Activate display's Sleep mode within 5 minutes of physical injury. The following tips: • refrain from staying too long in one fixed posture • avoid slouching forward and/or leaning backward • stand up...
User Manual
Page 8
...; using a task light • changing the display's viewing angle • using a glare-reduction filter • using a display visor, such as a piece of cardboard extended from the display's top front edge • Avoid adjusting your display to keep your display in such a way that the side faces the window or any light source • minimizing room light by looking at the middle of the display. • Adjust the display brightness and/or contrast...
...; using a task light • changing the display's viewing angle • using a glare-reduction filter • using a display visor, such as a piece of cardboard extended from the display's top front edge • Avoid adjusting your display to keep your display in such a way that the side faces the window or any light source • minimizing room light by looking at the middle of the display. • Adjust the display brightness and/or contrast...
User Manual
Page 11
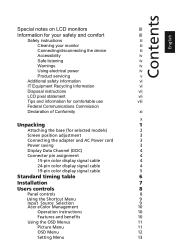
... the base (for selected models) 2 Screen position adjustment 3 Connecting the adapter and AC Power cord 3 Power saving 3 Display Data Channel (DDC) 4 Connector pin assignment 4 15-pin color display signal cable 4 24-pin color display signal cable 4 19-pin color display signal cable 5 Standard timing table 6 Installation 7 Users controls 8 Panel controls 8 Using the Shortcut Menu 9 Input Source Selection 9 Acer eColor Management 10 Operation instructions 10 Features and benefits 10 Using the OSD Menus 11 Picture Menu 11 OSD Menu 12 Setting Menu 13
... the base (for selected models) 2 Screen position adjustment 3 Connecting the adapter and AC Power cord 3 Power saving 3 Display Data Channel (DDC) 4 Connector pin assignment 4 15-pin color display signal cable 4 24-pin color display signal cable 4 19-pin color display signal cable 5 Standard timing table 6 Installation 7 Users controls 8 Panel controls 8 Using the Shortcut Menu 9 Input Source Selection 9 Acer eColor Management 10 Operation instructions 10 Features and benefits 10 Using the OSD Menus 11 Picture Menu 11 OSD Menu 12 Setting Menu 13
User Manual
Page 14
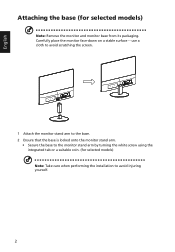
English Attaching the base (for selected models) Note: Take care when performing the installation to the monitor stand arm by turning the white screw using the integrated tab or a suitable coin. (for selected models) Note: Remove the monitor and monitor base from its packaging. use a cloth to avoid scratching the screen. 1 Attach the monitor stand arm to the base. 2 Ensure that the base is locked onto the monitor stand arm. • Secure the base to avoid injuring yourself. 2 Carefully place the monitor face-down on a stable surface --
English Attaching the base (for selected models) Note: Take care when performing the installation to the monitor stand arm by turning the white screw using the integrated tab or a suitable coin. (for selected models) Note: Remove the monitor and monitor base from its packaging. use a cloth to avoid scratching the screen. 1 Attach the monitor stand arm to the base. 2 Ensure that the base is locked onto the monitor stand arm. • Secure the base to avoid injuring yourself. 2 Carefully place the monitor face-down on a stable surface --

User Manual
Page 15
... blinking blue light. No user-adjustment is required. • Plug one end of the AC power cord to the Adapter, and plug the other end into an AC outlet. • For units using 120 V AC: Use a UL-listed cord set consisting of H05VV-F cord and plug rated 10 A/250 V. Power saving The monitor will be adjusted to hold the edges of the monitor. Screen position adjustment To optimize the viewing position, you can be switched to "power saving" mode by the control signal from "power saving" mode...
... blinking blue light. No user-adjustment is required. • Plug one end of the AC power cord to the Adapter, and plug the other end into an AC outlet. • For units using 120 V AC: Use a UL-listed cord set consisting of H05VV-F cord and plug rated 10 A/250 V. Power saving The monitor will be adjusted to hold the edges of the monitor. Screen position adjustment To optimize the viewing position, you can be switched to "power saving" mode by the control signal from "power saving" mode...

User Manual
Page 16
... No. Connector pin assignment 15-pin color display signal cable 1 5 6 10 11 15 PIN No. Description 13 NC 14 +5 V power 15 DVI detect 16 Hot-plug detection 17 TMDS data 018 TMDS data 0+ 19 TMDS data 0/5 shield 20 NC 21 NC 22 TMDS clock shield 23 TMDS clock+ 24 DDC TMDS clock- The monitor supports the DDC2B standard. Description 1 Red 2 Green 3 Blue 4 Monitor ground...
... No. Connector pin assignment 15-pin color display signal cable 1 5 6 10 11 15 PIN No. Description 13 NC 14 +5 V power 15 DVI detect 16 Hot-plug detection 17 TMDS data 018 TMDS data 0+ 19 TMDS data 0/5 shield 20 NC 21 NC 22 TMDS clock shield 23 TMDS clock+ 24 DDC TMDS clock- The monitor supports the DDC2B standard. Description 1 Red 2 Green 3 Blue 4 Monitor ground...

User Manual
Page 19
... damage to diagnose the problem. e Connect the audio cable (Optional, only Audio-input Model)to the computer. 2 Connect the adapter a Connect the AC cord to the computer. Note: Audio output is very important. 4 If the monitor does not function properly, please refer to the troubleshooting section to the monitor, do not lift the monitor by its base. 7 b Connect the VGA video cable to the adapter. English Installation To install the monitor on the monitor first, then the...
... damage to diagnose the problem. e Connect the audio cable (Optional, only Audio-input Model)to the computer. 2 Connect the adapter a Connect the AC cord to the computer. Note: Audio output is very important. 4 If the monitor does not function properly, please refer to the troubleshooting section to the monitor, do not lift the monitor by its base. 7 b Connect the VGA video cable to the adapter. English Installation To install the monitor on the monitor first, then the...

User Manual
Page 20
... to enter a selection in the OSD menu. 4 Auto/Exit button • When the OSD menu is active, press this button to exit the OSD menu. • When the OSD menu is inactive, press this button to open the Acer eColor Management OSD and access the scenario modes. 8 Blinking blue indicates standby/ power saving mode. 2 < / > button Press the < / > button to navigate to the desired function, and press the Menu button to view the OSD menu. Blue indicates power on /off. Users controls English Panel controls No.
... to enter a selection in the OSD menu. 4 Auto/Exit button • When the OSD menu is active, press this button to exit the OSD menu. • When the OSD menu is inactive, press this button to open the Acer eColor Management OSD and access the scenario modes. 8 Blinking blue indicates standby/ power saving mode. 2 < / > button Press the < / > button to navigate to the desired function, and press the Menu button to view the OSD menu. Blue indicates power on /off. Users controls English Panel controls No.
User Manual
Page 21
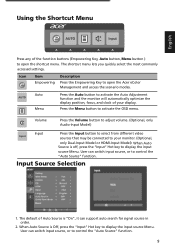
... the OSD menu. User can support auto search for signal source in order. 2. When Auto Source is off, press the "Input" Hot key to display the input source Menu. Volume Press the Volume button to adjust volume. (Optional, only Audio-Input Model) Input Input Press the Input button to select from different video sources that may be connected to your display. English Using the Shortcut Menu AUTO Input Press any of the function buttons (Empowering Key, Auto button, Menu button ) to open the Acer eColor Management and access the scenario modes. The default of Auto Source...
... the OSD menu. User can support auto search for signal source in order. 2. When Auto Source is off, press the "Input" Hot key to display the input source Menu. Volume Press the Volume button to adjust volume. (Optional, only Audio-Input Model) Input Input Press the Input button to select from different video sources that may be connected to your display. English Using the Shortcut Menu AUTO Input Press any of the function buttons (Empowering Key, Auto button, Menu button ) to open the Acer eColor Management and access the scenario modes. The default of Auto Source...

User Manual
Page 22
... mode. 3 Press the Auto button to suit any situation. Settings can be fine-tuned to confirm the selection and exit Acer eColor Management. Presents great visuals, even in unsuitably-lit environments. 10 Features and benefits Icon Mode type User mode Description User-defined. Reflects native display capability. Standard mode Default settings. ECO mode Adjusts the settings to open the Acer eColor Management OSD menu and access the scenario modes. English Acer eColor Management Operation instructions...
... mode. 3 Press the Auto button to suit any situation. Settings can be fine-tuned to confirm the selection and exit Acer eColor Management. Presents great visuals, even in unsuitably-lit environments. 10 Features and benefits Icon Mode type User mode Description User-defined. Reflects native display capability. Standard mode Default settings. ECO mode Adjusts the settings to open the Acer eColor Management OSD menu and access the scenario modes. English Acer eColor Management Operation instructions...

User Manual
Page 23
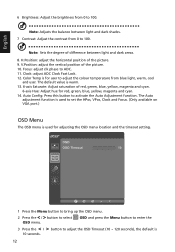
... an on-screen display (OSD) menu for making various adjustments and settings. Your LCD monitor is for general reference only. For the best protection select a lower value. 11 You can use the OSD menu to select Picture menu. Picture Acer eColor Management Blue Light On Brightness 70 Contrast 50 H.Position 20 V.Position 50 Focus 70 Clock 50 1 Press the Menu button to bring up the OSD menu. 2 Press the < / > button to adjust the picture quality, OSD timeout, and general settings. Position, V. Position, Focus, Clock...
... an on-screen display (OSD) menu for making various adjustments and settings. Your LCD monitor is for general reference only. For the best protection select a lower value. 11 You can use the OSD menu to select Picture menu. Picture Acer eColor Management Blue Light On Brightness 70 Contrast 50 H.Position 20 V.Position 50 Focus 70 Clock 50 1 Press the Menu button to bring up the OSD menu. 2 Press the < / > button to adjust the picture quality, OSD timeout, and general settings. Position, V. Position, Focus, Clock...
User Manual
Page 24
... default value is warm. 13. 6-axis Saturate: Adjust saturation of difference between light and dark shades. 7 Contrast: Adjust the contrast from 0 to 100. The Auto adjustment function is for red, green, blue, yellow, magenta and cyan. 14. OSD and press the Menu button to enter the 3 Press the < / > button to adjust the colour temperature from blue light, warm, cool and user. Color Temp is used to select OSD menu. V.Position: adjust the vertical position of the picture. 9. Focus: adjust...
... default value is warm. 13. 6-axis Saturate: Adjust saturation of difference between light and dark shades. 7 Contrast: Adjust the contrast from 0 to 100. The Auto adjustment function is for red, green, blue, yellow, magenta and cyan. 14. OSD and press the Menu button to enter the 3 Press the < / > button to adjust the colour temperature from blue light, warm, cool and user. Color Temp is used to select OSD menu. V.Position: adjust the vertical position of the picture. 9. Focus: adjust...
User Manual
Page 25
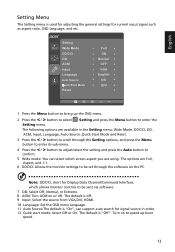
... support auto search for current input signal such as aspect ratio, OSD language, and etc. The default is off . The following options are available in order. 12 Quick start mode: Select Off or On. English Setting Menu The Setting menu is used for adjusting the general settings for signal source in the Setting menu: Wide Mode, DDC/CI, OD, ACM, Input, Language, Auto Source ,Quick Start Mode and Reset. 3 Press the < / > button to be sent via software. 7 OD: Select Off, Normal, or Extreme. 8 ACM: Turn...
... support auto search for current input signal such as aspect ratio, OSD language, and etc. The default is off . The following options are available in order. 12 Quick start mode: Select Off or On. English Setting Menu The Setting menu is used for adjusting the general settings for signal source in the Setting menu: Wide Mode, DDC/CI, OD, ACM, Input, Language, Auto Source ,Quick Start Mode and Reset. 3 Press the < / > button to be sent via software. 7 OD: Select Off, Normal, or Extreme. 8 ACM: Turn...

User Manual
Page 27
... connected to their default settings. VGA Mode Problem No picture visible LED status Blue Off Remedy Using the OSD menu, adjust brightness and contrast to maximum or reset to the monitor. Using the OSD menu, adjust focus, clock, H-position and V-position with non-standard signals. Blinking Blue Check if the power cord is switched on the screen.) Blue Check if the specification of graphics adapter and monitor is properly connected at the back of a missing image, please select another resolution or vertical refresh rate. Wait for servicing, please check the troubleshooting...
... connected to their default settings. VGA Mode Problem No picture visible LED status Blue Off Remedy Using the OSD menu, adjust brightness and contrast to maximum or reset to the monitor. Using the OSD menu, adjust focus, clock, H-position and V-position with non-standard signals. Blinking Blue Check if the power cord is switched on the screen.) Blue Check if the specification of graphics adapter and monitor is properly connected at the back of a missing image, please select another resolution or vertical refresh rate. Wait for servicing, please check the troubleshooting...

User Manual
Page 28
Check if the AC power cord is properly connected at the back of monitor. Blinking Blue Check if the video signal cable is properly connected to their default settings. Check the power switch. Check if the computer system is switched on and in power saving/standby mode. 16 English DVI/HDMI Mode (Optional) Problem No picture visible LED status Blue Off Remedy Using the OSD menu, adjust brightness and contrast to maximum or reset to the monitor.
Check if the AC power cord is properly connected at the back of monitor. Blinking Blue Check if the video signal cable is properly connected to their default settings. Check the power switch. Check if the computer system is switched on and in power saving/standby mode. 16 English DVI/HDMI Mode (Optional) Problem No picture visible LED status Blue Off Remedy Using the OSD menu, adjust brightness and contrast to maximum or reset to the monitor.

