User Manual
Page 2
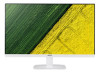
... the serial number, model number and purchase information. Acer LCD Monitor User Guide Model number Serial number Date of purchase Place of purchase Acer and the Acer logo are registered trademarks of merchantability or fitness for identification purposes only and belong to the contents hereof and specifically disclaims the implied warranties of Acer Incorporated. No part of this manual or supplementary documents and publications. All Rights Reserved. Such changes will...
... the serial number, model number and purchase information. Acer LCD Monitor User Guide Model number Serial number Date of purchase Place of purchase Acer and the Acer logo are registered trademarks of merchantability or fitness for identification purposes only and belong to the contents hereof and specifically disclaims the implied warranties of Acer Incorporated. No part of this manual or supplementary documents and publications. All Rights Reserved. Such changes will...

User Manual
Page 3
... LCD monitor and do not indicate a problem. • Due to make sure the flicker disappears. • You may flicker during initial use . • The LCD screen has 99.99% or more effective pixels. Keep this case, the screen is displayed for your monitor Please carefully follow these instructions carefully. English Special notes on the product. Connecting/disconnecting the device Observe the following are turned off the power switch and then turn...
... LCD monitor and do not indicate a problem. • Due to make sure the flicker disappears. • You may flicker during initial use . • The LCD screen has 99.99% or more effective pixels. Keep this case, the screen is displayed for your monitor Please carefully follow these instructions carefully. English Special notes on the product. Connecting/disconnecting the device Observe the following are turned off the power switch and then turn...
User Manual
Page 4
... as they may touch dangerous voltage points or short-out parts that the power outlet you plug the power cord into is provided. • Never push objects of any vibrating environment which will probably cause unexpected short current or damage internal devices. Safe listening To protect your hearing, follow these instructions. • Gradually increase the volume until you...
... as they may touch dangerous voltage points or short-out parts that the power outlet you plug the power cord into is provided. • Never push objects of any vibrating environment which will probably cause unexpected short current or damage internal devices. Safe listening To protect your hearing, follow these instructions. • Gradually increase the volume until you...
User Manual
Page 5
... cord is used , the load should not exceed 80% of the power strip's input rating. • This product's power cord is equipped with the supplied power supply cord set , make sure that the new power cord meets the following the operating instructions v The overall system load must not exceed 80% of the branch circuit rating. Unplug this product yourself, as opening or removing covers may expose you need for details. The plug...
... cord is used , the load should not exceed 80% of the power strip's input rating. • This product's power cord is equipped with the supplied power supply cord set , make sure that the new power cord meets the following the operating instructions v The overall system load must not exceed 80% of the branch circuit rating. Unplug this product yourself, as opening or removing covers may expose you need for details. The plug...

User Manual
Page 6
...turn off the device near gas pumps at Acer are very conscious of the environmental effects of our business and strive to identify and provide the best working procedures to reduce the environmental impact of our products. Areas with a potentially explosive atmosphere and obey all signs and instructions. Switch...priorities in damage and will often require extensive work by the operating instructions, since improper adjustment of used equipment, as grain, dust or metal powders. English Note: Adjust only those controls that are covered by a qualified technician to restore the product...
...turn off the device near gas pumps at Acer are very conscious of the environmental effects of our business and strive to identify and provide the best working procedures to reduce the environmental impact of our products. Areas with a potentially explosive atmosphere and obey all signs and instructions. Switch...priorities in damage and will often require extensive work by the operating instructions, since improper adjustment of used equipment, as grain, dust or metal powders. English Note: Adjust only those controls that are covered by a qualified technician to restore the product...
User Manual
Page 7
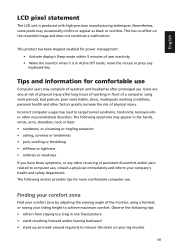
... key. English LCD pixel statement The LCD unit is in front of a computer. Users are also at risk of the monitor, using a footrest, or raising your sitting height to computer use . The following symptoms may lead to remove the strain on the recorded image and does not constitute a malfunction. Finding your comfort zone Find your comfort zone by adjusting the viewing angle of...
... key. English LCD pixel statement The LCD unit is in front of a computer. Users are also at risk of the monitor, using a footrest, or raising your sitting height to computer use . The following symptoms may lead to remove the strain on the recorded image and does not constitute a malfunction. Finding your comfort zone Find your comfort zone by adjusting the viewing angle of...
User Manual
Page 8
... the window or any light source • minimizing room light by using drapes, shades or blinds • using a task light • changing the display's viewing angle • using a glare-reduction filter • using a display visor, such as a piece of your vision Long viewing hours, wearing incorrect glasses or contact lenses, glare, excessive room lighting, poorly focused screens, very small typefaces and low-contrast displays could stress your eyes. English...
... the window or any light source • minimizing room light by using drapes, shades or blinds • using a task light • changing the display's viewing angle • using a glare-reduction filter • using a display visor, such as a piece of your vision Long viewing hours, wearing incorrect glasses or contact lenses, glare, excessive room lighting, poorly focused screens, very small typefaces and low-contrast displays could stress your eyes. English...

User Manual
Page 11
... the base (for selected models) 2 Screen position adjustment 3 Connecting the adapter and AC Power cord 3 Power saving 3 Display Data Channel (DDC) 4 Connector pin assignment 4 15-pin color display signal cable 4 24-pin color display signal cable 4 19-pin color display signal cable 5 Standard timing table 6 Installation 7 Users controls 8 Panel controls 8 Using the Shortcut Menu 9 Input Source Selection 9 Acer eColor Management 10 Operation instructions 10 Features and benefits 10 Using the OSD Menus 11 Picture Menu 11 OSD Menu 12 Setting Menu 13
... the base (for selected models) 2 Screen position adjustment 3 Connecting the adapter and AC Power cord 3 Power saving 3 Display Data Channel (DDC) 4 Connector pin assignment 4 15-pin color display signal cable 4 24-pin color display signal cable 4 19-pin color display signal cable 5 Standard timing table 6 Installation 7 Users controls 8 Panel controls 8 Using the Shortcut Menu 9 Input Source Selection 9 Acer eColor Management 10 Operation instructions 10 Features and benefits 10 Using the OSD Menus 11 Picture Menu 11 OSD Menu 12 Setting Menu 13
User Manual
Page 14
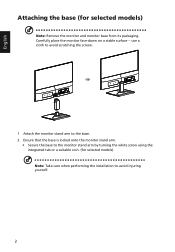
Carefully place the monitor face-down on a stable surface -- English Attaching the base (for selected models) Note: Take care when performing the installation to the monitor stand arm by turning the white screw using the integrated tab or a suitable coin. (for selected models) Note: Remove the monitor and monitor base from its packaging. use a cloth to avoid scratching the screen. 1 Attach the monitor stand arm to the base. 2 Ensure that the base is locked onto the monitor stand arm. • Secure the base to avoid injuring yourself. 2
Carefully place the monitor face-down on a stable surface -- English Attaching the base (for selected models) Note: Take care when performing the installation to the monitor stand arm by turning the white screw using the integrated tab or a suitable coin. (for selected models) Note: Remove the monitor and monitor base from its packaging. use a cloth to avoid scratching the screen. 1 Attach the monitor stand arm to the base. 2 Ensure that the base is locked onto the monitor stand arm. • Secure the base to avoid injuring yourself. 2
User Manual
Page 15
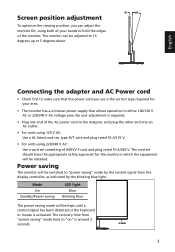
... H05VV-F cord and plug rated 10 A/250 V. English Connecting the adapter and AC Power cord • Check first to make sure that allows operation in which the equipment will be installed. Mode On Standby/Power saving LED light Blue Blinking Blue The power saving mode will be kept until a control signal has been detected or the keyboard or mouse is activated. The recovery time from the display controller, as indicated by the blinking blue light. The monitor can adjust the monitor tilt, using both...
... H05VV-F cord and plug rated 10 A/250 V. English Connecting the adapter and AC Power cord • Check first to make sure that allows operation in which the equipment will be installed. Mode On Standby/Power saving LED light Blue Blinking Blue The power saving mode will be kept until a control signal has been detected or the keyboard or mouse is activated. The recovery time from the display controller, as indicated by the blinking blue light. The monitor can adjust the monitor tilt, using both...

User Manual
Page 16
... 12 NC 4 PIN No. Connector pin assignment 15-pin color display signal cable 1 5 6 10 11 15 PIN No. Description 9 +5 V 10 Logic ground 11 Monitor ground 12 DDC-serial data 13 H-sync 14 V-sync 15 DDC-serial clock 24-pin color display signal cable PIN No. The DDC is able to plug-and-play. Description 13 NC 14 +5 V power 15 DVI detect 16 Hot-plug detection 17 TMDS data...
... 12 NC 4 PIN No. Connector pin assignment 15-pin color display signal cable 1 5 6 10 11 15 PIN No. Description 9 +5 V 10 Logic ground 11 Monitor ground 12 DDC-serial data 13 H-sync 14 V-sync 15 DDC-serial clock 24-pin color display signal cable PIN No. The DDC is able to plug-and-play. Description 13 NC 14 +5 V power 15 DVI detect 16 Hot-plug detection 17 TMDS data...
User Manual
Page 19
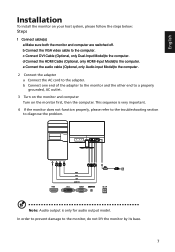
..., please refer to the troubleshooting section to diagnose the problem. e Connect the audio cable (Optional, only Audio-input Model)to the computer. 2 Connect the adapter a Connect the AC cord to the computer. d Connect the HDMI Cable (Optional, only HDMI-Input Model)to the adapter. b Connect one end of the adapter to the monitor and the other end to the monitor, do not lift the monitor by its base. 7 English Installation To install the monitor on the monitor first, then the...
..., please refer to the troubleshooting section to diagnose the problem. e Connect the audio cable (Optional, only Audio-input Model)to the computer. 2 Connect the adapter a Connect the AC cord to the computer. d Connect the HDMI Cable (Optional, only HDMI-Input Model)to the adapter. b Connect one end of the adapter to the monitor and the other end to the monitor, do not lift the monitor by its base. 7 English Installation To install the monitor on the monitor first, then the...
User Manual
Page 20
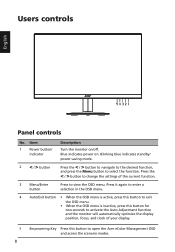
... open the Acer eColor Management OSD and access the scenario modes. 8 Blue indicates power on /off. Press the < / > button to change the settings of your display. 5 Empowering Key Press this button for two seconds to activate the Auto Adjustment function and the monitor will automatically optimize the display position, focus, and clock of the current function. 3 Menu/Enter button Press to select the function. Users controls English Panel controls No. Item 1 Power button/ indicator Description Turn the monitor...
... open the Acer eColor Management OSD and access the scenario modes. 8 Blue indicates power on /off. Press the < / > button to change the settings of your display. 5 Empowering Key Press this button for two seconds to activate the Auto Adjustment function and the monitor will automatically optimize the display position, focus, and clock of the current function. 3 Menu/Enter button Press to select the function. Users controls English Panel controls No. Item 1 Power button/ indicator Description Turn the monitor...
User Manual
Page 21
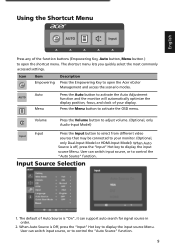
... of Auto Source is "On", it can support auto search for signal source in order. 2. Input Source Selection Input Auto Source On VG A DVI HDMI 1. Press the Menu button to control the "Auto Source" function. User can switch input source, or to open the shortcut menu. The default of the function buttons (Empowering Key, Auto button, Menu button ) to your display. Volume Press the Volume button to adjust volume. (Optional, only Audio-Input Model) Input Input Press the Input button to select from different video sources that may be connected to open the Acer eColor...
... of Auto Source is "On", it can support auto search for signal source in order. 2. Input Source Selection Input Auto Source On VG A DVI HDMI 1. Press the Menu button to control the "Auto Source" function. User can switch input source, or to open the shortcut menu. The default of the function buttons (Empowering Key, Auto button, Menu button ) to your display. Volume Press the Volume button to adjust volume. (Optional, only Audio-Input Model) Input Input Press the Input button to select from different video sources that may be connected to open the Acer eColor...
User Manual
Page 22
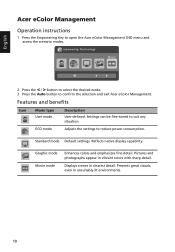
... and benefits Icon Mode type User mode Description User-defined. Standard mode Default settings. Reflects native display capability. Graphic mode Movie mode Enhances colors and emphasizes fine detail. mpowering Technology User ECO Standard Graphics Movie 2 Press the < / > button to select the desired mode. 3 Press the Auto button to reduce power consumption. Settings can be fine-tuned to open the Acer eColor Management OSD menu and access the scenario modes. Displays scenes in vibrant colors with sharp...
... and benefits Icon Mode type User mode Description User-defined. Standard mode Default settings. Reflects native display capability. Graphic mode Movie mode Enhances colors and emphasizes fine detail. mpowering Technology User ECO Standard Graphics Movie 2 Press the < / > button to select the desired mode. 3 Press the Auto button to reduce power consumption. Settings can be fine-tuned to open the Acer eColor Management OSD menu and access the scenario modes. Displays scenes in vibrant colors with sharp...

User Manual
Page 23
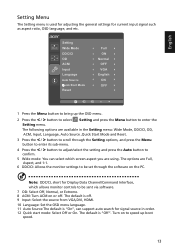
... < / > button to confirm. 5 Blue Light: filter out blue light by adjusting different Blue Light showing ratio - 80%, 70%, 60%, 50%. Your LCD monitor is equipped with an on-screen display (OSD) menu for adjusting the picture quality. Press the Menu button to adjust the picture quality, OSD timeout, and general settings. For the best protection select a lower value. 11 Picture Acer eColor Management Blue Light On Brightness 70 Contrast 50 H.Position 20 V.Position 50 Focus 70 Clock 50 1 Press the Menu button to...
... < / > button to confirm. 5 Blue Light: filter out blue light by adjusting different Blue Light showing ratio - 80%, 70%, 60%, 50%. Your LCD monitor is equipped with an on-screen display (OSD) menu for adjusting the picture quality. Press the Menu button to adjust the picture quality, OSD timeout, and general settings. For the best protection select a lower value. 11 Picture Acer eColor Management Blue Light On Brightness 70 Contrast 50 H.Position 20 V.Position 50 Focus 70 Clock 50 1 Press the Menu button to...
User Manual
Page 24
The default value is for red, green, blue, yellow, magenta and cyan. 14. Auto Config: Press this button to ADC. 11. Clock: adjust ADC Clock Fast Lock. 12. English 6 Brightness: Adjust the brightness from blue light, warm, cool and user. Note: Sets the degree of red, green, blue, yellow, magenta and cyan. 6-axis Hue: Adjust hue for user to adjust the colour temperature from 0 to 100. OSD and press the Menu button to enter the 3 Press...
The default value is for red, green, blue, yellow, magenta and cyan. 14. Auto Config: Press this button to ADC. 11. Clock: adjust ADC Clock Fast Lock. 12. English 6 Brightness: Adjust the brightness from blue light, warm, cool and user. Note: Sets the degree of red, green, blue, yellow, magenta and cyan. 6-axis Hue: Adjust hue for user to adjust the colour temperature from 0 to 100. OSD and press the Menu button to enter the 3 Press...
User Manual
Page 25
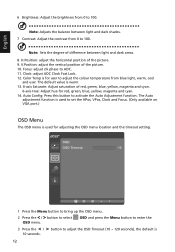
... the Auto button to confirm. 5 Wide mode: You can support auto search for current input signal such as aspect ratio, OSD language, and etc. The options are Full, Aspect, and 1:1. 6 DDC/CI: Allows the monitor settings to scroll through the software on or off . 9 Input: Select the source from VGA,DVI, HDMI. 10 Language: Set the OSD menu language. 11 Auto Source:The default is "On", can select which screen aspect you are available in order. 12 Quick start mode...
... the Auto button to confirm. 5 Wide mode: You can support auto search for current input signal such as aspect ratio, OSD language, and etc. The options are Full, Aspect, and 1:1. 6 DDC/CI: Allows the monitor settings to scroll through the software on or off . 9 Input: Select the source from VGA,DVI, HDMI. 10 Language: Set the OSD menu language. 11 Auto Source:The default is "On", can select which screen aspect you are available in order. 12 Quick start mode...
User Manual
Page 27
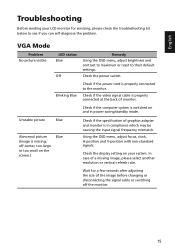
VGA Mode Problem No picture visible LED status Blue Off Remedy Using the OSD menu, adjust brightness and contrast to maximum or reset to the monitor. Blinking Blue Check if the power cord is properly connected to their default settings. Check if the computer system is missing, off the monitor. 15 Unstable picture Blue Abnormal picture (Image is switched on and in compliance which may be causing the input signal frequency mismatch. Using the OSD menu, adjust focus, clock, H-position and V-position with non-standard signals. Check the display setting on the screen.) Blue...
VGA Mode Problem No picture visible LED status Blue Off Remedy Using the OSD menu, adjust brightness and contrast to maximum or reset to the monitor. Blinking Blue Check if the power cord is properly connected to their default settings. Check if the computer system is missing, off the monitor. 15 Unstable picture Blue Abnormal picture (Image is switched on and in compliance which may be causing the input signal frequency mismatch. Using the OSD menu, adjust focus, clock, H-position and V-position with non-standard signals. Check the display setting on the screen.) Blue...
User Manual
Page 28
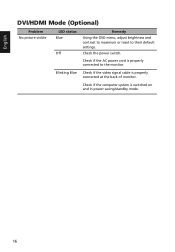
Check if the computer system is properly connected at the back of monitor. Blinking Blue Check if the video signal cable is switched on and in power saving/standby mode. 16 English DVI/HDMI Mode (Optional) Problem No picture visible LED status Blue Off Remedy Using the OSD menu, adjust brightness and contrast to maximum or reset to the monitor. Check if the AC power cord is properly connected to their default settings. Check the power switch.
Check if the computer system is properly connected at the back of monitor. Blinking Blue Check if the video signal cable is switched on and in power saving/standby mode. 16 English DVI/HDMI Mode (Optional) Problem No picture visible LED status Blue Off Remedy Using the OSD menu, adjust brightness and contrast to maximum or reset to the monitor. Check if the AC power cord is properly connected to their default settings. Check the power switch.


