
User Manual
Page 9
... Projected Image 10 Adjusting the Height of Projected Image 10 How to optimize image size and distance 11 How to get a preferred image size by adjusting distance and zoom 13 User Controls 15 Installation menu 15 Acer Empowering Technology 16 Onscreen Display (OSD) Menus 17 Color 18 Image 20 Management 21 Setting 23...
... Projected Image 10 Adjusting the Height of Projected Image 10 How to optimize image size and distance 11 How to get a preferred image size by adjusting distance and zoom 13 User Controls 15 Installation menu 15 Acer Empowering Technology 16 Onscreen Display (OSD) Menus 17 Color 18 Image 20 Management 21 Setting 23...
User Manual
Page 21
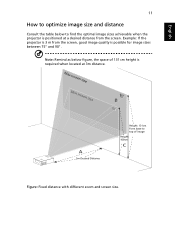
...find the optimal image sizes achievable when the projector is positioned at 3m distance. English 11 How to optimize image size and distance Consult the table below figure, the space of image Height: 109cm C Figure: Fixed distance with different zoom and screen size. Note: Remind as below to top... of 131 cm height is required when located at a desired distance from the screen, good image quality is 3 m from the screen. Example: ...
...find the optimal image sizes achievable when the projector is positioned at 3m distance. English 11 How to optimize image size and distance Consult the table below figure, the space of image Height: 109cm C Figure: Fixed distance with different zoom and screen size. Note: Remind as below to top... of 131 cm height is required when located at a desired distance from the screen, good image quality is 3 m from the screen. Example: ...
User Manual
Page 22
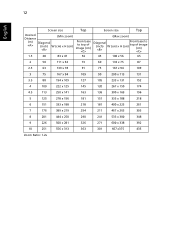
12 English Screen size Top Screen size Top Desired Distance (Min zoom) (m) Diagonal (inch) W (cm) x H (cm) From base to top of image (cm) (Max zoom) Diagonal (inch) W (cm) x H (cm) From base to top of image (...
12 English Screen size Top Screen size Top Desired Distance (Min zoom) (m) Diagonal (inch) W (cm) x H (cm) From base to top of image (cm) (Max zoom) Diagonal (inch) W (cm) x H (cm) From base to top of image (...
User Manual
Page 23
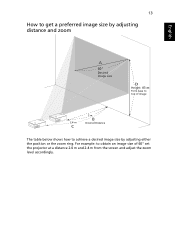
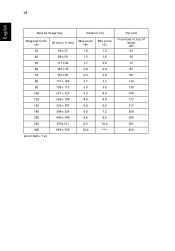
For example: to obtain an image size of image 2.4 m C 2 m B Desired Distance The table below shows how to top of 60" set the projector at a distance 2.0 m and 2.4 m from the screen and adjust the zoom level accordingly. 13 How to get a preferred image size by adjusting distance and zoom English A 60" Desired image size D Height: 87cm Form base to achieve a desired image size by adjusting either the position or the zoom ring.
For example: to obtain an image size of image 2.4 m C 2 m B Desired Distance The table below shows how to top of 60" set the projector at a distance 2.0 m and 2.4 m from the screen and adjust the zoom level accordingly. 13 How to get a preferred image size by adjusting distance and zoom English A 60" Desired image size D Height: 87cm Form base to achieve a desired image size by adjusting either the position or the zoom ring.
User Manual
Page 24
14 English Desired Image Size Distance (m) Diagonal (inch) 30 40 50 60 70 80 90 100 120 150 180 200 250 300 Zoom Ratio: 1.2x W (cm) x H (cm) 66 x 37 89 x 50 111 x 62 133 x 75 155 x 87 177 x 100 199 x 112 221 x 125 266 x 149 332 x 187 398 x 224 443 x 249 553x 311 664 x 374 Max zoom 1.0 1.3 1.7 2.0 2.3 2.7 3.0 3.3 4.0 5.0 6.0 6.6 8.3 10.0 Min zoom 1.2 1.6 2.0 2.4 2.8 3.2 3.6 4.0 4.8 6.0 7.2 8.0 10.0 *** Top (cm) From base to top of image 43 58 72 87 101 116 130 144 173 217 260 289 361 433
14 English Desired Image Size Distance (m) Diagonal (inch) 30 40 50 60 70 80 90 100 120 150 180 200 250 300 Zoom Ratio: 1.2x W (cm) x H (cm) 66 x 37 89 x 50 111 x 62 133 x 75 155 x 87 177 x 100 199 x 112 221 x 125 266 x 149 332 x 187 398 x 224 443 x 249 553x 311 664 x 374 Max zoom 1.0 1.3 1.7 2.0 2.3 2.7 3.0 3.3 4.0 5.0 6.0 6.6 8.3 10.0 Min zoom 1.2 1.6 2.0 2.4 2.8 3.2 3.6 4.0 4.8 6.0 7.2 8.0 10.0 *** Top (cm) From base to top of image 43 58 72 87 101 116 130 144 173 217 260 289 361 433
User Manual
Page 25
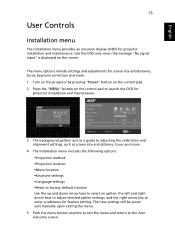
.... 5 Push the menu button anytime to exit the menu and return to adjusting the calibration and alignment settings, such as a guide to the Acer welcome screen. Use the OSD only when the message "No signal input" is displayed on the control pad to launch the OSD for projector installation... Installation menu The installation menu provides an onscreen display (OSD) for projector installation and maintenance. 3 The background pattern acts as screen size and distance, focus and more . 1 Turn on the projector by pressing "Power" button on the control pad. 2 Press the "MENU" button on the screen...
.... 5 Push the menu button anytime to exit the menu and return to adjusting the calibration and alignment settings, such as a guide to the Acer welcome screen. Use the OSD only when the message "No signal input" is displayed on the control pad to launch the OSD for projector installation... Installation menu The installation menu provides an onscreen display (OSD) for projector installation and maintenance. 3 The background pattern acts as screen size and distance, focus and more . 1 Turn on the projector by pressing "Power" button on the control pad. 2 Press the "MENU" button on the screen...
User Manual
Page 37
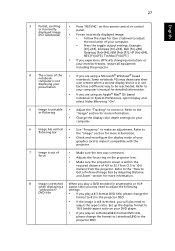
... are using an Apple® Mac® OS based notebook: In System Preferences, open Display and select Video Mirroring "On". 5 Image is within the required distance of your computer. 6 Image has vertical • Use "Frequency" to correct it compatible with the projector. 7 Image is out of your notebook: Some notebook PCs... the display color depth settings on the remote control or control or incorrectly panel. Refer to the "How to Get a Preferred Image Size by Adjusting Distance and Zoom" section for item 2 (above) to be reactivated.
... are using an Apple® Mac® OS based notebook: In System Preferences, open Display and select Video Mirroring "On". 5 Image is within the required distance of your computer. 6 Image has vertical • Use "Frequency" to correct it compatible with the projector. 7 Image is out of your notebook: Some notebook PCs... the display color depth settings on the remote control or control or incorrectly panel. Refer to the "How to Get a Preferred Image Size by Adjusting Distance and Zoom" section for item 2 (above) to be reactivated.

User Manual
Page 46
... to change without notice. 36 English Specifications The specifications listed below are subject to Acer's published marketing specifications. Projection system Resolution Computer compatibility Video compatibility Aspect ratio Displayable colors Projection lens Projection screen size (diagonal) Projection distance Throw ratio Horizontal scan rate Vertical refresh scan rate Lamp type Keystone correction Weight Dimensions...
... to change without notice. 36 English Specifications The specifications listed below are subject to Acer's published marketing specifications. Projection system Resolution Computer compatibility Video compatibility Aspect ratio Displayable colors Projection lens Projection screen size (diagonal) Projection distance Throw ratio Horizontal scan rate Vertical refresh scan rate Lamp type Keystone correction Weight Dimensions...