
User Manual
Page 4
... To protect your hearing, follow these instructions. • Gradually increase the volume until you can hear it clearly and comfortably and without distortion. • After setting the volume level, do not place the product on the cord. • If an extension cord is easily accessible and located as close to unplug...
... To protect your hearing, follow these instructions. • Gradually increase the volume until you can hear it clearly and comfortably and without distortion. • After setting the volume level, do not place the product on the cord. • If an extension cord is easily accessible and located as close to unplug...

User Manual
Page 5
... grounded before inserting the power cord plug. The plug only fits in electric shock and/or injury. If you to replace the power cord set, make sure that may interfere with the performance of all servicing to service this product. • Use the product only with a three-...Do not overload a power outlet, strip or receptacle by other risks. Make sure the power outlet is equipped with the supplied power supply cord set. Do not insert the plug into the extension cord does not exceed the extension cord ampere rating. Unplug this product from unexpected noise produced by...
... grounded before inserting the power cord plug. The plug only fits in electric shock and/or injury. If you to replace the power cord set, make sure that may interfere with the performance of all servicing to service this product. • Use the product only with a three-...Do not overload a power outlet, strip or receptacle by other risks. Make sure the power outlet is equipped with the supplied power supply cord set. Do not insert the plug into the extension cord does not exceed the extension cord ampere rating. Unplug this product from unexpected noise produced by...
User Manual
Page 7
... 80% energy at risk of physical injury after prolonged use less energy and prevent greenhouse gas emissions by meeting strict energy efficiency guidelines set by the U.S. Tips and information for power management: • Activate display's Sleep mode within 15 minutes of user inactivity. •...sleep" mode after 15 and 30 minute of inactivity respectively. •Wake the monitor when it is in front of a computer. Acer is committed to local, state or federal laws. Environmental Protection Agency. vii Mercury advisory For projectors or electronic products containing an LCD/CRT...
... 80% energy at risk of physical injury after prolonged use less energy and prevent greenhouse gas emissions by meeting strict energy efficiency guidelines set by the U.S. Tips and information for power management: • Activate display's Sleep mode within 15 minutes of user inactivity. •...sleep" mode after 15 and 30 minute of inactivity respectively. •Wake the monitor when it is in front of a computer. Acer is committed to local, state or federal laws. Environmental Protection Agency. vii Mercury advisory For projectors or electronic products containing an LCD/CRT...
User Manual
Page 11
... display signal cable 5 24-pin color display signal cable 6 19-pin color display signal cable* 6 Standard timing table 7 Installation 8 Users controls 9 Front panel controls 9 Acer eColor Management 10 Operation instructions 10 Features and benefits 10 Adjusting the OSD settings 11 Adjusting the picture quality 11 Adjusting the OSD position 12 Adjusting the...
... display signal cable 5 24-pin color display signal cable 6 19-pin color display signal cable* 6 Standard timing table 7 Installation 8 Users controls 9 Front panel controls 9 Acer eColor Management 10 Operation instructions 10 Features and benefits 10 Adjusting the OSD settings 11 Adjusting the picture quality 11 Adjusting the OSD position 12 Adjusting the...
User Manual
Page 15
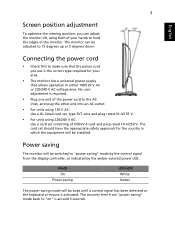
... detected or the keyboard or mouse is activated. The recovery time from the display controller, as indicated by the amber-colored power LED. The cord set , type SVT wire and plug rated 10 A/125 V. • For units using both of your area. • The monitor has a universal power supply that... cord to the AC inlet, and plug the other end into an AC outlet. • For units using 120 V AC: Use a UL-listed cord set should have the appropriate safety approvals for your hands to "on" is around 3 seconds. 3 English Screen position adjustment To optimize the viewing position, you use...
... detected or the keyboard or mouse is activated. The recovery time from the display controller, as indicated by the amber-colored power LED. The cord set , type SVT wire and plug rated 10 A/125 V. • For units using both of your area. • The monitor has a universal power supply that... cord to the AC inlet, and plug the other end into an AC outlet. • For units using 120 V AC: Use a UL-listed cord set should have the appropriate safety approvals for your hands to "on" is around 3 seconds. 3 English Screen position adjustment To optimize the viewing position, you use...
User Manual
Page 20
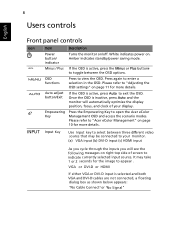
...below appears: "No Cable Connect"or "No S ignal" Empowering Key Press the Empowering Key to enter a selection in the OSD. Press again to open the Acer eColor Management OSD and access the scenario modes. It may be connected to your monitor. (a) VGA input (b) DVI-D input (c) HDMI input As you cycle ...the OSD is active, press Auto to indicate currently selected input source. Please refer to view the OSD. OSD functions Press to "Adjusting the OSD settings" on right top side of your display. VGA or DVI-D or HDMI If either VGA or DVI-D input is inactive, press Auto and the monitor...
...below appears: "No Cable Connect"or "No S ignal" Empowering Key Press the Empowering Key to enter a selection in the OSD. Press again to open the Acer eColor Management OSD and access the scenario modes. It may be connected to your monitor. (a) VGA input (b) DVI-D input (c) HDMI input As you cycle ...the OSD is active, press Auto to indicate currently selected input source. Please refer to view the OSD. OSD functions Press to "Adjusting the OSD settings" on right top side of your display. VGA or DVI-D or HDMI If either VGA or DVI-D input is inactive, press Auto and the monitor...
User Manual
Page 21
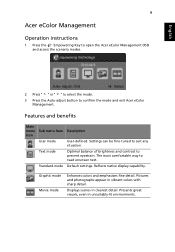
...1 Press the Empowering Key to open the Acer eColor Management OSD and access the scenario modes. 2 Press " " or " " to select the mode. 3 Press the Auto-adjust button to prevent eyestrain. Standard mode Default settings. Pictures and photographs appear in unsuitably-lit environments.... Presents great visuals, even in vibrant colors with sharp detail. Settings can be fine-tuned to read onscreen text. The most comfortable way to...
...1 Press the Empowering Key to open the Acer eColor Management OSD and access the scenario modes. 2 Press " " or " " to select the mode. 3 Press the Auto-adjust button to prevent eyestrain. Standard mode Default settings. Pictures and photographs appear in unsuitably-lit environments.... Presents great visuals, even in vibrant colors with sharp detail. Settings can be fine-tuned to read onscreen text. The most comfortable way to...

User Manual
Page 22
English 10 Adjusting the OSD settings Note: The following page: Adjusting the picture quality 1 Press the Menu key to bring up the OSD. 2 Using the / keys, select Picture from the OSD. You can be used for general reference only. For advanced settings, please refer to adjust the picture... quality, OSD position and general settings. The OSD can use the OSD to following content is for adjusting the settings of your LCD Monitor. Then navigate to the picture element you...
English 10 Adjusting the OSD settings Note: The following page: Adjusting the picture quality 1 Press the Menu key to bring up the OSD. 2 Using the / keys, select Picture from the OSD. You can be used for general reference only. For advanced settings, please refer to adjust the picture... quality, OSD position and general settings. The OSD can use the OSD to following content is for adjusting the settings of your LCD Monitor. Then navigate to the picture element you...

User Manual
Page 24
Setting from the OSD. Then navigate to the 3 The Setting menu can be used to adjust. 12 Adjusting the setting English 1 Press the Menu key to bring up the OSD. 2 Using the / keys, select feature you wish to adjust the screen Menu Language and other important settings.
Setting from the OSD. Then navigate to the 3 The Setting menu can be used to adjust. 12 Adjusting the setting English 1 Press the Menu key to bring up the OSD. 2 Using the / keys, select feature you wish to adjust the screen Menu Language and other important settings.
User Manual
Page 26
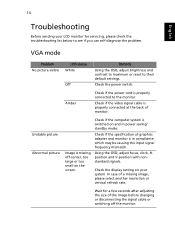
.... VGA mode Problem No picture visible LED status White Off Remedy Using the OSD, adjust brightness and contrast to maximum or reset to their default settings. Check the power switch. Using the OSD, adjust focus, clock, Hposition and V-position with nonstandard signals. Check the display...
.... VGA mode Problem No picture visible LED status White Off Remedy Using the OSD, adjust brightness and contrast to maximum or reset to their default settings. Check the power switch. Using the OSD, adjust focus, clock, Hposition and V-position with nonstandard signals. Check the display...

User Manual
Page 27
Check the power switch. Amber Check if the AC power cord is properly connected at the back of monitor. Check if the video signal cable is properly connected to their default settings. Check that the computer system is switched on and in power saving/ standby mode. * for selected models 15 English DVI/HDMI* mode Problem No picture visible LED status White Off Remedy Using the OSD, adjust brightness and contrast to maximum or reset to the monitor.
Check the power switch. Amber Check if the AC power cord is properly connected at the back of monitor. Check if the video signal cable is properly connected to their default settings. Check that the computer system is switched on and in power saving/ standby mode. * for selected models 15 English DVI/HDMI* mode Problem No picture visible LED status White Off Remedy Using the OSD, adjust brightness and contrast to maximum or reset to the monitor.


