Quick Start Guide
Page 1
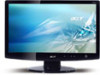
... standby/power saving mode. / Minus / Plus If the OSD is active, press the Minus or Plus buttons to toggle between three differentvideo source that the base is locked onto the monitor stand arm. (for selected models) • Secure the base to the monitor stand arm by turning the white screw using the integrated tab or a suitable coin. (for selected models Power button/ indicator Turns the monitor on the computer. English Acer LCD Monitor Quick Start Guide (QSG) Important safety instructions Please...
... standby/power saving mode. / Minus / Plus If the OSD is active, press the Minus or Plus buttons to toggle between three differentvideo source that the base is locked onto the monitor stand arm. (for selected models) • Secure the base to the monitor stand arm by turning the white screw using the integrated tab or a suitable coin. (for selected models Power button/ indicator Turns the monitor on the computer. English Acer LCD Monitor Quick Start Guide (QSG) Important safety instructions Please...
Quick Start Guide
Page 2
... by user in private household in a particular installation. Notice: Peripheral devices Only peripherals (input/output devices, terminals, printers, etc.) certified to comply with the Class B limits may cause undesired operation. Operation is in a manner that may be made using shielded cables to maintain compliance with EMC regulations. FOR LAMP SPECIFIC DISPOSAL INFORMATION CHECK WWW.LAMPRECYCLE.ORG. English Regulations...
... by user in private household in a particular installation. Notice: Peripheral devices Only peripherals (input/output devices, terminals, printers, etc.) certified to comply with the Class B limits may cause undesired operation. Operation is in a manner that may be made using shielded cables to maintain compliance with EMC regulations. FOR LAMP SPECIFIC DISPOSAL INFORMATION CHECK WWW.LAMPRECYCLE.ORG. English Regulations...

User Manual
Page 3
... sides. Keep this case, the screen is displayed for future reference. Cleaning your safety and comfort Safety instructions Read these guidelines when cleaning the monitor: • Always unplug the monitor before cleaning. • Use a soft cloth to the nature of the previous screen may remain after switching the image, when the same image is recovered slowly by changing the image or turning off the power switch and then turn it...
... sides. Keep this case, the screen is displayed for future reference. Cleaning your safety and comfort Safety instructions Read these guidelines when cleaning the monitor: • Always unplug the monitor before cleaning. • Use a soft cloth to the nature of the previous screen may remain after switching the image, when the same image is recovered slowly by changing the image or turning off the power switch and then turn it...
User Manual
Page 4
... could result in installation unless proper ventilation is provided. • Never push objects of internal components and to the equipment operator as they may touch dangerous voltage points or short-out parts that the total iv Accessibility Be sure that the power outlet you plug the power cord into is used with this product, make sure that could be...
... could result in installation unless proper ventilation is provided. • Never push objects of internal components and to the equipment operator as they may touch dangerous voltage points or short-out parts that the total iv Accessibility Be sure that the power outlet you plug the power cord into is used with this product, make sure that could be...

User Manual
Page 5
... extension cord ampere rating. Note: The grounding pin also provides good protection from the wall outlet and refer servicing to qualified service personnel when: • the power cord or plug is damaged, cut or frayed • liquid was exposed to replace the power cord set . The grounding pin is equipped with the supplied power supply cord set , make sure that the new power cord meets the following the operating instructions Using a power outlet...
... extension cord ampere rating. Note: The grounding pin also provides good protection from the wall outlet and refer servicing to qualified service personnel when: • the power cord or plug is damaged, cut or frayed • liquid was exposed to replace the power cord set . The grounding pin is equipped with the supplied power supply cord set , make sure that the new power cord meets the following the operating instructions Using a power outlet...

User Manual
Page 6
... best working procedures to reduce the environmental impact of the company's top priorities in minimizing the burden placed on the environment. For more information on the use of our other controls may contain small parts. Switch off...turn off the device near gas pumps at Acer are often, but not always, marked. We at service stations. Potentially explosive atmospheres include areas where you would normally be advised to environmental protection and views recycling, in damage and will often require extensive work by the operating instructions, since improper adjustment of used...
... best working procedures to reduce the environmental impact of the company's top priorities in minimizing the burden placed on the environment. For more information on the use of our other controls may contain small parts. Switch off...turn off the device near gas pumps at Acer are often, but not always, marked. We at service stations. Potentially explosive atmospheres include areas where you would normally be advised to environmental protection and views recycling, in damage and will often require extensive work by the operating instructions, since improper adjustment of used...
User Manual
Page 7
..., and warmer climates. •Automatically go into "display sleep" and "computer sleep" mode after prolonged use Computer users may occasionally misfire or appear as black or red dots. Users are registered U.S. For lamp-specific disposal information, check www.lamprecycle.org. Products that help customers save you money by the U.S. ENERGY STAR ® Acer's ENERGY STAR qualified products save money, conserve energy and improve the quality...
..., and warmer climates. •Automatically go into "display sleep" and "computer sleep" mode after prolonged use Computer users may occasionally misfire or appear as black or red dots. Users are registered U.S. For lamp-specific disposal information, check www.lamprecycle.org. Products that help customers save you money by the U.S. ENERGY STAR ® Acer's ENERGY STAR qualified products save money, conserve energy and improve the quality...
User Manual
Page 8
...keep your eyes. Display • Keep your display clean. • Keep your head at a higher level than the top edge of the display so your eyes point downward when looking away from the monitor and focusing on your leg muscles Taking care of the display. • Adjust the display brightness and/or contrast to computer use...any light source • minimizing room light by : • placing your display in one fixed posture • avoid slouching forward and/or leaning backward • stand up and walk around regularly to remove the strain on a distant point. • Blink frequently...
...keep your eyes. Display • Keep your display clean. • Keep your head at a higher level than the top edge of the display so your eyes point downward when looking away from the monitor and focusing on your leg muscles Taking care of the display. • Adjust the display brightness and/or contrast to computer use...any light source • minimizing room light by : • placing your display in one fixed posture • avoid slouching forward and/or leaning backward • stand up and walk around regularly to remove the strain on a distant point. • Blink frequently...
User Manual
Page 9
...Acer Computer (Shanghai) Limited Feb. 27, 2009 Date ix • using a glare-reduction filter • using a display visor, such as a piece of cardboard extended from the display's top front edge • Avoid adjusting your computer use...@acer.com.tw Hereby declare that: Product: 23" LCD Monitor Trade Name: Acer or eMachines or Gateway or packard bell Model Number: H233H SKU Number:...open windows, for extended periods of time. Developing good work habits Develop the following work habits to make your display to an awkward viewing angle. • Avoid looking at bright light sources...
...Acer Computer (Shanghai) Limited Feb. 27, 2009 Date ix • using a glare-reduction filter • using a display visor, such as a piece of cardboard extended from the display's top front edge • Avoid adjusting your computer use...@acer.com.tw Hereby declare that: Product: 23" LCD Monitor Trade Name: Acer or eMachines or Gateway or packard bell Model Number: H233H SKU Number:...open windows, for extended periods of time. Developing good work habits Develop the following work habits to make your display to an awkward viewing angle. • Avoid looking at bright light sources...
User Manual
Page 11
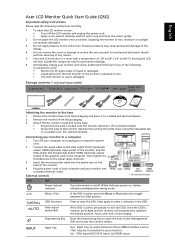
... the base (for selected models) 3 Screen position adjustment 4 Connecting the power cord 4 Power saving 4 Connecting the docking device (for selected models) 5 Display Data Channel (DDC) 5 Connector pin assignment 5 15-pin color display signal cable 5 24-pin color display signal cable 6 19-pin color display signal cable* 6 Standard timing table 7 Installation 8 Users controls 9 Front panel controls 9 Acer eColor Management 10 Operation instructions 10 Features and benefits 10 Adjusting the OSD settings 11 Adjusting the picture quality 11 Adjusting the OSD...
... the base (for selected models) 3 Screen position adjustment 4 Connecting the power cord 4 Power saving 4 Connecting the docking device (for selected models) 5 Display Data Channel (DDC) 5 Connector pin assignment 5 15-pin color display signal cable 5 24-pin color display signal cable 6 19-pin color display signal cable* 6 Standard timing table 7 Installation 8 Users controls 9 Front panel controls 9 Acer eColor Management 10 Operation instructions 10 Features and benefits 10 Adjusting the OSD settings 11 Adjusting the picture quality 11 Adjusting the OSD...
User Manual
Page 13
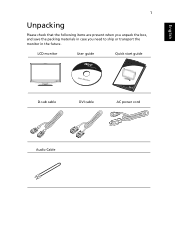
English 1 Unpacking Please check that the following items are present when you unpack the box, and save the packing materials in case you need to ship or transport the monitor in the future. LCD monitor User guide Quick start guide D-sub cable DVI cable AC power cord Audio Cable
English 1 Unpacking Please check that the following items are present when you unpack the box, and save the packing materials in case you need to ship or transport the monitor in the future. LCD monitor User guide Quick start guide D-sub cable DVI cable AC power cord Audio Cable
User Manual
Page 15
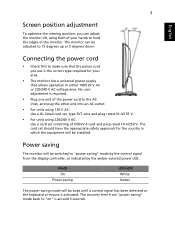
... recovery time from "power saving" mode back to "power saving" mode by the control signal from the display controller, as indicated by the amber-colored power LED. 3 English Screen position adjustment To optimize the viewing position, you use is the correct type required for the country in either 100/120 V AC or 220/240 V AC voltage area. The monitor can adjust the monitor tilt, using 220/240 V AC: Use a cord set consisting of the power cord to make sure that allows operation...
... recovery time from "power saving" mode back to "power saving" mode by the control signal from the display controller, as indicated by the amber-colored power LED. 3 English Screen position adjustment To optimize the viewing position, you use is the correct type required for the country in either 100/120 V AC or 220/240 V AC voltage area. The monitor can adjust the monitor tilt, using 220/240 V AC: Use a cord set consisting of the power cord to make sure that allows operation...
User Manual
Page 16
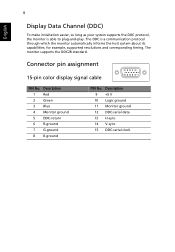
...-pin color display signal cable 1 5 6 10 11 15 PIN No. The DDC is able to plug-and-play. Description 1 Red 2 Green 3 Blue 4 Monitor ground 5 DDC-return 6 R-ground 7 G-ground 8 B-ground PIN No. The monitor supports the DDC2B standard. for example, supported resolutions and corresponding timing. Description 9 +5 V 10 Logic ground 11 Monitor ground 12 DDC-serial data 13 H-sync 14 V-sync 15 DDC-serial clock 4 English Display Data Channel (DDC) To make installation easier...
...-pin color display signal cable 1 5 6 10 11 15 PIN No. The DDC is able to plug-and-play. Description 1 Red 2 Green 3 Blue 4 Monitor ground 5 DDC-return 6 R-ground 7 G-ground 8 B-ground PIN No. The monitor supports the DDC2B standard. for example, supported resolutions and corresponding timing. Description 9 +5 V 10 Logic ground 11 Monitor ground 12 DDC-serial data 13 H-sync 14 V-sync 15 DDC-serial clock 4 English Display Data Channel (DDC) To make installation easier...
User Manual
Page 17
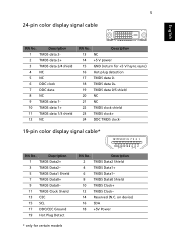
... models Description 2 TMDS Data2 Shield 4 TMDS Data1+ 6 TMDS Data1- 8 TMDS Data0 Shield 10 TMDS Clock+ 12 TMDS Clock- 14 Reserved (N.C. Description 1 TMDS Data2+ 3 TMDS Data2- 5 TMDS Data1 Shield 7 TMDS Data0+ 9 TMDS Data0- 11 TMDS Clock Shield 13 CEC 15 SCL 17 DDC/CEC Ground 19 Hot Plug Detect PIN No. 5 24-pin color display signal cable English...
... models Description 2 TMDS Data2 Shield 4 TMDS Data1+ 6 TMDS Data1- 8 TMDS Data0 Shield 10 TMDS Clock+ 12 TMDS Clock- 14 Reserved (N.C. Description 1 TMDS Data2+ 3 TMDS Data2- 5 TMDS Data1 Shield 7 TMDS Data0+ 9 TMDS Data0- 11 TMDS Clock Shield 13 CEC 15 SCL 17 DDC/CEC Ground 19 Hot Plug Detect PIN No. 5 24-pin color display signal cable English...
User Manual
Page 19
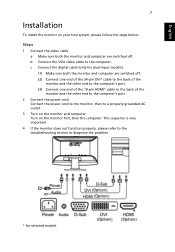
... to the computer's port. 2 Connect the power cord Connect the power cord to the monitor, then to the computer. c Connect the digital cable (only for selected models This sequence is very important. 4 If the monitor does not function properly, please refer to the troubleshooting section to diagnose the problem * for dual-input models). (1) Make sure both the monitor and computer are switched off . English 7 Installation To install the monitor on the monitor first, then the...
... to the computer's port. 2 Connect the power cord Connect the power cord to the monitor, then to the computer. c Connect the digital cable (only for selected models This sequence is very important. 4 If the monitor does not function properly, please refer to the troubleshooting section to diagnose the problem * for dual-input models). (1) Make sure both the monitor and computer are switched off . English 7 Installation To install the monitor on the monitor first, then the...
User Manual
Page 20
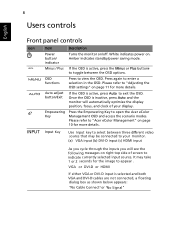
... video source that may take 1 or 2 seconds for more details. Amber indicates standby/power saving mode. / Minus / Plus If the OSD is selected and both VGA and DVI-D cables are not connected, a floating dialog box as shown below appears: "No Cable Connect"or "No S ignal" It may be connected to open the Acer eColor Management OSD and access the scenario modes. 8 Users controls English Front panel controls Icon Item Description Power button/ indicator Turns the monitor...
... video source that may take 1 or 2 seconds for more details. Amber indicates standby/power saving mode. / Minus / Plus If the OSD is selected and both VGA and DVI-D cables are not connected, a floating dialog box as shown below appears: "No Cable Connect"or "No S ignal" It may be connected to open the Acer eColor Management OSD and access the scenario modes. 8 Users controls English Front panel controls Icon Item Description Power button/ indicator Turns the monitor...
User Manual
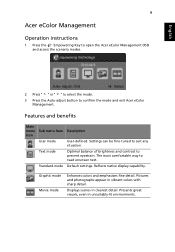
Page 21
... prevent eyestrain. Text mode Optimal balance of brightness and contrast to read onscreen text. Features and benefits Main menu Sub menu item Description icon User mode User-defined. Displays scenes in unsuitably-lit environments. English 9 Acer eColor Management Operation instructions 1 Press the Empowering Key to open the Acer eColor Management OSD and access the scenario modes. 2 Press " " or " " to select the mode. 3 Press the Auto-adjust button to suit any situation...
... prevent eyestrain. Text mode Optimal balance of brightness and contrast to read onscreen text. Features and benefits Main menu Sub menu item Description icon User mode User-defined. Displays scenes in unsuitably-lit environments. English 9 Acer eColor Management Operation instructions 1 Press the Empowering Key to open the Acer eColor Management OSD and access the scenario modes. 2 Press " " or " " to select the mode. 3 Press the Auto-adjust button to suit any situation...

User Manual
Page 22
The OSD can be used to adjust the current Brightness, Contrast, Colour Temp, Auto Config and other image-related qualities. Then navigate to the picture element you wish to adjust. 3 Use the / keys to adjust the sliding scales. 4 The Picture menu can be used for general reference only. You can use the OSD to open the OSD. English 10 Adjusting the OSD settings Note: The following page: Adjusting the picture quality 1 Press the Menu key to...
The OSD can be used to adjust the current Brightness, Contrast, Colour Temp, Auto Config and other image-related qualities. Then navigate to the picture element you wish to adjust. 3 Use the / keys to adjust the sliding scales. 4 The Picture menu can be used for general reference only. You can use the OSD to open the OSD. English 10 Adjusting the OSD settings Note: The following page: Adjusting the picture quality 1 Press the Menu key to...
User Manual
Page 26
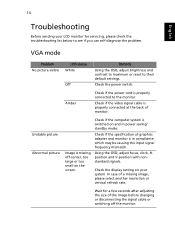
... self-diagnose the problem. Amber Check if the power cord is properly connected at the back of a missing image, please select another resolution or vertical refresh rate. Image is in power saving/ standby mode. VGA mode Problem No picture visible LED status White Off Remedy Using the OSD, adjust brightness and contrast to maximum or reset to the monitor. Check if the video signal cable is properly connected to their default settings. 14 English Troubleshooting Before sending your system. Using the OSD, adjust focus, clock, Hposition and V-position with nonstandard...
... self-diagnose the problem. Amber Check if the power cord is properly connected at the back of a missing image, please select another resolution or vertical refresh rate. Image is in power saving/ standby mode. VGA mode Problem No picture visible LED status White Off Remedy Using the OSD, adjust brightness and contrast to maximum or reset to the monitor. Check if the video signal cable is properly connected to their default settings. 14 English Troubleshooting Before sending your system. Using the OSD, adjust focus, clock, Hposition and V-position with nonstandard...

User Manual
Page 27
Check if the video signal cable is switched on and in power saving/ standby mode. * for selected models Check that the computer system is properly connected at the back of monitor. Check the power switch. 15 English DVI/HDMI* mode Problem No picture visible LED status White Off Remedy Using the OSD, adjust brightness and contrast to maximum or reset to the monitor. Amber Check if the AC power cord is properly connected to their default settings.
Check if the video signal cable is switched on and in power saving/ standby mode. * for selected models Check that the computer system is properly connected at the back of monitor. Check the power switch. 15 English DVI/HDMI* mode Problem No picture visible LED status White Off Remedy Using the OSD, adjust brightness and contrast to maximum or reset to the monitor. Amber Check if the AC power cord is properly connected to their default settings.


