User Manual
Page 3
...and comfort Safety instructions Read these guidelines when cleaning the monitor: • Always unplug the monitor before cleaning. • Use a soft cloth to wipe the screen and cabinet front and sides. Turn off the power switch for a few hours. It may include blemishes of 0.01% or less such as a missing ... on LCD monitors The following are normal with the LCD monitor and do not indicate a problem. • Due to the nature of the previous screen may remain after switching the image, when the same image is recovered slowly by changing the image or turning off the power switch and then...
...and comfort Safety instructions Read these guidelines when cleaning the monitor: • Always unplug the monitor before cleaning. • Use a soft cloth to wipe the screen and cabinet front and sides. Turn off the power switch for a few hours. It may include blemishes of 0.01% or less such as a missing ... on LCD monitors The following are normal with the LCD monitor and do not indicate a problem. • Due to the nature of the previous screen may remain after switching the image, when the same image is recovered slowly by changing the image or turning off the power switch and then...
User Manual
Page 6
...Sustainability/sustainability01.htm IT Equipment Recycling Information Acer is strongly committed to this electronic device into the trash when discarding. "For use in Office environments with special controlled illumination to avoid disturbing reflections from the screen'"For indoor use of our products....fire resulting in minimizing the burden placed on the Waste from the screen ' Disposal instructions Do not throw this website: http://www.acer-group.com/public/Sustainability/sustainability01.htm Visit www.acer-group.com for further information on the features and benefits of other...
...Sustainability/sustainability01.htm IT Equipment Recycling Information Acer is strongly committed to this electronic device into the trash when discarding. "For use in Office environments with special controlled illumination to avoid disturbing reflections from the screen'"For indoor use of our products....fire resulting in minimizing the burden placed on the Waste from the screen ' Disposal instructions Do not throw this website: http://www.acer-group.com/public/Sustainability/sustainability01.htm Visit www.acer-group.com for further information on the features and benefits of other...
User Manual
Page 8
... that is too strong. viii Taking care of your vision Long viewing hours, wearing incorrect glasses or contact lenses, glare, excessive room lighting, poorly focused screens, very small typefaces and low-contrast displays could stress your computer use more relaxing and productive: • Take short breaks regularly and often. • Perform...
... that is too strong. viii Taking care of your vision Long viewing hours, wearing incorrect glasses or contact lenses, glare, excessive room lighting, poorly focused screens, very small typefaces and low-contrast displays could stress your computer use more relaxing and productive: • Take short breaks regularly and often. • Perform...
User Manual
Page 9
TABLE OF CONTENTS UNPACKING 1 ATTACHING / REMOVING THE BASE 2 SCREEN POSITION ADJUSTMENT 2 CONNECTING THE POWER CORD 3 SAFETY PRECAUTION 3 CLEANING YOUR MONITOR 3 POWER SAVING 4 DDC...4 CONNECTOR PIN ASSIGNMENT 5 STANDARD TIMING TABLE 7 INSTALLATION 8 USER CONTROLS 10 TROUBLESHOOTING 16
TABLE OF CONTENTS UNPACKING 1 ATTACHING / REMOVING THE BASE 2 SCREEN POSITION ADJUSTMENT 2 CONNECTING THE POWER CORD 3 SAFETY PRECAUTION 3 CLEANING YOUR MONITOR 3 POWER SAVING 4 DDC...4 CONNECTOR PIN ASSIGNMENT 5 STANDARD TIMING TABLE 7 INSTALLATION 8 USER CONTROLS 10 TROUBLESHOOTING 16
User Manual
Page 11
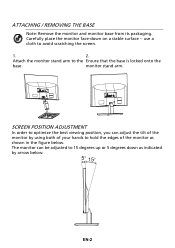
.... The monitor can adjust the tilt of the monitor by arrow below . monitor stand arm. EN-2 Attach the monitor stand arm to avoid scratching the screen. 1. 2. ATTACHING / REMOVING THE BASE Note: Remove the monitor and monitor base from its packaging. Carefully place the monitor face-down as indicated by using both... of your hands to optimize the best viewing position, you can be adjusted to 15 degrees up or 5 degrees down on a stable surface -- SCREEN POSITION ADJUSTMENT In order to hold the edges of the monitor as shown in the figure below .
.... The monitor can adjust the tilt of the monitor by arrow below . monitor stand arm. EN-2 Attach the monitor stand arm to avoid scratching the screen. 1. 2. ATTACHING / REMOVING THE BASE Note: Remove the monitor and monitor base from its packaging. Carefully place the monitor face-down as indicated by using both... of your hands to optimize the best viewing position, you can be adjusted to 15 degrees up or 5 degrees down on a stable surface -- SCREEN POSITION ADJUSTMENT In order to hold the edges of the monitor as shown in the figure below .
User Manual
Page 12
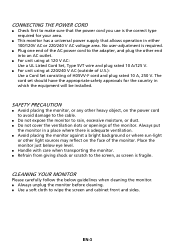
... 220/240 V AC (outside of U.S.): Use a Cord Set consisting of the AC power cord to the cable. z Do not expose the monitor to the screen, as screen is the correct type required for the country in which the equipment will be installed. z Handle with care when transporting the monitor. Always put the... cleaning. z Use a soft cloth to make sure that allows operation in a place where there is required. CONNECTING THE POWER CORD z Check first to wipe the screen and cabinet front and sides.
... 220/240 V AC (outside of U.S.): Use a Cord Set consisting of the AC power cord to the cable. z Do not expose the monitor to the screen, as screen is the correct type required for the country in which the equipment will be installed. z Handle with care when transporting the monitor. Always put the... cleaning. z Use a soft cloth to make sure that allows operation in a place where there is required. CONNECTING THE POWER CORD z Check first to wipe the screen and cabinet front and sides.
User Manual
Page 18
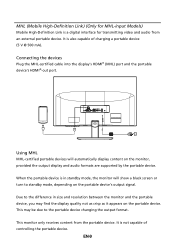
MHL Using MHL MHL-certified portable devices will show a black screen or turn to standby mode, depending on the portable device's output signal. MHL (Mobile High-Definition Link) (Only for MHL-input Models) Mobile High-Definition ...
MHL Using MHL MHL-certified portable devices will show a black screen or turn to standby mode, depending on the portable device's output signal. MHL (Mobile High-Definition Link) (Only for MHL-input Models) Mobile High-Definition ...
User Manual
Page 19
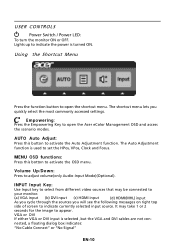
... and Focus. Using the Shortcut Menu Press the function button to adjust volume(only Audio-Input Mode)(Optional). Volume Up/Down: Press to open the Acer eColor Management OSD and access the scenario modes. VGA or DVI If either VGA or DVI input is selected ,but the VGA and DVI cables...
... and Focus. Using the Shortcut Menu Press the function button to adjust volume(only Audio-Input Mode)(Optional). Volume Up/Down: Press to open the Acer eColor Management OSD and access the scenario modes. VGA or DVI If either VGA or DVI input is selected ,but the VGA and DVI cables...
User Manual
Page 22
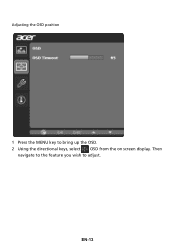
Adjusting the OSD position 1 Press the MENU key to adjust. Then navigate to the feature you wish to bring up the OSD. 2 Using the directional keys, select OSD from the on screen display. EN-13
Adjusting the OSD position 1 Press the MENU key to adjust. Then navigate to the feature you wish to bring up the OSD. 2 Using the directional keys, select OSD from the on screen display. EN-13

User Manual
Page 23
Then navigate to the feature you wish to adjust. 3 The Setting menu can be used to bring up the OSD. 2 Using the e/ f keys, select Setting from the OSD. EN-14 Adjusting the setting 1 Press the MENU key to adjust the screen Menu Language and other important settings.
Then navigate to the feature you wish to adjust. 3 The Setting menu can be used to bring up the OSD. 2 Using the e/ f keys, select Setting from the OSD. EN-14 Adjusting the setting 1 Press the MENU key to adjust the screen Menu Language and other important settings.
User Manual
Page 25
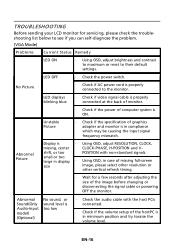
... signal cable or powering OFF the monitor. Unstable Picture · Check if the specification of graphics adapter and monitor is in case of missing full-screen size image, please select other resolution or other vertical refresh timing. · Wait for servicing, please check the troubleshooting list below to see if you...
... signal cable or powering OFF the monitor. Unstable Picture · Check if the specification of graphics adapter and monitor is in case of missing full-screen size image, please select other resolution or other vertical refresh timing. · Wait for servicing, please check the troubleshooting list below to see if you...


