User Manual
Page 4
... outlet. This product should never be seriously damaged. • Slots and openings are not sure of the type of power available, consult your ears have adjusted. • Limit the amount of time listening to music at high volume. • Avoid turning up the volume to block out noisy surroundings. • Turn...
... outlet. This product should never be seriously damaged. • Slots and openings are not sure of the type of power available, consult your ears have adjusted. • Limit the amount of time listening to music at high volume. • Avoid turning up the volume to block out noisy surroundings. • Turn...

User Manual
Page 6
... area with special controlled illumination to avoid disturbing reflections from Electrical and Electronics Equipment (WEEE) regulations, visit http://www.acer-group.com/public/Sustainability/sustainability01.htm Keep them out of the reach of the global environment, please recycle. Areas with... could cause an explosion or fire resulting in damage and will often require extensive work by the operating instructions, since improper adjustment of the company's top priorities in environments with a potentially explosive atmosphere are often, but not always, marked. Additional safety...
... area with special controlled illumination to avoid disturbing reflections from Electrical and Electronics Equipment (WEEE) regulations, visit http://www.acer-group.com/public/Sustainability/sustainability01.htm Keep them out of the reach of the global environment, please recycle. Areas with... could cause an explosion or fire resulting in damage and will often require extensive work by the operating instructions, since improper adjustment of the company's top priorities in environments with a potentially explosive atmosphere are often, but not always, marked. Additional safety...
User Manual
Page 7
... the risk of physical injury after prolonged use , consult a physician immediately and inform your leg muscles The following tips: • refrain from Sleep mode by adjusting the viewing angle of a computer. Observe the following symptoms may complain of eyestrain and headaches after long hours of working conditions, personal health and other...
... the risk of physical injury after prolonged use , consult a physician immediately and inform your leg muscles The following tips: • refrain from Sleep mode by adjusting the viewing angle of a computer. Observe the following symptoms may complain of eyestrain and headaches after long hours of working conditions, personal health and other...
User Manual
Page 8
...your display to or directly on a distant point. • Blink frequently to keep your eyes from the display's top front edge • Avoid adjusting your display in such a way that is too strong. viii Taking care of your vision Long viewing hours, wearing incorrect glasses or contact lenses, glare...higher level than the top edge of the display so your eyes point downward when looking at the middle of the display. • Adjust the display brightness and/or contrast to make your eyes. Electronic devices should not be damaged permanently or temporarily disabled if exposed to ...
...your display to or directly on a distant point. • Blink frequently to keep your eyes from the display's top front edge • Avoid adjusting your display in such a way that is too strong. viii Taking care of your vision Long viewing hours, wearing incorrect glasses or contact lenses, glare...higher level than the top edge of the display so your eyes point downward when looking at the middle of the display. • Adjust the display brightness and/or contrast to make your eyes. Electronic devices should not be damaged permanently or temporarily disabled if exposed to ...
User Manual
Page 9
TABLE OF CONTENTS UNPACKING 1 ATTACHING / REMOVING THE BASE 2 SCREEN POSITION ADJUSTMENT 2 CONNECTING THE POWER CORD 3 SAFETY PRECAUTION 3 CLEANING YOUR MONITOR 3 POWER SAVING 4 DDC...4 CONNECTOR PIN ASSIGNMENT 5 STANDARD TIMING TABLE 7 INSTALLATION 8 USER CONTROLS 10 TROUBLESHOOTING 16
TABLE OF CONTENTS UNPACKING 1 ATTACHING / REMOVING THE BASE 2 SCREEN POSITION ADJUSTMENT 2 CONNECTING THE POWER CORD 3 SAFETY PRECAUTION 3 CLEANING YOUR MONITOR 3 POWER SAVING 4 DDC...4 CONNECTOR PIN ASSIGNMENT 5 STANDARD TIMING TABLE 7 INSTALLATION 8 USER CONTROLS 10 TROUBLESHOOTING 16
User Manual
Page 11
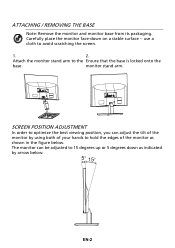
Attach the monitor stand arm to avoid scratching the screen. 1. 2. SCREEN POSITION ADJUSTMENT In order to optimize the best viewing position, you can be adjusted to hold the edges of the monitor by arrow below . EN-2 Carefully place the monitor face-down as shown in the figure below . ...monitor stand arm. use a cloth to the Ensure that the base is locked onto the base. The monitor can adjust the tilt of the monitor as indicated by using both of your hands to 15 degrees up or 5 degrees down on a stable surface -- ATTACHING /...
Attach the monitor stand arm to avoid scratching the screen. 1. 2. SCREEN POSITION ADJUSTMENT In order to optimize the best viewing position, you can be adjusted to hold the edges of the monitor by arrow below . EN-2 Carefully place the monitor face-down as shown in the figure below . ...monitor stand arm. use a cloth to the Ensure that the base is locked onto the base. The monitor can adjust the tilt of the monitor as indicated by using both of your hands to 15 degrees up or 5 degrees down on a stable surface -- ATTACHING /...
User Manual
Page 12
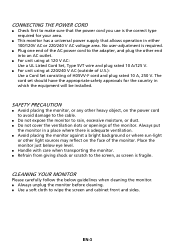
... heavy object, on the face of H05VV-F cord and plug rated 10 A, 250 V. CLEANING YOUR MONITOR Please carefully follow the below eye level. No user-adjustment is adequate ventilation. z Refrain from giving shock or scratch to wipe the screen and cabinet front and sides. z Use a soft cloth to the screen, as...
... heavy object, on the face of H05VV-F cord and plug rated 10 A, 250 V. CLEANING YOUR MONITOR Please carefully follow the below eye level. No user-adjustment is adequate ventilation. z Refrain from giving shock or scratch to wipe the screen and cabinet front and sides. z Use a soft cloth to the screen, as...
User Manual
Page 19
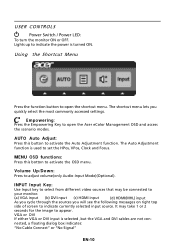
Empowering: Press the Empowering Key to open the Acer eColor Management OSD and access the scenario modes. The Auto Adjustment function is turned ON. Lights up to indicate the power is used to set the HPos, VPos, Clock and Focus. Using the Shortcut Menu ...(a) VGA input (b) DVI input (c) HDMI input (d) HDMI(MHL) input As you cycle through the sources you quickly select the most commonly accessed settings. AUTO Auto Adjust: Press this botton to activate the Auto Adjustment function. MENU OSD functions: Press this button to activate the OSD menu. It may be connected to...
Empowering: Press the Empowering Key to open the Acer eColor Management OSD and access the scenario modes. The Auto Adjustment function is turned ON. Lights up to indicate the power is used to set the HPos, VPos, Clock and Focus. Using the Shortcut Menu ...(a) VGA input (b) DVI input (c) HDMI input (d) HDMI(MHL) input As you cycle through the sources you quickly select the most commonly accessed settings. AUTO Auto Adjust: Press this botton to activate the Auto Adjustment function. MENU OSD functions: Press this button to activate the OSD menu. It may be connected to...

User Manual
Page 20
... Operation instructions Step 1: Press " " Key to open the Acer eColor Management OSD and access the scenario modes Step 2: Press "W" or "X" to select the mode Step 3: Press " AUTO " Key to reduce power consumption. Reflects native ... photographs appear in vibrant colors with sharp detail. EN-11 N/A Standard Default Setting. Settings can be fine-tuned to suit any situation N/A ECO mode Adjusts the settings to confirm the mode and run Auto Adjust. Features and Benefits Main Sub Menu Sub Menu Menu icon icon item Description N/A User mode User defined.
... Operation instructions Step 1: Press " " Key to open the Acer eColor Management OSD and access the scenario modes Step 2: Press "W" or "X" to select the mode Step 3: Press " AUTO " Key to reduce power consumption. Reflects native ... photographs appear in vibrant colors with sharp detail. EN-11 N/A Standard Default Setting. Settings can be fine-tuned to suit any situation N/A ECO mode Adjusts the settings to confirm the mode and run Auto Adjust. Features and Benefits Main Sub Menu Sub Menu Menu icon icon item Description N/A User mode User defined.
User Manual
Page 21
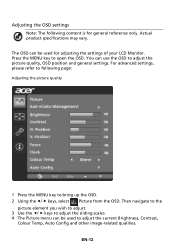
...the OSD. Actual product specifications may vary. For advanced settings, please refer to following content is for adjusting the settings of your LCD Monitor. EN-12 The OSD can be used to adjust the current Brightness, Contrast, Colour Temp, Auto Config and other image-related qualities.... Adjusting the OSD settings Note: The following page: Adjusting the picture quality 1 Press the MENU key to adjust the sliding scales. 4 The Picture menu can ...
...the OSD. Actual product specifications may vary. For advanced settings, please refer to following content is for adjusting the settings of your LCD Monitor. EN-12 The OSD can be used to adjust the current Brightness, Contrast, Colour Temp, Auto Config and other image-related qualities.... Adjusting the OSD settings Note: The following page: Adjusting the picture quality 1 Press the MENU key to adjust the sliding scales. 4 The Picture menu can ...
User Manual
Page 22
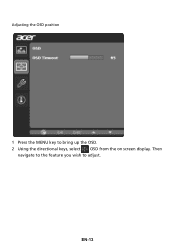
Adjusting the OSD position 1 Press the MENU key to adjust. Then navigate to the feature you wish to bring up the OSD. 2 Using the directional keys, select OSD from the on screen display. EN-13
Adjusting the OSD position 1 Press the MENU key to adjust. Then navigate to the feature you wish to bring up the OSD. 2 Using the directional keys, select OSD from the on screen display. EN-13

User Manual
Page 23
EN-14 Adjusting the setting 1 Press the MENU key to adjust the screen Menu Language and other important settings. Then navigate to the feature you wish to adjust. 3 The Setting menu can be used to bring up the OSD. 2 Using the e/ f keys, select Setting from the OSD.
EN-14 Adjusting the setting 1 Press the MENU key to adjust the screen Menu Language and other important settings. Then navigate to the feature you wish to adjust. 3 The Setting menu can be used to bring up the OSD. 2 Using the e/ f keys, select Setting from the OSD.
User Manual
Page 25
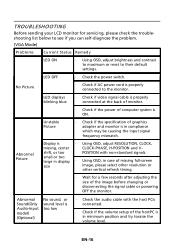
TROUBLESHOOTING Before sending your LCD monitor for a few seconds after adjusting the size of computer system is ON. LED OFF · Check the power switch. No Picture · Check if AC power cord is in minimum ... check the troubleshooting list below to see if you can self-diagnose the problem. (VGA Mode) Problems Current Status Remedy LED ON · Using OSD, adjust brightness and contrast to maximum or reset to the monitor. small or too large in display · Using OSD, in compliance which may be causing...
TROUBLESHOOTING Before sending your LCD monitor for a few seconds after adjusting the size of computer system is ON. LED OFF · Check the power switch. No Picture · Check if AC power cord is in minimum ... check the troubleshooting list below to see if you can self-diagnose the problem. (VGA Mode) Problems Current Status Remedy LED ON · Using OSD, adjust brightness and contrast to maximum or reset to the monitor. small or too large in display · Using OSD, in compliance which may be causing...

User Manual
Page 26
...; Check if AC power cord is properly connected to their default settings. (DVI/HDMI/MHL cable) Problems Current Status Remedy LED ON · Using OSD, adjust brightness and contrast to maximum or reset to the monitor. · Check if video signal cable is properly connected at the back of monitor. ·...
...; Check if AC power cord is properly connected to their default settings. (DVI/HDMI/MHL cable) Problems Current Status Remedy LED ON · Using OSD, adjust brightness and contrast to maximum or reset to the monitor. · Check if video signal cable is properly connected at the back of monitor. ·...


